background image

User's Guide

HP Fax 700/750

Summary of Contents for 700 Series

Page 1: ...User s Guide HP Fax 700 750 ...

Page 2: ...XV DQG 1DYLJDWLQJ LVSOD LQJ WKH PHQXV URZVLQJ WKH PHQXV 0RYLQJ GLUHFWO WR DQ RSWLRQ KRRVLQJ DQ RSWLRQ 6HOHFWLQJ VHWWLQJV QWHULQJ OHWWHUV DQG V PEROV LQ QDPHV URZVLQJ VWRUHG QXPEHUV DQG VFKHGXOHG ID HV 6HWWLQJ XS RXU 3 6HWWLQJ XS WKH DWH DQG 7LPH 6HWWLQJ XS WKH ID QXPEHU DQG QDPH 6HWWLQJ WKH GLDOLQJ PHWKRG 7 HVWLQJ WKH VHWXS RQQHFWLQJ WKH KDQGVHW WR WKH 3 RQQHFWLQJ D WHOHSKRQH RQQHFWLQJ D WHOHSKRQH...

Page 3: ...V 6WRULQJ URXS LVWV RI XWR LDO QXPEHUV 5HYLHZLQJ FKDQJLQJ RU GHOHWLQJ VWRUHG QXPEHUV LDOLQJ ZLWK 2QH 7RXFK DQG XWR LDO 6HQGLQJ WR D LVWULEXWLRQ LVW 6HQGLQJ WR RU PRUH QXPEHUV ZLWK WKH PHQX QWHULQJ PRUH WKDQ RQH QXPEHU ZKHQ RX VHQG D ID 6HQGLQJ D 6FDQQHG RU 6FKHGXOHG D 6FDQQLQJ DQG VHQGLQJ IURP PHPRU 6HQGLQJ D D DW D ODWHU WLPH 5HYLHZLQJ FKDQJLQJ RU FDQFHOLQJ VFKHGXOHG ID HV 6HQGLQJ DQG 5HFHLYLQJ E...

Page 4: ...PL LQJ RXU 3 6HWWLQJV IRU RXU WHOHSKRQH V VWHP 6HWWLQJV IRU RXU RIILFH 7DNLQJ DUH RI RXU 3 KDQJLQJ WKH SDSHU VHSDUDWRU OHDQLQJ WKH VFDQQHU ZLQGRZ JODVV OHDULQJ GRFXPHQW DQG SDSHU MDPV RDGLQJ PXOWLSDJH GRFXPHQWV WR SUHYHQW MDPV 8QGHUVWDQGLQJ GLVSOD PHVVDJHV QWHUSUHWLQJ HUURU FRGHV YRLGLQJ 3UREOHPV 5HSODFHPHQW SDUW QXPEHUV 3 VSHFLILFDWLRQV GHQWLI LQJ DQG 6ROYLQJ 3UREOHPV LUVW HDU DUUDQW 3URJUDPV 3 S...

Page 5: ...LRQV DUUDQW LPLWDWLRQV 7R 2EWDLQ D 0DWHULDO 6DIHW DWD 6KHHW 06 6 1RWLFH WR 8VHUV RI WKH 8 6 7HOHSKRQH 1HWZRUN 5HTXLUHPHQWV OHFWURPDJQHWLF RU 5DGLR UHTXHQF QWHUIHUHQFH 5HTXLUHPHQWV 1RWLFH WR 8VHUV RI WKH DQDGLDQ 7HOHSKRQH 1HWZRUN 5HTXLUHPHQWV QGH ...

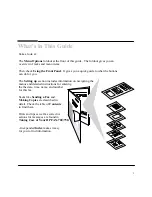
Page 6: ... for you The Setting up section includes information on navigating the menus and detailed instructions for entering the the date time name and number for this fax Tasks like Sending a Fax and Making Copies are described in detail Check the table of Contents to find them Hints and tips as well as corrective actions for messages are found in Taking Care of Your HP FAX 700 750 An expanded Index makes...

Page 7: ...750 follow the instructions on the following pages to P Unpack and remove packing material P Connect the power and cord phone line P Load paper P Install the print cartridge P Open the document trays When you have completed unpacking and connecting turn to Setting up Your HP FAX 700 750 ...

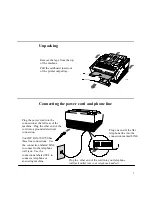
Page 8: ...NE Plug the power cord into the connection at the left rear of the machine Plug the other end of the cord into a grounded electrical connection Plug the other end of the cord into your telephone wall jack outlet not your telephone handset Your HP FAX 700 750 has three line connections Use the connection labeled LINE to connect to the telephone wall jack Use the connections labeled TEL to connect a...

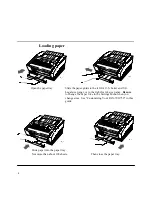
Page 9: ... Letter and U S Legal size paper or to the right for A4 size paper Be sure to change the Paper Size in the Settings Menu when you change sizes See Customizing Your FAX 700 750 in this guide Slide paper into the paper tray Not more than about 100 sheets ek_5 Then close the paper tray ek 6 ...

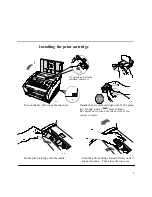
Page 10: ...y by the green top Gently remove both pieces of tape Be careful not to touch the ink nozzles or the copper contacts Put the print cartridge into the cradle Push the print cartridge forward firmly until it snaps into place Then close the top cover ek 18 ek 19 STOP If a cartridge is already installed remove it ek 47 ...

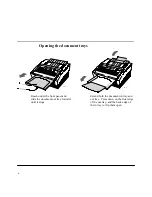
Page 11: ...ach under the front panel and slide the document out tray forward until it stops Extend both the document in tray and out tray Press down on the front edge of the out tray and the back edge of the in tray to flip them open ek 7 ek 8 ...

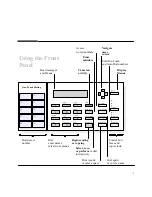
Page 12: ...look Erase mistakes Print reports or enter a space Dial again or enter a pause Select save or perform or dial interactively Edit One Touch and Auto Dial numbers Begin sending or copying Navigate move cursor Using the Front Panel Stop Backspace Enter Monitor Start Copy Auto Dial Store Number Redial Pause Report Space Photograph Resolution Contrast One Touch Dialing ...

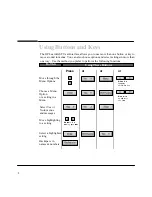
Page 13: ... way Use the method you prefer to perform the following functions Using These Buttons Do This Choose a Menu Option or a setting in a Menu Move through the Menu Options 47 3UHVV WKH QXPEHU RI WKH 2SWLRQ 47 47 Select Yes or No in menus and messages Select a highlighted setting 0RYH WR WKH VHWWLQJ RX ZDQW Move highlighting to a setting 7088 3UHVV WKH QXPEHU WR FKRRVH Backspace in names numbers ...

Page 14: ...o an option The menu tree at the front of this guide shows all of the menus options available The options in each menu are numbered To move directly to a menu option first press the Menu button then press the number for that menu Press Enter Start Copy Yes or the number again to choose the menu To move directly to a choice within a menu press the number for that choice For example after you press ...

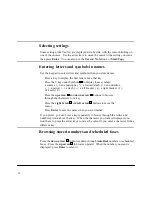
Page 15: ... a dash a left bracket a right bracket or a zero 0 P Press the up arrow and down arrow buttons to browse through the characters for a key P Press the right arrow and left arrow buttons to move the cursor P Press Enter to save the name when you are finished If you prefer you can press a key repeatedly to browse through the letters and numbers printed above that key When the character you want is di...

Page 16: ...u have completed these setup procedures your HP FAX 700 750 is ready to send and receive faxes and to make copies If you wish you can also P Connect a telephone P Connect a telephone answering machine P Set the receive mode Warning When you first set up your HP FAX be sure to leave it on for at least twelve hours to charge the backup battery The battery saves information you enter during set up ...

Page 17: ...in the Using These Buttons column Check to see that the display shows what you see in the To Display column If you want to stop and start over press the Stop button Using These Buttons Do This To Display Display the Menu Press the Menu button Menu Options 1 8 1 Scan Send When you display the menu there are 8 options available Press the down arrow to browse down to 6 Settings If you pass it press t...

Page 18: ...ow to move to year Browse to the new year If you make a mistake use the left and right arrows to move to the mistake then the up and down arrows to browse again Time HH MM 24Hr Clk 02 15 14 15 Press the arrow keys to browse to the hour and minute you want Your fax uses a 24 hr clock When you browse past 12 00 the time is shown in 12 hr format between the brackets Time HH MM 24Hr Clk 08 00 08 00 Se...

Page 19: ...sing These Buttons column Check to see that the display shows what you see in the To Display column If you want to stop and start over press the Stop button Using These Buttons Do This To Display Display the Menu Press the Menu button Menu Options 1 8 1 Scan Send When you display the menu there are 8 options available Press the down arrow to browse down to 6 Settings If you pass it press the up ar...

Page 20: ...p to leave the menus Number for this fax Save the number Press the Enter button Name for this fax Enter the name to print on each fax sent Up to 20 characters Name for this fax Settings 01 18 02 Fax Number Name Press a key to enter the first letter above the key Press the up and down arrow buttons to browse through the characters for a key Press the 0 key under Symbols to enter one of these symbol...

Page 21: ...tons Do This To Display Display the Menu Menu Options 1 8 1 Scan Send Browse to 6 Settings Menu Options 1 8 6 Settings Settings 1 18 01 Date Time Choose Settings Settings 1 18 06 Dialing Method Browse to 06 Dialing Method Select Pulse or Tone Dialing Method Pulse Tone Choose 06 Dialing Method Dialing Method Pulse Tone Save the new Dialing Method Settings 1 18 06 Dialing Method P Press Stop to leav...

Page 22: ...fax is working as you expect it to If you would like to test receiving a fax you can call HP FIRST and retrieve an index of fax machine support information HP FIRST is at your fingertips 24 hours a day providing instantaneous access to the most current Hewlett Packard product support information Be sure to call from a telephone that is not connected to your fax machine The toll free number in the ...

Page 23: ... Warning When you first set up your HP FAX be sure to leave it on for at least 12 hours to charge the backup battery The battery saves information you enter during set up Topics of Interest Connecting a telephone 20 Connecting a telephone answering machine 21 Sending a Fax 23 Making Copies 25 Customizing Your HP FAX 700 750 54 ...

Page 24: ... telephone base into the slots in the bottom edge of the fax machine To remove the telephone base press the tabs that snap into the bottom edge of the fax machine together Plug the other end of the coiled phone cord into one of the connections marked TEL Plug the small end of the coiled phone cord into the back of the handset ek 14 ek 37 When you have connected the handset turn to Managing incomin...

Page 25: ... labeled TEL to connect a telephone or answering machine Plug the other end of the phone cord into one of the connections marked TEL Plug one end of the phone cord into the back of the telephone ek 17 When you have connected the telephone turn to Managing incoming calls and set the Reception mode Telephone Wall Jack Topics of Interest Managing incoming calls 22 ...

Page 26: ...nnect a telephone or answering machine Plug the the other end of the answering machine line into one of the connections marked TEL When you have connected the telephone answering machine turn to Managing incoming calls and set the Reception mode ek_51 Plug one end of the answering machine line into the back of the answering machine Telephone Wall Jack Topics of Interest Managing incoming calls 22 ...

Page 27: ...to the fax Auto Fax Phone When Auto Fax Phone is selected the fax machine answers a fax call but switches voice calls to the phone Press Start Copy to answer a telephone call An answering machine connected directly to the fax Auto Fax Ans Mach When Auto Fax Ans Mach is selected the answering machine answers calls while the fax machine listens for a fax signal For fax calls the fax takes the line a...

Page 28: ...d to prompts For example to dial a credit card call press Enter Monitor Then dial as you normally would To change the monitor volume choose 16 Adjust Volume from the settings menu Loading the document Adjust the guides on the document in tray above the front panel to fit the document Load the document face down in the document in tray Be sure that the document is not stapled paper clipped or torn ...

Page 29: ...olution button on the front panel If your document contains a photograph press the Photograph button The light next to a setting shows which setting is selected After you send a fax contrast and resolution return to the option selected in the settings menu and photograph turns off These settings do not affect faxes you receive Topics of Interest Controlling How Faxes and Copies Look 26 ...

Page 30: ...the document Load the document face down in the document in tray Be sure that the document is not stapled paper clipped or torn Making the image lighter or darker To temporarily change the contrast press Contrast on the front panel If your document contains a photograph press the Photograph button The light next to a setting shows what you select When the copy is finished contrast returns to the o...

Page 31: ...he button shows which setting is on Set Fax Resolution in the settings menu to the setting you will usually use Fine for small type Standard for medium or large type Copies are automatically set to fine resolution Contrast To change the setting for a single fax or copy use the Contrast button on the front panel The light above the button shows which setting is on For example if the bars on this ch...

Page 32: ...gs menu to the setting you will usually use Quality or Economy When you choose Quality it requires more time to process but produces a better reproduction When you send photographs or a fax with a lot of detail try Scan and Send to reduce telephone time Resolution Contrast and Photograph Use all of the above settings on the front panel to adjust for unusual documents Try making a copy before you s...

Page 33: ...t you can store all of the Auto Dial numbers for the individuals in a Group List After you store One Touch or Auto Dial numbers you can store up to five Group Lists that contain up to 49 other Auto Dial numbers each Only One Touch and Auto Dial numbers can be stored in Group Lists Group Lists can be stored in any Auto Dial number There are a total of 50 Auto Dial numbers available The first ten ar...

Page 34: ...29 To store numbers To dial numbers This graphic represents how you can store and dial numbers Read About Auto Dial numbers on the previous page for more detail ...

Page 35: ...shown Browse to a different code if you wish Auto Dial 1 50 XX FAX Nbr Unused Enter the number to store up to 36 digits including spaces and pauses Auto Dial 1 50 XX FAX Nbr 11 Name Save the number Enter a name up to 15 characters Save the name Store another number now Auto Dial 1 50 12 FAX Nbr Unused To Send Fax Dial Load Doc START Finish storing numbers Store another number Yes No P Press Stop t...

Page 36: ...sed Enter a One Touch or Auto Dial number to store Group List 1 50 XX 1St Nbr Enter another number Yes No Save the number Enter another number now Enter 2nd number Enter group name Enter a name up to15 characters Save the name To Send Fax Dial Load Doc START Press Store Number Repeat the above for each number you want in the list up to 49 then choose No The first unused code is shown Browse to a d...

Page 37: ... delete a number the name stored with it is also deleted After you have stored at least one group list you can chose Edit Old in the Group List display You then have the option of changing the group name or pressing Enter to retain it and deleting or adding numbers to the list Topics of Interest Browsing stored numbers and scheduled faxes 10 Storing Auto Dial numbers 30 Storing Group Lists of Auto...

Page 38: ...e One Touch key assigned to the number to dial To dial Auto Dial numbers Press Auto Dial to access stored numbers Auto Dial 01 50 01 Name Number Auto Dial 01 50 01 Name Number Auto Dial 01 50 01 Name Number When the name and number exceed the display area arrows appear in the display Use the arrow buttons to see the complete entry Topics of Interest Storing Auto Dial numbers 30 Storing Group Lists...

Page 39: ...umber The instructions that follow show you how to P Send to two or more numbers with the menu P Enter more than one fax number when you send a fax You can can also store One Touch and Auto Dial numbers in group lists Topics of Interest Storing Group Lists of Auto Dial numbers 31 ...

Page 40: ...Send to 2 or more Enter 1st number Dial a number manually One Touch or Auto Dial Save the number Enter another number Yes No Enter another number now Enter 2nd number Load the document face down Document ready Press Start Copy Storing document Enter 1st number Repeat the above for each number you want to send to Up to 10 manually dialed and 40 One Touch and Auto Dial numbers P Press Stop to cancel...

Page 41: ...e Touch or Auto Dial Save the number Repeat the above for each number you want to send to Up to 10 manually dialed and 40 One Touch and Auto Dial numbers Load the document face down Press Start Copy START to send Storing document Document ready Dial another number manually One Touch or Auto Dial Dial 2 of 2 P Press Stop to cancel sending ...

Page 42: ...When you choose Scan and Send from the menu documents are scanned into memory before the telephone connection is made This generally results in faster transmission of the fax When you choose Schedule Send Fax from the menu you can schedule a time in the next 24 hours to transmit the fax The following pages contain instructions for P Scanning and sending from memory P Sending a fax at a later time ...

Page 43: ...ons Do This To Display Press Menu Menu Options 1 9 1 Scan Send Choose 1 Scan Send Enter number Enter number Dial a number manually One Touch or Auto Dial Load the document face down Press Start Copy Storing document Document ready P Press Stop to cancel ...

Page 44: ...d Fax Choose Schedule Send Fax Enter number Dial a number manually One Touch or Auto Dial Enter the time you want the fax sent Enter time to send 24Hr Clk 5 30 17 30 If you entered only one number store the fax or leave it in the in tray Send from Intray Memory Load the document face down Document ready Press Start Copy Storing document Enter number P Press Stop to cancel ...

Page 45: ...fax 01 18 30 1 619 592 Browse to the fax you want to change or review ENTER selects fax 03 21 00 1 814 335 Select the fax Cancel fax Yes No 03 21 00 1 814 335 Choose Yes to cancel or No to review or change Cancel fax Yes No 03 21 00 1 814 335 Change the time to send or press Enter to keep it Enter time to send 24Hr Clk 09 00 21 00 Choose Yes to remove numbers or No to keep them Delete 1st nbr Y N ...

Page 46: ...uments if the other fax machine doesn t require a password or security code For example you may have a document that you want to make available to a group of people whenever they need it You can set up the document to be polled and it can be retrieved by anyone calling your machine You can also set up a document to be polled one time only You can set up your fax to P Allow your fax machine to be p...

Page 47: ...ing Polled 1 3 1 Off Browse to 2 One Time Only Being Polled 1 3 2 One Time Only Choose 2 One Time Only if you want the fax sent just once Send from Memory in tray Choose to store the fax or leave it in the in tray Send from Memory in tray OR Browse to 3 Until Turned Off if you want the fax sent more than once Being Polled 1 3 3 Until Turned Off Load the document face down Document ready Press Star...

Page 48: ...ng Menu Options 1 9 8 Polling Choose 8 Polling Polling 1 2 1 Being polled Choose 2 Polling Dial Number Dial a number manually One Touch or Auto Dial Dialing Browse to 2 Polling Polling 1 2 2 Polling P Press Stop to cancel Note Your HP FAX 700 750 allows you to poll another fax machine if that machine doesn t require a password or security code ...

Page 49: ... 4 1 Last Transaction Choose the report you want 1 Last Transaction 2 Last 32 Transactions 3 Auto Dial Directory 4 Settings Send OK Pages XX Print Report Yes No When you choose Last Transaction read the display Choose Yes to print a copy Send OK Pages XX Print Report Yes No P Press Stop to leave the menus ...

Page 50: ...ME DATE FAX NUMBER TIME DATE TIME REMOTE FAX NAME AND NUMBER DURATION PG RESULT DIAGNOSTIC S FAX SENT O POLLED OUT FAX SENT TO PRINT THIS REPORT AUTOMATICALLY SELECT AUTOMATIC REPORTS IN THE SETTINGS MENU TO PRINT MANUALLY PRESS THE REPORT SPACE BUTTON THEN PRESS ENTER When errors occur refer to Interpreting error codes for an explanation of these codes Topics of Interest Interpreting error codes ...

Page 51: ...OSTIC S FAX SENT R FAX RECEIVED I POLL IN FAX RECEIVED O POLLED OUT FAX SENT Your HP FAX 700 750 transaction report can contain up to 32 records When the number of transactions exceeds 32 between printing reports the first entries are deleted as new transactions take place You may want to print this report frequently if you require records of transactions When errors occur refer to Interpreting er...

Page 52: ...FOR HP FAX 700 SERIES VERSION 01 00 FAX NAME DATE FAX NUMBER TIME AUTO DIAL NO NAME NUMBER NO OF AUTO DIAL NUMBERS ASSIGNED GROUP LIST DIRECTORY FOR HP FAX 700 SERIES VERSION 01 00 FAX NAME DATE FAX NUMBER TIME GROUP AUTO DIAL NO NAME NUMBER The Auto Dial Directory lists all One Touch and Auto Dial numbers in numeric order It includes a directory of all Group Lists ...

Page 53: ...you can cut it out and place it under the plastic cover on the front panel One Touch DIALING OVERLAY FOR HP FAX 700 SERIES VERSION 01 00 FAX NAME DATE FAX NUMBER TIME 01 03 05 07 09 02 04 06 07 10 CUT ALONG DASHED LINES AND PLACE UNDER One Touch DIALING OVERLAY ...

Page 54: ... on the next page is generated All of the settings are listed with the options available The current and standard or factory settings are shown to the right of each setting To change any of the settings that control your HP FAX 700 750 see Customizing Your HP FAX 700 750 Topics of Interest Customizing Your HP FAX 700 750 54 ...

Page 55: ...DE 4 4 SILENT DETECT 1 YES 2 NO 1 2 08 DISTINCTIVE RING 1 SET 2 NOT SET 1 2 09 REMOTE RECEPTION 1 ENABLE 2 DISABLE 2 2 REMOTE RECEPTION SEQUENCE 123 123 10 RECEIVE TO MEMORY 1 NEVER 2 IF PRINTER ERROR 2 2 11 ERROR CORRECTION 1 YES 2 NO 1 1 12 AUTOMATIC REPORTS 1 OFF 2 ON 3 3 3 ERRORS 13 HEADER LOCATION 1 INSIDE FAX AREA 2 OUTSIDE FAX AREA 2 2 14 PAPER SIZE 1 A4 METRIC 2 LETTER U S 2 2 3 LEGAL U S ...

Page 56: ...ed when power is restored POWER FAILURE REPORT FOR HP FAX 700 SERIES VERSION 01 00 FAX NAME DATE FAX NUMBER TIME POWER FAILURE OCCURRED FROM 11 JAN 94 19 32 51 TO 11 JAN 94 19 33 55 DOCUMENTS IN MEMORY ARE LOST TOTAL NUMBER OF FAXES NOT SENT TOTAL NUMBER OF RECEIVED FAXES LOST FAXES NOT SENT ITEM REMOTE FAX NAME AND NUMBER ACTIVITY STATUS PAGES ...

Page 57: ...ers up to 32 digits long To remove a number from redial hang up and dial any digit except 0 Changing to Tone Dialing During a Call If you have pulse rotary telephone service you can temporarily change from pulse to tone dialing during a call by setting the DIAL switch to Tone This is useful if you need to send tone signals for use with telephone banking or long distance services Turning off the ha...

Page 58: ...w number replaces the old one When you store numbers it s a good idea to write the number or name on the directory card located under the handset Remove the plastic cover and write on the paper directory If you need to store a number that is more than 16 digits you can use two One Touch keys To dial press the first key then after the dialing stops press the second key You can also combine One Touc...

Page 59: ...54 Set ringer volume Set Dialing for Tone or Pulse Turn off the handset microphone Redial the last number Store One Touch numbers Dial stored One Touch numbers EK 39 ...

Page 60: ...ssed in other parts of this guide and may have been changed as part of setting up or other tasks To print the settings report and review the current settings choose 2 Print Report from the Main Menu Then choose 4 Settings from the Print Report Menu A sample of the Settings Report is shown on the following page See the Menu Options foldout at the front of this guide to review the settings available...

Page 61: ...ONLY2 2 3 AUTO FAX PHONE 4 AUTO FAX ANS MACH NUMBER OF RINGS FAX ONLY MODE 1 1 NUMBER OF RINGS FAX ANS MACH MODE 4 4 SILENT DETECT 1 YES 2 NO 1 2 08 DISTINCTIVE RING 1 SET 2 NOT SET 1 2 09 REMOTE RECEPTION 1 ENABLE 2 DISABLE 2 2 REMOTE RECEPTION SEQUENCE 123 123 10 RECEIVE TO MEMORY 1 NEVER 2 IF PRINTER ERROR 2 2 11 ERROR CORRECTION 1 YES 2 NO 1 1 12 AUTOMATIC REPORTS 1 OFF 2 ON 3 3 3 ERRORS 13 HE...

Page 62: ...e line In these systems each number is assigned a distinctive ring If your telephone system is set up with a distinctive ring select Enable then place a call to your fax machine from another phone If a call is received before you call your fax machine set distinctive ring to Disable and start over P Remote Reception Select Enable when there is an extension phone in the circuit not connected direct...

Page 63: ...ion P Photo Quality The factory default for Photo Quality is Quality You can select Economy to reduce the time it takes to send photographs P Receive to Memory The factory default for Receive to Memory is If Printer Error If an error occurs incoming faxes are received to memory and printed when the error is corrected You can select Never if you don t want your fax machine to answer when there is a...

Page 64: ...4 For example if you want to receive faxes that are the same size as the original document set Fax Reduction to Fixed and set the reduction percentage to 100 The factory default for Copy Reduction is 100 You can change Copy Reduction to a reduction percentage within the range of 70 to 100 P Adjust Volume The factory default for volume is Soft You can adjust Ring Volume Monitor Volume the monitor a...

Page 65: ...stance P For information by fax call HP FIRST at 800 333 1917 HP FIRST provides 24 hour toll free technical information to you by fax P To speak with someone for technical assistance within the hardware warranty of your printer call the HP Customer Support Center at 208 323 2551 If your HP FAX 700 750 is out of warranty you have two options you can call 900 551 1500 a charge will be assessed or yo...

Page 66: ...low these instructions to change the paper separator Open the front panel Pry the paper separator assembly out at the notch using your fingers a coin or a small screwdriver Install a new paper separator by pressing it firmly into place Then close the front panel firmly until both top corners snap into place Notch Paper Separator Assembly ...

Page 67: ... on them follow these instructions to clean the scanner window glass and scanner plate Lift the front panel to open it Use a lint free cloth moistened with water to clean the scanner window glass Then close the front panel until both top corners snap into place Scanning Glass Scanner Plate ...

Page 68: ...es of the cover until it snaps closed To clear a paper jam Lift and remove the paper delivery tray Do not attempt to clear paper from the print cartridge area Remove the jammed paper Then slide the tray back in until it stops ek_10 ek_32 Note If a document jam happens while you are storing to memory press Stop on the front panel to clear memory then start over ek_22 ...

Page 69: ... Document is displayed you may have to follow this procedure if your document contains many pages Hold the document by the top and bottom edges Bend it upwards to fan the bottom edges Load the document so that the pages are fanned as they feed into the in tray ...

Page 70: ...ter is open Weekdays 7am to 6 pm Wednesdays to 4 pm MST The phone number is 208 323 2551 Clear document jam The document you are sending or copying is jammed Open the front cover and remove the document Be sure that the cover is fully closed then try again See Also Clearing document and paper jams 62 Clear paper jam The paper loaded in your HP FAX is jammed Remove the paper tray and take out the j...

Page 71: ...ve your settings See Also Setting up Your HP FAX 700 750 11 Receive error FAX may be incomplete An error occurred while receiving a fax If some pages were received they may not be complete Check your fax carefully to be sure that it is complete You may want to contact the sender and ask that he or she send it again Reload document The document did not feed correctly Remove the document check to se...

Page 72: ...memory and printed when ink is available See Also Installing the print cartridge 5 Reseat or load ink cartridge The print cartridge is missing or not seated correctly in the cartridge cradle Open the top cover and install a print cartridge if there is none If there is a cartridge remove it and reinstall it press firmly until the cartridge snaps into place Faxes received while out of ink are receiv...

Page 73: ... through 425 Sending error while dialing Check for a dial tone then try resending 441 442 444 through 483 and 531 through 567 Sending error This may be the result of a bad connec tion Try resending 501 through 506 508 through 516 and 571 through 582 Receiving error This may be the result of a bad connec tion If you received this fax be sure to check it for completeness You may want to ask the send...

Page 74: ...riers are available at most office supply stores Faxes or copies have lines or spots Open the front panel and check to see that the scanner window glass and the white strip above it are clean If cleaning is needed use a lint free cloth moistened with water Do not use liquid cleaners or air pressure to clean the scanner window See Also Cleaning the scanner window glass 61 Faxes or copies are not st...

Page 75: ...e not received properly If you have call services like call waiting call forwarding or rollover lines faxes received can be corrupted These services are not supported with your HP FAX 700 750 Faxes are recorded on the telephone answering machine When the telephone answering machine is not connected directly to your HP FAX 700 750 callers must enter your remote reception code and then send the fax ...

Page 76: ...ch overlay C3530 85010 In tray extender C3530 43056 Top cover assembly C3530 63051 Paper delivery tray C3530 62351 ek 22 Print cartridge 51626A HP FAX 750 telephone C3781 60001 Paper separator C3530 62913 For ordering information see page 73 ...

Page 77: ...2 Transmission Speed 9 seconds per page Memory 256 KB 12 pages Auto Dialing 50 auto dial numbers 10 One Touch 40 Auto Dial Group Dialing Yes up to 5 groups Warranty 1 year overnight HP Express Exchange Maximum Power Consumption Approximately 45 watts Environmental Ranges Operating Temperature 59 95 degrees F Relative Humidity 20 80 Based on the standard CCITT ITU Test Chart 1 at standard resolutio...

Page 78: ... Guide The fastest way to solve problems is to take the corrective steps outlined in troubleshooting 2 Make sure you are operating your HP fax machine in the correct environment HP fax products are not supported with roll over phone systems voicemail or other advanced features provided by your phone company 3 Gather some basic information before you call If you suspect that your HP fax machine wil...

Page 79: ...y 7 days per week HP FIRST Fax 24 hour automated support service 800 333 1917 Must call using a Group 3 fax machine Detailed product support information on common software applications and troubleshooting tips all sent by facsimile 24 hours per day 7 days per week HP Download Service real time access over modem 208 344 1691 Electronic download of HP product information troubleshooting hints and up...

Page 80: ...oftware application manufacturer However HP distributes some of the most popular software applications 24 hours per day 6 days per week closed Sundays HP Customer Information Center 800 752 0900 Ordering of user s guides technical reference guides and other literature 6 00 am 5 00 pm PST weekdays HP Direct 800 538 8787 Customer orderable supplies and accessories except documentation 6 00 am 5 00 p...

Page 81: ... fee per call U S Visa or MasterCard prices subject to change without notice Post warranty assistance on product questions and the most common software applications 7 00 am 6 00 pm MST Mon Tu Th Fri 7 00 am 4 00 pm MST Wed HP Customer Support Center 208 323 2551 Technical Assistance with setup operation repair information and exchange program information 7 00 am 6 00 pm MST Mon Tu Th Fri 7 00 am 4...

Page 82: ... on other HP customer resources 24 hours per day 7 days per week HP FIRST Fax 24 hour automated support service 800 333 1917 Must call using a Group 3 fax machine all info sent by facsimile Detailed product support information on common software applications and troubleshooting tips 24 hours per day 7 days per week HP Download Service real time access over modem 208 344 1691 Electronic download of...

Page 83: ...th setup operation repair and exchange program information 7 00 am 4 00 pm weekdays HP Canada Customer Information Center HP Canada Customer Information Center 5150 Spectrum Way Mississauga Ontario L4W 4V1 Mailing address for correspondence Post Warranty Support fee based support 800 999 1148 25 00 fee per call Visa or MasterCard prices subject to change without notice Post warranty assistance on ...

Page 84: ...ery or where the purchase price includes installation by Hewlett Packard or its authorized dealer on the date of installation Warranty Limitations The warranty set forth above is exclusive and no other warranty whether written or oral is expressed or implied Hewlett Packard specifically disclaims the implied warranties of merchantability and fitness for a particular purpose Some states or province...

Page 85: ...e the opportunity to maintain uninterrupted service If you experience trouble with this equipment please contact the manufacturer or look elsewhere in this manual for warranty or repair information Your telephone company may ask you to disconnect this equipment from the network until the problem has been corrected or until you are sure that the equipment is not malfunctioning This equipment may no...

Page 86: ...quipment meets certain telecommunications network protective operations and safety requirements The Department does not guarantee the equipment will operate to the user s satisfaction Before installing this equipment users should ensure that it is permissible to be connected to the facilities of the local telecommunications company The equipment must also be installed using an acceptable method of...

Page 87: ...QXPEHUV DQG VFKHGXOHG ID HV WKH PHQXV URZVLQJ RQWLQXHG WKURXJK FKDUDFWHUV VHH QWHULQJ OHWWHUV DQG V PEROV LQ QDPHV WKURXJK PHQX RSWLRQV EXWWRQV DQG NH V XVLQJ DOO IRU VHUYLFH FRP WLPH RXW VHUYLFH VWDWLRQ HUURU DOO IRU VHYLFH PHFKDQLFDO HUURU FDOOLQJ DQRWKHU ID PDFKLQH E SROOLQJ FDQFHOLQJ VFKHGXOHG ID HV FDUWULGJH SULQW LQVWDOOLQJ FKDQJLQJ XWR LDO DQG 2QH 7RXFK QXPEHUV GDWH DQG WLPH VHH 6HWWLQJV GL...

Page 88: ...YHQW MDPV ORDGLQJ WKH RULJLQDO 17 5 021 725 VHH LDOLQJ QWHULQJ OHWWHUV DQG V PEROV LQ QDPHV QWHULQJ PRUH WKDQ RQH ID QXPEHU ZKHQ RX VHQG D ID UURU RGHV LQWHUSUHWLQJ RUUHFWLRQ VHWWLQJ 0HVVDJHV VHH 8QGHUVWDQGLQJ LVSOD 0HVVDJHV H WHQVLRQ SKRQHV VHH 0DQDJLQJ LQFRPLQJ FDOOV D DQG RS 3UREOHPV D 1XPEHU 1DPH VHWWLQJ D QXPEHU DQG QDPH VHWWLQJ D 2QO VHH 0DQDJLQJ LQFRPLQJ FDOOV D 5HVROXWLRQ VHWWLQJ ID HV DQG...

Page 89: ...DNLQJ WKH LPDJH OLJKWHU RU GDUNHU DQG FKDQJLQJ UHVROXWLRQ 0DQDJLQJ LQFRPLQJ FDOOV PHGLD VHH OHDULQJ GRFXPHQW DQG SDSHU MDPV VHH RDGLQJ SDSHU PHPRU VFDQQLQJ DQG VHQGLQJ IURP PHQX RSWLRQV EURZVLQJ RSWLRQV EURZVLQJ WKURXJK RSWLRQV FKRRVLQJ RSWLRQV 0RYLQJ GLUHFWO WR VHQGLQJ RU PRUH QXPEHUV VHWWLQJV VHOHFWLQJ PHQXV GLVSOD LQJ QDYLJDWLQJ LQ 0HVVDJHV DOO IRU VHUYLFH OHDU GRFXPHQW MDP OHDU SDSHU MDP ORVH ...

Page 90: ...H ODVW WUDQVDFWLRQV 3ULQW RQWLQXHG D UHSRUW IRU WKH ODVW WUDQVDFWLRQ D UHSRUW RI WKH VHWWLQJV FRQWUROOLQJ RXU D 7KH DXWRPDWLF 3RZHU DLOXUH 5HSRUW SULQW FDUWULGJH LQVWDOOLQJ 3ULQW 5HGXFWLRQ VHWWLQJ SULQWLQJ UHSRUWV SUREOHP VROYLQJ VHH 7DNLQJ DUH RI RXU 3 3UREOHPV ZLWK 7HOHSKRQH DQG QVZHULQJ 0DFKLQH 3UREOHPV DYRLGLQJ SURGXFW VSHFLILFDWLRQV 3URJUDPPLQJ XWR LDO DQG 2QH 7RXFK QXPEHUV VHH 6WRULQJ 1XPEHU...

Page 91: ...RQ WHPSRUDULO 6HWWLQJ XS RXU 3 6HWWLQJV GMXVW 9ROXPH XWRPDWLF 5HGLDO XWRPDWLF 5HSRUWV URZVLQJ VHH URZVLQJ WKURXJK PHQXV 6HWWLQJV RQWLQXHG RQWUDVW FRQWUROOLQJ RXU ID SULQW D UHSRUW RI DWH 7LPH LDOLQJ 0HWKRG LVWLQFWLYH 5LQJ UURU RUUHFWLRQ D 1XPEHU 1DPH D 5HVROXWLRQ IRU RXU RIILFH IRU RXU WHOHSKRQH V VWHP HDGHU RFDWLRQ 1XPEHU DQG 1DPH 3DSHU 6L H 3KRWR 4XDOLW 3ULQW 5HGXFWLRQ 5HFHLYH WR 0HPRU 5HFHSWLRQ...

Page 92: ... VHH 7 DNLQJ DUH RI RXU 3 8 8QGHUVWDQGLQJ LVSOD 0HVVDJHV 8QSDFNLQJ 8QSDFNLQJ DQG RQQHFWLQJ RXU 3 8VLQJ XWWRQV DQG H V 0HQXV DQG 1DYLJDWLQJ WKH URQW 3DQHO 8VLQJ WKH 7 HOHSKRQH ZLWK WKH 3 9 YHULILFDWLRQ VHH 9LHZ DQG SULQW D UHSRUW IRU WKH ODVW WUDQVDFWLRQ YHULI LQJ VHH 9LHZLQJ DQG 3ULQWLQJ 5HSRUWV 9LHZ DQG SULQW D UHSRUW IRU WKH ODVW WUDQVDFWLRQ 9LHZLQJ DQG 3ULQWLQJ 5HSRUWV KDW V LQ 7KLV XLGH ...

Reviews: