Installing the HP UPS Management Module 23
Use the HP UPS Management Module Service Menu to configure the minimum settings required to
access the management module remotely using telnet or the web interface. You can configure other
settings using this utility in conjunction with a terminal emulation program or a telnet connection.
NOTE:
If your network is configured with a BOOTP server, the network settings are
automatically assigned. Verify and note the assigned values.
5.
If your network is not configured with a BOOTP server:
a.
On the Main menu, enter
1
at the prompt to open Module Configuration submenu.
b.
Enter
2
at the prompt to enter the Network Configuration submenu.
c.
Enter
1
at the prompt to enter the Network Settings submenu.
6.
From this menu, change the mode used to acquire a network IP address to Static IP. You can also
change the IP address, subnet mask, and default gateway of the HP UPS Management Module.
7.
Configure web access:
a.
On the Network Configuration submenu, enter
3
at the prompt to open the Web Access
submenu.
b.
Use the submenu options to select HTTP (default) or HTTPS and configure the associated port. The
default port for HTTP is port 80, and the default port for HTTPS is port 443.
8.
Configure telnet access:
a.
On the Network Configuration submenu, enter
2
at the prompt to open the Remote Console
submenu.
b.
Use the submenu options to configure the telnet port. The default port is port 23.
9.
Enter
0
at the prompt until you have returned to the Main menu.
10.
Enter
s
at the prompt to save the changes and restart the management module.
11.
Enter
2
at the prompt to close the configuration utility.
Connecting devices
NOTE:
The management module ships with one DB-9 to RJ-45 adapter for management
module configuration. Five additional adapters for connecting serial devices are available for
purchase in the adapter kit (part number AF402A).
1.
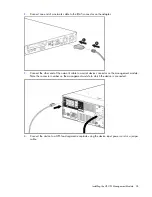
Connect a DB-9 to RJ-45 adapter to a serial connector on the device.


