background image

Getting Started

Summary of Contents for A6419fh - Pavilion - 3 GB RAM

Page 1: ...Getting Started ...

Page 2: ...Copyright 2000 2007 Hewlett Packard Development Company L P This product incorporates copyright protection technology that is protected by U S patents and other intellectual property rights Use of this copyright protection technology must be authorized by Macrovision and is intended for home and other limited pay per view viewing uses only unless otherwise authorized by Macrovision Reverse enginee...

Page 3: ... the screen resolution by using Vista 6 Adjusting the screen resolution by using the NVIDIA Control Panel 7 Setting Up a Local Area Network 8 Setting Up a Wired Ethernet Connection 9 Integrated Wireless Devices 9 Connecting the Wireless LAN Device 10 Checking the wireless LAN device installation 11 Using wireless security features 11 Connecting a Modem 12 Getting Help 13 Finding Onscreen Guides 13...

Page 4: ...puter for automatic Microsoft software updates 25 Installing critical security updates 25 Guidelines for Installing Software and Hardware Devices 26 Transferring Files and Settings from an Old Computer to a New Computer 27 Using the Keyboard 29 Identifying Keyboard Features 29 Alphanumeric keys 29 Function keys 30 Edit keys 30 Arrow keys 30 Numeric keys 31 Keyboard indicators 31 Special keyboard b...

Page 5: ...files permanently 46 Using the Windows Start Button Menu 46 Using the All Programs menu 46 Organizing the All Programs list 47 Using the Control Panel 47 Resizing Windows 48 Working with Digital Images 48 About the Internet 49 Using a Browser 50 Searching the Internet 50 Restricting Internet content 51 Sending and Receiving E Mail 52 Using Windows Mail 52 Using the e mail program provided by your ...

Page 6: ...ting Started features vary by model Using the Memory Card Reader 59 Media Insertion Guide 60 Understanding the Activity Light 63 Formatting a Memory Card 63 Troubleshooting the Memory Card Reader 64 Index 65 ...

Page 7: ... your new computer place it where ventilation openings are unobstructed Make sure that all connections are secure and that all cabling is out of the way Do not place cabling in walkways or where it can be stepped on or damaged from placing furniture on it WARNING The power supply is preset for the country region in which you purchased your computer If you move please check the voltage requirements...

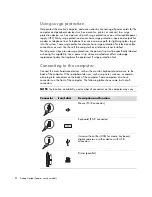
Page 8: ... strips provide surge protection the power strip must be specifically labeled as having this capability Use a power strip whose manufacturer offers a damage replacement policy that replaces the equipment if surge protection fails Connecting to the computer Connect the main hardware devices such as the monitor keyboard and mouse to the back of the computer Other peripheral devices such as a printer...

Page 9: ...n Headphones Microphone FireWire IEEE 1394 for video cameras or other devices with very fast transfer rates NOTE You must use a 6 pin FireWire IEEE 1394 transfer cable with this 6 pin connector Digital audio in and digital audio out Side speaker out Rear speaker out Center Subwoofer Connector Icon Label Description and function continued ...

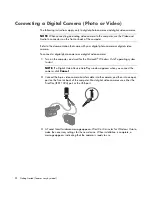
Page 10: ...ideo camera transfer cable into the camera and then into an open port on the front or back of the computer Most digital video cameras use either the FireWire IEEE 1394 port or the USB port 3 A Found New Hardware message appears Wait 2 or 3 minutes for Windows Vista to make the necessary settings for the new device When installation is complete a message appears indicating that the camera is ready ...

Page 11: ...e digital video camera 1 Click the Windows Start Button on the taskbar and then click Control Panel 2 Click System and Maintenance and then click System 3 Click Device Manager 4 Click the plus sign next to the camera port If the name of the camera appears the device is ready If the name is not there try the following Click Action and then click Scan for hardware changes Look in Device Manager for ...

Page 12: ...formation in an easy to find safe location It is a good idea to store the system recovery discs with the documentation This allows easy access to all important computer documents and files Adjusting the Monitor Adjusting the screen resolution by using Vista To change the screen resolution by using Vista 1 Right click an empty area of the desktop and then click Personalize 2 Click Display Settings ...

Page 13: ...ust the screen resolution by using the slider under Display resolution 5 Click Apply and then click Yes if you want to apply that resolution Or Click No and change the resolution by using the slider under Display resolution again click Apply and then click Yes NOTE You can connect more than one display device CRT monitor flat panel monitor TV and so on to the computer at a time select models only ...

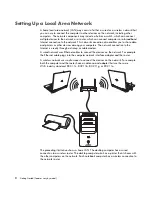
Page 14: ... The network connection to the Internet is usually through a dial up or cable modem A wired network uses Ethernet cables to connect the devices on the network For example the Ethernet cable plugs into the computer network interface adapter and the router A wireless network uses radio waves to connect the devices on the network For example both the computer and the router have an antenna and adapte...

Page 15: ...adio waves instead of wires Your computer may be equipped with one or more of the following integrated wireless devices Wireless local area network WLAN devices connect the computer to wireless local area networks commonly referred to as wireless networks wireless LANs or WLANs in corporate offices your home and public areas such as airports and restaurants In a WLAN each mobile wireless device co...

Page 16: ...b or 802 11g wireless network by using the external antenna that was included with the system This device enables you to establish a wireless network using the computer as a wireless access point or you can use the computer as a wireless client Station Mode if you already have a wireless network running You need an existing wireless LAN with an Internet connection consult your Internet Service Pro...

Page 17: ...taskbar click Help and Support and then type Setting up a wireless network into the Search Help box Go to http www hp com go techcenter wireless English only Go to http hp com support and search for wireless topics Using wireless security features When you set up a home WLAN or access an existing public WLAN always enable security features to protect the network from unauthorized access The most c...

Page 18: ...he Internet Before you can use telephone dial up to connect to the Internet and send or receive e mail and faxes you must connect your telephone service line to the modem A which is on the back of the computer B The setup poster shows you how to plug a modem telephone cable into the computer modem connector and into the telephone service line wall jack connector A Modem connector B Back of compute...

Page 19: ...wser 2 Select your country region and language 3 Click Support and Drivers 4 Enter the model number of your computer and then click Search 5 Click Manuals 6 Locate the manual you want and then do one of the following Click the title to display the file in Adobe Acrobat Reader which you can download from the Manuals page if it is not currently installed on your computer Right click the title click ...

Page 20: ...r The PC Help Tools folder contains special utilities for computer owners such as support information and programs To see the items in the PC Help Tools folder 1 Click the Windows Start Button on the taskbar 2 Click All Programs 3 Click PC Help Tools 4 Click Hardware Diagnostic Tools to view or use these tools Using the hardware diagnostic tools The hardware diagnostic tools help you to do the fol...

Page 21: ... alternate language it may take up to 30 minutes for this one time language setup on the computer 5 Set up Microsoft Windows Vista by following the onscreen instructions 6 Follow the onscreen instructions to register with HP or Compaq sign up for updates and get online If you do not want to set up an Internet connection at this time you can do so later by manually starting Easy Internet Services S...

Page 22: ...work where you left off Hibernate mode saves the system memory to a temporary file on the hard disk and then turns off the hardware Some computers also have a reduced power state called Away mode Away mode turns off the display and mutes the audio but otherwise keeps the computer operational During Away mode the computer can perform tasks such as recording a scheduled TV program or streaming video...

Page 23: ...t time that you use the computer any programs folders and documents that were open before you put the computer into Sleep mode are available The computer can receive faxes if you set it to do so The computer can retrieve e mail messages and download information from the Internet automatically if you set it to do so To put the computer into Sleep mode manually Press the Sleep button on the keyboard...

Page 24: ... then turns itself off When you turn on the computer again your programs folders and documents are restored to the screen To put the computer into Hibernate mode manually 1 Click the Windows Start Button on the taskbar 2 Click the Arrow button next to the Lock button 3 Click Hibernate if it is present To wake the computer from Hibernate mode press the On button on the front of the computer If the ...

Page 25: ...ges Or For Hibernate or Away mode a Click Change advanced power settings b Click the plus sign next to Sleep c Click an item and make selections and then click Apply d Click OK Restarting the Computer When you restart the computer the computer clears some settings and starts over using the operating system and software in its memory Restarting is the easiest and most effective way to solve many so...

Page 26: ...rea Network To connect to the Internet you must have A computer A dial up modem a cable modem or a DSL modem for high speed broadband connections Contact your ISP for any specific software and hardware that you may need Internet service with an ISP A Web browser To connect to the Internet 1 Sign up with an ISP If you already have an account with an ISP skip this step and follow the instructions pr...

Page 27: ...wed to change account types for other users change passwords change system wide settings access all files on the computer and install software and drivers that are compatible with Windows Vista Limited Standard User Is not allowed to change other user settings or passwords A Limited account may not be able to install or run some software Is allowed to change the limited account picture and to crea...

Page 28: ...e Computer Protect the computer personal settings and data from a variety of risks by using Passwords Antivirus software Firewall software Critical security updates NOTE Security solutions are designed to act as deterrents but they may not be able to prevent software attacks or to prevent the computer from being mishandled or stolen Computer risk Security feature Unauthorized use of the computer o...

Page 29: ...ess you store them in a secure place away from the computer Do not store passwords in a file on the computer You can use the same password for more than one Windows Vista security feature A password can have any combination of up to eight letters and numbers and it is not case sensitive A password must be set and entered with the same keys For example if you set the password with number keys on th...

Page 30: ...firewall software When you use the computer for e mail network or Internet access unauthorized persons may be able to gain access to information about you the computer and your data To protect your privacy use firewall software Microsoft Windows Vista includes firewall software preinstalled on the computer Firewall features include logging reporting and automatic alarms to monitor all incoming and...

Page 31: ... Click Control Panel 3 Click Security 4 Click Windows Update 5 Click Change settings 6 Select the desired configuration Install updates automatically recommended This is the default setting and it enables you to specify a day and time to automatically download and install recommended updates Download updates but let me choose whether to install them Check for updates but let me choose whether to d...

Page 32: ... use For information on System Restore go to the Microsoft Web site at http www microsoft com worldwide Choose software that is compatible with the computer check the operating system memory and other requirements listed for the new software Install the new software according to the directions provided by the software manufacturer If you need help check the manufacturer s documentation or customer...

Page 33: ... Easy Transfer software which is included with Microsoft Windows Vista To transfer your files and settings 1 Click the Windows Start Button on the taskbar 2 Click Help and Support 3 Type transfer files into the Search Help box 4 Click the overview article Transfer files and settings from another computer This article describes a Microsoft solution for moving your files to your new computer 5 Click...

Page 34: ...28 Getting Started features vary by model ...

Page 35: ...the receiver indicates receiver activity Identifying Keyboard Features The keyboard contains an arrangement of standard keys indicator lights and special buttons select models only Your keyboard may vary from the illustrations that follow Alphanumeric keys The alphanumeric keys are the main keys found on a standard typewriter IMPORTANT Please see the documentation that came with the keyboard for a...

Page 36: ...e program being used Pressing F3 opens a search window Edit keys The edit keys are Insert Home Page Up Delete End and Page Down Use these keys to insert and delete text and to quickly move the cursor on the screen The edit keys function differently with some software programs Arrow keys The arrow keys are controls for moving up down right and left You can use these keys instead of the mouse to mov...

Page 37: ...alculator When the Num Lock light on the keyboard is off the numeric keys are directional keys used to move the cursor or play games Keyboard indicators Each keyboard indicator is a light labeled with a name or with an icon for its status Icon Name Description Num Lock When lit numeric keys are locked as number keys and arithmetic functions Caps Lock When lit alphanumeric keys are locked to upperc...

Page 38: ...ying Special Keyboard Buttons Your keyboard may not include some of the buttons listed Access buttons NOTE The number location and labeling of buttons vary by keyboard model Icon Feature Description Sleep Puts computer into or out of power saving mode It may take 10 30 seconds before screen reappears User Switches between computer users Or Information Opens Help and Support Center Or Pictures Phot...

Page 39: ... site or software program Or Finance Goes to a finance Web site Can be reconfigured to open a site or software program Or Connect to Internet Goes to an Internet browser page Can be reconfigured to open a site or software program Or Search Goes to a search engine Can be reconfigured to open a site or software program Or Chat Goes to chat Web site Can be reconfigured to open a site or software prog...

Page 40: ...nd Sound if it is present 4 Click Keyboard Icon Label Description Eject 1 and Eject 2 Opens or closes upper and lower optical drive trays Rec Starts recording to selected media Stop Stops media Play Pause Plays or pauses media Prev Rewinds media Next Fast forwards media Or Volume Volume knob controls speaker volume Turn clockwise to increase speaker volume and counterclockwise to decrease volume N...

Page 41: ...e Windows Vista desktop press the Alt alternate key the Ctrl control key and the S key the letter S to display support information for the computer including the model number serial number and service ID You see this combination of keys represented as Alt Ctrl S In Windows Vista press Ctrl C to copy an item that you ve highlighted or selected Ctrl V to paste a copied item or Ctrl Z to undo the pre...

Page 42: ...a USB port on the front of the computer is best if it will be closer to the mouse and keyboard 2 Push the Connect button A on the receiver and hold it for 5 to 10 seconds until the blue light starts to flash 3 Push and hold the Connect button B on the underside of the mouse until the blue LED on the receiver stops flashing NOTE The receiver connection session times out after 60 seconds To ensure t...

Page 43: ...ct button on the receiver and hold it for 5 to 10 seconds until the blue light starts to flash 2 Push and hold the Connect button C on the underside of the keyboard until the blue LED on the receiver stops flashing For additional mouse and keyboard troubleshooting tips refer to the Troubleshooting and Maintenance Guide ...

Page 44: ...38 Getting Started features vary by model ...

Page 45: ...ter A light on the receiver indicates receiver activity IMPORTANT Please see any documentation that came with the mouse for additional information about using the mouse customizing mouse buttons and using special buttons or features that are included with the mouse You may need to install mouse software and drivers to access all the special features and functions of the mouse NOTE The optical mous...

Page 46: ...the right button once To select an item click it To select sequential items in a list or group click the first item in the list and then press and hold the Shift key on the keyboard while you click the last item To select non sequential items click the first item and then press and hold the Ctrl key on the keyboard while you click the additional items You can switch the function of the left and ri...

Page 47: ...rther that you move the mouse from the starting point the faster the document pans 3 To stop panning release the scroll wheel button Changing Mouse Settings Switching mouse button functions To switch the functions of the right and left mouse buttons for left handed use 1 Click the Windows Start Button on the taskbar 2 Click Control Panel 3 Click Hardware and Sound if it is present 4 Click Mouse 5 ...

Page 48: ...k speed To change the double click speed of the right mouse button 1 Click the Windows Start Button on the taskbar 2 Click Control Panel 3 Click Hardware and Sound if it is present 4 Click Mouse 5 Click the Buttons tab 6 In the Double click speed area use the slider to adjust the double click speed 7 Click Apply and then click OK Turning on the ClickLock option ClickLock enables you to highlight o...

Page 49: ...n the Vertical Scrolling area adjust the number of lines per scroll by clicking the arrow buttons Or In the Horizontal Scrolling area adjust the number of lines per scroll by clicking the arrow buttons 7 Click Apply and then click OK Wireless Mouse and Keyboard Troubleshooting If the wireless mouse and keyboard do not respond see Synchronizing a wireless mouse and keyboard in the Using the Keyboar...

Page 50: ...44 Getting Started features vary by model ...

Page 51: ...abeled with a question mark icon on your keyboard select models only Or Click the Windows Start Button on the taskbar and then click Help and Support For help with specific software refer to the onscreen Help within the program Using the Desktop The desktop is the work area that appears on the monitor screen It includes the taskbar along one edge and shortcut icons that make it easy to find the th...

Page 52: ...Windows Start Button Menu Click the Windows Start Button on the taskbar to open the Start menu From the Start menu you can Open programs or documents Open the Help and Support Center Start a search Open the Control Panel to view or change settings Using the All Programs menu To find the software programs on your computer 1 Click the Windows Start Button on the taskbar 2 Click All Programs The All ...

Page 53: ...the shortcut in All Programs may not be removed To remove a shortcut 1 Click the Windows Start Button on the taskbar 2 Click All Programs 3 Click the folder 4 Right click the shortcut and then click Delete Using the Control Panel The Control Panel is where you can set up or change properties and settings for the monitor the keyboard the mouse the modem a network connection and other components and...

Page 54: ... card reader select models only Feature Name Description Minimize Collapses the window to the taskbar but does not close it To bring the window back up click the taskbar button with the name of the window Maximize Expands the window to the full screen size Restore Down Reduces the window from full screen size so that it covers only a portion of the screen Close Closes the window and stops the prog...

Page 55: ...used by individuals companies governments and organizations These individuals and groups have created millions of Web sites in support of their activities A Web site consists of one or more Web pages A Web page is a file or group of files that a user can access by entering the file location or Uniform Resource Locator URL The URL identifies a Web site location typically in the form http www name e...

Page 56: ...display the search feature depending on the type of browser program Type a question or a word that describes the information that you want to find into the Search box and then press Enter The Windows search feature includes direct use of Internet Explorer Search To begin a search 1 Click the Windows Start Button on the taskbar 2 Type a word or question what you type automatically appears in the St...

Page 57: ...ed under the rating setup However to view unrated Web sites or pages users must enter the Content Advisor password that you have set This means that any unrated page even Help and Support or Internet Explorer is not viewable if the user does not know the password To enable Content Advisor 1 Click the Windows Start Button on the taskbar 2 Click Internet Explorer 3 Click Tools and then click Interne...

Page 58: ... and perhaps some other details The first time you start Windows Mail make sure the computer is connected to the Internet and follow the wizard to set up your account To add an account in Windows Mail 1 Click the Windows Start Button on the taskbar 2 Click All Programs 3 Click Windows Mail 4 Click Tools and then click Accounts 5 Click Add E mail Account and then click Next 6 Follow the onscreen in...

Page 59: ...nd it can even contain other folders Each file within a folder must have a unique name but two different folders can have files with the same name There are two methods for working with files and folders on the computer The Computer view enables you to quickly see all the files and folders within a specific folder on the computer It also contains links to common tasks for managing files such as co...

Page 60: ...n the taskbar and then click Windows Explorer 2 Find the file that you want to move and then click it to select it 3 Click Organize and then Cut 4 Find and open the folder in which you want to put the file 5 Click Organize and then Paste CAUTION Do not move any file that is part of an installed program Doing so can cause the program to become unusable NOTE You can also move files by dragging them ...

Page 61: ...he Search box filters according to what you type It displays files if your term matches the file name tags or other file properties It displays text documents if the term occurs in any of the text inside the document file To search from the Windows Start Button menu 1 Click the Windows Start Button on the taskbar 2 Type a word or question what you type automatically appears in the Start Search box...

Page 62: ...t it 2 Click Organize and then Delete 3 Click Yes to confirm the delete and send the file to the Recycle Bin If you make a mistake and need to retrieve the deleted file see Retrieving Files from the Recycle Bin CAUTION Do not change the file name extension the last three characters of a file name after the period Doing so could make the file unrecognizable to the computer NOTE Another way to renam...

Page 63: ...ycle Bin and goes back to its previous location Copying Files 1 Click the Windows Start Button on the taskbar and then click Computer Or Click the Windows Start Button on the taskbar and then click Windows Explorer 2 Find the file that you want to copy and then click it to select it 3 Click Organize and then Copy 4 Find and open the folder in which you want to put the file 5 Click Organize and the...

Page 64: ...rk with the computer If it does not follow the instructions that came with the printer to install the specific printer driver manually You can print text and graphics from most software programs and Web sites if you have a printer connected to the computer and if the computer has the necessary software installed for the printer To print 1 Click File on the program menu bar and then click Print 2 S...

Page 65: ... the title of the media if a title is present When you insert media the Safely Remove Hardware window may appear If it opens or if you open the Safely Remove Hardware window by mistake click Close To use the memory card reader 1 Insert the media into the card slot until it stops The activity light A on the memory card reader lights and the computer automatically detects the media CAUTION Do not cl...

Page 66: ...hen remove the media A steady activity light indicates that the computer is not reading or writing the media card Media Insertion Guide 4 slot memory card reader select models only A Activity light B Upper left slot C Lower left slot D Upper right slot E Lower right slot CAUTION Do not try to remove media when the activity light is blinking Doing so may cause loss of data Card Insert the media 4 s...

Page 67: ...diaCard Plus MMC Facing up D upper right MMC Plus MultiMediaCard Mobile MMC Mobile Facing up D upper right MMC Mobile Memory Stick MS memory card Facing up E lower right MS Memory Stick MS Pro memory card Facing up E lower right PRO Memory Stick MS Pro Duo memory card Facing up E lower right PRO Duo Memory Stick MS Duo memory card Facing up E lower right MS Duo NOTE Some memory cards such as CF Ul...

Page 68: ...ld connector fingers down F upper Memory Stick MS Pro Memory Card Facing up gold connector fingers down F upper SmartMedia SM Memory Card Facing down gold connector fingers up F upper xD media Facing up gold connector fingers down F upper IBM Microdrive disk drive Receptacle edge holes G lower CompactFlash Type I media Receptacle edge holes G lower CompactFlash Type II media Receptacle edge holes ...

Page 69: ... that came with your digital camera Or Insert the media into the correct card slot on the reader until it stops and locks into place The activity light on the memory card reader lights and the computer automatically detects the media 2 Click the Windows Start Button on the taskbar and then click Computer 3 In the Devices with Removable Storage area right click the correct memory card icon 4 Select...

Page 70: ... not blinking and shine a flashlight into the empty slot If any of the pins are bent replace the memory card reader or have the computer serviced if a pin is touching another pin To straighten slightly bent pins use the tip of a fine point retracted ballpoint pen with the computer off Inspect the ends of the memory cards for anything that could be blocking a proper connection Clean the contacts wi...

Page 71: ...onnectors 2 Help Tools 14 setting up 1 transferring files 27 turning off 16 connecting devices 6 digital camera 4 digital video camera 4 peripherals 2 connection modem 12 wired network 9 connector computer 2 cursor speed 42 customizing keyboard buttons 34 D devices connecting 6 digital camera connecting 4 6 digital picture 59 digital video camera connecting to a computer 4 troubleshooting 5 docume...

Page 72: ...tching button functions 41 MultiMediaCard MMC 61 MultiMediaCard Plus MMC 61 Mute button 34 N Network Interface Card NIC 9 O Off button See turning off computer 16 P panning with the mouse 41 peripherals 2 printer connecting 6 R reduced size MultiMediaCard RSMMC 61 repetitive strain injury RSI see Safety Comfort Guide S Safety Comfort Guide 21 safety warnings 21 scanner connecting 6 scrolling with ...

Page 73: ...less devices 9 wireless LAN 10 wireless LAN connection 10 wireless local area network WLAN 9 wireless network security 11 wireless network device checking installation 11 wireless wide area networks WWAN devices 10 WLAN security 11 working in comfort 21 WPA 11 X xD media 62 ...

Page 74: ...Part number 5992 3577 ...

Reviews: