


4
疑難排解與維護手冊
保持電腦遠離灰塵
保持電腦遠離灰塵可
延
長
電腦使用
壽命
。灰塵、動
物
毛髮
和其他塵
埃
會
不
斷堆積
,
因而
產
生
毛毯
效
應
,
如
此一
來
,電腦組件
會
過熱
,且將
無
法
順
利且
有
效
率
地
使用鍵盤和滑鼠。
請每個月
檢查一
次
您的系統,查
看
是
否
明顯
覆蓋
一
層
灰塵和
堆積物
,
並
大約
每
三
個月
清
潔一
次
。
清潔電腦和顯示器
1
拔
下電腦的電源線。
2
拔
下顯示器的電源線。
3
使用
乾淨
的
乾布
來
擦
除電腦外
殼
和顯示器上的
灰塵。
4
使用
以
溫水沾溼
的
乾淨濕布
來
擦拭
電腦外
殼
和顯
示器外
殼
。
請
勿
用
水
清潔顯示器螢幕。
5
使用
乾淨
的
布擦乾
電腦與顯示器外
殼
。
6
使用
乾淨
的
乾布
清潔顯示器螢幕,或
者
使用
防靜
電螢幕清潔
劑
和
乾淨
的
布
來
加強
清潔。
清潔通風孔
通
風孔
可
以
冷卻
電腦和顯示器的
溫
度
。
若要
維持通
風
孔
的效用,
請
使用電
池
式
小型
吸
塵器
來
清潔通
風孔
。
(電
池
式
吸
塵器可
減
少
電
擊
的
危險
性
。)
1
使用
吸
塵器清潔電腦外
殼
和顯示器外
殼
的通
風孔
。
2
吸
除任何
堆積
在電腦連
接
埠
(
例如:
乙太
網
路
與
USB
連
接
埠
)
周圍
的
堆積物
。
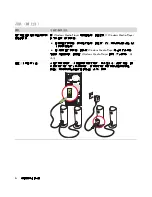
清潔鍵盤和滑鼠
清潔鍵盤時,
請
使用設為
低
速
的電
池
式
吸
塵器,
以
防
按
鍵上
蓋
與
彈簧脫落
。
1
在鍵盤
按
鍵間
沿
著
溝槽吸
除灰塵。
2
使用
乾淨
的
乾布
和
異丙醇酒精
來
清潔鍵盤
按
鍵上
以及按
鍵
邊緣
的
堆積物
。
3
使用清潔
抹布
或
布
與清潔
劑
來
擦拭
滑鼠與滑鼠連
接
線。
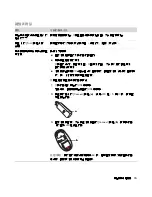
如果
您使用的是
滾球
式滑鼠,
請
清潔
滾球
和
滾輪
內
部
:
1
將滑鼠的
底
部
朝
上。
2
以
逆
時
針
方向
旋轉滾球蓋
以取
下外
蓋
和
滾球
。
3
使用
肥皂溫水沖洗滾球
。
4
使用
沾異丙酮酒精
的
棉花棒
清潔滑鼠
內
的
滾輪
。
5
滾球
與
滾輪
完全
乾燥
後
,裝
回
滾球
與
滾球
外
蓋
。
注意事項
:
如果
電腦或顯示器外
殼
上
有
撕
除
貼紙
痕跡
或
濺
到
液
體,
請
使用
異丙醇
或外用
酒精
和不
含
絨毛
的
布擦拭
。
Summary of Contents for A6600f - Pavilion - 3 GB RAM
Page 1: ...疑難排解與維護手冊 ...
Page 4: ...iv 疑難排解與維護手冊 ...
Page 32: ...www hp com ...
Page 33: ......
Page 61: ...iv Troubleshooting and Maintenance Guide ...
Page 64: ...Troubleshooting and Maintenance Guide Printed in ...