Chapter 2
HP-UX Installation: HP A7173A PCI-X Dual Channel Ultra320 SCSI Host Bus Adapter
Verifying the Installation
17
Verifying the Installation
After installing the scsiU320-00 software bundle containing the mpt driver, installing the A7173A adapter,
and attaching the peripheral devices, verify that all of the components are working by following these steps:
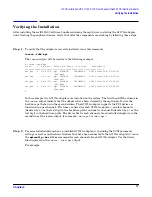
Step 1. To verify that the adapter is correctly installed, issue this command:
ioscan -fnkd mpt
The
ioscan
output will be similar to the following example:
# ioscan -fnkd mpt
Class I H/W Path Driver S/W State H/W Type Description
==================================================================
ext_bus 6 1/0/2/0/0 mpt CLAIMED INTERFACE SCSI Ultra320 A7173-60011
/dev/mpt6
ext_bus 7 1/0/2/0/1 mpt CLAIMED INTERFACE SCSI Ultra320 A7173-60011
/dev/mpt7
ext_bus 8 1/0/4/0/0 mpt CLAIMED INTERFACE SCSI Ultra320 A7173-60011
/dev/mpt8
ext_bus 9 1/0/4/0/1 mpt CLAIMED INTERFACE SCSI Ultra320 A7173-60011
/dev/mpt9
#
In this example, two A7173A adapters are installed on the system. The fourth and fifth columns in
the
ioscan
output indicate that the adapters have been claimed by the mpt driver. Notice the
hardware path shown in the second column. The A7173A adapter supports two PCI devices or
functions (one per channel). Two lines are listed for each A7173A adapter, —one for channel A
(denoted by a
0
as the last digit in the hardware path), and one for channel B (denoted by a
1
as the
last digit in the hardware path). The device file for each channel of each installed adapter is in the
second line of the ioscan output, for example:
/dev/mpt6
or
/dev/mpt7
.
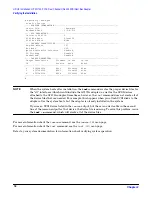
Step 2. For more detailed information on installed A7173A adapter(s), including the SCSI parameter
settings as well as verification of devices that have been connected to the A7173A adapter(s), issue
the
mptconfig <dev file>
command for each channel of each A7173A adapter. Use the device
files displayed in the
ioscan -fnkd mpt
output.
For example:


