Replacing an Internal Hot-Swappable Chassis Fan Unit
Use the following procedures to remove and replace an internal hot-swappable chassis fan unit.
CAUTION:
To prevent server components from overheating, replace the fan within 20 seconds.
Failure to observe this caution results in an automatic server shut down in two minutes to prevent
an overtemperature condition.
NOTE:
The fan unit is keyed to fit into the fan housing in the correct orientation only.
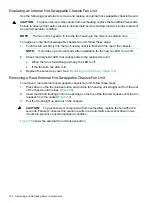
To replace an internal hot-swappable chassis fan unit, follow these steps:
1.
Push the fan unit firmly into the fan housing until it is flush with the top of the chassis.
NOTE:
It can take up to ten seconds after installation for the new fan LED to turn off.
2.
Check the diagnostic LED that corresponds to the replaced fan unit.
•
When the fan is functioning normally, the LED is off.
•
If the fan fails, the LED is lit.
3.
Replace the server top cover. See
“Replacing the Top Cover” (page 179)
Removing a Rear External Hot-Swappable Chassis Fan Unit
To remove a rear external hot-swappable chassis fan unit, follow these steps:
1.
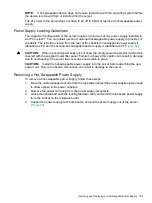
Press down on the fan release button and pull the fan housing unit straight out from the rear
of the chassis until it stops (
).
2.
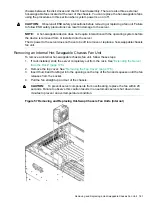
Insert thumb and forefinger into the openings on the top of the fan and squeeze until the fan
releases from the socket (
).
3.
Pull the fan straight up and out of the chassis.
CAUTION:
To prevent server components from overheating, replace the fan within 20
seconds. Failure to observe this caution results in an automatic server shut down in two
minutes to prevent an overtemperature condition.
shows the external fan unit release button.
182
Removing and Replacing Server Components


