Once you have determined the iLO 2 MP access, you must determine how you will configure the
iLO 2 MP LAN in order to acquire an IP address. There are three methods available.
•
DHCP/DNS
•
ARP Ping
•
RS-232 serial port
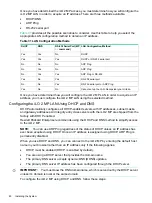
provides all the possible scenarios to consider. Use this table to help you select the
appropriate LAN configuration method to obtain an IP address.
Table 31 LAN Configuration Methods
LAN Configuration Method
RS-232 Serial Port (MP
LC
command)
DNS
DHCP
DHCP
No
Yes
Yes
DHCP or RS-232 serial port
Yes
Yes
Yes
ARP Ping
No
No
No
ARP Ping
No
Yes
No
ARP Ping or RS-232
Yes
Yes
No
RS-232 serial port
Yes
No
Yes
RS-232 serial port or ARP Ping
Yes
No
No
Cannot set up the LAN. Reconsider your criteria.
No
No
Yes
Once you have determined how you will configure the iLO 2 MP LAN in order to acquire an IP
address, you must configure the iLO 2 MP LAN using the selected method.
Configuring the iLO 2 MP LAN Using DHCP and DNS
DHCP automatically configures all DHCP-enabled servers with IP addresses, subnet masks,
and gateway addresses. All Integrity entry class servers with the iLO 2 MP are shipped from the
factory with DHCP enabled.
Hewlett Packard Enterprise recommends using the DHCP and DNS method to simplify access
to the iLO 2 MP.
NOTE:
You can use ARP Ping regardless of the status of DHCP unless an IP address has
ever been acquired using DHCP. Once an IP address is assigned using DHCP, ARP Ping is
permanently disabled.
When you use DHCP and DNS, you can connect to the iLO 2 MP by entering the default host
name in your browser rather than an IP address only if the following applies:
•
DHCP must be enabled (DHCP is enabled by default).
•
You are using a DHCP server that provides the domain name.
•
The primary DNS server accepts dynamic DNS (DDNS) updates.
•
The primary DNS server IP address has been configured through the DHCP server.
IMPORTANT:
You must know the DNS domain name, which is served out by the DHCP server,
unless it’s domain is local or the same domain.
To configure the iLO 2 MP using DHCP and DNS, follow these steps:
80
Installing the System

