background image


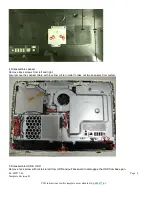
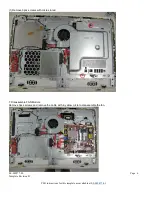
8, Disassemble converter board 
Remove two cables and 2pcs screws to remove the converter board. 


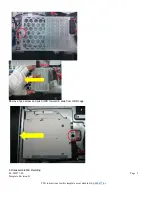
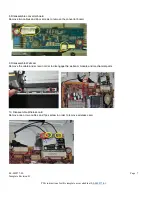
9, Disassemble Webcam 
Remove the cable and screw in order to disengage the webcam module and mechanical parts. 


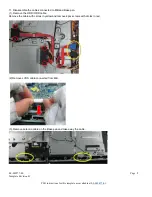
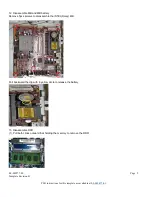
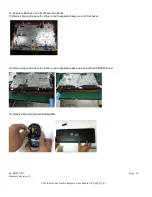
10, Disassemble Wireless card 
Remove one or two cables and 1pcs screw in order to remove wireless card. 


EL-MF877-00                                                 Page  7 
Template Revision B  


PSG instructions for this template are available a

EL-MF877-01


Summary of Contents for All-in-One

Page 1: ...button board 4 Batteries All types including standard alkaline and lithium coin or button style batteries 7 Mercury containing components For example mercury in lamps display backlights scanner lamps switches batteries 0 Liquid Crystal Displays LCD with a surface greater than 100 sq cm Includes background illuminated displays with gas discharge lamps 1 Cathode Ray Tubes CRT 0 Capacitors condensers...

Page 2: ... the 3 2 7 disassemble MB Shielding 6 Please refer to the 3 2 8 disassemble FAN Module 7 Please refer to the 3 2 9 disassemble converter board 8 Please refer to the 3 2 10 disassemble Webcam 9 Please refer to the 3 2 11 disassemble Wireless card 10 Please refer to the 3 2 12 disassemble the cables connected from MB 11 Please refer to the 3 2 13 disassemble MB and MB battery 12 Please refer to the ...

Page 3: ...ear cover Remove 2pcs screws with circle in red 3 Disassemble stand Remove 4pcs screws on both left and right so you can remove stand EL MF877 00 Page 3 Template Revision B PSG instructions for this template are available at EL MF877 01 ...

Page 4: ...with in yellow circle in order to take out two speakers from system 5 Disassemble HDD ODD Remove 1pcs screw with circles in red from HDD and pull backward to disengage the HDD from base pan EL MF877 00 Page 4 Template Revision B PSG instructions for this template are available at EL MF877 01 ...

Page 5: ...Remove 1pcs screw and push ODD forward to slide from ODD cage 6 Disassemble MB shielding EL MF877 00 Page 5 Template Revision B PSG instructions for this template are available at EL MF877 01 ...

Page 6: ... circles in red 7 Disassemble FAN Module Remove 3pcs screws and remove the cable with in yellow circle to disassemble the fan EL MF877 00 Page 6 Template Revision B PSG instructions for this template are available at EL MF877 01 ...

Page 7: ...mble Webcam Remove the cable and screw in order to disengage the webcam module and mechanical parts 10 Disassemble Wireless card Remove one or two cables and 1pcs screw in order to remove wireless card EL MF877 00 Page 7 Template Revision B PSG instructions for this template are available at EL MF877 01 ...

Page 8: ...emove the cable with circles in yellow and remove 4pcs screws with circles in red 2 Remove LVDS cable connected from MB 3 Remove antenna cable on the Base pan and take away the cable EL MF877 00 Page 8 Template Revision B PSG instructions for this template are available at EL MF877 01 ...

Page 9: ...INTEL Daisy MB Pull backward the clip with in yellow circle to release the battery 13 Disassemble DDR 1 Pull both clicks outward that holding the memory to remove the DDR EL MF877 00 Page 9 Template Revision B PSG instructions for this template are available at EL MF877 01 ...

Page 10: ...ircles in red to separate base pan and front bezel 2 Remove 4pcs screws with circles in red to separate base pan and AUO LG CM0049 Panel 15 Remove Mouse Keyboard Battery MB EL MF877 00 Page 10 Template Revision B PSG instructions for this template are available at EL MF877 01 ...

Page 11: ...16 Remove power supply EL MF877 00 Page 11 Template Revision B PSG instructions for this template are available at EL MF877 01 ...

Reviews: