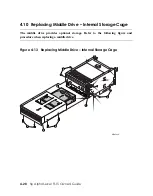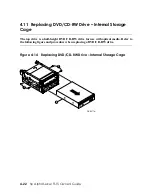
Replacing DVD/CD-RW Drive – Internal Storage Cage
1.
Shut down the system and remove the top cover as explained in Section 4.2.
2.
Remove the internal storage cage and all cables as explained in Section 4.8.
3.
Remove the four screws
n
that fasten the drive
o
to the storage cage.
4.
Pull drive forward. Push away EMC finger stock clips if they hang up on the drive.
5.
Before installing the new drive, be sure all eight (8) EMC finger stock clips are in place.
6.
Slide the new drive into the storage cage and insert the four screws as shown.
7.
Reinstall the storage cage as explained in Section 4.8.
8.
Replace the top cover and reassemble the system enclosure as explained in the end of
Section 4.2.
9.
Turn on system power by pressing the power switch on the operator control panel. Boot
the operating system.
Installing and Configuring Options
4-23

