2.
Remove the slot cover (if installed).
CAUTION:
Properly ground yourself before handling the switch.
3.
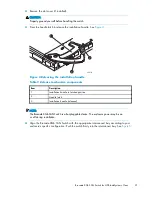
Press the handle latch to release the installation handle. See
Figure 4
.
scale: 2/3" = 1"
21
22
23
17
18
19
20
!
Reset
26475a
2
3
1
Figure 4 Releasing the installation handle
Table 9 Release mechanism components
Item
Description
1
Installation handle in latched position
2
Handle latch
3
Installation handle (released)
NOTE:
The Brocade 8Gb SAN Switch is a hot-pluggable device. The enclosure power may be on
or off during installation.
4.
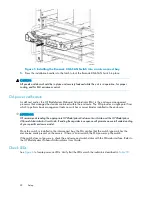
Align the Brocade 8Gb SAN Switch with the appropriate interconnect bay according to your
enclosure’s speci
fi
c con
fi
guration. Push the switch
fi
rmly into the interconnect bay. See
Figure 5
.
Brocade 8Gb SAN Switch for HP BladeSystem c-Class
21
Summary of Contents for Brocade 8Gb SAN
Page 5: ...Index 61 Brocade 8Gb SAN Switch for HP BladeSystem c Class 5 ...
Page 8: ...8 ...
Page 12: ...12 About this guide ...
Page 18: ...18 Overview ...
Page 40: ...40 Managing the 8Gb SAN Switch ...
Page 46: ...46 Regulatory compliance and safety ...
Page 48: ...48 Electrostatic discharge ...
Page 52: ...52 SAN Switch technical specifications ...
Page 60: ...60 Glossary ...


