scale: 1" = 1"
17
18
19
20
!
Reset
26477a
1
2
3
4
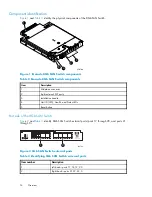
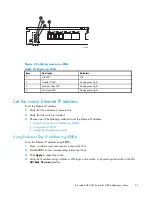
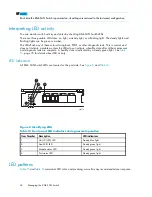
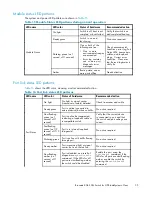
Figure 6 Verifying power-on LEDs
Table 10 Power-on LEDs
Item
Description
Indicators
1
UID LED
Off
2
Health ID LED
Steady green light
3
Module status LED
Steady green light
4
Port status LED
Steady green light
Set the switch Ethernet IP address
To set the Ethernet IP address:
1.
Verify that the enclosure is powered on.
2.
Verify that the switch is installed.
3.
Choose one of the following methods to set the Ethernet IP address:
•
Using Enclosure Bay IP Addressing (EBIPA)
•
Using external DHCP
•
Setting the IP address manually
Using Enclosure Bay IP Addressing (EBIPA)
To set the Ethernet IP address using EBIPA:
1.
Open a web browser and connect to the active OA.
2.
Enable EBIPA for the corresponding interconnect bay.
3.
Click
Apply
to restart the switch.
4.
Verify the IP address using a Telnet or SSH login to the switch, or by selecting the switch in the OA
GUI Rack Overview
window.
Brocade 8Gb SAN Switch for HP BladeSystem c-Class
23
Summary of Contents for Brocade 8Gb SAN
Page 5: ...Index 61 Brocade 8Gb SAN Switch for HP BladeSystem c Class 5 ...
Page 8: ...8 ...
Page 12: ...12 About this guide ...
Page 18: ...18 Overview ...
Page 40: ...40 Managing the 8Gb SAN Switch ...
Page 46: ...46 Regulatory compliance and safety ...
Page 48: ...48 Electrostatic discharge ...
Page 52: ...52 SAN Switch technical specifications ...
Page 60: ...60 Glossary ...

