
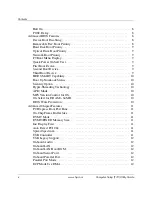


12
www.hp.com
Computer Setup (F10) Utility Guide
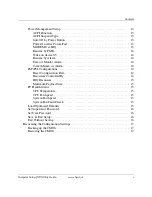
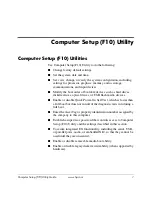
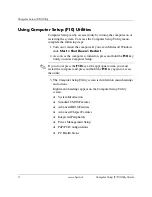
Computer Setup (F10) Utility
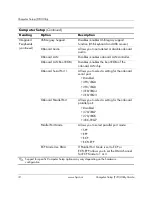
Integrated
Peripherals
(continued)
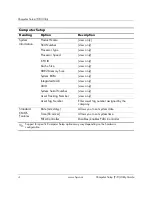
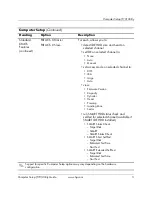
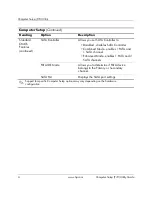
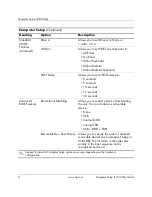
USB Legacy Support
Disables/enables USB legacy support
function (USB keyboard and USB mouse).
Onboard Audio
Allows you to auto-detect or disable onboard
audio.
Onboard LAN
Disables/enables onboard LAN controller.
Onboard LAN Boot ROM
Disables/enables the boot ROM of the
onboard LAN chip.
Onboard Serial Port 1
Allows you to select a setting for the onboard
serial port:
• Disabled
• 3F8/IRQ4
• 2F8/IRQ3
• 3E8/IRQ4
• 2E8/IRQ3
Onboard Parallel Port
Allows you to select a setting for the onboard
parallel port:
• Disabled
• 378/IRQ7
• 278/IRQ5
• 3BC/IRQ7
Parallel Port Mode
Allows you to select parallel port mode:
• SPP
• EPP
• ECP
• ECP+EPP
ECP Mode Use DMA
If Parallel Port Mode is set to ECP or
ECP+EPP, allows you to set the DMA channel
for ECP Mode to 1 or 3.
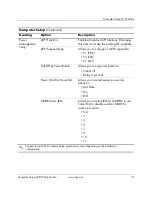
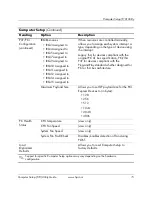
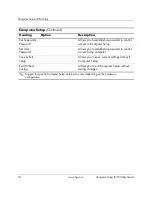
Computer Setup
(Continued)
Heading
Option
Description
✎
Support for specific Computer Setup options may vary depending on the hardware
configuration.


