background image

Hardware and Software 
Guide

HP Compaq Notebook Series

Document Part Number: 393677-002

June 2005

This guide explains how to identify and use the notebook 
hardware features, including connectors and external devices. 
It also includes security, software, and specification information.

Summary of Contents for Compaq NC6110

Page 1: ...Notebook Series Document Part Number 393677 002 June 2005 This guide explains how to identify and use the notebook hardware features including connectors and external devices It also includes security software and specification information ...

Page 2: ...n contained herein is subject to change without notice The only warranties for HP products and services are set forth in the express warranty statements accompanying such products and services Nothing herein should be construed as constituting an additional warranty HP shall not be liable for technical or editorial errors or omissions contained herein Hardware and Software Guide HP Compaq Notebook...

Page 3: ...ents 1 16 Right Side Components 1 18 Left Side Components 1 20 Bottom Components 1 23 Additional Hardware Components 1 26 Labels 1 27 2 Power Power Control and Light Locations 2 1 Power Sources 2 4 Standby and Hibernation 2 5 Standby 2 5 Hibernation 2 6 Initiating Standby Hibernation or Shutdown 2 7 When You Leave Your Work 2 7 When the Power Supply Is Uncertain 2 8 When Using Infrared Communicati...

Page 4: ...ifying Battery Packs 2 20 Inserting or Removing a Primary Battery Pack 2 21 Charging Battery Packs 2 23 Charging a New Battery Pack 2 24 Charging an In Use Battery Pack 2 24 Monitoring the Charge of a Battery Pack 2 25 Obtaining Accurate Charge Information 2 25 Displaying Charge Information on the Screen 2 25 Managing Low Battery Conditions 2 27 Identifying Low Battery Conditions 2 27 Resolving Lo...

Page 5: ...Brightness fn f10 3 10 Displaying System Information fn esc 3 10 Using Hotkeys with External Keyboards 3 10 Quick Launch Buttons Select Models Only 3 11 Keypads 3 12 Using the Embedded Numeric Keypad 3 13 Using an External Keypad 3 14 4 Multimedia Audio Features 4 1 Using the Audio In Microphone Jack 4 4 Using the Audio Out Headphone Jack 4 4 Adjusting the Volume 4 5 Video Features Select Models O...

Page 6: ...s 4 21 Setting Advanced Preferences 4 22 Info Center Select Models Only 4 24 5 Hardware Components Drives 5 1 Caring for Drives 5 1 Adding a Drive to the System 5 3 Identifying the IDE Drive Light 5 4 Replacing the Hard Drive 5 5 Inserting and Removing Optical Discs Select Models Only 5 9 Displaying Optical Disc Contents Select Models Only 5 13 Avoiding Standby or Hibernation 5 13 Using PC Cards 5...

Page 7: ...d Transmission 5 40 Using Standby with Infrared 5 41 Connecting a USB Device 5 41 Using a USB Device 5 43 Enabling USB Legacy Support 5 43 Connecting Optional External Devices 5 44 Connecting an Optional External MultiBay and External MultiBay II 5 45 Mobile Printing for Notebooks 5 45 6 Wireless Wireless Local Area Network Select Models Only 6 4 Connecting Your Wireless Notebook to a Corporate WL...

Page 8: ...ws Password Guidelines 7 6 HP Administrator Passwords 7 7 Setting HP Administrator Passwords 7 8 Entering HP Administrator Passwords 7 8 Power On Passwords 7 9 Setting Power On Passwords 7 9 Entering Power On Passwords 7 10 Requiring a Power On Password at Restart 7 11 DriveLock 7 12 Setting DriveLock Passwords 7 13 Entering DriveLock Passwords 7 14 Requiring a Drivelock Password at Restart 7 14 C...

Page 9: ...5 MultiBoot Preferences 8 6 Setting a New Default Boot Order 8 6 Setting a MultiBoot Express Prompt 8 7 Entering MultiBoot Express Preferences 8 8 9 Computer Setup Using Computer Setup 9 1 Computer Setup Access 9 2 Computer Setup Defaults 9 3 File Menu 9 4 Security Menu 9 5 Tools Menu 9 6 Advanced Menu 9 6 10Client Management Solutions Configuration and Deployment 10 2 Client Manager Software 10 3...

Page 10: ...tiris Local Recovery 11 8 Using System Restore Points 11 9 Reinstalling Applications 11 11 Repairing the Operating System 11 13 Reinstalling the Operating System 11 14 Reinstalling Device Drivers and Other Software 11 15 12Specifications Operating Environment 12 1 Rated Input Power 12 2 Index ...

Page 11: ...re features of the notebook Components included with your notebook may vary by geographical region and by model The illustrations in this chapter identify the standard external features included in most notebook models Refer to the illustrations that most closely match your notebook ...

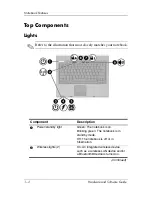
Page 12: ...ly matches your notebook Component Description 1 Power standby light Green The notebook is on Blinking green The notebook is in standby mode Off The notebook is off or in hibernation 2 Wireless lights 2 On An integrated wireless device such as a wireless LAN device and or a Bluetooth device is turned on Continued ...

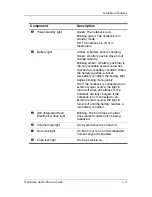
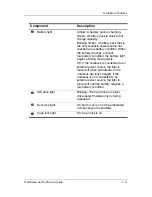
Page 13: ...y condition the battery light begins blinking more quickly Off If the notebook is connected to an external power source the light is turned off when all batteries in the notebook are fully charged If the notebook is not connected to an external power source the light is turned off until the battery reaches a low battery condition 5 IDE Integrated Drive Electronics drive light Blinking The hard dri...

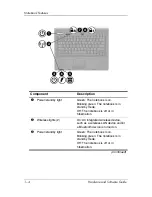
Page 14: ... notebook is in standby mode Off The notebook is off or in hibernation 2 Wireless lights 2 On An integrated wireless device such as a wireless LAN device and or a Bluetooth device is turned on 3 Power standby light Green The notebook is on Blinking green The notebook is in standby mode Off The notebook is off or in hibernation Continued ...

Page 15: ...t begins blinking more quickly Off If the notebook is connected to an external power source the light is turned off when all batteries in the notebook are fully charged If the notebook is not connected to an external power source the light is turned off until the battery reaches a low battery condition 5 IDE drive light Blinking The hard drive or optical drive select models only is being accessed ...

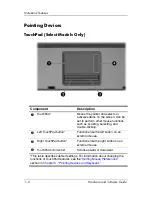
Page 16: ...uch as scrolling selecting and double clicking 2 Left TouchPad button Functions like the left button on an external mouse 3 Right TouchPad button Functions like the right button on an external mouse 4 TouchPad scroll zone Scrolls upward or downward This table describes default settings For information about changing the functions of TouchPad features see the Setting Mouse Preferences section in Ch...

Page 17: ...dels Only Component Description 1 Pointing stick Moves the pointer and selects or activates items on the screen 2 Left pointing stick button Functions like the left button on an external mouse 3 Right pointing stick button Functions like the right button on an external mouse ...

Page 18: ...dby button When the notebook is Off press the button to turn on the notebook In standby briefly press the button to exit standby In hibernation briefly press the button to exit hibernation If the notebook has stopped responding and Microsoft Windows shutdown procedures cannot be used press the power standby button and hold for 5 seconds to turn off the notebook Continued ...

Page 19: ...s connection a wireless network must already be set up For more information about establishing a wireless connection from Windows visit http www hp com go wireless 5 Presentation mode button Turns on Presentation mode 6 Volume mute button Mutes system sound 7 Volume down button Decreases system volume 8 Volume up button Increases system volume This table describes default settings For information ...

Page 20: ...he button to turn on the notebook In standby briefly press the button to exit standby In hibernation briefly press the button to exit hibernation If the notebook has stopped responding and Microsoft Windows shutdown procedures cannot be used press the power standby button and hold for 5 seconds to turn off the notebook Continued ...

Page 21: ...ction To establish a wireless connection a wireless network must already be set up For more information about establishing a wireless connection from Windows visit http www hp com go wireless This table describes default settings For information about changing the functions of power features see the Power Options section in Chapter 2 Power For information about changing the functions of wireless f...

Page 22: ... used system functions when pressed in combination with the fn key 2 fn key Executes frequently used system functions when pressed in combination with a function key or the esc key 3 Windows logo key Displays the Microsoft Windows Start menu 4 Windows applications key Displays a shortcut menu for items beneath the pointer 5 Keypad keys Can be used like the keys on an external numeric keypad ...

Page 23: ...tebook and an optional IrDA compliant device 2 Speakers 2 Produce notebook sound 3 6 in 1 Digital Media Slot select models only Supports 6 optional digital memory card formats SD Secure Digital Memory Card MultiMediaCard Memory Stick Memory Stick Pro SmartMedia and xD Picture Card 4 6 in 1 Digital Media Slot light select models only On Slot is accessing a digital memory card 5 Display release latc...

Page 24: ...1 14 Hardware and Software Guide Notebook Features Component Description 1 Speaker Produce notebook sound 2 Display release latch Opens the notebook ...

Page 25: ...human contact during normal operation is minimized To avoid the possibility of exceeding the FCC radio frequency exposure limits human proximity to the antennae should not be less than 20 cm 8 inches during normal operation including when the notebook display is closed On select notebook models there are 2 wireless antennae that send and receive wireless device signals They are not visible from th...

Page 26: ...le to the notebook Ä Security solutions are designed to act as deterrents These deterrents may not prevent a product from being mishandled or stolen 2 Power connector Connects an AC adapter or an optional automobile or aircraft adapter 3 Parallel port Connects an optional printer 4 S Video out jack Connects an optional S Video device such as a television VCR camcorder overhead projector or video c...

Page 27: ...ty cable slot Attaches an optional security cable to the notebook Ä Security solutions are designed to act as deterrents These deterrents may not prevent a product from being mishandled or stolen 2 Power connector Connects an AC adapter or an optional automobile or aircraft adapter ...

Page 28: ...evision audio 2 Audio in microphone jack Connects an optional stereo or monaural microphone 3 USB ports 2 Connect USB 1 1 and 2 0 compliant devices to the notebook using a standard USB cable or connect an optional External MultiBay II to the notebook The MultiBay II must also be connected to an external power source 4 Optical drive select models only Holds an optical disc 5 Optical drive button se...

Page 29: ...ces system sound when connected to optional powered stereo speakers headphones headset or television audio 2 Audio in microphone jack Connects an optional stereo or monaural microphone 3 Optical drive select models only Holds an optical disc 4 Optical drive button select models only Ejects an optical disc ...

Page 30: ... ports 2 Connect USB 1 1 and 2 0 compliant devices to the notebook using a standard USB cable or connect an optional External MultiBay II to the notebook The MultiBay II must be connected to an external power source 2 External monitor port Connects an external monitor 3 RJ 11 modem jack Connects a modem cable 4 RJ 45 network jack Connects a network cable Continued ...

Page 31: ...94 device such as a camcorder 6 PC Card slots 2 Support optional Type I Type II or Type III 32 bit CardBus or 16 bit PC Cards Some models may be shipped with a smart card reader in the bottom card slot 7 PC Card slot eject buttons 2 Eject PC Cards from the PC Card slots Component Description ...

Page 32: ...e MultiBay II must be connected to an external power source 2 External monitor port Connects an external monitor 3 RJ 11 modem jack Connects a modem cable 4 RJ 45 network jack Connects a network cable 5 1394 port Connects an optional IEEE 1394 device such as a camcorder 6 PC Card slot 1 Supports optional Type I Type II or Type III 32 bit CardBus or 16 bit PC Cards 7 PC Card slot eject button 1 Eje...

Page 33: ...rimary battery bay Holds the primary battery pack 2 Primary battery release latches 2 Releases the primary battery pack from the battery bay The primary battery locking latches must be in the unlocked position 3 Travel battery connector Connect an optional travel battery 4 Expansion memory module compartment Contains the expansion memory module slot Continued ...

Page 34: ...Vents 4 Enable airflow to cool internal components Ä To prevent overheating do not obstruct vents Using the notebook on a soft surface such as a pillow blanket rug or thick clothing may block airflow 7 Docking connector Connect the notebook to an optional docking device Component Description ...

Page 35: ...ry locking latches must be in the unlocked position 3 Travel battery connector Connects an optional travel battery 4 Expansion memory module compartment Contains the expansion memory module slot 5 Hard drive bay Holds the hard drive 6 Vents 4 Enable airflow to cool internal components Ä To prevent overheating do not obstruct vents Using the notebook on a soft surface such as a pillow blanket rug o...

Page 36: ...AC adapter Converts AC power to DC power 3 Primary battery pack Powers the notebook when the notebook is not connected to external power 4 Modem cable select models only Connects an internal modem to an RJ 11 telephone jack or to a country specific modem adapter Modem cables and power cords vary in appearance by region and country Battery packs vary by model ...

Page 37: ...bel Provides regulatory information about the notebook The Regulatory label is affixed to the bottom of the notebook Modem Approval label Provides regulatory information about the modem and lists the agency approval markings required by some of the countries in which the modem has been approved for use You may need this information when traveling internationally The Modem Approval label is affixed...

Page 38: ...de 2 1 2 Power Power Control and Light Locations The following illustration and table identify and describe the power control and light locations Your notebook may look slightly different from the illustrations in this section ...

Page 39: ...2 Power standby button When the notebook is Off press the button to turn on the notebook In standby briefly press the button to to exit standby In hibernation briefly press the button to exit hibernation If the notebook has stopped responding and Microsoft Windows shutdown procedures cannot be used press the power standby button and hold for at least 5 seconds to turn off the notebook Continued ...

Page 40: ...reached a low battery condition When the battery reaches a critical low battery condition the battery light begins blinking more quickly Off If the notebook is connected to an external power source the light is turned off when all batteries in the notebook are fully charged If the notebook is not connected to an external power source the light is turned off until the battery reaches a low battery ...

Page 41: ...e notebook External power supplied through one of the following devices AC adapter Optional docking device select models only Optional power adapter Charge or calibrate a battery pack in the notebook External power supplied through AC adapter Optional docking device select models only Optional power adapter Install or modify system software or write to a CD External power supplied through AC adapt...

Page 42: ...void a complete battery discharge do not leave your notebook in standby for extended periods Connect the notebook to an external power source Standby reduces power to system components that are not in use When standby is initiated your work is saved in random access memory RAM and the screen is cleared When you resume from standby your work returns to the screen where you left off Saving your work...

Page 43: ...password has been set the password must be entered to restore from hibernation You can disable hibernation However if hibernation is disabled and the system reaches a low battery condition the system will not automatically save your work while power is on or when standby has been initiated In the Power Options window hibernation is not displayed as an option if it has been disabled You must enable...

Page 44: ... notebook is in standby it uses less power than when it was on Your work returns instantly to the screen when you resume from standby Initiating hibernation clears the screen and saves your work to the hard drive When the notebook is in hibernation it uses much less power than when it was in standby Shutting down the notebook and removing the battery pack is recommended to extend the life of the b...

Page 45: ... Media ÄCAUTION Do not initiate standby or hibernation while using drive media Doing so may result in possible video and audio degradation and loss of audio or video playback functionality Standby and hibernation interfere with the use of infrared and Bluetooth communication and drive media Note the following guidelines If the notebook is in standby or hibernation you cannot initiate an infrared o...

Page 46: ...ation and shutdown procedures For information about changing the function of some of the power features on your notebook see the Power Options section later in this chapter The controls and lights discussed in this section are illustrated in the Power Control and Light Locations section earlier in this chapter ...

Page 47: ... operating system In Windows XP Home select Start Turn Off Computer Turn Off In Windows XP Professional select Start Turn Off Computer Turn Off The power standby lights are turned off The operating system shuts down The notebook is turned off Turn off the display while the power is on Close the notebook Closing the notebook activates the display switch which initiates standby If the system is unre...

Page 48: ... action required If the notebook is running on battery power the system initiates standby after 10 minutes of notebook inactivity Default setting If the notebook is attached to external power the system does not initiate standby Power settings and timeouts can be changed in the Power Options window The power standby lights blink The screen clears Resume from user initiated or system initiated stan...

Page 49: ... If hibernation is enabled the Enable Hibernation check box is selected Task Procedure Result Initiate hibernation In Windows XP Home select Start Turn Off Computer Then hold down shift as you select Hibernate In Windows XP Professional select Start Turn Off Computer Then hold down the shift key as you select Hibernate If hibernate is not displayed press the up or down arrow select Hibernate from ...

Page 50: ...power standby lights are turned off The screen clears Restore from user initiated or system initiated hibernation Press the power standby button The power standby lights are turned on Your work returns to the screen Depending on your network connections the Turn Off Computer button may be called the Shut Down button If the system initiated hibernation because of a critical low battery condition co...

Page 51: ...re information about removing and storing the battery pack refer to the Storing a Battery Pack section in this chapter Power Options You can change many default power settings in Windows Control Panel For example you can set an audio alert to warn you when the battery pack reaches a low power condition or you can change the default settings for the power standby button By default when the notebook...

Page 52: ...ion area at the far right of the taskbar The icon changes shape to indicate whether the notebook is running on a battery pack or external power To hide or show the Power Meter icon in the notification area 1 Right click the Power Meter icon in the notification area and then click Adjust Power Properties 2 Click the Advanced tab 3 Select or clear the Always show icon on the taskbar check box 4 Sele...

Page 53: ...n the notification area and then click Adjust Power Properties 2 Click the Power Schemes tab 3 Select the power scheme you wish to modify and adjust options in the lists on the screen 4 Click Apply Using a Security Password You can add a security feature that prompts you for a password when the notebook is turned on resumes from standby or restores from hibernation To set a password prompt 1 Right...

Page 54: ... power source changes from external power to battery pack power or when the notebook use changes between active and idle Processor performance controls are managed in the Power Options Properties dialog box To access Windows XP processor performance controls Select Start Control Panel Performance and Maintenance Power Options Power Schemes tab The power scheme you select determines how the process...

Page 55: ...ased on CPU demand Portable Laptop Performance state is determined based on CPU demand Performance state is determined based on CPU demand Presentation Performance state is determined based on CPU demand CPU performance is lower on battery power then steadily decreases as the battery discharges Always On Always runs at the highest performance state Always runs at the highest performance state Mini...

Page 56: ... is running on external AC power supplied through the AC adapter the notebook switches to battery power if the AC adapter is disconnected from the notebook You can leave a battery pack in the notebook or in storage depending on how you work Keeping a battery pack in the notebook enables the battery pack to charge whenever the notebook is connected to external AC power and also protects your work i...

Page 57: ...ed from external power for more than 2 weeks remove the battery pack and store it as described in the Storing a Battery Pack section in this chapter to prolong the battery pack life For more information about leaving your work refer to the Initiating Standby Hibernation or Shutdown section in this chapter ÅWARNING To reduce potential safety issues only the battery pack provided with the computer a...

Page 58: ...ng a battery pack that is the sole power source initiate hibernation or turn off the notebook before removing the battery pack To insert a primary battery pack 1 Turn the notebook upside down 2 Slide the battery pack 1 into the battery bay until it is seated The battery locking latch 2 automatically locks the battery into place ...

Page 59: ...move a primary battery pack 1 Turn the notebook upside down with the battery bay facing you 2 Slide the battery locking latch 1 to the right 3 Slide and hold the battery release latch 2 to the right 4 Slide the battery pack 3 out of the notebook ...

Page 60: ...hen the battery pack is almost fully charged the battery light is green The light is turned off when all battery packs are fully charged The primary battery pack charges when it is inserted into the notebook and the notebook is connected to external power External power can be supplied through the following AC adapter Optional docking device select models only Optional power adapter ÅWARNING To re...

Page 61: ...battery pack that has been partially charged can run the notebook but the battery charge indicators may be inaccurate Charging an In Use Battery Pack To prolong battery life and increase the accuracy of battery charge indicators Allow a battery pack to discharge to 10 percent of a full charge through normal use before charging it When you charge a battery pack charge it fully ...

Page 62: ...ge it fully If a battery pack has been unused for 1 month or more calibrate the battery pack instead of simply charging it For calibration instructions refer to the Calibrating a Battery Pack section in this chapter Displaying Charge Information on the Screen This section explains how to access and interpret battery charge displays Viewing Charge Displays To view information about the status of an...

Page 63: ...battery pack if the battery pack continues to provide power at the current level For example the time remaining will decrease when you start playing a DVD and will increase when you stop playing a DVD Most charge displays identify battery packs by location Location 1 is the battery pack in the primary battery bay Location 2 is the optional travel battery pack In some instances a lightning bolt ico...

Page 64: ...book reaches a low battery condition the battery light blinks in an amber color Critical Low Battery Condition If a low battery condition is not resolved the notebook enters a critical low battery condition and the amber colored battery light blinks more rapidly In a critical low battery condition If hibernation is enabled and the notebook is on or in standby the notebook initiates hibernation If ...

Page 65: ... a Charged Battery Pack Is Available To resolve a low battery condition when a charged battery pack is available 1 Turn off the notebook or initiate hibernation 2 Insert a charged battery pack 3 Turn on the notebook When No Power Source Is Available To resolve a low battery condition when no power source is available Initiate hibernation or Save your work and shut down the notebook When the Notebo...

Page 66: ...used for one month or more How to Calibrate To calibrate a battery pack you must fully charge fully discharge and then fully recharge the battery pack Charging the Battery Pack A battery pack can charge whether the notebook is off or in use but it will charge faster when the notebook is off To charge the battery pack 1 Insert the battery pack into the notebook 2 Connect the notebook to an AC outle...

Page 67: ...can discharge whether or not you are using the notebook but will discharge faster while the notebook is in use If you plan to leave the notebook unattended during the discharge save your work before beginning the discharge procedure If you use the notebook occasionally during the discharge procedure and have set energy saving timeouts expect the following performance from your system during the di...

Page 68: ... a note of the 4 settings in the Running on batteries column so that you can reset them after the calibration 3 Set the 4 options to Never 4 Select OK 5 Disconnect the notebook from the external power source but do not turn off the notebook 6 Run the notebook on battery power until the battery pack is fully discharged The battery light begins to blink in an amber color when the battery pack has di...

Page 69: ...d the battery light is turned off 3 Access the Power Schemes tab by selecting Start Control Panel Performance and Maintenance Power Options Power Schemes tab 4 Refer to the settings you made a note of earlier Reenter the settings that you recorded for the items in the Plugged In column and the Running on Batteries column 5 Select OK ÄCAUTION After calibrating the battery pack reenable hibernation ...

Page 70: ...ot connected to an external power source Stop or remove an optional PC Card you are not using For more information refer to Chapter 5 Hardware Components Remove a CD or DVD that you are not using Use the fn f9 and fn f10 hotkeys to adjust screen brightness as you need it Use optional powered speakers instead of the internal speakers or adjust system volume as you need it Turn off a device connecte...

Page 71: ...t for the screen saver and select a screen saver with minimal graphics and motion To access screen saver settings Select Start Control Panel Appearance and Themes Choose a screen saver Select a Power Scheme with low power use settings through the operating system Refer to the Setting or Changing a Power Scheme section in this chapter ...

Page 72: ...l dry place Use the following table to estimate how long you can safely store a battery pack The storage times provided are based on a battery pack that contains 50 percent of a full charge A fully charged battery pack can be safely stored for longer times a battery pack containing a lower charge can be safely stored for less time Calibrate a battery pack before using it if it has been stored for ...

Page 73: ...re or water Do not expose a battery pack to high temperatures above 60 C 140 F N When a battery pack has reached the end of its useful life do not dispose of the battery pack in general household waste Follow the local laws and regulations in your area for computer battery pack disposal In Europe dispose of or recycle the battery packs by using the public collection system or by returning them to ...

Page 74: ...ect Models Only The following illustration and table identify and describe the notebook TouchPad Component Description 1 TouchPad Moves the pointer and selects or activates items on the screen Can be set to perform other mouse functions such as scrolling selecting and double clicking Continued ...

Page 75: ... scroll up and down using the TouchPad vertical scroll area slide your finger up or down over the raised area 2 Left TouchPad button Functions like the left button on an external mouse 3 Right TouchPad button Functions like the right button on an external mouse 4 TouchPad scroll zone Scrolls upward or downward This table describes default settings For information about changing the functions of To...

Page 76: ...ect Models Only Component Description 1 Pointing stick Moves the pointer and selects or activates items on the screen 2 Left pointing stick button Functions like the left button on an external mouse 3 Right pointing stick button Functions like the right button on an external mouse ...

Page 77: ... direction you want to move the pointer Use the left and right pointing stick buttons as you would the left and right buttons on an external mouse To change the pointing stick cap 1 Turn off the notebook 2 Gently pull off the used pointing stick cap 3 Press the replacement cap into place Replacement caps are not included with the notebook ...

Page 78: ...perties in Windows enables you to customize settings for pointing devices including TouchPad tapping which enables you to tap the TouchPad once to select an object or twice to double click an object enabled by default Edge motion which enables you to continue to scroll even though your finger has reached the edge of the TouchPad disabled by default Enabling or disabling a pointing devices enabled ...

Page 79: ... and procedures are discussed in the following sections Your notebook may look slightly different from the illustration in this section Component Description 1 fn key Executes frequently used system functions when pressed in combination with a function key or the esc key 2 esc key Executes frequently used system functions when pressed in combination with the fn key 3 Function keys Execute frequent...

Page 80: ...vate Function KeyCombination to Deactivate Function Initiate standby fn f3 Power standby button Switch between notebook display and external display fn f4 fn f4 View battery information fn f8 fn f8 Decrease screen brightness fn f9 Not applicable Increase screen brightness fn f10 Not applicable Display system information fn esc fn esc ...

Page 81: ...conserved While the notebook is in standby the power standby lights blink To exit standby Press the power standby button The fn f3 hotkey is set at the factory to initiate standby The function of the fn f3 hotkey called the sleep button in Windows can be changed For example the fn f3 hotkey can be set to initiate hibernation instead of standby For more information about standby hibernation and cha...

Page 82: ...r devices receiving video information from the notebook The following 4 video transmission types with examples of devices that use them are supported by the fn f4 hotkey LCD notebook display External VGA most external monitors S Video televisions camcorders VCRs and video capture boards with S Video in jacks on select models Composite video televisions camcorders VCRs and video capture boards with...

Page 83: ...system hardware components and software version numbers Press fn esc a second time to remove the system information from the screen The system BIOS date is the version number of the system ROM The BIOS date may display in a decimal format such as 10 19 2004 F 07 Using Hotkeys with External Keyboards The following table describes how certain hotkeys are used on external keyboards Notebook Keys Exte...

Page 84: ... you to open various software solutions Refer to Info Center Select Models Only in Chapter 4 Multimedia for more information 2 Presentation mode button Starts Presentation mode Opens an application folder file or Web site and simultaneously displays information on both the notebook screen and an external device that is connected to one of the following The external monitor port The S Video out jac...

Page 85: ...dded numeric keypad and also supports an optional external keypad or an optional external keyboard that includes a numeric keypad Your notebook may look slightly different from the illustration in this section Component Description 1 num lock light 2 num lk key 3 Embedded numeric keypad 4 fn key ...

Page 86: ...oard functions The embedded numeric keypad does not work while an external keyboard or keypad is connected to the notebook or to an optional docking device select models only Switching Key Functions on the Embedded Numeric Keypad You can temporarily alternate the functions of keys on the embedded numeric keypad between their standard keyboard functions and their keypad functions by using the fn ke...

Page 87: ...keypad keys function like the arrow page up or page down keys When num lock on an external keypad is turned on the num lock light on the notebook is turned on When num lock on an external keypad is turned off the num lock light on the notebook is turned off If the external keypad is connected the embedded numeric keypad cannot be turned on Enabling or Disabling Num Lock Mode As You Work To turn nu...

Page 88: ... describe the audio features of the notebook Components included with your notebook may vary by geographical region and by model The illustrations in this chapter identify the standard features included in most notebook models Refer to the illustration that most closely matches your notebook ...

Page 89: ...urned off 3 Volume down button Decreases notebook sound 4 Volume up button Increases notebook sound 5 Audio in microphone jack Connects an optional stereo or monaural microphone 6 Audio out headphone jack Produces notebook sound when connected to optional powered stereo speakers headphones headset or television audio 7 Speakers 2 Produce notebook sound ...

Page 90: ...iption 1 Speaker Produces notebook sound 2 Audio out headphone jack Produces notebook sound when connected to optional powered stereo speakers headphones headset or television audio 3 Audio in microphone jack Connects an optional stereo or monaural microphone ...

Page 91: ... a microphone to the microphone jack use a microphone with a 3 5 mm plug Using the Audio Out Headphone Jack ÅWARNING To reduce the risk of personal injury adjust the volume before putting on headphones or a headset The headphone jack is also used to connect the audio function of an audio video device such as a television or VCR When connecting a device to the headphone jack Use only a 3 5 mm stere...

Page 92: ...decrease the volume by moving the slider up or down You can also click the check box next to Mute to mute the volume or 1 Double click the Volume icon 2 In the Volume Control column increase or decrease the volume by moving the Volume slider up or down You can also adjust the balance or mute the volume Volume can also be adjusted within some applications If the Volume icon is not in the notificati...

Page 93: ... while simultaneously supporting an image on the notebook display and on any other supported external display The S Video connection usually provides a higher quality image than a composite video connection To transmit video signals through the S Video out jack you need an S Video cable available from most electronics retailers If you are combining audio and video functions such as playing a movie...

Page 94: ...le into the S Video out jack on the notebook 2 Connect the other end of the cable to the video device as instructed in the documentation included with the device If the S Video out jack on the notebook is not accessible because the notebook is docked into an optional docking device you can connect the device to the S Video out jack on the docking device ...

Page 95: ...the notebook insert the monitor cable into the external monitor port on the left side of the notebook Your notebook may look slightly different from the illustration in this section If a properly connected external monitor or projector does not display an image try pressing the fn f4 hotkey to switch the image to the monitor ...

Page 96: ...Recovery disc contact Customer Care for a copy of the restore solution for your notebook Download the software from the HP Web site http www hp com InterVideo WinDVD Creator Plus Provides the ability to create edit and burn movies to a DVD or video CD This software is located on the InterVideo WinDVD Creator CD included with select notebooks Sonic RecordNow Enables you to create copies of data and...

Page 97: ... or MultiBay II If Autorun is enabled an installation wizard is displayed If Autorun is disabled select Start Run Then enter x setup exe where x is your CD drive designation 2 Select OK 3 When the installation wizard is displayed follow the installation instructions on the screen 4 Restart the notebook if prompted Repeat the installation procedure for all software you want to install WinDVD Creato...

Page 98: ...http www microsoft com Using Windows Media Player Windows Media Player is included with the Windows operating system It can be used to play CDs and DVDs and create audio and data CDs To play a CD or DVD 1 Insert the CD or DVD into the optical drive select models only or into an optional external MultiBay or MultiBay II 2 Wait several seconds and then If AutoPlay is enabled Windows Media Player ope...

Page 99: ... bar Using WinDVD Creator Plus Select Models Only WinDVD Creator Plus can be used to create edit and burn movies to a DVD or video CD This software must be installed from the InterVideo WinDVD Creator CD provided with select notebooks WinDVD Creator Plus must be installed using a DVD CD RW Combo Drive or a DVD RW and CD RW Combo Drive only If you do not use one of these drives WinDVD Creator Plus ...

Page 100: ...g DVD Region Settings Select Models Only Most DVDs that contain copyrighted files also contain region codes The region codes help protect copyrights internationally You can play a DVD containing a region code only if the region code on the DVD matches the region setting on your DVD drive If the region code on a DVD does not match the region setting on your drive a Playback Of Content From This Reg...

Page 101: ...layed in the Changes remaining field on the DVD Region tab The number in the field includes the fifth and permanent change To change settings through the operating system 1 Select Start My Computer 2 Right click in the window and select Properties Hardware tab Device Manager 3 Click DVD CD ROM drives right click the DVD drive for which you want to change region settings and then click Properties 4...

Page 102: ...con in the notification area at the far right of the taskbar Select Start All Programs InterVideo WinDVD InterVideo WinDVD 2 Right click the WinDVD player window 3 Click Setup 4 Click the region on the Region tab 5 Click Apply and then OK Using Other DVD Software To change region settings on a drive using a DVD player other then WinDVD refer to the documentation provided with the player ...

Page 103: ...ns Presentation mode on and off Turning Presentation mode on opens an application folder file or Web site that you specify The image simultaneously displays on the notebook screen and on an external device connected to The external monitor port or S Video out jack on the rear panel Ports and jacks on an optional docking device ...

Page 104: ...n mode button If you do not select this option each time you press the Presentation mode button the Presentation Settings dialog box displays and you have to click Continue to open the program application folder file or Web site you have selected to start when the button is pressed Automatically switch to an external display You can modify the Presentation mode settings using the Quick Launch Butt...

Page 105: ...ons provide instructions for setting preferences within the control panel For additional onscreen information about any item on the control panel select the help button in the upper right corner of the window The help button is identified with a question mark icon Accessing the Quick Launch Buttons Control Panel You can access the Quick Launch Buttons control panel from the Start button or from an...

Page 106: ...t Control Panel Printers and Other Hardware Quick Launch Buttons or Double click the Quick Launch Buttons icon in the notification area at the far right of the taskbar or on the Windows desktop 2 Click the Presentation tab 3 In the box under Program to Start add the application folder file or Web site you want to start when the Presentation mode button is pressed or click Browse to view available ...

Page 107: ... Buttons icon in the notification area at the far right of the taskbar or on the Windows desktop 2 Click the Presentation tab 3 Select an option from the list or click Power Options to open the Power Options control panel to view or change the current power scheme 4 To save your preferences click OK Showing the Welcome Screen You can choose to show the Presentation Properties dialog box each time ...

Page 108: ...resentation mode button The power scheme changes to Presentation You can alternate between displays by pressing the Presentation mode button If you do this the power scheme reverts to the original settings Setting Tiling Preferences To set tiling preferences on the Windows desktop 1 Open the Quick Launch Buttons control panel Select Start Control Panel Printers and Other Hardware Quick Launch Butt...

Page 109: ...rol panel Select Start Control Panel Printers and Other Hardware Quick Launch Buttons or Double click the Quick Launch Buttons icon in the notification area at the far right of the taskbar or on the Windows desktop 2 Click the Advanced tab On the Advanced tab you can Display or hide the Quick Launch Buttons icon in the notification area or on the Windows desktop To display the icon Select the Show...

Page 110: ...ns or Double click the Quick Launch Buttons icon in the notification area at the far right of the taskbar or on the Windows desktop 2 Click the Advanced tab Then To display and enable the Settings tab select the Allow users to modify button assignments on external keyboard check box To disable and hide the Settings tab clear the Allow users to modify button assignments on external keyboard check b...

Page 111: ...cal Recovery Contact HP Help and Support Options Demo ProtectTools Security Manager Software Setup System Information Wireless Assistant To access Info Center 1 Press the Info Center button or Select Start Info Center 2 In the Info Center window click the software application you want to open For more information refer to the Info Center online help ...

Page 112: ...cribe the hard drive and explain how to use hard drives and optical disc drives select models only Caring for Drives Drives are fragile notebook components that must be handled with care The following cautions apply to all drives Additional cautions are included with the procedures to which they apply ...

Page 113: ...not use excessive force when inserting a drive into a drive bay Do not type on the keyboard or move the computer while the drive is writing to a medium The write process is sensitive to vibration When the battery pack is the only source of power ensure that the battery pack is sufficiently charged before writing to a medium Avoid exposing a drive to temperature or humidity extremes Avoid exposing ...

Page 114: ...SB drive can be added by connecting the drive to a USB port on the notebook or optional docking device select models only For information about connecting a USB drive refer to the Connecting a USB Device section in this chapter The notebook has 2 drive bays The hard drive bay supports only a hard drive The optical drive select models only supports the following optical devices CD ROM drive DVD ROM...

Page 115: ...dware Components Identifying the IDE Drive Light The IDE drive light blinks when either the hard drive or optical drive select models only is being accessed Your notebook may look slightly different from the illustration in this section ...

Page 116: ...ation If you are not sure whether the notebook is off or in hibernation turn the notebook on by pressing the power standby button Then shut down the notebook through the operating system Remove the hard drive only after the notebook is properly shut down To remove the hard drive 1 Save your work 2 Shut down the notebook and close the display 3 Turn the notebook upside down with the battery facing ...

Page 117: ...5 6 Hardware and Software Guide Hardware Components 6 Loosen the hard drive screw 1 7 Pull the hard drive tab 2 to the right to disconnect the hard drive 8 Lift the hard drive 3 from the notebook ...

Page 118: ...re and Software Guide 5 7 To install a hard drive 1 Insert the hard drive into the hard drive bay on the bottom of the notebook 1 2 Pull the hard drive tab 2 to the left to connect the hard drive 3 Tighten the hard drive screw 3 ...

Page 119: ...5 8 Hardware and Software Guide Hardware Components 4 Align the tab 1 on the hard drive cover on the notebook 5 Close the cover 2 6 Tighten the hard drive cover screws 3 ...

Page 120: ...the media tray 3 Pull the tray out 2 until it is fully extended Position a CD or one sided DVD over the tray with the label side up 4 Gently press the disc 3 onto the tray spindle until the disc snaps into place Handle the disc by the edges not the flat surfaces If the media tray is not fully extended tilt the disc to position it over the tray spindle and then press it into position 5 Close the me...

Page 121: ... to release the media tray and then pull the tray 2 out until it is fully extended 3 Remove the disc 3 from the tray by gently pressing down on the spindle while lifting the outer edges of the disc Handle the disc by the edges not the flat surfaces If the media tray is not fully extended tilt the disc as you remove it 4 Close the media tray and place the disc in a protective case ...

Page 122: ...wer The following illustrations identify the standard external features included in most notebook models Refer to the illustration that most closely matches your notebook model If power is unavailable 1 Insert the end of a paper clip into the release access in the front bezel of the drive ...

Page 123: ... out the tray until it is fully extended 3 Remove the disc from the tray by gently pressing down on the spindle while lifting the outer edges of the disc Handle the disc by the edges not the flat surfaces If the media tray is not fully extended tilt the disc as you remove it Place the disc in a protective case 4 Close the media tray ...

Page 124: ...ssible video degradation and loss of audio or video playback functionality do not initiate standby or hibernation while playing any type of media If standby or hibernation is accidentally initiated while a drive medium such as a CD CD RW DVD or digital media is in use the following results may occur Your playback may be interrupted You may see the following warning Putting the computer into hibern...

Page 125: ... accessory designed to conform to the standard specifications of the Personal Computer Memory Card International Association PCMCIA The notebook supports 32 bit CardBus and 16 bit PC Cards The notebook is equipped with 1 or 2 PC Card slots If your notebook model has 1 PC Card slot it supports 1 Type I card 1 Type II card or 1 Type III card If your notebook model has 2 PC Card slots it supports 2 T...

Page 126: ...ssure when inserting a PC Card into a PC Card slot Do not move or transport the notebook while a PC Card is inserted 1 Hold the PC Card label side up with the connector facing the notebook 2 Gently slide the card into the slot until the card is seated The operating system will issue a sound to indicate that a device has been detected ...

Page 127: ...ght of the taskbar and then select the PC Card To display the Safely Remove Hardware icon select Show Hidden Icons in the notification area 2 Press the PC Card slot eject button 1 This action extends the button into position for releasing the PC Card 3 To release the PC Card press the extended PC Card slot eject button 4 Gently slide out the card 2 An inserted PC Card uses power even when not in u...

Page 128: ...ring it with other devices such as PDAs and cameras The optional 6 in 1 Digital Media Slot supports the following digital memory card formats Secure Digital SD Memory Card MultiMediaCard Memory Stick Memory Stick Pro SmartMedia Card xD Picture Card ÄCAUTION This notebook does not support adapters in the 6 in 1 Digital Media Slot Inserting any kind of adapter into your Digital Media Slot can damage...

Page 129: ...e connectors to the digital memory card connectors use minimal pressure when inserting a digital memory card into a Digital Media Slot To insert a digital memory card 1 Hold the digital memory card label side up with the connectors facing the notebook 2 Slide the memory card into the Digital Media Slot until the card is seated ...

Page 130: ...nt loss of work or system lockup stop the digital memory card before removing it To remove a digital memory card 1 Close all files and applications using the digital memory card To stop a data transfer select the cancel button in the operating system Copying window 2 Pull the digital memory card out of the slot ...

Page 131: ...rnal compartments on the notebook All other areas that require a tool to open should be opened only by a service partner ÅWARNING To reduce the risk of electric shock and damage to the equipment unplug the power cord and remove all battery packs before installing a memory module ÄCAUTION Electrostatic discharge ESD can damage electronic components Before beginning any procedure ensure that you are...

Page 132: ...re whether the notebook is off or in hibernation turn the notebook on by pressing the power standby button Then shut down the notebook through the operating system 2 Disconnect all external devices connected to the notebook 3 Disconnect the power cord 4 Turn the notebook upside down 5 Remove any battery packs from the notebook 6 Loosen the memory module cover screw 1 7 Lift the memory module cover...

Page 133: ...emory module slot remove it a Pull away the retention clips on each side of the memory module 1 The memory module tilts upward b Grasp the edges of the memory module and gently pull the module out of the memory slot 2 To protect a memory module after removal place it in an electrostatic safe container ...

Page 134: ... new memory module a Align the keyed notched edge 1 of the memory module with the tabbed area in the memory slot b With the memory module at a 45 degree angle from the surface of the memory module compartment press the module into the memory slot until it is seated 2 ...

Page 135: ...5 24 Hardware and Software Guide Hardware Components c Push the memory module downward until the retention clips snap into place ...

Page 136: ...nts Hardware and Software Guide 5 25 10 Replace the memory module cover 1 and tighten the memory module cover screw 2 11 Replace the battery pack 12 Reconnect external power and external devices 13 Restart the notebook ...

Page 137: ... down the notebook If you are not sure whether the notebook is off or in hibernation turn the notebook on by pressing the power standby button Then shut down the notebook through the operating system 2 Disconnect all external devices connected to the notebook 3 Disconnect the power cord 4 Remove any battery packs from the notebook 5 Turn the notebook upside down 6 Loosen the memory module cover sc...

Page 138: ...Hardware Components Hardware and Software Guide 5 27 8 Remove the 2 keyboard screws 9 Turn over the notebook and open it 10 Slide the 4 keyboard latches to release the keyboard ...

Page 139: ...5 28 Hardware and Software Guide Hardware Components 11 Gently lift the top edge of the keyboard and tilt the keyboard over until it rets on the palm rest of the notebook ...

Page 140: ... module slot a Pull the retention clips 1 away from each side of the memory module The memory module tilts upward when released b Lift the edge of the memory module 2 and gently remove it from the slot To protect a memory module after it has been removed place it in an electrostatic safe container ...

Page 141: ...e into the memory module slot a Align the keyed notched edge of the memory module 1 with the keyed area in the memory module slot b With the memory module at a 45 degree angle from the surface of the memory module compartment press the module into the memory slot until it is seated 2 ...

Page 142: ...Hardware Components Hardware and Software Guide 5 31 c Press the memory module downward until the retention clips snap into place ...

Page 143: ...5 32 Hardware and Software Guide Hardware Components 14 Replace the keyboard and slide the keyboard latches up to lock them 15 Replace the keyboard access screws located on the bottom of the notebook ...

Page 144: ...nents Hardware and Software Guide 5 33 16 Replace the memory module cover 1 and the memory module cover screw 2 17 Replace the battery pack 18 Reconnect the external power and external drives 19 Restart the notebook ...

Page 145: ...rger hibernation file To display the amount of RAM in the system Select Start Control Panel Performance and Maintenance System General tab or Press fn esc To display the amount of free space on your hard drive 1 Double click the My Computer icon on the Windows desktop 2 Double click your hard drive Information about the space on the drive is displayed in a status bar at the bottom of the window To...

Page 146: ...ntry specific modem adapter is required Jacks for digital PBX systems may resemble analog telephone jacks but are not compatible with the modem ÅWARNING Connecting the notebook s analog modem to a digital line can permanently damage the modem Immediately disconnect your modem cable if you accidentally connect it to a digital line Your notebook may look slightly different from the illustrations in ...

Page 147: ...lephone cable into the RJ 45 network jack To connect a modem cable 1 Plug the modem cable into the modem jack 1 on the notebook 2 Plug the modem cable into the RJ 11 telephone wall jack 2 For more information about using the modem or about using AT commands and dial modifiers refer to the modem guides located in the Help and Support Center at Start Help and Support User Guides ...

Page 148: ...h you purchased the notebook you must obtain a country specific modem adapter Refer to the modem guides located in the Help and Support Center at Start Help and Support User Guides for more details about using your notebook internationally To connect the modem to an analog telephone line that does not have an RJ 11 telephone jack 1 Plug the modem cable into the modem jack 1 on the notebook 2 Plug ...

Page 149: ...notebook may look slightly different from the illustration in this section A network cable has an 8 pin RJ 45 connector at each end To connect the network cable 1 Plug the network cable into the network jack 1 on the notebook 2 Plug the other end of the cable into a network wall jack 2 ...

Page 150: ...vice that is also IrDA compliant The infrared port supports both low speed connections of up to 115 kilobits per second Kbps and high speed connections of up to 4 Mbps Infrared performance may vary depending on the performance of infrared peripherals distance between infrared devices and applications used Infrared signals are sent through an invisible beam of infrared light and require an unobstru...

Page 151: ...nother at a distance no greater than 1 meter 3 3 feet Position the ports so that they face one another directly Because the maximum capture angle is 30 degrees the ports must be aligned no more than 15 degrees off center Shield the ports from direct sunlight flashing incandescent light and energy saving fluorescent light Be sure that no signals from remote control or other wireless devices such as...

Page 152: ...ay not continue at the point it was stopped For example if a program was printing when standby was initiated the program resumes transmission after the notebook resumes but the print job may not resume Connecting a USB Device Universal Serial Bus USB is a hardware interface that can be used to connect optional external devices such as a USB keyboard mouse drive printer scanner or hub to the notebo...

Page 153: ...tional docking device select models only or to other USB devices Hubs support varying numbers of USB devices and are used to increase the number of USB devices in the system Powered hubs must be connected to external power Unpowered hubs must be connected either to a USB port on the notebook or to a port on a powered hub ...

Page 154: ...acy support to Use a USB keyboard mouse or hub connected to a USB port on the notebook during startup or in a non Windows application or utility Boot from an optional external MultiBay To enable USB legacy support 3 Open Computer Setup by turning on or restarting the computer and then pressing f10 while the F10 ROM Based Setup message is displayed in the lower left corner of the screen To change t...

Page 155: ...y the device such as drivers refer to the documentation included with the device To connect a standard external device to the notebook 1 Save your work and turn off the notebook 2 If you are connecting a powered device turn off the device 3 Connect the device to the notebook 4 If you are connecting a powered device plug the device power cord into a grounded electrical outlet 5 Turn on the device 6...

Page 156: ...External MultiBay refer to the documentation that is included with the device Mobile Printing for Notebooks Mobile Printing for Notebooks enables you to print to any PostScript enabled HP network printer even if the notebook does not have the needed printer driver To print using Mobile Printing 1 Select File Print from any application 2 Select HP Mobile Printing from the list of printers 3 Select ...

Page 157: ...places such as airports restaurants coffee shops hotels and universities A Bluetooth wireless notebook can connect to other Bluetooth wireless enabled devices using a wireless personal area network PAN Your notebook has a button that can be used to enable and disable 802 11 and Bluetooth wireless devices and an associated light to indicate the state of the wireless devices Components included with...

Page 158: ...6 2 Hardware and Software Guide Wireless ...

Page 159: ...oftware utility that enables you to turn on and off 802 11 and Bluetooth wireless devices individually For more information on using Wireless Assistant refer to the Turning On Turning Off Enabling and Disabling the 802 11 and Bluetooth Wireless Devices section in this chapter Computer Setup controls Enable and disable 802 11 and Bluetooth wireless devices in Computer Setup For more information abo...

Page 160: ...typically uses wireless access points that can handle a large number of computers and accessories and can separate critical network functions A home or small office WLAN typically uses a wireless router which enables several wireless and wired computers to share an Internet connection a printer and files without additional pieces of hardware or software Wireless access point and wireless router ar...

Page 161: ...le with 802 11b and 802 11g For information on identifying the type of device in your notebook refer to the Identifying a WLAN Device section in this chapter Connecting Your Wireless Notebook to a Corporate WLAN Contact your network administrator or IT department for information on connecting your notebook to your corporate WLAN Connecting Your Wireless Notebook to a Public WLAN Contact your ISP o...

Page 162: ...d to the Internet This wireless network includes An optional broadband modem either DSL or cable and high speed Internet service purchased from an Internet service provider ISP 1 An optional wireless router purchased separately 2 Your wireless notebook 3 As this network grows additional wireless and wired computers can be connected to the network to access the Internet If you need technical assist...

Page 163: ...ling and Disabling the 802 11 and Bluetooth Wireless Devices section For your home WLAN verify that your router is correctly configured For instructions refer to your router documentation Functional range for subsequent WLAN connections vary depending on your notebook WLAN implementation router manufacturer and interference from varying types of walls and other electronic devices For more informat...

Page 164: ...nal or WEP security encryption on the router you may want to use one or more of the following security measures Change the default network name SSID and password Use a firewall Set security on your Web browser Enable MAC address filtering on the router For more information about WLAN security refer to the HP Web site at http www hp com go wireless for details Installing Wireless Software Optional ...

Page 165: ...802 11 wireless device from the list that is displayed The listing for an 802 11 wireless device includes the term wireless LAN WLAN or 802 11 If no 802 11 wireless device is listed either your notebook does not have an integrated 802 11 wireless device or the driver for the 802 11 wireless device is not properly installed Accessing WLAN Software and Documentation Your WLAN software is preloaded o...

Page 166: ...are is provided in the Network category To access model information about your computer refer to the serial number label The serial number label is on the bottom of the notebook To access documentation for your WLAN software 1 Install the WLAN software as instructed earlier in this chapter 2 Open the utility 3 Select Help on the menu bar Troubleshooting 802 11 Wireless Devices For more troubleshoo...

Page 167: ...etooth for Windows software provides the following functions Personal Information Management PIM item transfer Sends and receives information files such as business cards calendar items notes and message items to and from another Bluetooth computer or device PIM synchronization Synchronizes PIM data between a computer PDA or cell phone using Bluetooth File Transfer Sends and receives files to and ...

Page 168: ...ra can be controlled remotely by a notebook and images can be transferred from a camera to be stored on a computer or to be printed Human interface device Provides a wireless connection to other Bluetooth devices such as keyboards pointing devices gaming devices and remote monitoring devices Fax Provides a Bluetooth connection that enables a notebook to send or receive a fax message using a Blueto...

Page 169: ...ou to a WLAN For information on setting up a WLAN refer to the Wireless Local Area Network Select Models Only section in this chapter The 802 11 and Bluetooth wireless devices have 2 power states Enabled Disabled You can enable and disable wireless devices in Computer Setup For more information about using Computer Setup to control the 802 11 and Bluetooth wireless devices refer to Chapter 9 Compu...

Page 170: ...ss Assistant displays the status of the devices as on off or disabled Wireless Assistant also displays the status of the devices in Computer Setup as enabled or disabled For more information about Wireless Assistant 1 Open Wireless Assistant by double clicking the icon in the notification area 2 Select the Help button You cannot use the wireless button or Wireless Assistant to control the wireless...

Page 171: ...s you want to turn on If the wireless devices are turned off pressing the wireless button disables both devices The button does not turn on the devices Wireless Assistant shows that both WLAN and Bluetooth are disabled Wireless light is off You want to turn on either or both devices 1 Press the wireless button The devices return to their previous on or off state 2 If the wireless devices are turne...

Page 172: ...ice is on and the other device is off Wireless light is on You want to turn on either or both devices 1 Right click the Wireless Assistant icon in the notification area 2 Select the device or devices you want to turn on If the wireless devices are not both on when you disable the devices pressing the wireless button again returns the devices to their previous on or off state Pressing the button do...

Page 173: ...ant shows that both WLAN and Bluetooth are off Wireless light is off You want to disable both devices Press the wireless button Wireless Assistant shows that one device is on and the other device is off Wireless light is on You want to disable both devices Press the wireless button You want to turn off both devices 1 Right click the Wireless Assistant icon in the notification area 2 Select the dev...

Page 174: ...can protect the notebook personal information and data from a variety of risks Depending on your environment some security features may be unnecessary In addition to the Windows operating system security measures the following table may help you decide which other security features to use Most of these additional security features can be configured in the Setup utility For more information refer t...

Page 175: ... security Unauthorized access to a Windows user account Optional smart cards An enabled smart card can store both the Windows user password and the Windows administrator password therefore both the smart card and the smart card PIN are required to access the account Credential Manager for ProtectTools Refer to the Credential Manager for ProtectTools section in this chapter for more information Thi...

Page 176: ...on HP administrator password Unauthorized removal of the notebook Security cable slot used with an optional security cable For more information on the security cable slot refer to the Optional Security Cable section in this chapter This security feature is configured in Computer Setup Computer Setup is a non Windows utility accessed by pressing f10 when the notebook is started or restarted The pro...

Page 177: ...puter Setup If you forget the DriveLock user password but know the DriveLock master password you can remove DriveLock protection from the drive For instructions refer to the DriveLock section in this chapter HP and Windows Passwords HP security features and Windows operating system security features work independently from one another For example a device disabled in Computer Setup cannot be enabl...

Page 178: ...y DriveLock at startup Smart card PIN Used for smart card authentication Power on and HP administrator passwords can be stored on smart cards if an optional smart card reader supports this functionality You must enable the smart card security feature in Computer Setup and then enable a PIN in ProtectTools Security Manager select models only Refer to the ProtectTools Security Manager Select Models ...

Page 179: ...ase sensitive An HP password must be set and entered with the same type of keys For example an HP password set with keyboard number keys will not be recognized if it is entered with embedded numeric keypad number keys For information about the embedded numeric keypad refer to the Keypads section in Chapter 3 Pointing Devices and Keyboard Although you can use the same text for various passwords HP ...

Page 180: ... password Is not interchangeable with a Windows administrator password although both can use the same word or series of letters or numbers Does not display as it is set entered changed or deleted Must be set and entered with the same type of keys For example an HP administrator password set with keyboard number keys will not be recognized if you enter it with embedded numeric keypad number keys Ca...

Page 181: ...hen press f10 To change an HP administrator password type your current password in the Old password field type the new password in the New password and Verify new password fields and then press f10 To delete an HP administrator password type your current password in the Old password field and then press f10 3 To save your preferences and exit Computer Setup use the arrow keys to select File Save C...

Page 182: ...umeric keypad number keys Can include any combination of up to 32 letters and numbers and is not case sensitive Setting Power On Passwords A power on password is set changed or deleted in Computer Setup To manage the password 1 Open Computer Setup by turning on or restarting the computer and then pressing f10 while the F10 ROM Based Setup message is displayed in the lower left corner of the screen...

Page 183: ...ype the current password in the Old password field and then press f10 3 To save your preferences use the arrow keys to select File Save Changes and Exit Then follow the instructions on the screen Your preferences are in effect when the notebook restarts Entering Power On Passwords At the Power on Password prompt type your password and then press enter After 3 unsuccessful attempts to enter the pas...

Page 184: ...sing f10 while the F10 ROM Based Setup message is displayed in the lower left corner of the screen To change the language press f2 For navigation instructions press f1 2 Use the arrow keys to select Security Password options Require password on restart 3 Toggle the field to enable or disable and then press enter 4 Save your preferences by using the arrow keys to select File Save Changes and Exit T...

Page 185: ...word defined in Computer Setup A hard drive protected by DriveLock can be accessed with either the user password or the master password You can delete a user password or master password only by removing DriveLock protection from the drive DriveLock protection can be removed from the drive only with the master password The owner of the user password should be the day to day user of the protected ha...

Page 186: ... of the screen To change the language press f2 For navigation instructions press f1 4 Use the arrow keys to select Security DriveLock passwords Then press enter 5 Select the location of the hard drive and then press f10 6 Toggle the Protection field to Enable and then press f10 7 Read the warning To continue press f10 8 Type your user password in the New password and Verify new password fields and...

Page 187: ... enter the password you must restart the notebook and try again Requiring a Drivelock Password at Restart You can require that a DriveLock password be entered each time the notebook is restarted Enable and disable this feature in Computer Setup 1 Shut down the notebook If you are not sure whether the notebook is off or in hibernation turn the notebook on by pressing the power standby button and th...

Page 188: ...rts Changing DriveLock Passwords To access the DriveLock settings in Computer Setup 1 Shut down the notebook If you are not sure whether the notebook is off or in hibernation turn the notebook on by pressing the power standby button and then shut down the notebook through the operating system 2 Be sure that the hard drive is inserted into the notebook not into an optional docking device or externa...

Page 189: ...rrent password in the Old password field and then type the new password in the New password field and in the Verify new password field Then press f10 7 To save your preferences use arrow keys to select File Save Changes and Exit and then follow the instructions on the screen Your preferences are in effect when the notebook restarts ...

Page 190: ...on or restarting the computer and then pressing f10 while the F10 ROM Based Setup message is displayed in the lower left corner of the screen To change the language press f2 For navigation instructions press f1 4 Use the arrow keys to select Security DriveLock passwords and then press enter 5 Use the arrow keys to select the location of the hard drive and then press f10 6 Toggle the Protection fie...

Page 191: ...ss f10 4 To save your preferences select File Save Changes and Exit Then follow the instructions on the screen Your preferences are in effect when the notebook restarts System Information The System Information setting provides details about your notebook and battery pack The following sections explain how to prevent other users from viewing system information and how to configure system informati...

Page 192: ...instructions press f1 2 Access or set your preferences by following these directions To view general system information select File System Information To view or enter identification values for system components select Security System IDs 3 To confirm the information or your preferences press f10 4 To save your information or preferences use the arrow keys to select File Save Changes and Exit and ...

Page 193: ...tivirus software can detect most viruses destroy them and in most cases repair damage they have caused To provide protection against newly discovered viruses antivirus software must be updated Norton AntiVirus is preinstalled on the notebook For information about using the Norton AntiVirus software Select Start All Programs Norton AntiVirus Help and Support For more information about computer viru...

Page 194: ...user interfaces for configuring the firewall To protect your privacy it is recommended that you use firewall software The Windows operating system firewall is available on your notebook To learn more about this firewall 1 Select Start Control Panel Network and Internet Connections Windows Firewall 2 Select the General tab To learn more about Windows Firewall select the What else should I know abou...

Page 195: ... tries to connect To temporarily block the application select Keep blocking this program but ask me again later The next time the application attempts to connect to your notebook you will receive the security alert To manually add an application to the Windows Firewall Exceptions list so that it will not be blocked by the firewall 1 Select Start Control Panel Network and Internet Connections Windo...

Page 196: ...om Microsoft A Critical Security Updates for Windows XP disc may have been included with your notebook to provide additional updates delivered after the computer was configured Microsoft will continue to update the operating system and make these updates available on their Web site To update your system using the Critical Security Updates for Windows XP disc 1 Insert the disc into the drive The di...

Page 197: ... add on modules may be preinstalled preloaded or downloaded from the HP Web site Visit http www hp com for more information Credential Manager for ProtectTools Credential Manager for ProtectTools has security features that provide protection against unauthorized access to your notebook including the following Alternatives to passwords when logging on to Microsoft Windows such as using a smart card...

Page 198: ...age power on user passwords and administrator passwords Configure preboot authentication features such as smart card passwords and power on passwords Enable and disable hardware features such as the enable CD ROM boot feature Configure boot options which includes disabling the ability to boot to drives other than the primary hard drive Many of the features in BIOS Configuration for ProtectTools ar...

Page 199: ...for ProtectTools Work with the BIOS to enable optional smart card authentication in a preboot environment and to configure separate smart cards for an administrator and a user This requires a user to insert the smart card and optionally enter a PIN prior to allowing the operating system to load For more information on BIOS security features refer to Chapter 9 Computer Setup Set and change the pass...

Page 200: ... as deterrents These deterrents may not prevent a product from being mishandled or stolen To install a security cable 1 Loop the security cable around a secured object 2 Insert the key 1 into the cable lock 2 3 Insert the cable lock into the security cable slot 3 and then lock the cable lock with the key ...

Page 201: ...ify those devices and control the sequence in which the system attempts to boot from those devices as it starts up your notebook Boot devices include optical drive discs such as CDs or DVDs bootable diskettes or a NIC Some devices including USB devices and NICs must be enabled in Computer Setup before they can be included in the boot sequence For more information refer in this chapter to Enabling ...

Page 202: ... boot as drive C The NIC does not have a drive letter assigned to it An optical drive device such as a CD ROM can boot either as drive A or drive C depending on the format of the CD Most bootable CDs boot as drive A If you have a CD that boots as the C drive the system will boot the diskette drive before it boots the CD By default the notebook selects the startup device by searching enabled device...

Page 203: ...s drive A 3 Diskette drive in an optional docking device select models only or in an external MultiBay Default sequence for devices that boot as drive C 1 An optical drive in an optional docking device select models only or in an external MultiBay that contains a disc that boots as drive C 2 Optical drive in the internal MultiBay that contains a disc that boots as drive C 3 Hard drive in the noteb...

Page 204: ...SB drives or in drives inserted into an optional docking device select models only use the arrow keys to select the Advanced menu Device Options Then select Enable USB legacy support or To enable a NIC select the Security menu Device Security and then select Internal network adapter boot 3 To save your preferences and exit Computer Setup use the arrow keys to select File Save Changes and Exit Then...

Page 205: ...to the hard drive in the hard drive bay Instead it will try to boot to the next type of device in the boot order diskette optical device or NIC However if there are 2 optical devices and the first optical device does not boot either because it does not contain media or the media is not bootable the system will try to boot to the second optical device Changing the boot sequence also changes the log...

Page 206: ...tarted 1 Open Computer Setup by turning on or restarting the notebook and then pressing f10 while the F10 ROM Based Setup message is displayed in the lower left corner of the screen To change the language press f2 For navigation instructions press f1 2 Use the arrow keys to select the Advanced menu Boot Options and then press enter 3 Toggle the MultiBoot field to Enable 4 Toggle the Boot Order fie...

Page 207: ...For navigation instructions press f1 2 Use the arrow keys to select the Advanced menu Boot Options and then press enter 3 In the Express Boot Popup Delay Sec field select the length of time in seconds that you want the notebook to display the startup location menu before it defaults to the current MultiBoot setting when 0 is selected the Express Boot startup location menu is not displayed 4 To sav...

Page 208: ...enu select your preference within the allotted time and then press enter To prevent the notebook from defaulting to the current MultiBoot setting press any key before the allotted time expires The notebook will not start up until you select a startup location and press enter To allow the notebook to start up according to the current MultiBoot settings wait for the allotted time to expire ...

Page 209: ...ting system after you exit Computer Setup Pointing devices are not supported in Computer Setup you must use the keyboard to navigate and make selections An external keyboard connected by USB can be used with Computer Setup only if USB legacy support is enabled For more information about USB refer to the Connecting a USB Device section in the Hardware Components chapter in this guide The menu table...

Page 210: ... press f2 To view navigation information press f1 To return to the Computer Setup menu press esc 2 Select the File Security Tools or Advanced menu 3 To exit Computer Setup choose one of the following methods To exit Computer Setup without saving your preferences use the arrow keys to select File Ignore Changes and Exit Then follow the instructions on the screen To save your preferences and exit Co...

Page 211: ...the language press f2 To view navigation information press f1 2 Use the arrow keys to select File Restore defaults and then press enter 3 Select the Restore Defaults check box and then press enter 4 To confirm the restoration press f10 5 To save your preferences and exit Computer Setup use the arrow keys to select File Save Changes and Exit Then follow the instructions on the screen Your preferenc...

Page 212: ...estore from floppy Restore system configuration settings from a diskette Restore defaults Replace configuration settings in Computer Setup with factory default settings Password and security settings are not changed when you restore the factory default settings Ignore changes and exit Cancel changes entered during the current session Then exit and restart the notebook Save changes and exit Save ch...

Page 213: ...able disable DriveLock on the notebook hard drive s Change a DriveLock user or master password DriveLock settings are accessible only when you enter Computer Setup by turning on not restarting the notebook Smart card security Enable disable support for smart card authentication on boot This feature is supported only by certain smart card readers Refer to Chapter 7 Security in this guide Device sec...

Page 214: ...t on any hard drive in the system Memory Check Run a comprehensive check on system memory Select To Do This Language or press f2 Change the Computer Setup language Boot options Set f10 and f12 delay when starting up Enable disable MultiBoot which sets a boot order that can include most bootable devices and media in the system For details refer to Chapter 8 MultiBoot Set the boot order Continued ...

Page 215: ...aded The notebook starts from a bootable hard drive diskette drive diskette or CD ROM CD RW or DVD inserted into a drive connected by a USB port to the notebook or to an optional docking device select models only Select a parallel port mode EPP Enhanced Parallel Port standard bidirectional or ECP Enhanced Capabilities Port Enable disable all settings in the SpeedStep window When Disable is selecte...

Page 216: ...management are Initial software image deployment Remote system software installation Software management and updates ROM updates Tracking and security of computer assets the hardware and software installed on the computer Fault notification and recovery of certain system software and hardware components Support for specific features described in this chapter may vary depending on the computer mode...

Page 217: ...Using software deployment tools such as Altiris Deployment Solutions to replace the preinstalled software with a customized software image Using a disk cloning process to copy the contents from one hard drive to another The deployment method you should use depends on your organization s technology environment and processes Visit the HP Web site at http www hp com go pcsolutions for more informatio...

Page 218: ...views of hardware inventory for asset management PC health check monitoring and diagnostics Web accessible reporting of business critical details such as machines with thermal warnings and memory alerts Remote updating of system software such as device drivers and ROM BIOS Additional functionality can be added when HP CMS is used with optional Altiris Solutions software purchased separately For mo...

Page 219: ...uter Information ÄCAUTION If your computer is connected to a network it is recommended that you consult with your network administrator before installing any software updates especially system BIOS updates The computer system BIOS is stored on the system ROM The BIOS initializes the operating system determines how the computer will interact with the hardware devices and provides for data transfer ...

Page 220: ...ed to know the version of the system BIOS currently installed BIOS version information also known as ROM date and System BIOS can be displayed by pressing fn esc if you are already in Microsoft Windows or by opening Computer Setup To use Computer Setup for displaying BIOS information 1 Open Computer Setup by turning on or restarting the computer and then pressing f10 while the F10 ROM Based Setup ...

Page 221: ...rovides both the current version and future versions of the CD visit the HP Web site at http www hp com Software Updates and the HP Web Site Most software on the HP Web site is packaged in compressed files called SoftPaqs Some BIOS updates may be packaged in compressed files called ROMPaqs Most download packages contain a file named Readme txt A Readme txt file contains information regarding insta...

Page 222: ...ice cable or cord To download a BIOS update 1 Access the page on the HP Web site that provides software for your computer Select Start Help and Support and then click a software update link or Visit the HP Web site at http www hp com support 2 Follow the instructions on the screen to identify your computer and access the BIOS update you want to download 3 At the download area a Identify the BIOS u...

Page 223: ...ows Explorer by selecting Start All Programs Accessories Windows Explorer 2 In the left pane of the Windows Explorer window a Click My Computer and then your hard drive designation The hard drive designation is typically Local Disk C b Using the hard drive path you recorded earlier open the folder on your hard drive that contains the update 3 Double click the file with an exe extension for example...

Page 224: ...link or Visit the HP Web site at http www hp com support and click Download drivers and software to download the software for your computer model 2 Follow the instructions on the screen to find the software you want to update 3 At the download area select the software you want and follow the download instructions on the Web page Make a note of the path to the location on your hard drive where the ...

Page 225: ...ive designation The hard drive designation is typically Local Disk C b Using the hard drive path you recorded earlier open the folder on your hard drive that contains the software 6 Double click the file with an exe extension for example filename exe The installation begins 7 Complete the installation by following the instructions on the screen After a message on the screen reports a successful in...

Page 226: ...our computer by storing copies of files called snapshots If files on your computer are accidentally deleted or corrupted you can easily restore the files yourself You can also restore your complete file system to a previous state Altiris Local Recovery provides protection of files by backing up files to a hidden Altiris recovery partition When you install the software the Recovery Agent Partition ...

Page 227: ...alled a restore point A restore point is a snapshot of your software drivers and operating system files at a particular time The computer automatically creates restore points at regular intervals and may create additional restore points when you change your personal settings or add software or hardware You can manually create additional restore points to provide increased protection for your syste...

Page 228: ...window opens 3 Click Create a restore point and then click Next 4 Follow the on screen instructions Restoring to a Restore Point To restore the computer to a previous date and time when it was functioning optimally 1 Select Start Help and Support 2 Click System Restore The System Restore window opens 3 Click Restore my computer to an earlier time and then click Next 4 Follow the on screen instruct...

Page 229: ...the Software Setup utility select Start All Programs Software Setup The application reinstallation process replaces corrupted system files within the application and reinstalls deleted system files within the application In most cases If the application you are reinstalling is still installed on your computer the reinstallation process does not affect your settings within the application In all ca...

Page 230: ...o select the software you want to reinstall select or clear the appropriate check boxes Reinstalling Applications from Discs To reinstall applications from discs 1 Insert the disc into the optical drive If autorun is enabled an installation wizard opens If autorun is disabled select Start Run Enter x setup exe where x is your optical drive designation and then select OK 2 When the installation wiz...

Page 231: ...e power standby button for at least 5 seconds to turn off the computer 4 Press the power standby button again to turn on the computer 5 When prompted press any key to start from the disc After a few minutes you may need to select your language and then the Setup Wizard opens On the Welcome to Setup page do not press R step 8 in this procedure until you have completed steps 6 and 7 6 Press enter to...

Page 232: ... successfully repair the operating system you can reinstall it To reinstall the operating system If your computer does not have an optical drive you may need to connect to an optional external MultiBay 1 Connect the computer to external power through the AC adapter and turn on the computer 2 Immediately insert the Operating System disc into the computer 3 Press and hold the power standby button fo...

Page 233: ...ete The computer restarts in Windows when the process is complete Reinstalling Device Drivers and Other Software After the operating system installation process is complete you must reinstall drivers To reinstall drivers use the Recovery disc included with the computer 1 While running Windows insert the Recovery disc into the optical drive 2 If you do not have autorun enabled a Select Start Run b ...

Page 234: ...tric U S Temperature Operating not writing to optical disc 0 C to 35 C 32 F to 95 F Operating writing to optical disc 5 C to 35 C 41 F to 95 F Nonoperating 20 C to 60 C 4 F to 140 F Relative humidity noncondensing Operating 10 to 90 10 to 90 Nonoperating 5 to 95 5 to 95 Maximum altitude unpressurized Operating 14 7 to 10 1 psia 15 m to 3 048 m 50 ft to 10 000 ft Nonoperating 14 7 to 4 4 psia 15 m ...

Page 235: ...lthough the notebook can be powered from a stand alone DC power source it is strongly recommended that the notebook be powered only with an AC adapter or DC power cord supplied or approved by HP The notebook is capable of accepting DC power within the following specifications This product is designed for IT power systems in Norway with phase to phase voltage not exceeding 240 Vrms Input Power Rati...

Page 236: ...sc 11 8 11 15 applications key Windows 1 12 applications reinstalling or repairing 11 13 11 14 11 15 audio cable 4 4 audio in microphone jack 1 18 1 19 4 2 4 3 4 4 audio out headphone jack 1 18 1 19 4 2 4 3 4 4 automobile adapter 1 16 1 17 AutoPlay 4 11 B battery bay 1 23 1 25 1 27 battery charge displaying information 3 9 battery light displaying charge status 2 23 2 27 identifying 1 3 1 5 2 3 ba...

Page 237: ... mute 1 9 4 2 optical drive 1 18 1 19 PC Card slot eject 1 21 1 22 5 16 power standby 1 8 1 10 2 2 Presentation mode 1 9 3 11 4 16 Quick Launch 3 11 4 18 TouchPad 1 6 3 2 volume 1 9 4 2 wireless 1 9 1 11 C cable lock security 7 27 cables audio 4 4 modem 1 20 1 22 1 26 5 35 monitor 4 8 network 1 20 1 22 S Video 4 6 USB 1 18 1 20 1 22 calibration battery 2 29 caps lock light 1 3 1 5 card and socket ...

Page 238: ...ectors docking 1 24 power 1 16 1 17 travel battery 1 23 1 25 conservation power 2 33 cord power identifying 1 26 country specific modem adapter 5 37 Credential Manager for ProtectTools 7 24 critical low battery condition 2 27 Critical Security Updates for Windows XP 7 23 D data safeguarding 11 8 default boot sequence 8 2 device disabling 7 18 device security 7 18 digital memory cards 6 in 1 Digita...

Page 239: ...s 2 14 enablers PC Card 5 14 enabling num lock 3 14 environmental specifications 12 1 esc key 3 6 ESD electrostatic discharge 5 20 exhaust vents 1 24 1 25 external devices connecting 5 44 external keypad 3 14 external mouse 3 5 external MultiBay connecting 5 45 F family identifying computer 11 2 firewall software 7 21 fn key 1 12 3 6 3 12 fn f3 key 2 3 function keys 1 12 3 6 H hard drive affected ...

Page 240: ...P password guidelines 7 6 HP Web site 11 3 humidity specifications 12 1 I IDE drive light 1 3 1 5 IEEE 1394 port 1 21 1 22 Info Center button 1 9 3 11 infrared device linking to 5 39 infrared port 1 13 infrared transmission setting up 5 40 installing software 4 10 Internet Connection Firewall 7 21 InterVideo WinDVD Creator 4 12 InterVideo WinDVD Player 4 12 J jacks audio in microphone 1 18 1 19 4 ...

Page 241: ... caps lock 1 3 1 5 IDE drive 1 3 1 5 5 4 mute 1 3 num lock 1 3 1 5 3 12 power standby 1 3 1 4 2 2 2 3 wireless 1 2 1 4 lock security cable 1 16 1 17 7 27 low battery condition 2 27 M Media Player Windows 4 9 memory displaying amount of 5 34 increasing 5 34 memorymodulecompartment expansion 1 23 1 25 5 20 5 21 memorymodulecompartment primary 5 20 5 26 memory module removing or inserting 5 21 5 26 M...

Page 242: ...operating environment specifications 12 1 operating system 2 10 7 21 Microsoft Certificate of Authenticity label 1 27 passwords 7 4 Product Key 1 27 security 7 1 System Restore 11 8 Windows reinstalling or repairing 11 15 Operating System disc 11 8 11 13 11 14 optical drive indentifying 1 18 1 19 inserting removing disc 5 9 optical drive button 1 18 1 19 P parallel port 1 16 passwords DriveLock 7 ...

Page 243: ...eferences setting 4 19 printing mobile 5 45 processor performance controls 2 17 Product Key 1 27 product name and number computer 11 2 product name and number notebook 1 27 projector connecting 4 8 ProtectTools Security Manager 7 24 PXE server 8 4 Q Quick Launch buttons 3 11 4 18 R RAM random access memory 5 34 rated input power specifications 12 2 reader memory card 5 17 recovery discs 4 9 10 2 r...

Page 244: ...rt 1 18 Service Tag 1 27 Setup utility accessing 9 2 Advanced menu 9 6 enabling bootable devices 8 4 File menu 9 4 restoring default settings 9 3 Security menu 9 5 setting security preferences 7 3 Tools menu 9 6 shift key 2 11 3 13 shutdown procedures 2 14 shutting down 2 10 slots 6 in 1 Digital Media 1 13 memory 1 23 1 25 5 20 5 26 PC Card 1 21 1 22 security cable 1 16 1 17 Smart Card Security fo...

Page 245: ...ying 3 10 7 19 system recovery 11 8 system recovery disc 10 2 System Restore 11 9 system ROM determining current version of 3 10 T temperature specifications 12 1 storage battery pack 2 35 tiling setting preferences 4 21 TouchPad 1 6 3 1 3 2 travel battery connector 1 23 1 25 traveling with notebook battery pack temperature considerations 2 35 environmental specifications 12 2 Modem Approval label...

Page 246: ...dia Player 4 9 Windows password guidelines 7 6 WinDVD Creator Plus 4 12 WinDVD Player 4 12 wireless types of WLAN adapters 6 9 WLAN 6 8 WLAN software 6 10 wireless antennae 1 15 wireless button 1 9 1 11 6 13 wireless certification label 1 27 wireless light 1 2 1 4 WLAN wireless local area network identifying devices 6 8 software 6 10 troubleshooting 6 10 types 6 9 WLAN label 1 27 X xD Picture Card...

Reviews: