background image

HP StorageWorks Disk System 2100 / 2110

10

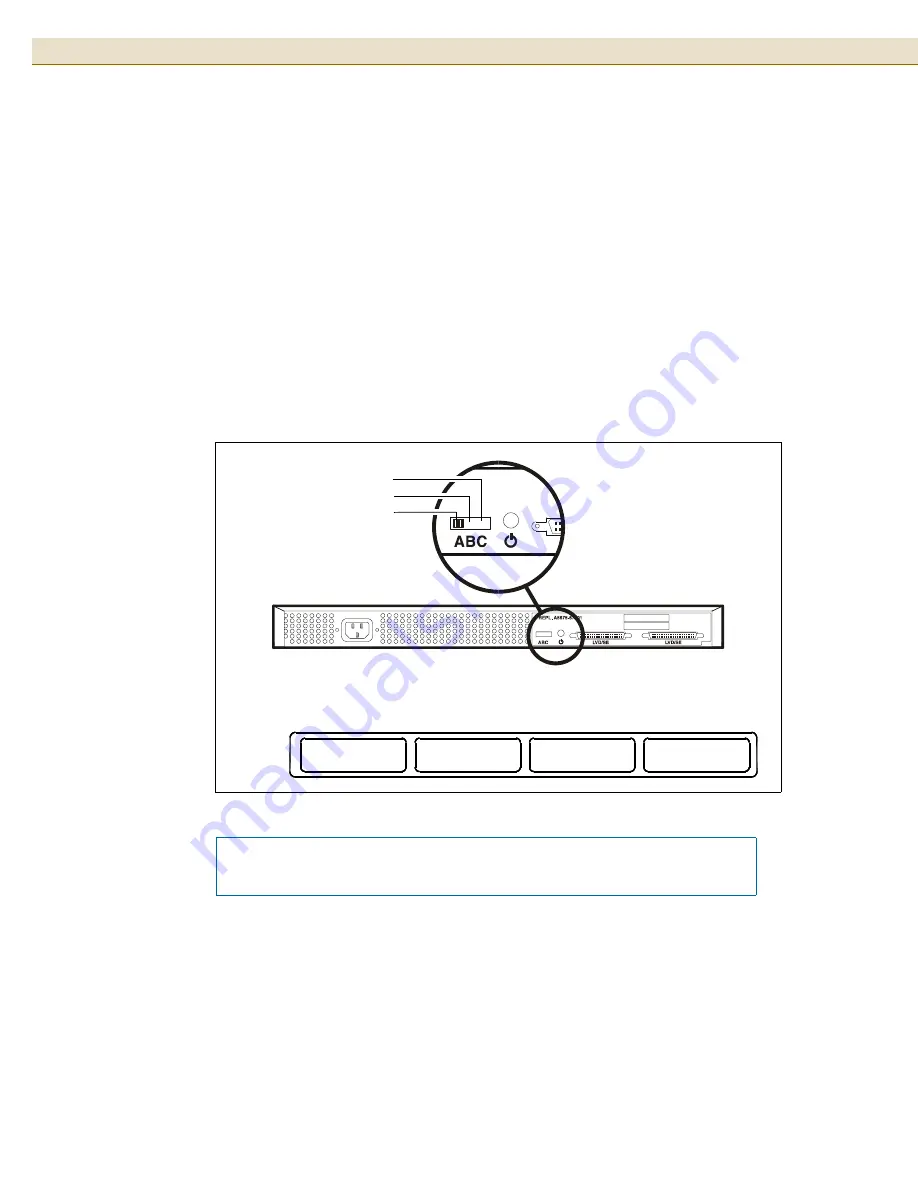
SCSI ID Switch

The SCSI ID switch sets the address for the disk drives.

There are three possible settings for the SCSI address switch: A, B, and C. Each 
setting assigns a different 

set

 of addresses to the disk modules installed in the disk 

system. For SCSI address switch setting A, the addresses for the installed disk 
modules are (from left to right, looking at the disk system from the front) 0, 2, 4, and 
6. For SCSI address switch setting B, the addresses for the installed disk modules are 
8, 10, 12, and 14. For SCSI address switch setting C, the addresses for the installed 
disk modules are 9, 11, 13, and 15. See Figure 5, below.

SCSI address 7 is reserved for use by the host bus adapter.

FIGURE 5

SCSI ID Switch Settings


Note

The disk system requires a terminator when it is installed at the end 
of the SCSI bus. 

0

8

9

2

10

11

4

12

13

6

14

15

A

B

C

SCSI

Address

Switch

Setting

Disk Module SCSI Addresses (Viewed from front of storage enclosure)

C
B
A

Summary of Contents for Compaq Presario,Presario 2100

Page 1: ...HP StorageWorks Disk System 2100 2110 User s Guide Edition E0304 Order No A7381 96013 Printed in U S A ...

Page 2: ...onal injury and product damage do not attempt to lift the product without the assistance of another person or lift device Components bearing this symbol may be hot to touch Components bearing this symbol are fragile Handle with care Components bearing this symbol are susceptible to damage by static electricity ESD precautions are required Operation The front door should be closed and locked at all...

Page 3: ...f 16 Power On the Disk System 16 Power Off the Disk System 17 Adding Disk Modules 18 Add a Disk Module 18 Configure the new Disk Module 19 Remove and Replace A Disk Module 19 Remove a Disk Module 19 Replace a Disk Module 20 Remove the Disk System 21 Setting Up the Hardware Event Monitor HP UX Only 22 Configuration Overview 22 Event Notification HP UX Only 23 Status LEDs 25 View Disk Status 26 STM ...

Page 4: ...36 A FCC Notice for United States 36 B Canadian Notice Avis Canadien 37 C Notice for European Union 37 D Notice for France 37 E Notice for Japan 37 F Harmonics Conformance Japan 37 G BSMI 38 H Notice for Germany 38 I Declaration of Conformity 39 Product Web Site 40 Related Documents 40 ...

Page 5: ...Figure 7 SCSI Switch Location 13 Figure 8 SCSI Port Locations 14 Figure 9 AC Power Connector Location 16 Figure 10 Power Button Location 17 Figure 11 Installing a Disk Module 19 Figure 12 Removing the Disk System 21 Figure 13 Sample Hardware Event Notification 24 Figure 14 LED Status Indicators 25 Figure 15 Sample STM Information Log HP UX 27 Figure 16 Sample STM Expert Tool Disk Error Log MPE iX ...

Page 6: ...Address Priority 14 Table 6 LED Status Indicators 25 Table 7 Troubleshooting Table 30 Table 8 Product Numbers 32 Table 9 Available Upgrade Disk Modules 33 Table 10 Upgrade Products for Hewlett Packard Systems 33 Table 11 Replaceable Parts 34 Table 12 Supported HP Cables and Terminators 34 Table 13 Physical Dimensions 35 Table 14 AC Power Requirements 35 Table 15 Environmental Specifications 35 ...

Page 7: ... Internal Disk Array Controller Both units support Ultra3 U160 drives and the new U320 drives However the U320 drives are supported at a maximum of 160 MB s speeds The Disk System 2100 does not support the U320 73 GB drive part number A7286A or the U320 146 GB drive part number A7287A For both the DS2100 and DS2110 connectivity to U320 initiators is supported if the speed of the U320 initiator is ...

Page 8: ... a disk module is added to the system Disk Module LEDs Each disk module has two LEDs an amber LED on the top see Figure 1 and a green LED on the bottom The amber LED is not operational The green LED provides disk module status information as listed in Table 6 FIGURE 1 Disk Module LEDs TABLE 1 Disk LED Activity Definitions System Power LED The System Power LED see Figure 2 gives diagnostic informat...

Page 9: ...r Button With the power button in the ON position power is supplied to the disk system LED Activity Indication Blinking Malfunction either a fan is not operating properly or internal voltage is too low On solid Disk system is operating properly Off Disk system is off System Power LED Power Button AC Power Connector LVD SE SCSI Port SCSI Address Switch LVD SE SCSI Port Power Button ...

Page 10: ...looking at the disk system from the front 0 2 4 and 6 For SCSI address switch setting B the addresses for the installed disk modules are 8 10 12 and 14 For SCSI address switch setting C the addresses for the installed disk modules are 9 11 13 and 15 See Figure 5 below SCSI address 7 is reserved for use by the host bus adapter FIGURE 5 SCSI ID Switch Settings Note The disk system requires a termina...

Page 11: ... positioned between the power source and the disk system These protective devices must not trip when exposed to an inrush current of 30 amps lasting 5 ms I Note These protection devices must meet all applicable electrical safety requirements and be approved for the intended purpose TABLE 3 AC Power Requirements Electrical Element Requirements Voltage 100 240 VAC Frequency 50 60 Hz Input Current 1 ...

Page 12: ...r your storage disk system A6828A Single Port Ultra160 SCSI Host Bus Adapter A6829A Dual Port Ultra160 SCSI Host Bus Adapter C2364A High Density 68 pin Terminator for LVD or Single Ended The DS2100 and DS2110 support a maximum SCSI speed of U160 Connectivity to U320 initiators is supported if the speed of the U320 initiator is set to limit negotiations to U160 speed U320 drives do not operate reli...

Page 13: ...tch on the back of the disk system FIGURE 7 SCSI Switch Location 3 Set the SCSI IDs Verify that the SCSI IDs you have chosen are available If you are daisy chaining these disk systems together each SCSI ID switch must be set for a unique available set of SCSI IDs TABLE 4 SCSI Switch Setting Definitions SCSI Switch Setting Disk Slot 1 2 3 4 A 0 2 4 6 B 8 10 12 14 C 9 11 13 15 0 8 9 2 10 11 4 12 13 ...

Page 14: ...e SCSI Cables 1 Make sure that the host system has been powered down 2 Connect one end of an Ultra SCSI cable included in the shipping box to the host system For the SCSI port location on your host system refer to your host system s documentation 3 Connect the other end of the SCSI cable to one of the LVD SE ports on the rear of the disk system FIGURE 8 SCSI Port Locations SCSI ID 7 6 5 4 3 2 1 0 ...

Page 15: ...hat the SCSI IDs assigned to the disk drives in the second disk system or additional peripherals are not already assigned to any other peripherals installed in the host system For the DS2100 the overall SCSI bus length cannot exceed 12 meters For the DS2110 the overall SCSI bus length cannot exceed 9 meters The SCSI bus length for the disk system internal cables is 1 1 meters If another type of pe...

Page 16: ...hecking the system power LED and the disk module LEDs at the front of your disk system A system reboot may be necessary to assure that the host system recognizes the disk drives within the disk system Refer to Front Panel on page 3 for explanations of the LED functions and their meanings Ensure that the connection of multiple units to the supply circuit does not overload the supply overcurrent pro...

Page 17: ...stem or stopping access to the disk modules within the disk system 4 Turn the disk system off by pressing the power button See Figure 10 below for the power button location 5 Confirm that the storage disk system System Power LED is off See Figure 2 on page 9 6 Disconnect the power cable from the power connector at the rear of the disk system FIGURE 10 Power Button Location Note If your host system...

Page 18: ...thin the storage system The system administration procedure for adding a disk module is operating system specific You must decide where the disk module is to be installed and install it Once the disk module is installed the operating system must be configured to recognize it Add a Disk Module 1 Select an available slot for the new disk module Note the slot chosen for application configuration 2 Re...

Page 19: ...is state it is safe to remove the disk module These procedures should be performed only by qualified system administrator Performing hot plug operations on an active disk drive can result in data loss or corruption If the disk system is running and a disk module slot does not contain a disk drive or filler panel the disk system will not cool properly and may overheat If you are not replacing the d...

Page 20: ...slot for two to three minutes to allow the disk drive to spin down before removing the disk module from the enclosure If you are going to replace the disk module immediately refer to Replace a Disk Module below If you are not going to replace the disk module immediately insert a filler panel into the open slot to assure the required cooling Replace a Disk Module 1 Refer to your operating system do...

Page 21: ...ial Systems A6533A all other Hewlett Packard rack systems for Commercial Systems purchased before November 1998 If your disk system is a factory integrated unit see the figure below for removal instructions FIGURE 12 Removing the Disk System If you are exchanging a desktop disk system be sure to remove and store the plastic Desktop Disk System Cover for use on the replacement disk system Some data...

Page 22: ...ocs hp com hpux diag The way you configure the monitor determines among other things where event messages will be sent and what level of severity will be reported Configuration Overview The following steps will help you identify and resolve disk system failures 1 Gather information from all sources Hardware event notifications page 25 Disk system LED status page 25 Online information tools page 26...

Page 23: ...omponent that experienced the event and the nature of the event Probable Cause Recommended Action The cause of the event and suggested steps toward a solution This information should be the first step in troubleshooting Critical An event that causes data loss host system downtime or other loss of service Host system operation will be affected if the disk system continues to be used without correct...

Page 24: ...ent Class I O Severity CRITICAL Disk at hardware path 10 4 4 0 0 Media failure Associated OS error log entry id s 000000000000000000 Description of Error The device was unsuccessful in reading data for the current I O request due to an error on the medium The data could not be recovered The request was likely processed in a way which could cause damage to or loss of data Probable Cause Recommended...

Page 25: ...LED State Indication System Power Green Power is on Blinking Malfunction either a fan is not operating properly or internal voltage is too low OFF Power is off Disk Module Green Installed and spinning up If the LED is still on 3 minutes after term power is engaged and there is no I O activity occurring the disk may be faulty Flashing I O activity on the disk The LED flashes at variable speeds depe...

Page 26: ...sk Information HP UX STM displays the last generated Information Log for a selected disk Start STM and run the Information tool as follows 1 Log on the system 2 At the system prompt type xstm STM starts and displays a graphic of the devices on the system 3 Select the desired disk 4 Select Information from the Tools menu 5 To generate a current log select Run The log will be displayed as soon as it...

Page 27: ...27 HP StorageWorks Disk System 2100 2110 English FIGURE 15 Sample STM Information Log HP UX ...

Page 28: ...m prompt type vsclose physical volume number This removes the disk from use 3 At the system prompt type cstm STM starts 4 At the cstm prompt type map STM displays a list of all the disks installed on the system 5 Select the desired disk by typing select device number for example select device 15 6 Type information STM updates the system map 7 To display the information log type infolog A sample in...

Page 29: ...lay 0 Total Retries 0 Total Errors Corrected 23781 Correction Algorithm Executions 23781 Total Bytes Processed 9 6191e 10 Total Uncorrected Errors 0 Read Reverse Error Statistics Errors Corrected Without Delay N A Errors Corrected With Delay N A Total Retries N A Total Errors Corrected N A Correction Algorithm Executions N A Total Bytes Processed N A Total Uncorrected Errors N A Verify Error Stati...

Page 30: ...eprived of term power when the server loses power or is powered down The disk system does not provide its own term power It relies on the host bus adapter to which it is connected for term power TABLE 7 Troubleshooting Table Problem Description LED State Probable Cause Solution Disk system fails to power on when installed System power LED is off Power cord is not plugged in Plug in the power cord ...

Page 31: ...chassis If the all disks on the bus have this problem the cable is faulty Replace the cable Unable to configure device for use by operating system Disk module LED is on solid or off Disk module possibly not correctly seated Remove and reinstall the disk module If troubleshooting an existing installation run diagnostics to determine drive status If the problem cannot be resolved replace the disk mo...

Page 32: ...cked disk system with at least one drive A5675AE 0 88698 48848 5 Field racked disk system empty enclosure only A5675ED 0 88698 48849 2 Desktop disk system empty enclosure only Disk System 2110 Product Number UPC Code Description A7381A 8 08736 55999 7 Field racked disk system with at least one drive A7381AD 8 08736 56000 9 Desktop disk system with at least one drive A7381AZ 8 08736 56002 3 Factory...

Page 33: ...0 MB s speeds and are not supported at those speeds This is due to limitations within the controller and not the disk mechanisms 2 May only be used in Disk System 2110 Product Number Description A4999A Single Port Ultra2 SCSI Host Bus Adapter for Hewlett Packard Workstations A5675A HP StorageWorks Disk System 2100 A5679A Rail kit for the Rittal Style Rack Systems and HP Rack Systems E A5680A Rail ...

Page 34: ...10 Base Disk System Assembly A7381 69001 Yes Yes Desktop Disk System Cover 5065 5217 No Yes Desktop Disk System Feet 0403 0285 No Yes The U320 drives are supported at 160 MB s speeds only U320 drives do not operate reliably 320 MB s speeds and are not supported at those speeds This is due to limitations within the controller and not the disk mechanisms Order Number Description Part Number C2978B 0...

Page 35: ...y loaded 8 11 kg 17 89 lbs Electrical Element Requirement Product Voltage Range 100 240 VAC RMS Product Frequency Range 50 60 Hz Climate Control Disk System 2100 Temperature dry bulb Operating 0 C 40 C Storage 40 C 70 C Disk System 2110 Temperature dry bulb Operating 0 C 35 C Storage 40 C 70 C Relative Humidity non condensing Operating 5 95 Relative Humidity at 40 C Storage 90 Relative Humidity at...

Page 36: ... UL listed UL 1950 1995 3rd Edition CSA certified C22 2 No 950 1995 TUV certified with GS mark EN 60950 1992 A1 1993 A2 1993 A3 1995 A4 1997 A11 1997 CE mark see I Declaration of Conformity on page 39 EMC Compliance Australia AS NZS 3548 Class A Canada ICES 003 Class A China GB9254 88 European Union EN55022 Class A EN55024 Japan VCCI Class A Taiwan CNS 13438 Class A US 47 CFR Parts 2 15 Class A A ...

Page 37: ...irements of the FCC B Canadian Notice Avis Canadien This Class A digital apparatus meets all requirements of the Canadian Interference Causing Equipment Regulations Cet appareil numérique de la classe A respecte toutes les exigences du Règlement sur le matériel brouilleur du Canada C Notice for European Union This is a Class A product In a domestic environment this product may cause radio interfer...

Page 38: ...HP StorageWorks Disk System 2100 2110 38 G BSMI H Notice for Germany Schalldruckpegel Lp 55 0 dB A Am Arbeitsplatz operator position Normaler Betrieb normal operation Nach ISO 7779 1999 Typprüfung ...

Page 39: ...991 A1 A2 A3 A4 EN 60950 1992 A1 A2 A3 A4 A11 GB 4943 1995 IEC 60825 1 1993 EN 60825 1 1994 A11 Class 1 Laser LED EMC CISPR 22 1997 A1 EN 55022 1998 A1 Class A 1 GB 9254 1988 CISPR 24 1997 EN 55024 1998 IEC 61000 3 2 1995 EN 61000 3 2 1995 A14 IEC 61000 3 3 1994 EN 61000 3 3 1995 Supplementary Information The product herewith complies with the requirements of the Low Voltage Directive 73 23 EEC an...

Page 40: ...t information about the HP StorageWorks Disk System 2110 visit the support Web site located at http www hp com support ds2110 Related Documents The following resources contain information on using the system software interfaces to the HP StorageWorks Disk System 2100 2110 Online Diagnostics for HP 9000 Support Tools Manager Overview available at http docs hp com hpux diag HP UX documentation avail...

Page 41: ...41 HP StorageWorks Disk System 2100 2110 English ...

Page 42: ...HP StorageWorks Disk System 2100 2110 42 ...

Reviews: