8Ć36 Troubleshooting
C4699Ć90000
Align
Cartridges
+
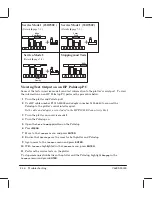
Service Mode 1 (230/250C)
(Details
page 7-3.)
Shift
Stopping most Tests
Service-Mode 2
(Details
page 7-4.)
Quality
+
Form
Feed
+
Service Mode 1 (330/350C)
(Details
page 7-3.)
Some of the tests in service mode
send test information to the plotter's serial port. To view
the information on an HP Palmtop PC, perform the procedure below.
Turn the plotter and Palmtop off.
Use HP cable number F1015Ć80002 and adapter number 5181Ć6640 to connect the
Palmtop to the plotter's serial interface port.
Both cable and adaptor are included in the HP F1021B Connectivity Pack.
Turn the plotter on in service mode
.
Turn the Palmtop on.
Open the
Data Comm
application on the Palmtop.
Press
MENU
.
Move to the
Connect
menu and press
ENTER
.
Ensure that
Settings
are the same for both plotter and Palmtop.
Again move to the
Connect
menu and press
ENTER.
With
Connect
highlighted in the
Connect
menu, press
ENTER.
Perform the service tests on the plotter.
To stop communication between the plotter and the Palmtop, highlight
Hangup
in the
Connect
menu and press
ENTER
.
Summary of Contents for Designjet 230
Page 1: ... ...
Page 3: ... ...
Page 13: ... ...
Page 18: ... ...
Page 19: ... ...
Page 22: ... ...
Page 23: ... ...
Page 25: ... ...
Page 28: ... ...
Page 29: ...3Ć7 Installation and Configuration C4699Ć90000 E A0Ćsize plotters only 32Kg 71 lb ...
Page 31: ... 2 1 ...
Page 32: ... ...
Page 33: ... ...
Page 39: ... ...
Page 43: ... ...
Page 59: ... ...
Page 63: ... ...
Page 64: ... Ensure that the cartridge caps are clean the wipers straight and the openings clear ...
Page 66: ... 2 1 ...
Page 69: ... ...
Page 73: ... Clip ...
Page 76: ... 5 5 mm Torx 15 ...
Page 78: ... Torx 15 Leave loose 5 5 mm Tighten slightly Torx 15 Tighten slightly ...
Page 81: ... Torx 20 ...
Page 93: ... Trailing cable under tabs ...
Page 96: ... ...
Page 103: ... the left and right sideĆplates or the lift mechanism will not work ...
Page 109: ... ...
Page 121: ... GO NO GO ...
Page 135: ... ...
Page 137: ... Flashing Can be On or Off Off On ...
Page 168: ... ...
Page 196: ... ...
Page 197: ... ...
Page 202: ... ...
Page 203: ... ...
Page 207: ... ...
Page 209: ...10Ć7 Parts and Diagrams C4699Ć90000 Top and Back Covers Electronics Trailing Cable ...
Page 211: ... ...
Page 213: ... ...
Page 215: ...10Ć13 Parts and Diagrams C4699Ć90000 CarriageĆAxis Right End ...
Page 217: ... ...
Page 219: ... ...
Page 221: ... ...
Page 223: ... ...
Page 225: ... ...
Page 227: ... ...
Page 233: ... ...
Page 242: ......
Page 243: ... ...
Page 249: ... ...


