8Ć58 Troubleshooting
C4699Ć90000
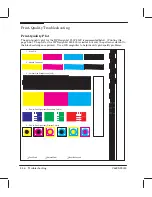
Blotchy area fills. (PrintĆQuality Plot
'
page 8Ć56
1. - Area Fills
.) (See also
'
User's Guide,
chapter 4.)
D
An incorrect mediaĆtype setting has been selected on the front panel and does not
correspond to the media being used.
The ink is incompatible with the media and does not spread uniformly through the area fill.
One or both of the following actions may be appropriate to solve an unevenĆfillĆdensity
problem:
D
Change the mediaĆtype setting on the front panel.
D
Use a more suitable media type.
D
If the problem is occurring in black area fills on color plots printed in
Normal
printĆquality mode, then use
Best
printĆquality mode instead.
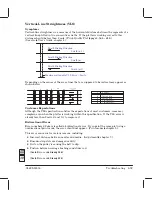
Drawings plotted with the color cartridges 51650C, 51650M, and 51650Y fade when exposed
to light. Colors become less vivid and less bright, and change over time:
D
Under direct sunlight: After between 3 and 10 hours.
D
Under office light: After about 20 days.
D
Laminated and under office light: After about 24 days.
The use of some nonĆHP media types improves the lightfastness.
Strict lightfastness is NOT necessary for the large majority of HP DesignJet 250C customers,
but it will become important in the future for the largeĆformat printing (LFP) market. HP is
working on the development of a new set of inks.
Smaller dots of sprayed ink located around the point at which the required dot is placed.
The cartridges are positioned too far from the media.
Adjust the nozzleĆtoĆmedia distance. (Details
'
chapter 7.)
Summary of Contents for Designjet 230
Page 1: ... ...
Page 3: ... ...
Page 13: ... ...
Page 18: ... ...
Page 19: ... ...
Page 22: ... ...
Page 23: ... ...
Page 25: ... ...
Page 28: ... ...
Page 29: ...3Ć7 Installation and Configuration C4699Ć90000 E A0Ćsize plotters only 32Kg 71 lb ...
Page 31: ... 2 1 ...
Page 32: ... ...
Page 33: ... ...
Page 39: ... ...
Page 43: ... ...
Page 59: ... ...
Page 63: ... ...
Page 64: ... Ensure that the cartridge caps are clean the wipers straight and the openings clear ...
Page 66: ... 2 1 ...
Page 69: ... ...
Page 73: ... Clip ...
Page 76: ... 5 5 mm Torx 15 ...
Page 78: ... Torx 15 Leave loose 5 5 mm Tighten slightly Torx 15 Tighten slightly ...
Page 81: ... Torx 20 ...
Page 93: ... Trailing cable under tabs ...
Page 96: ... ...
Page 103: ... the left and right sideĆplates or the lift mechanism will not work ...
Page 109: ... ...
Page 121: ... GO NO GO ...
Page 135: ... ...
Page 137: ... Flashing Can be On or Off Off On ...
Page 168: ... ...
Page 196: ... ...
Page 197: ... ...
Page 202: ... ...
Page 203: ... ...
Page 207: ... ...
Page 209: ...10Ć7 Parts and Diagrams C4699Ć90000 Top and Back Covers Electronics Trailing Cable ...
Page 211: ... ...
Page 213: ... ...
Page 215: ...10Ć13 Parts and Diagrams C4699Ć90000 CarriageĆAxis Right End ...
Page 217: ... ...
Page 219: ... ...
Page 221: ... ...
Page 223: ... ...
Page 225: ... ...
Page 227: ... ...
Page 233: ... ...
Page 242: ......
Page 243: ... ...
Page 249: ... ...


