8Ć61
Troubleshooting
C4699Ć90000
The colors on the plot are misaligned. (See also
'
User's Guide, chapter 4.)
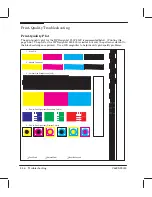
Refer to the printĆquality plot
'
page 8Ć56:
4. - Pen-to-Pen Alignment Secondary:
The first of these patterns tests alignment between the
cyan and magenta cartridges; it should be blue with no cyan or magenta shadows. The
second tests alignment between the cyan and yellow cartridges; it should be green with no
cyan or yellow shadows. The third tests alignment between the magenta and yellow
cartridges; it should be red, with no magenta or yellow shadows.
5. - Pen-to-Pen Alignment Primary
: These patterns also test alignment between the different
cartridges. The inner color in each disk should not overlap the outer color.
The cartridges are misaligned with respect to each other.
Perform a print cartridge alignment.
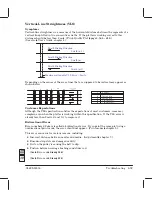
Blurred lines. (See also
'
User's Guide, chapter 4.)
D
Different color inks, printed side by side, run into each other.
D
Ink absorbs into the paper, spreading beyond the desired ink dot.
D
Ink spreads along a fiber or fibers in the paper, creating a spider web" effect.
Plotting in fast mode.
D
The ink is incompatible with the media type.
D
Environmental conditions may affect the media. (Temperature or humidity levels are too
high.)
One or more of the following actions may be appropriate to solve the problem:
D
Change the plotĆquality mode: Plotting in
Best
mode slows plotting but improves quality.
D
Use better quality media.
D
If you are plotting on vellum or translucent media, try using HewlettĆPackard media.
D
Recommended environmental conditions for optimum plot quality are in the range of
15 - 35 degrees Celsius (59 - 95 degrees Fahrenheit) with 20 - 80 % relative humidity.
D
Pen problem: TTOE (Thermal TurnĆOn Energy) has not been performed because of
incorrect cartridge change. With the power ON, open the top cover and reseat the cartridge.
Summary of Contents for Designjet 230
Page 1: ... ...
Page 3: ... ...
Page 13: ... ...
Page 18: ... ...
Page 19: ... ...
Page 22: ... ...
Page 23: ... ...
Page 25: ... ...
Page 28: ... ...
Page 29: ...3Ć7 Installation and Configuration C4699Ć90000 E A0Ćsize plotters only 32Kg 71 lb ...
Page 31: ... 2 1 ...
Page 32: ... ...
Page 33: ... ...
Page 39: ... ...
Page 43: ... ...
Page 59: ... ...
Page 63: ... ...
Page 64: ... Ensure that the cartridge caps are clean the wipers straight and the openings clear ...
Page 66: ... 2 1 ...
Page 69: ... ...
Page 73: ... Clip ...
Page 76: ... 5 5 mm Torx 15 ...
Page 78: ... Torx 15 Leave loose 5 5 mm Tighten slightly Torx 15 Tighten slightly ...
Page 81: ... Torx 20 ...
Page 93: ... Trailing cable under tabs ...
Page 96: ... ...
Page 103: ... the left and right sideĆplates or the lift mechanism will not work ...
Page 109: ... ...
Page 121: ... GO NO GO ...
Page 135: ... ...
Page 137: ... Flashing Can be On or Off Off On ...
Page 168: ... ...
Page 196: ... ...
Page 197: ... ...
Page 202: ... ...
Page 203: ... ...
Page 207: ... ...
Page 209: ...10Ć7 Parts and Diagrams C4699Ć90000 Top and Back Covers Electronics Trailing Cable ...
Page 211: ... ...
Page 213: ... ...
Page 215: ...10Ć13 Parts and Diagrams C4699Ć90000 CarriageĆAxis Right End ...
Page 217: ... ...
Page 219: ... ...
Page 221: ... ...
Page 223: ... ...
Page 225: ... ...
Page 227: ... ...
Page 233: ... ...
Page 242: ......
Page 243: ... ...
Page 249: ... ...


