background image

This is the cyan on page 1 (seq: 1)

This is the black on page 1 (seq: 1)

Company confidential.  Pelican User’s Guide, Ed1, Final.  Freeze Status: frozen


C4699-90031 English

HP DesignJet 330 and 350C
Plotters

User’s Guide

Summary of Contents for Designjet 330

Page 1: ...C4699 90031 English HP DesignJet 330 and 350C Plotters User s Guide ...

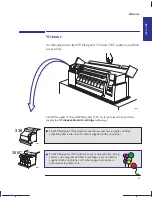
Page 2: ... the use of symbols in the left margin and shaded backgrounds to the text These are used to identify different types of information as follows Information specific only to the HP DesignJet 330 is shown like this Information specific only to the HP DesignJet 350C is shown like this All other information is applicable to both plotters The accompanying Quick Reference Guide contains selected informat...

Page 3: ...9 Load media Page 2 9 Set the print quality Page 3 15 Check cartridge alignment Chapter 5 Replace a cartridge Page 7 2 Clean the cartridge nozzles by priming them Page 7 7 Interpret the lights on the front panel Chapter 8 Clear a media jam Page 9 5 Solve print quality problems Page 9 12 Order accessories Page 10 15 To find any other information Go to the index at the back of this manual ...

Page 4: ...iv ...

Page 5: ...2 Choosing media 2 2 Supported media types and relative costs 2 3 Physical characteristics of media types 2 4 HP DesignJet 350C Recommended print quality settings and recommended media for color plots 2 5 Typical media type choices by application 2 6 Before loading media 2 7 Before sending your file 2 7 Loading sheet media 2 9 To load a sheet without the roll feed option installed 2 9 To realign t...

Page 6: ...eract with your software 3 9 Plotting a mirror image 3 10 Changing the treatment of overlapping lines Merge feature 3 11 Changing the plotter s logical pen characteristics 3 12 Printing color drawings in monochrome 3 13 To switch from color to monochrome 3 13 Important points about monochrome printing 3 14 Choosing an appropriate print quality 3 15 To change the print quality on the front panel 3 ...

Page 7: ...Cleaning the plotter 7 9 8 Front panel lights 9 Troubleshooting Using the documentation 9 2 Locating the source of your problem 9 3 Solving media handling problems 9 4 If the plotter will not accept your media 9 4 If the plotter continually rejects your media with the Error and Load Media lights flashing 9 4 Clearing a media jam 9 5 Solving communication problems 9 8 Solving problems with plot pos...

Page 8: ... quality appears to be poor just in one part of the plot 9 16 Solving miscellaneous problems 9 17 If the plotter does not plot 9 17 If the plotter seems too slow 9 17 Getting help 9 18 What to do before you call 9 18 If a repair is needed 9 19 10 Reference Plotter specifications 10 2 Interface specifications 10 8 Parallel Bi Tronics Centronics Cable 10 9 Serial RS 232 C Cables 10 10 Interface cabl...

Page 9: ...print cartridge technology The HP DesignJet 330 prints in monochrome and uses a single cartridge containing black ink one of which is supplied with your plotter The HP DesignJet 350C prints in color or monochrome using yellow cyan magenta and black cartridges a set of which is supplied with your plotter All other supported colors are generated using these four WELCOME Welcome r0006 330 0006 350C ...

Page 10: ...for use with your plotter including A roll feed kit including a legs assembly Extra spindles for the roll feed for easy changing of rolls Memory expansion modules In addition for the HP DesignJet 330 A color upgrade kit allowing the plotter to be upgraded to a HP DesignJet 350C For the full range of available accessories see page 10 15 Welcome 330 ...

Page 11: ...ots use HP media as your plotter s configuration is optimized for it and tested with it For details of HP media see page 10 18 and any separate HP media literature supplied with the plotter To indicate which media type you have loaded use the plotter s front panel 1 It is possible that since the publication of this document more media types have been tested and are now supported for your plotter F...

Page 12: ...ey on the front panel of the plotter you can print the plotter s current configuration in a Setup Sheet If you want to change any of the configuration settings for example line widths you can do this by simply marking your changes on the Setup Sheet and feeding it back into the plotter The plotter will read your request and re configure itself automatically Each time you print one of these Setup S...

Page 13: ...lications include their own drivers too For some popular applications we have provided with this plotter a set of Software Application Notes If you find your own application in these notes we recommend that you use the information they contain as an overall guide to configuring the software for your plotter Memory Your plotter comes with a basic memory of 4MB Note that there is not a one for one r...

Page 14: ...xiv ...

Page 15: ...Task 3 Position the plotter 1 8 Task 4 Switch on 1 9 Task 5 Load the print cartridge s 1 10 Task 6 Optional Change the language 1 14 Task 7 Connect the plotter to your computer 1 17 Task 8 Configure the plotter 1 19 Task 9 Set up the plotter in your application software 1 24 Task 10 Send a sample or demo plot 1 26 Setting up your plotter 1 SETUP 1 ...

Page 16: ...gs place it at the edge of a stable platform see page 1 10 2 Connect the power cord and switch the plotter on 3 Open the cover and load the supplied print cartridge s into the carriage on the left of the plotter For help use the label on the plotter near the carriage and the documentation in the cartridge box Don t forget to remove the tape from the cartridge s 4 Switch off the plotter and your co...

Page 17: ... you have all the items required 2 Optional Install a memory expansion module 3 Position the plotter 4 Switch on 5 Load the print cartridge s 6 Optional Change the language 7 Connect the plotter to your computer 8 Optional Configure the plotter 9 Set up the plotter in your application software 10 Send a sample or demo plot SETUP 1 Setting up your plotter Setup checklist ...

Page 18: ... 330 One black For the HP DesignJet 350C One yellow One cyan One magenta One black Software The following two software packs were supplied with the plotter Whether you need them depends on what application s you intend to use Drivers for AutoCAD Drivers for Microsoft Windows applications 2 Inspect the plotter itself and the above accessories If you received any item in a damaged condition notify t...

Page 19: ...d assembly you can use either roll media or cut sheets if not you can use only cut sheets 4 If you have bought one you will also need your Memory expansion module For details of the memory expansion modules available see page 10 16 HP JetDirect EX print server This is required if you intend to connect your plotter directly to a network For details of the latest HP JetDirect EX products contact you...

Page 20: ...page 10 16 You may install only one 1 Make sure that the plotter is switched OFF and that neither the power cord nor an interface cable is connected X X 1736a 2 Unscrew the cover plate at the back of the plotter and remove it 1737 Setting up your plotter Task 2 Optional Install a memory expansion module ...

Page 21: ...ing the module only by the edges 4 With the module s small notch on the left and the metallic edge away from you load the module into the slot nearest to you The other slot is not for memory modules To do this first hold the module at an angle and then gradually push it back until it clicks into place vertically Notch Push until it clicks into place Slot nearest to you 1 2 1738a 5 Replace the cove...

Page 22: ...g temperature and humidity see page 10 5 Allow enough space above the plotter to open the cover Level surface Sturdy support For plotter weights see page 10 4 Place the plotter at the edge of the support so that sheets exit without hitting the top of the support Leave enough space for your largest sheet size to hang freely from the media exit slot without touching the ground If the plotter is with...

Page 23: ... on the front of the plotter is in the OFF position extended 2 Plug the power cord into the socket at the back of the plotter and then into your power outlet 1740a 3 Switch on the plotter by pushing the power switch on off 1741 4 If there is no sound nor any light on the front panel you may have a power problem For troubleshooting information see chapter 9 SETUP 1 Setting up your plotter Task 4 Sw...

Page 24: ... If other lights are on look up their meaning in Chapter 8 Error Film 2 Open the cover If necessary wait for the cartridge carriage to move to the service station the area on the left of the plotter 1752a Cartridge carriage in service station 350C 330 r1752a Setting up your plotter Task 5 Load the print cartridges ...

Page 25: ...magenta black For the 350C each stall in the carriage has a dot indicating the color of the cartridge that should be installed you must put the correct cartridge in the correct stall The sequence of the stall colors is from left to right yellow cyan magenta and black Yellow Cyan Magenta Black 00019 For users with color vision deficiencies You can identify the colors of the cartridges by the part n...

Page 26: ...he cartridge s label with the color of the dot above the stall 3 Make sure that the plotter is still switched ON Never install cartridges with the plotter switched off 4 Insert the cartridge in the stall Press down lightly and push the cartridge away from you until it snaps into place If it is installed correctly the Ready light flashes for a few seconds Otherwise re seat it 0019 Setting up your p...

Page 27: ...o off The Load Media light should then be on together with Media Type and Print Quality lights Load Media If you wish you can now check your cartridge alignment by running the Black Cartridge Alignment Routine See page 5 3 However this is normally only required for troubleshooting SETUP 1 Setting up your plotter Task 5 Load the print cartridges ...

Page 28: ...ou want then you can skip this task and go to task 7 To change from English to any of the other languages you must use the plotter s Setup Sheet as explained below 1 Load a sheet of A size or A4 size plain paper in portrait orientation For guidance on loading a sheet see page 2 9 When the Ready light is on you have loaded the sheet correctly Plot will be on underside 1750 Setting up your plotter T...

Page 29: ...ary press the Media Type key until the Plain light is on Plain 3 Press Setup Setup 4 When the plot has finished wait until the Load Media light comes on and the plotter ejects the sheet Remove the sheet Load Media SETUP 1 Setting up your plotter Task 6 Optional Change the language ...

Page 30: ...ançais English 6 Reload it in the plotter printed side down and with the large arrow pointing into the plotter When the Ready light comes on press Setup again The plotter will now read your marks and reconfigure itself automatically Ready Setup 7 When the Load Media light comes on again remove the sheet and make sure that the plotter has marked your selection with a check mark Load Media 1751b Set...

Page 31: ...ications starting on page 10 8 Use shielded interface cables only Note on the parallel interface The parallel interface is an IEEE 1284 compliant Bi Tronics Centronics interface The same cable can be used for both Bi Tronics and Centronics communication 3 Switch off the plotter and the computer 4 Connect one end of the cable to the appropriate port on the back of the plotter Port for parallel inte...

Page 32: ...rating systems are supported in DOS Unixr and Macintosh environments For the latest information on HP JetDirect EX products contact your local HP Sales and Support office HP JetDirect EX Print Server LAN PC Unix Macintosh Parallel cable HP DesignJet 330 350C 0001 For installation of the HP JetDirect EX interface see the Installation Guide that comes with that product Setting up your plotter Task 7...

Page 33: ...ou do want to change the defaults follow steps 1 through 8 which explain how to print and use the Setup Sheet Note If you changed the language from English see task 6 above you already know how to use this sheet but this time it will be in your chosen language 1 Load a sheet of A size or A4 size plain paper in portrait orientation For guidance on loading a sheet see page 2 9 When the Ready light i...

Page 34: ...essary press the Media Type key until the Plain light is on Plain 3 Press Setup Setup 4 When the plot has finished wait until the Load Media light comes on and the plotter ejects the sheet Remove the sheet Load Media Setting up your plotter Task 8 Optional Configure the plotter ...

Page 35: ...r If you want these pen settings to take effect don t forget to mark the oval above 8 Pen Settings Inked Area Software Setup Ready Grayscale HP DesignJet 330 350C Setup Sheet 1 2 3 2 Serial Interface 5 Plot Appearance Português Italiano Español Deutsch Français English 1200 2400 4800 9600 19200 38400 None Even Odd Baud Rate Parity Auto rotate Rotate off Rotate 90_ Mirror off Mirror on Merge off Me...

Page 36: ...terface only You must set the parity to be the same as that of the computer sending the data Graphics Language HP GL 7586B See page 6 3 I O Timeout 30 min See page 6 4 Rotate off See page 3 7 Mirror off See page 3 10 Merge off See page 3 11 Color Mono Print color as color See page 3 13 Page Size Inked Area See page 3 5 Note that not all the page size options shown in the example are available on t...

Page 37: ...ht comes on press Setup again Setup 6 When the Load Media light comes on again remove the sheet and make sure that the plotter has marked your selection with a check mark Load Media 1751b 7 Please store this latest copy of the Setup Sheet with the Quick Reference Guide in the plastic pocket at the side of the plotter so that a service engineer would know the current configuration even if the plott...

Page 38: ...pack containing drivers for AutoCAD for DOS and AutoCAD for Windows Please refer to the documentation supplied with these drivers Windows applications Supplied with this plotter is a pack containing a driver for applications that work with Microsoft Windows Please refer to the documentation supplied with this driver Other applications Users of other applications should first check any Software App...

Page 39: ...ster SX HP 7596B DraftMaster RX HP 7599A DraftMaster MX HP 7595C DraftMaster SX Plus HP 7596C DraftMaster RX Plus HP 7599B DraftMaster MX Plus If any of the options quoted above appears then your software supports HP GL 2 If it doesn t support HP GL 2 then go to Preference 8 Preference 9 HP 7586B This plotter supports HP GL However if you choose this device you may not be able to use you plotter s...

Page 40: ...al demonstration plot To print the demonstration plot 1 If media is not already loaded load roll media or a sheet as explained in Chapter 2 which also provides advice on the availability and use of different media types 2 Press simultaneously the two keys Setup Continue Plotting The demonstration plot summarizes the plotter s main features and includes a sample CAD drawing using a variety of line ...

Page 41: ...2 Choosing media 2 2 Before loading media 2 7 Before sending your file 2 7 Loading sheet media 2 9 Loading roll media 2 17 Loading a sheet with the roll feed option installed 2 26 Unloading media 2 27 MEDIA 2 Working with media 2 ...

Page 42: ...ll use significantly less ink printing on coated paper types than on normal opaque bond Whenever you load a roll or a sheet you must check that the media type specified on the plotter s front panel is correct for the media type you are loading It is essential for good print quality to specify this correctly See the table on page 2 3 You should also be aware of which print quality setting best norm...

Page 43: ... Coated Paper Heavyweight color inkjet paper Heavyweight matte paper Moderate Film Film light on HP Matte Film Poly matte film Matte polyester Mylar High HP Clear Film Translucent film Clear polyester High Glossy3 Film and Coated lights on HP High Gloss White Film High 1 From time to time new media types may become available Up to date information is available from your HP dealer or local HP Sales...

Page 44: ...No HP Translucent Bond Wood pulp Semi opaque Matte No HP Natural Tracing Paper HP Vellum Cotton fiber Semi opaque Matte No HP Coated Paper Wood pulp Opaque Matte Yes HP Heavyweight Coated Paper HP Matte Film Polyester Semi opaque Matte Yes HP Clear Film Polyester Clear Yes HP High Gloss White Film Polyester Opaque Glossy Yes See page 2 10 Working with media Choosing media 350C ...

Page 45: ...Paper OK for monochrome but color for CAD drawings only1 HP Vellum drawings only1 HP Coated Paper OK HP Heavyweight Coated Paper HP Matte Film HP Clear Film HP High Gloss White Film Not recommended OK for color not recommended for monochrome 1 The limitation on the use of non coated media for color really depends on D the amount of area fill in your drawing the more there is the less likely that t...

Page 46: ...GIS color Drafts Opaque bond Natural tracing paper Vellum Coated paper Fast or Normal Fast or Normal Final versions Coated paper Heavyweight coated paper for durability Matte film Clear film Normal or Best Normal or Best Normal or Best Fast or Normal Archives Matte film Clear film Best Normal Overlays Clear film Fast or Normal Imaging and graphics packages Matte Opaque bond for drafts Coated paper...

Page 47: ...he media type Press the Media Type key until the light comes on against the name of the media type you are going to load For an explanation of which media type category on the front panel should be used for each supported media type see the table on page 2 3 To select Glossy press the Media Type key until both the Film and Coated lights are on 350C Note that if your software printer driver allows ...

Page 48: ...h print quality setting see the table on page 3 15 Alternatively you can specify the print quality setting from your software printer driver In this case the driver s setting is used for the next plot During the plot the front panel setting changes temporarily to that from the driver and then resumes its previous setting again Working with media Before sending your file ...

Page 49: ... If your alignment is almost correct you have a chance to re align it as explained in steps 8 and 9 below 1 If your plotter has no legs you ll find it easier if it is positioned at the edge of the table 2 Which way round You can load a sheet in either portrait or landscape orientation or Unless using the Rotate option see page 3 7 load the sheet in the same orientation as you have specified in you...

Page 50: ...rl up Coated paper Heavyweight coated paper Load with the coated side down On HP Coated Paper and Heavyweight Coated Paper look for the small notch in the corner D When loading in a portrait orientation make sure the notch is on the right side of the leading edge D When loading in a landscape orientation make sure the notch is on the left side of the leading edge Matte film Load with the matte sid...

Page 51: ...place your hands flat on the surface of the sheet as is normal when loading a sheet into some old pen plotters as this would make step 7 very difficult for you X X 5 Align the right hand side of the sheet with the line of holes on the plotter 6 Make sure the entire top edge of the sheet left and right is placed inside the entry slot especially if the sheet is wider than A or A4 size MEDIA 2 Workin...

Page 52: ...of the slot Three things will happen in quick succession 1 You will feel the sheet come up against the media stops 2 The sheet may buckle slightly as you are still pushing it This is normal 3 The plotter will start to take the sheet from you At this point let go Don t touch the sheet while the plotter feeds it out again a short way as this would probably misalign it X 1750 Working with media Loadi...

Page 53: ... Ready Load Media Error Wait until Load Media or the Load Media lights starts flashing Alignment bad The plotter has rejected the sheet Simply remove it and start again from step 4 on page 2 11 There s no need to press any key There is another reason why these two lights may flash the sheet may be an invalid size For sup ported media sizes see page 10 3 With very small supported sizes B A3 loaded ...

Page 54: ...shing without the Error light flashing the plotter is inviting you to realign the media manually Load Media 2 1 Raise the cover The bail the black metal bar is raised automati cally 2 Lower the green media lever to release the media 1801a 1 2 Working with media Loading sheet media ...

Page 55: ... into the plotter by pulling them taut and aligning them by eye For A3 sized media if the roll feed deflectors are fitted you may find it easier if you move them out of the way 1918 4 1 Raise the green media lever 2 Lower the cover 1801b 1 2 MEDIA 2 Working with media Loading sheet media ...

Page 56: ...t stops flashing but stays on Alignment good ready to plot Ready Ready Load Media Error Wait until Alignment bad The plotter has rejected the sheet Simply remove it and start again from step 4 on page 2 11 Notice that you have only one chance to realign the media manually If it s still not right after the realignment you have to load it again Working with media Loading sheet media ...

Page 57: ...ing the same spindle for both the old and the new roll 1 Be sure the plotter wheels are locked the brake lever pressed down to prevent the plotter from moving In the next step see next page Don t touch the stainless steel strip that runs the length of the plotter behind the cartridge carriage its edge is very sharp Keep hair jewelry clothing and foreign objects away from the plotter mechanisms Wor...

Page 58: ...ower the green media lever to release the media 3 The bail the black metal bar should automatically rise when you raise the cover 4 Turn the roll on the spindle to wind the media out of the plotter and onto the roll 5 Raise the green media lever and then lower the cover 1 2 3 4 1920 Working with media Loading roll media ...

Page 59: ...oll feed assembly while pulling the roll with your fingers to be able to release the spindle 2 If the new roll is on a different spindle then you can skip steps 4 and 5 and go straight to step 6 4 Remove the left media stop and then remove the roll from the spindle with the right media stop still connected to the spindle 1 2 1922a Working with media Loading roll media MEDIA 2 ...

Page 60: ...the graphic below Then insert the left media stop on the left end of the spindle 3 1 2 1922b 1930 6 Put the loaded spindle back in the plotter pushing first the right side into place and then the left Make sure that each end of the spindle slots firmly into place with an audible click 1921a 1 2 It is important to make sure that the spindle is firmly in place otherwise it could fall off the plotter...

Page 61: ...your grip as you push it into the plotter and this would probably make you misalign it Don t place your hands flat on the surface of the media as is normal when loading media into some old pen plotters as this would make step 5 very difficult for you Media path view from right 1923a 1928 Wind the media around the upper roller and hold it ready to load into the plotter Hold the media by its edges a...

Page 62: ...eep the angle of the sheet the same as the angle of the slot Three things will happen in quick succession 1 You will feel the media come up against the media stops 2 The media may buckle slightly as you are still pushing it This is normal 3 The plotter will start to take the media from you At this point let go Don t touch the media while the plotter feeds it out again a short way as this would pro...

Page 63: ...must still go through the motions of realigning it When the Load Media light is flashing the plotter is waiting for you to realign the media as explained below Load Media 7 1 Raise the cover 2 This automatically raises the bail the black metal bar 3 Lower the green media lever to release the media 1924 1 2 3 Working with media Loading roll media MEDIA 2 ...

Page 64: ...th hands and aligning them by eye Make sure that the right hand side of the media is aligned with the line of holes on the plotter the top roller and the roll You may need to manually unroll a small amount of the media from its roll to align the sheet satisfactorily 9 Raise the green media lever Working with media Loading roll media ...

Page 65: ...r will pause waiting for you to trim the front edge of the roll Trim the roll as follows Holding the front edge of the media taut on the left adjacent the cutter slide the cutter from left to right and then back again 11 Lower the cover MEDIA 2 ...

Page 66: ...is currently loaded in the plotter unload it as explained on page 2 18 remembering to raise the green media lever again when it s done 2 Roll Sheet On the front panel make sure the Roll light OFF to indicate that you are going to load a sheet Roll OFF 3 Load the sheet as explained in the steps starting with step 2 on page 2 9 Working with media To load a sheet with the roll feed option installed ...

Page 67: ...n to let you know you can unload a plotted sheet Typical Drying Times minutes Print Quality HP Media Type Fast Normal or Best HP Opaque Bond 0 5 1 5 HP Translucent Bond 0 5 1 0 HP Natural Tracing Paper 0 5 1 0 HP Vellum 1 0 3 0 HP Coated Paper 0 0 25 HP Heavyweight Coated Paper 0 0 25 HP Matte Film Not recom 4 0 HP Clear Film recom mended 4 0 HP High Gloss White Film Not recom mended 4 0 Notice th...

Page 68: ... is finished Load Media 2 Then simply pull the sheet downwards to remove it from the plotter 1751 To unload a sheet under any other circumstances Press Form Feed wait for the sheet to be ejected and them simply pull it downwards to remove it from the plotter Form Feed Working with media Unloading media ...

Page 69: ...otter does not pause between plots In Continuous Plotting mode when you are cutting the roll after the last of a series of plots another plot sent to the plotter could start printing while you are cutting If this is likely Pause mode rather than Continuous Plotting mode is recommended Continue Plotting Roll To switch between the two modes press the Continue Plotting key at any time except when it ...

Page 70: ...ed by the Roll light not flashing 1 When the plot is finished the Ready light stops flashing and goes off Holding the media taut on the left adjacent to the cutter slide the cutter from left to right and then back again to cut the plots from the roll Ready Roll Working with media Unloading media ...

Page 71: ...ext plot Continue Plotting Ready Roll To cut and unload a plot from a roll in Continuous Plotting mode This mode is indicated by the Roll light flashing 1 When the plot is finished the Ready light stops flashing but stays on to confirm that the plotter is ready for the next plot Ready Roll MEDIA 2 Working with media Unloading media ...

Page 72: ... the plotter to feed out more media Before cutting the roll as explained next make sure that no other plot has been sent to the plotter 2 Holding the media taut on the left adjacent to the cutter slide the cutter from left to right and then back again to cut the plots from the roll Form Feed 3 There s no need to press any other keys ...

Page 73: ...tting a mirror image 3 10 Changing the treatment of overlapping lines Merge feature 3 11 Changing the plotter s logical pen characteristics 3 12 Printing color drawings in monochrome 3 13 Choosing an appropriate print quality 3 15 Controlling your plot s appearance 3 PLOT APPEARANCE 3 ...

Page 74: ...se controls are only available using the setup sheet an example of which is shown on page 1 21 Print quality can be changed from the front panel This chapter explains the controls in the same order as in the list above Changing the settings of these controls using the Setup Sheet is explained from page 1 19 It is also possible to change these settings within many applications and many software dri...

Page 75: ...xample ISO A3 ANSI Letter Architectural E Custom etc Alternatively it can be set by the plotter By default the plotted page size is set to the inked area plus the margins In AutoCAD for DOS however the User Size is the plotting area Margins These are fixed for the HP DesignJet 330 and 350C The values are 17 mm on the leading and trailing edges and 5 mm on the sides Plotting area This is the chosen...

Page 76: ...ts to be on a page meeting a specific standard for example ISO or ANSI but the actual size within that standard is not important specify the Best option for that standard For example you may want a page size that conforms to the ISO standard but not care whether the final page size is ISO A4 or ISO A3 In this case you should specify Best within the ISO options With this setting the plotter interac...

Page 77: ...chooses the smallest page size from the ISO series A4 A3 etc that will ANSI Best hold the inked area of the plot For example if the inked area of the plot is between A3 and E D C B A if the inked area of the lot is between A3 and A4 the plotter chooses A3 as the page size Di t ti JIS Best Discrete options ISO A0 A1 A2 A3 A4 B1 B2 B3 B4 ANSI E D C B A JIS B1 B2 B3 B4 ARCH Best J S 3 ARCH E1 E D C B...

Page 78: ... the plotter A1 page size in software Clipped area If you specify in software a page size setting that is too small for the plot the plot will be clipped even though the physical media size may be adequate If you specify a discrete page size in the Setup Sheet that is too small for the plot the plot may be clipped even though the physical media size may be adequate Physical roll media size Clipped...

Page 79: ...t Providing your plot file does not contain raster data you can rotate a plot using the Setup Sheet without changing the drawing in your software The available options are Auto rotate roll media only With this setting the plotter will automatically rotate a plot by 90_ providing it will fit on the available media if this will save media Rotate off With this setting the plotter will print your plot...

Page 80: ...the side regardless of the orientation Rotate off Rotate 90_ 0025 With sheet media the drawing is rotated but the page orientation specified in your software is retained You should always load sheet media in the same orientation as you have specified in the software A A Rotate off Rotate 90_ 0026 Rotating a plot Controlling your plot s appearance ...

Page 81: ...s which like the plotter rotate counterclockwise for example CorelDRAW the result is the sum For example if your software specifies 180 degrees rotation and you set Rotate 90_ in the Setup Sheet your plot s final rotation will be 270 degrees For software applications which rotate clockwise for example AutoCAD the result is the difference For example if your software specifies 90 degrees rotation a...

Page 82: ... are Mirror off With this setting the plotter will print your plot as requested by your software without adding any mirroring This is the default Mirror on With this setting the plotter will produce a mirror image of a drawing relative to the drawing s orientation in your software Mirror off Mirror on Plotting a mirror image Controlling your plot s appearance ...

Page 83: ...ides a previous line where they overlap Merge on Overlapping lines and area fills are merged Merge off A subsequent line hides a previous line where they overlap Merge on Overlapping lines and area fills are merged You can set this feature from your software in some applications for example in AutoCAD PLOT APPEARANCE 3 Changing the treatment of overlapping lines Merge feature Controlling your plot...

Page 84: ...f logical pens 1 through 8 Item Available options Pens 1 through 8 Width mm 0 13 0 18 0 25 0 35 0 50 0 70 1 00 Note that 0 13 mm is a one pixel line width and renders some colors as a dot pattern Grayscale 100 80 60 40 20 10 5 Color Black Red Green Yellow Blue Magenta Cyan For the HP DesignJet 330 only pen Width and Grayscale are available Once you have chosen your pen settings you can change back...

Page 85: ... a draft where color is not important for example to check that the plot is not going to be clipped because you want a version for photocopying in monochrome To switch from color to monochrome With the HP DesignJet 350C if your application or software driver has a color mono setting use this since the Setup Sheet setting is normally overridden by software If not you can set the plotter to print in...

Page 86: ... black or in the Setup Sheet see page 3 12 With monochrome plotting you have the option to choose between 300 and 600 dpi resolution see page 3 15 With the HP DesignJet 350C the resolution on glossy media is always 300 dpi This is because with the Glossy media type selected all printing is performed using the cyan yellow and magenta cartridges the black cartridge is not used With the HP DesignJet ...

Page 87: ...the plot the front panel setting changes temporarily to that from the driver and then resumes its previous setting again The exact printing process used by the plotter varies not only with your print quality setting but also with your specification of the media type when loading the media see page 2 3 Recommended combinations of print quality and media type are given in the table on page 2 5 Recom...

Page 88: ...e the front panel Print Quality key to toggle between the three print quality settings Fast Normal Both ON Best The setting also impacts the plotter s internal demonstration plots You cannot change the print quality setting for a plot already received by the plotter Controlling a plot s overall appearance Choosing an appropriate print quality ...

Page 89: ...4 1 To cancel a plot 4 2 To copy a plot 4 2 To advance the media 4 3 PLOT 4 MANAGEMENT Managing your plots 4 ...

Page 90: ...s another plot Cancel To copy a plot Replot To print another copy of the last plot press Replot It will be printed with the same settings for Media Type and Print Quality as the original copy even if you ve changed them on the front panel Replot does not work if another file has already been sent to the plotter including internal plots for example the Setup Sheet or you have switched the plotter o...

Page 91: ... the roll after the last one see page 2 31 or to eject damaged media after clearing a media jam see page 9 5 There is no need to use Form Feed to unload a plotted sheet from the plotter see page 2 28 Don t press Form Feed while a file is being received by the plotter as this terminates the data transmission unless you are doing this as part of a troubleshooting routine see page 9 9 PLOT 4 MANAGEME...

Page 92: ...4 4 ...

Page 93: ...5 1 Their purpose and how to print them 5 2 Using the Black Cartridge Alignment Sheet 5 3 Using the Color Cartridge Test Sheet 5 7 INTERNAL 5 PLOTS Special internal plots 5 ...

Page 94: ... the two horizontal cartridge movements 5 3 Color Cartridge Test Sheet To test the performance and alignment of all cartridges 5 7 Service Configuration Plot Print Quality Plot These plots are essentially for use by a qualified service engineer if troubleshooting the plotter You may be asked to print one and read out some details over the phone Special internal plots Their purpose and how to print...

Page 95: ... portrait orientation Make sure you have selected Plain as the media type on the front panel see page 2 3 For this plot the plotter sets the print quality level automatically Plot will be on underside 1750 For help on how to load a sheet either refer to the pictures on the right hand side of the plotter s media entry slot or see the section starting on page 2 9 Note that you cannot print the Black...

Page 96: ...m the plotter 4 Follow the instructions on the sheet itself As you will see this involves you identifying the straightest set of vertical lines in each of the two boxes 5 If the straightest sets are already the current selection you need do nothing more If not then mark the appropriate ovals reverse the sheet as indicated and reload it 6 When the Ready light comes on press Setup The plotter now re...

Page 97: ... good Current Best Black Cartridge Alignment Sheet Pencil or black pen Setup Ready R HP DesignJet 330 350C 7 When the Load Media light comes on again remove the sheet and make sure that the plotter has marked your selections with a check mark INTERNAL 5 PLOTS Special internal plots Using the Black Cartridge Alignment Sheet ...

Page 98: ...e Alignment Sheet immediately after printing it Never re use a Black Cartridge Alignment Sheet Any plot that was in the plotter s memory before you printed the Black Cartridge Alignment Sheet has been lost and so to print it you must resend it Special internal plots Using the Black Cartridge Alignment Sheet ...

Page 99: ...in paper in portrait orientation Make sure you have selected Plain as the media type on the front panel see page 2 3 For this plot the plotter sets the print quality level automatically For help on how to load a sheet either refer to the pictures on the right hand side of the plotter s media entry slot or see the section starting on page 2 9 Note that you cannot print the Color Cartridge Test Shee...

Page 100: ...lashing the plot is finished Simply remove the sheet from the plotter Notice that there are two parts related to two quite distinct tasks The part headed To check the nozzles lets you see if any of the cartridges is not printing correctly It is to be used when cleaning the nozzles priming see page 7 7 Some examples of the patterns when a cartridge is not printing correctly are shown here White str...

Page 101: ...t by filling in the oval above the best pair If you changed any setting reload the sheet as shown here To check the cartridge alignment If any color has gaps or streaks then that cartridge is either out of ink or needs priming see User s Guide Examine the patterns below Current Ready Setup Pencil or black pen To check the nozzles Best INTERNAL 5 PLOTS Special internal plots Using the Color Cartrid...

Page 102: ...the rest of the steps 5 Having marked the appropriate ovals reverse the sheet as indicated and reload it 6 When the Ready light comes on press Setup The plotter now reads your marks and adjusts itself automatically Setup Ready 7 When the Load Media light comes on again remove the sheet and make sure that the plotter has marked your selections with a check mark Three important points concerning the...

Page 103: ...ange the graphics language setting for less common applications 6 3 To change the I O timeout setting 6 4 To upgrade your plotter with more memory 6 4 To upgrade your plotter with a network interface 6 5 To upgrade the HP DesignJet 330 plotter with color 6 5 RECONFIG 6 URATION Reconfiguring your plotter 6 ...

Page 104: ...the top right hand corner of the Setup Sheet tell you the overall configuration of the plotter Item Comments RAM This is the size in megabytes of the plotter s main standard memory plus the amount of memory reserved for printing D This does not correspond directly to the size of your files on the computer as explained on page 6 4 D This is the total RAM not the RAM currently free SIMM This tells y...

Page 105: ...unicates with the plotter by a graphics language The HP DesignJets 330 and 350C support HP GL 7586B HP GL 2 and HP RTL The plotter s default setting HP GL 7586B is designed to work successfully with most applications However it s possible that with some older or less common applications you may need to change this setting to HP GL 2 To change the graphics language setting use the Setup Sheet as ex...

Page 106: ...f 4MB In case you need to print particularly large files the following memory expansion modules are available 4MB 8MB 16MB and 32MB The maximum total memory is 36MB 4 32 For HP part numbers see page 10 16 For installation details see the task starting on page 1 6 File size and memory usage There is no direct relationship between file size on your computer and memory used in the plotter to print th...

Page 107: ...rt number of the upgrade kit see page 10 15 The upgrade kit comprises A ROM SIMM containing the code for the HP DesignJet 350C A set of four print cartridges cyan magenta yellow and black A color label for installation on the plotter s cartridge carriage An new overlay for the plotter s front panel A manual kit comprising this User s Guide and the Quick Reference Guide Drivers for AutoCAD and for ...

Page 108: ...witched OFF and that neither the power cord nor an interface cable is connected X X 1736a 2 Unscrew the cover plate at the back of the plotter and remove it 1737 Reconfiguring the plotter To upgrade the HP DesignJet 330 plotter with color ...

Page 109: ...ning the upgrade goes in the slot furthest from you If both slots are free skip this step and go straight to step 5 If the slot nearest to you already contains a SIMM a memory module then you must first remove it in order to access the other slot 1 Gently push aside the two clips that hold the memory module in place 2 Holding it only by the edges carefully pull the top of the module toward you and...

Page 110: ...ush the top away from you until the module clicks into place Slot furthest from you 1910 2 1 7 If you removed a memory module from the slot nearest to you re install it in the same way 8 Replace the cover plate and screws In steps 9 10 and 11 pay special attention to this warning Don t touch the stainless steel strip that runs the length of the plotter behind the cartridge carriage its edge is ver...

Page 111: ...Remove the black cartridge 1911 10 Move the cartridge carriage out of the service station Then remove the cover from the three left hand cartridge slots by first squeezing on both sides and then lifting it off 1912 2 1 1 RECONFIG 6 URATION Reconfiguring your plotter To upgrade the HP DesignJet 330 with color ...

Page 112: ... the cover off 2 1913 1 12 From the upgrade kit take the label containing four colored dots 1 Remove the protective strip from the back 2 Stick the label onto the vertical panel above the cartridge stalls while the cartridge is out of its stall as shown below Note that the yellow dot must be on the left 3 Close the cover Reconfiguring the plotter To upgrade the HP DesignJet 330 plotter with color ...

Page 113: ...the dots 16 Print a Setup Sheet to confirm that the plotter has correctly read the new ROM SIMM and has reconfigured itself to be an HP DesignJet 350C For instructions on how to print a Setup Sheet see the section Configure the plotter starting on page 1 19 The place to look is at the top of the setup sheet which should now read HP DesignJet 350C 17 Finally reconfigure the print driver s you are u...

Page 114: ...6 12 ...

Page 115: ...7 1 Replacing cartridges 7 2 Cleaning the cartridge nozzles priming 7 7 Cleaning the plotter 7 9 MAINTENANCE 7 Maintaining your plotter 7 ...

Page 116: ...print quality or the ink level indicator on the cartridge indicates that the cartridge is out of ink To check a cartridge s ink level Green full Black empty More than half empty 0002 When the ink level indicator shows approximately half black and half green be sure to have a replacement cartridge available The ink level indicator is not an exact gauge of the specific quantity of ink available over...

Page 117: ...t cartridge electrical components resulting in poor printouts Potential damage If ink from a refilled cartridge leaks the excess ink may cause damage to the service station that caps the cartridge while not in use Because this service station maintains the health of the cartridge quality problems may occur with the print cartridge If ink from a refilled cartridge leaks onto the electrical componen...

Page 118: ...han a few minutes at a time they are susceptible to clogging and drying It is absolutely essential to load the cartridges with the plotter switched ON otherwise you will get poor print quality and the reliability of your cartridges will be impaired With the HP DesignJet 350C plotter it is absolutely essential to load the cartridges in the correct stalls otherwise not only will your colors be wrong...

Page 119: ... cartridge carriage to move to the service station on the left Cartridge carriage in service station 1749b 2 Remove the cartridge to be replaced 1 Press down lightly and then pull the cartridge towards you 2 Remove the cartridge from its stall Discard it if it is empty or defective 0003 1 2 350C 330 1 2 r0003 MAINTENANCE 7 Maintaining your plotter Replacing cartridges ...

Page 120: ...shes for a second or two 1754 Yellow Cyan Magenta Black 1 2 1 2 330 350C Match the color of the cartridge s label with the color of the dot above the empty stall For users with color vision deficiencies you can identify the colors of the cartridges by the part numbers on the boxes see page 10 17 350C 0004 r0004 4 When you have finished replacing cartridges lower the cover If you wish you can now c...

Page 121: ...t of the priming in the latter part of the same plot So simply go to step 2 to interrupt the print If you try to prime a cartridge while the plotter is switched off you could damage the cartridges 2 Open the cover If necessary wait for the cartridge carriage to move to the service station the area on the left of the plotter Cover open Cartridge carriage in service station 330 350C Plunger Selector...

Page 122: ...teps 3 and 4 for any other cartridges to be primed Note It is not necessary to return the selectors to their original positions 6 Lower the cover 7 If you interrupted the print the plotter now resumes it Ignoring that part of the drawing immediately after the interruption where print quality cannot be guaranteed check the rest of the print to see if the problem has been resolved Maintaining your p...

Page 123: ...ed service technician When cleaning the outside of the plotter use a damp sponge or soft cloth and household cleaner To avoid electrical shock make sure that the plotter is switched OFF and unplugged before you clean it Do not let water get inside the plotter Do not use abrasive cleaners on the plotter MAINTENANCE 7 Maintaining your plotter Cleaning the plotter W A R N I N G C A U T I O N ...

Page 124: ...7 10 ...

Page 125: ...8 1 FRONT PANEL 8 LIGHTS Front panel lights 8 ...

Page 126: ...this table invaluable in troubleshooting This graphic Means The nine lights on the plotter s front panel This light is ON and STEADY This light is ON and FLASHING This light is OFF or this is the relevant light The state of this light is not relevant Pattern of lights Explanation and Action If no lights are on you may have a power problem See chapter 9 for troubleshooting The current media selecti...

Page 127: ... plot For information on available memory expansion modules see page 10 16 The current media selection is Film For an explanation of which media types this means see page 2 3 The current media selection is Glossy For an explanation of which media types this means see page 2 3 Either the black print cartridge is faulty misplaced or missing Or you have loaded a print cartridge of the wrong type for ...

Page 128: ... the cover See also pages 2 14 for sheet media or 2 23 for roll media Either the sheet you loaded is misaligned Realign it as explained on page 2 14 A short tutorial on loading media starts on page 2 9 Or it is an invalid size For supported media sizes see page 10 3 Or the media lever is lowered Open the cover raise the lever close the cover Or the cover is open when the plotter is initializing Lo...

Page 129: ...e 9 18 Error If the Error light is flashing there is an error which you can correct Check which other light is flashing and look up the pattern in this table There is a problem with the serial interface The plotter s settings for baud rate and parity must be the same as those of the computer sending the data To check the plotter settings use the Setup Sheet as explained from page 1 19 Also check y...

Page 130: ...ll media The plotter is currently set for roll media rather than sheet media The plotter is waiting for you to cut the roll after the last plot Cut the roll and press Continue Plotting The Continue Plotting key has been pressed to put the plotter in Continuous Plotting mode It will therefore not pause at the end of the current plot for you to cut the plot from the roll If you want to toggle to the...

Page 131: ...Solving media handling problems 9 4 Clearing a media jam 9 5 Solving communication problems 9 8 Solving problems with plot position or content 9 9 Solving print quality problems 9 12 Solving miscellaneous problems 9 17 Getting help 9 18 Troubleshooting 9 TROUBLE 9 SHOOTING ...

Page 132: ...ppropriate section in this chapter The sections are Solving media handling problems Clearing a media jam Solving problems with plot position or content Solving print quality problems Solving miscellaneous problems If the problem could be related to your software driver and you are using an HP driver refer to the driver s own documentation and on line help If the problem has no obvious cause read L...

Page 133: ...f the plotter plots this correctly the problem is probably not with the plotter 3 Test your computer hardware and interface as follows a Ensure that you are using the correct interface cable between the computer and the plotter and that it is firmly connected to the correct ports see pages 1 17 and 10 11 b Serial interface users only Check that the serial interface settings on the Setup Sheet matc...

Page 134: ...the plotter Loaded the media at an angle The right hand edge must be parallel to the perforated line on the plotter Held or pushed the surface of the media You must hold the media only by the edges Used media that is crumpled or warped or has irregular edges Used hand cut media the edges of which do not form a right angle or are rough It is not recommended to use media that you have cut yourself u...

Page 135: ...ed 1746 Don t touch the stainless steel strip that runs the length of the plotter behind the cartridge carriage its edge is very sharp Keep hair jewelry clothing and foreign objects away from the plotter mechanisms TROUBLE 9 SHOOTING Troubleshooting Clearing a media jam W A R N I N G ...

Page 136: ... solid plastic parts of the carriage Lower the media jam lever and raise the bail the black metal bar Bar raised Media jam lever lowered 1 2 3 1747 3 Carefully pull the main part of the jammed sheet down and out of the media entry slot 1801 Troubleshooting Clearing a media jam ...

Page 137: ... plotter behind the cartridge carriage its edge is very sharp Media torn 1748 5 Lower the bail raise the media jam lever and lower the cover Bar lowered Media jam lever raised 1 2 3 1802 6 On the front panel press Form Feed to eject any pieces of media that are still in the media path TROUBLE 9 SHOOTING Troubleshooting Clearing a media jam ...

Page 138: ...ced lines partial drawings etc Investigate the following Check that you have selected the correct interface port in your software Find out if the plotter works correctly when receiving files from other software If the plotter is connected to a network try using it when connected directly to your computer If your plotter is connected to your computer via any other intermediate devices such as switc...

Page 139: ...ference Manual If the plot is completely blank Check the print cartridges to be sure you have removed the protective nozzle tape from all of them One or more of your cartridges may be out of ink For an explanation of how to check if a cartridge is out of ink see page 7 2 If the output contains only a partial plot Did you press Form Feed before all the data was received by the plotter If so you hav...

Page 140: ...ee AutoCAD documentation If the entire plot is in one quadrant of the correct plotting area Is the page size configured in the software too small Are you sure that your software doesn t believe the drawing to be in one quadrant of the page If neither of these possibilities explains the position of the plot there is an incompatibility between the software and the plotter Is your software configured...

Page 141: ... a different plot than the one you were expecting You may have pressed Replot giving you a copy of the last plot or may have accidentally initiated one of the plotter s internal plots For a summary of these plots and how to print them see page 5 2 If pen settings seem to have no effect You may have changed them in the Setup Sheet but forgotten to fill in the oval called Use settings from tables be...

Page 142: ... the Black Cartridge Alignment Procedure see page 5 3 5 If the problem still occurs then prime the cartridge again this time pressing the plunger twice 6 If the problem still occurs try choosing a higher print quality level see page 2 8 With lower print quality levels the different pattern of ink may create the impression in some drawings of white streaks or gaps 7 If the problem is still unresolv...

Page 143: ... If you don t know which cartridge has the problem run the Color Cartridge Test Procedure as explained on page 5 7 Then prime the appropriate cartridge s as explained on page 7 7 7 If the problem still occurs after priming try reseating each cartridge to ensure good electrical connections Then run both the Black Cartridge Alignment Procedure see page 5 3 and the Color Cartridge Test Procedure see ...

Page 144: ...ment For all environmental specifications see page 10 5 If there are color shadows In the example on the left a magenta shadow which is not part of the drawing appears at the edge of a blue object The cartridges need to be re aligned Run the Color Cartridge Test Procedure explained on page 5 7 If a cartridge is not printing at all Look to see if the cartridge is out of ink See page 7 2 Try priming...

Page 145: ...re plotting in color see the table on page 2 5 for a note about which print quality media type combinations are not recommended If there is other pronounced banding in area fills Some banding is normal especially in dark or dense area fills If banding is more pronounced than expected however try the following If the banding is in a black or gray area then in the Setup Sheet reduce the Pen Settings...

Page 146: ...h For environmental specifications see page 10 5 Handle media by the edges If possible wear gloves when you handle film Skin oils can interact with ink and cause it to smear If the print quality appears to be poor just in one part of the plot Did you raise the cover during printing Although the plot continues after the interruption the print quality in the area of the interruption cannot be guaran...

Page 147: ...printing mode and try to send the file again In the case of the Microsoft Windows 95r driver shipped with the plotter the relevant field is called Process document in the Options dialog box If no other printing mode is available or if your file still doesn t print you may need to consider obtaining a memory expansion module For information on memory expansion modules see page 10 16 If you continue...

Page 148: ... plot works and does not display the problems you have found with your own plots then the problem is probably not related to your plotter 3 If the problem appears to be related to your software application first contact your software vendor 4 If you still have difficulty begin by contacting your HP dealer The sales representative is familiar with your needs equipment and software and should be abl...

Page 149: ...number and where you purchased it The type of interface used on your plotter RS 232 C parallel or modular The software name and version you are currently using The plotter s latest setup sheet showing the current configurations of various plotter parameters See page 6 2 and the section starting on page 1 19 The media type you are using If a repair is needed Contact the Hewlett Packard dealer or HP...

Page 150: ...9 20 ...

Page 151: ...10 1 Plotter specifications 10 2 Interface specifications 10 8 Interface cables 10 11 Regulatory notices 10 12 Ordering accessories 10 15 REFERENCE 10 Reference 10 ...

Page 152: ...cing paper 2 Vellum 2 Coated paper Heavyweight coated paper Matte film Clear film High gloss white film3 High gloss white film 1 CAD drawings only 2 CAD drawings only and HP media only 3 HP DesignJet 330 Monochrome printing is not supported on glossy media HP DesignJet 350C Monochrome printing is supported on glossy media as long as you leave all cartridges loaded For alternative names HP commerci...

Page 153: ... Print color as grayscale Print color as color Fast print quality Other print qualities 300 x 300 dpi 600 x 600 dpi 2 All print qualities 300 x 300 dpi 3 Accuracy Maximum accumulated error 0 38 mm 0 015 in or 0 2 of the specified vector length whichever is greater at 23_C 73_F 50 60 relative humidity on HP Matte Film Programming languages supported HP GL 7586B HP GL 2 HP RTL PJL 1 The 600 dpi reso...

Page 154: ...Power specifications Source 100 240V ac 10 Auto ranging Frequency 47 63 Hz Consumption 70 W 2 0 A max Acoustic specifications Operating sound pressure E A0 size 45 dB A From a one meter bystander position D A1 size 43 dB A Idle sound pressure 20 dB A Duty cycle Recommended maximum number of plots per day 20 Medium density E A0 CAD plots The plotter keeps an internal count of the number of plots pr...

Page 155: ...nufacturing process Free of ozone depleting chemicals Montreal Protocol Plastics Free of brominated flame retardants PBB and PBDE All housing parts made of same material ABS 90 of parts marked according to ISO 11469 standard Metals Chassis made of aluminium Shafts made of stainless steel Enclosures made of electro galvanized steel sheet Packaging Cardboard non chlorine bleached and foam are 100 re...

Page 156: ...Communications Commission certified Class B computing device CFR 47 Part 15 Safety specifications Information Technology Equipment ITE Movable Class I Plugable Type A Installation Category II Pollution Degree 2 For indoor controlledĆofficeenvironment use Canada Canadian Standards Association Certified ITE CSA C22 2 No 950 Czech Republic EZU IEC950 certified European Union 73 23 EEC LowĆVoltageĆDir...

Page 157: ... 66 x 11 6 295 x 195 195 x 295 B portrait 16 7 x 11 6 11 6 x 16 7 423 x 295 295 x 423 B landscape 17 6 x 10 7 10 7 x 17 6 447 x 271 271 x 447 C portrait 22 7 x 17 6 17 6 x 22 7 576 x 447 447 x 576 C landscape 23 6 x 16 7 16 7 x 23 6 600 x 423 423 x 600 D portrait 34 7 x 23 6 23 6 x 34 7 880 x 600 600 x 880 D landscape 35 6 x 22 7 22 7 x 35 6 904 x 576 576 x 904 E1 portrait 40 7 x 29 6 29 6 x 40 7 ...

Page 158: ...h this plotter the cable must meet the specification in this table 13 Select SelectOut plotter the s ecification in this table IEEE ibl 14 AutoFd computer IEEE 1284 compatible 16 GND 19 30 GND 31 Init computer 32 Fault plotter 36 SelectIn computer Serial RS 232 C Interface Pin Wire Signal Name Source The connector on the plotter is 25 pin 1 Protective Ground The connector on the plotter is 25 pin ...

Page 159: ...mber C2950A 2m C2951A 3m Parallel cable for Bi Tronics Centronics Plotter End Computer End Male 36 pin Male 25 pin 1 1 14 14 32 15 31 16 36 19 18 20 19 22 21 23 20 24 25 21 26 27 22 28 23 29 24 33 30 25 17 REFERENCE 10 Reference Interface specifications ...

Page 160: ...e 9 pin Male 25 pin Female 9 pin 4 1 2 2 3 3 5 4 6 7 5 20 6 8 8 7 1 1 3 2 2 3 7 7 20 5 6 6 20 5 HP part no 17255M or 13242G Modem eliminator cable Plotter End Computer End Male 25 pin Female 25 pin 1 1 3 2 2 3 7 7 20 5 6 6 20 5 Symmetrical either end may be connected to the plotter Other pins are connected in the 13242G cable but they do not affect plotter operation Reference Interface specificati...

Page 161: ...rface card 9 pin connector HP 9000 workstations using 9 pin connectors IBM AT and compatibles using 9 pin serial connectors 24542G 3 0 m 9 8 ft 9 pin female HP Vectra PC with HP 24541A B dual serial interface card using the 25 pin connector HP Apollo workstation using an SPE Serial Parallel Expansion option and supplied adapter cable DEC VAX Sun workstation 17255M 1 2 m 3 9 ft 25 pin male IBM PC P...

Page 162: ...use harmful interference to radio communications However there is no guarantee that interference will not occur in a particular installation If this equipment does cause harmful interference to radio or television reception which can be determined by turning the equipment off and on the user is encouraged to try and correct the interferences by one or more of the following measures Reorient the re...

Page 163: ...atus set out in the Radio Interference Regulations of the Canadian Department of Communications LpA 70 dB am Arbeitsplatz im Normalbetrieb nach DIN 45635 T 19 Telecommunications statement The HP DesignJet 330 and 350C plotters Models C4699A C4700A C4701A and C4702A are approved under Approval Number NS G 1234 5 100003 for indirect connection to public telecommunications systems within the United K...

Page 164: ...92 1KV Power Lines 0 5KV Signal Lines FCC Part 15 Class B DOC B VCCI 2 RRL A Product Accessory HP JetDirect EX external network servers 1 Supplementary Information The product herewith complies with the requirements of the Low Voltage Directive 73 23 EEC and the EMC Directive 89 336 EEC and carries the CE marking accordingly 1 Product options with network servers exhibit Class A operation 2 The pr...

Page 165: ...4 Italian C4699 90097 Japanese C4699 90098 Korean C4699 90092 Portuguese C4699 90099 Spanish C4699 90096 Taiwanese C4699 90093 Software Application Notes English C4699 90080 Hewlett Packard Support Services booklet The latest edition was shipped with this plotter Multi HP CAD Plotters Software Hardware Guide The latest edition was shipped with this plotter English This item is updated regularly Fo...

Page 166: ...time new media types may become available For up to date information please contact your HP dealer or local HP Sales and Support Office Memory expansion modules 4 MB C3132A For up to date details of any memory expansion modules other than those listed here contact your 8 MB C3133A modules other than those listed here contact your local authorized HP dealer 16 MB C3146A 1 32 bits wide no parity 2 3...

Page 167: ...Y Although other cartridges may appear to fit in the t ll l th t b Cyan 51644C stalls use only these part numbers Magenta 51644M Black 51640A Roll feed and legs kit D A1 size C3176A E A0 size C3177A Spindle assembly The spindle assembly includes the spindle and a pair of media stops For D A1 size spindle assembly C3174 60005 For E A0 size spindle assembly C3175 60005 REFERENCE 10 Reference Orderin...

Page 168: ... Arch D Arch E in 11 x 17 22 x 34 34 x 44 24 x 36 36 x 48 30 x 42 mm 558 x 864 864 x 1118 610 x 914 914 x 1220 760 x 1067 HP Opaque Bond C3853A C3852A C3855A C3854A C3858A HP Translucent Bond C3891A C3890A C3896A C3894A C3895A HP Vellum C3864A C3863A C3866A C3865A C3867A HP Natural Tracing Paper C3871A C3870A C3874A HP Clear Film HP Matte Film 51642C 51642G 51642K 51642J 51642N 51642L HP Coated Pa...

Page 169: ... refer to The Product Comparison Guide for HP Languages on HP Plotters and Large Format Printers which you can order through your HP Sales office How to order supplies and accessories You can order supplies and accessories in any of the following ways By calling your local authorized HP dealer By contacting your local HP Sales and Support office By contact one of the addresses given in Hewlett Pac...

Page 170: ...10 20 ...

Page 171: ...11 1 GLOSSARY 11 Glossary 11 ...

Page 172: ...umed if no other value or condition is specified device An external item connected to the computer printer plotter tape drive etc Your HP DesignJet is a device dpi Dots per inch a measure of print resolution driver The software that controls the communication between a computer and a device entry platen The exterior part of the plotter just below the media entry slot front panel The control panel ...

Page 173: ...paque bond Good quality matte paper palette A set of logical pens defined by color and width PJL Printer Job Language A programming language that controls jobs going to a printer or plotter parallel interface A type of interface between computer and device Generally faster than a serial interface plotting area Page size minus margins parity An error checking method in a serial interface between a ...

Page 174: ...paque matte paper type vector A line An image may be defined in terms of vectors rather than dots Vector data typically needs less memory than raster data vellum Cotton fiber based semi opaque matte media type X axis The vertical axis as you look at the plotter from the front Y axis The horizontal axis as you look at the plotter from the front Glossary ...

Page 175: ...ng and page size 3 6 and Rotate 3 9 troubleshooting 9 10 clogged cartridges 7 7 7 9 Coated light 8 3 color media type for 2 5 of pens in palette 3 12 problems 9 12 9 17 switching on off 3 13 3 15 Color Cartridge Test Sheet 5 10 5 12 how to print 5 2 sample 5 9 using 5 7 5 10 color upgrade 6 5 6 12 part number 10 15 color vision deficiencies advice for users with 1 11 color monochrome switching 3 1...

Page 176: ...1 20 1 23 L LAN 1 18 languages graphics 10 3 changing 6 3 documentation 10 19 languages human changing 1 14 1 17 manuals available in 10 15 supported 1 14 legs 10 17 lever for media jam 9 5 9 8 lights Coated 8 3 Error 8 2 Fast 8 4 Film 8 3 front panel 8 2 Load Media 8 4 Normal 8 5 Plain 8 2 Ready 8 5 Roll 8 6 line quality problems 9 12 9 17 Load Media light 8 4 Local Area Network 1 18 location of ...

Page 177: ...oblems 9 9 9 12 distorted 9 11 management 4 1 position problems 9 9 9 12 unexpected 9 11 plot appearance controlling 3 2 plots maximum per day 10 4 special internal 5 1 plotting area 10 7 polyester film 10 2 ports on computer 1 17 on plotter 1 17 position of plotter 1 8 power cord 1 4 1 9 socket 1 9 supply 1 9 power specifications 10 4 priming cartridges 7 7 7 9 print cartridges See cartridges pri...

Page 178: ...fications 10 2 10 8 acoustic 10 4 ecological 10 5 electromagnetic 10 6 EMC 10 6 environmental 10 5 functional 10 2 10 3 interface 10 8 10 11 physical 10 4 power 10 4 safety 10 6 speed problems 9 17 spindle removing 2 17 2 20 spindle assembly part numbers 10 17 stand See roll feed and legs Sun cables to connect 10 11 supplies See accessories support 9 18 9 20 Support services documentation 10 15 T ...

Page 179: ...t Microsoft Windows Driver for HP Plotters Installer s Guide HP CAD Plotters Software Hardware Guide Getting support Hewlett Packard Support Services Programmer s reference The Product Comparison Guide for HP Languages on HP Plotters and Large Format Printers 5959 9734 The HP GL 2 and HP RTL Reference Guide 5959 9733 PJL Technical Reference Manual part of 5010 3997 These documents are supplied wit...

Page 180: ......

Page 181: ...nts Please explain any low score Any other comments on any of the documentation accompanying the plotter 1 2 3 4 5 1 2 3 4 5 1 2 3 4 5 1 2 3 4 5 Poor Excellent Cut here Name Organization Address Job Title Alternatively you can fax this form to Spain 34 3 582 1400 Attn Learning Products Dept Phone If mailing to the address in the USA see over fill out this sheet If mailing to the address in Spain f...

Page 182: ...West Bernardo Drive San Diego CA 92127 U S A BUSINESS REPLY MAIL FIRST CLASS MAIL PERMIT NO 24343 SAN DIEGO CA POSTAGE WILL BE PAID BY ADDRESSEE NO POSTAGE NECESSARY IF MAILED IN THE UNITED STATES R B Fold here and then staple or tape the ends together B A A A Any comments ...

Page 183: ...nts Please explain any low score Any other comments on any of the documentation accompanying the plotter 1 2 3 4 5 1 2 3 4 5 1 2 3 4 5 1 2 3 4 5 Poor Excellent Cut here Name Organization Address Job Title Alternatively you can fax this form to Spain 34 3 582 1400 Attn Learning Products Dept Phone If mailing to the address in Spain see over fill out this sheet If mailing to the address in the USA f...

Page 184: ...Hewlett Packard Company Barcelona Division Attn Learning Products Dept Avda Graells 501 08190 Sant Cugat del Vallès Spain R B Fold here and then staple or tape the ends together B A A A Any comments ...

Reviews: