background image

Using hard drives

CAUTION:

To prevent information loss or an unresponsive system:

Save your work and shut down the computer before adding or replacing a memory module or hard

drive.

If you are not sure whether the computer is off, turn the computer on by pressing the power button.

Then shut down the computer through the operating system.

Removing or replacing the service door

Removing the service door

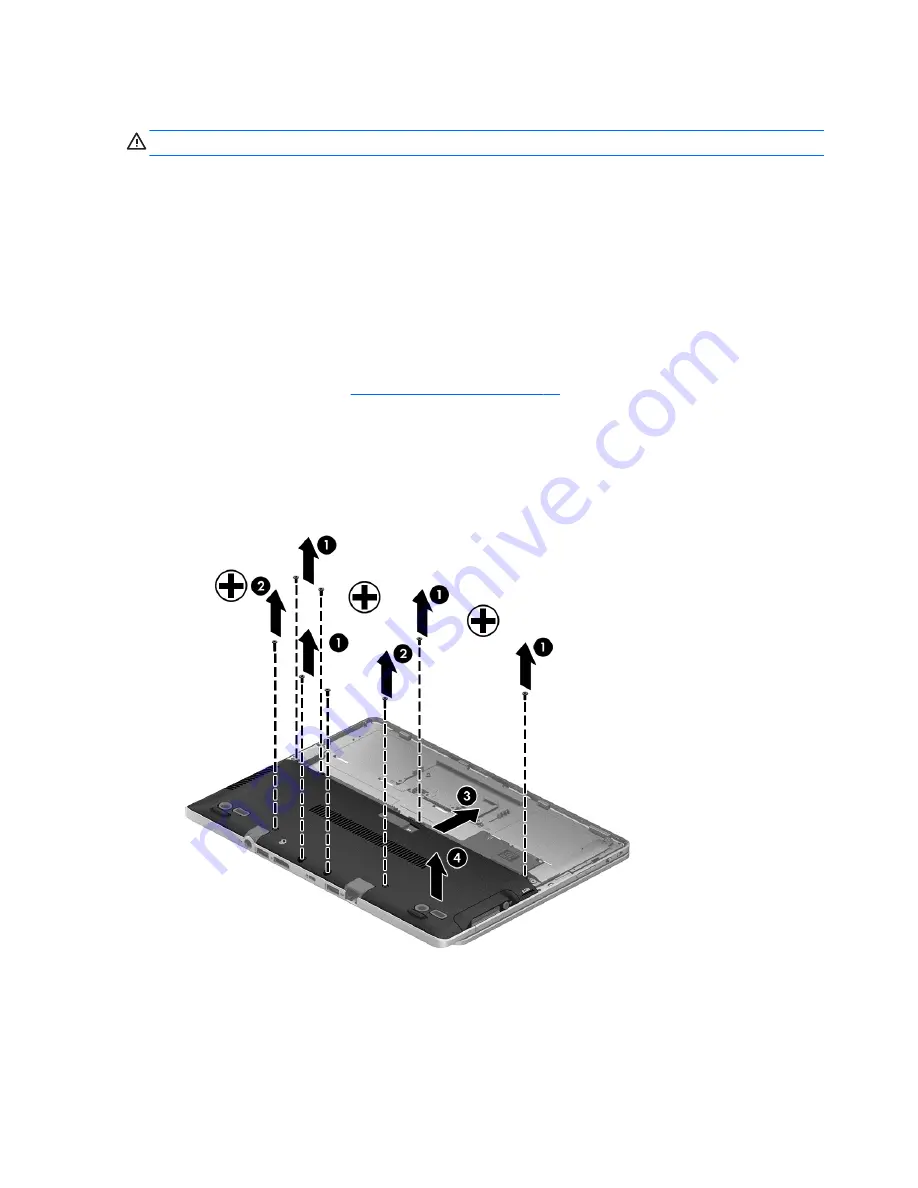
Remove the service door to access the memory module slot, hard drive, and other components.

1.

Remove the battery (see 

Removing a battery on page 44

).

2.

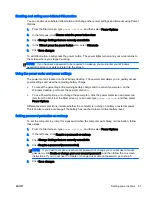
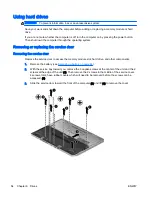
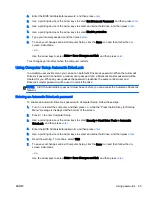
With the service bay toward you, remove the 3 captive screws at the center of the unit and the 2

screws at the edge of the unit (1). Then remove the 2 screws in the middle of the service cover.

4 screws, total, have rubber covers which will need to be removed before the screws can be

accessed. (2).

3.

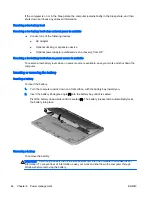
Slide the service door toward the front of the computer (3) and lift (4) to remove the cover.

54 Chapter 8   Drives

ENWW

Summary of Contents for EliteBook Revolve 810 G2 Tablet

Page 1: ...User Guide ...

Page 2: ...er guide describes features that are common to most models Some features may not be available on your computer Not all features are available in all editions of Windows This computer may require upgraded and or separately purchased hardware drivers and or software to take full advantage of Windows functionality Go to http www microsoft com for details To obtain the latest information in this guide...

Page 3: ...ow another hard surface such as an adjoining optional printer or a soft surface such as pillows or rugs or clothing to block airflow Also do not allow the AC adapter to contact the skin or a soft surface such as pillows or rugs or clothing during operation The computer and the AC adapter comply with the user accessible surface temperature limits defined by the International Standard for Safety of ...

Page 4: ...iv Safety warning notice ENWW ...

Page 5: ...ing the wireless button 15 Using operating system controls 16 Using a WLAN 16 Using an Internet service provider 16 Setting up a WLAN 17 Configuring a wireless router 17 Protecting your WLAN 17 Connecting to a WLAN 18 Using HP Mobile Broadband select models only 18 Inserting and removing a SIM 19 Using GPS select models only 20 Using Bluetooth wireless devices select models only 20 Connecting to a...

Page 6: ...Identifying the hot keys 30 Using keypads 31 Using the embedded numeric keypad 32 Turning the embedded numeric keypad on and off 33 Switching key functions on the embedded numeric keypad 33 Using an optional external numeric keypad 33 5 Multimedia 35 Using the media activity controls 35 Audio 35 Connecting speakers 35 Adjusting the volume 36 Connecting headphones 36 Connecting a microphone 36 Conn...

Page 7: ...44 Conserving battery power 45 Storing a user replaceable battery select models only 45 Disposing of a user replaceable battery select models only 46 Replacing a user replaceable battery select models only 46 Using external AC power 46 Testing an AC adapter 47 7 External cards and devices 49 Using memory card readers select models only 49 Inserting a memory card 49 Removing a memory card 50 Using ...

Page 8: ...mputer Setup Automatic DriveLock 65 Entering an Automatic DriveLock password 65 Removing Automatic DriveLock protection 66 Using antivirus software 66 Using firewall software 66 Installing critical security updates 67 Using HP Client Security 67 Installing an optional security cable 68 10 Maintenance 69 Adding or replacing memory modules 69 Cleaning your computer 71 Cleaning procedures 72 Cleaning...

Page 9: ... Choosing MultiBoot preferences 83 Setting a new boot order in Computer Setup 83 Dynamically choosing a boot device using the f9 prompt 84 Setting a MultiBoot Express prompt 84 Entering MultiBoot Express preferences 84 Using HP PC Hardware Diagnostics UEFI 85 Downloading HP PC Hardware Diagnostics UEFI to a USB device 85 13 Support 87 Contacting support 87 Labels 88 14 Specifications 91 Input powe...

Page 10: ...ing 99 The wireless network connection is not working 99 A disc does not play 99 A movie is not visible on an external display 100 The process of burning a disc does not begin or it stops before completion 100 Appendix C Electrostatic discharge 101 Index 103 x ENWW ...

Page 11: ... damage caused by viruses The software is preinstalled on the computer For more information see Using antivirus software on page 66 Get to know your computer Learn about your computer features See Getting to know your computer on page 5 and Navigating using the keyboard touch gestures and pointing devices on page 23 for additional information Find installed software Access a list of the software p...

Page 12: ...o to http welcome hp com country us en wwcontact_us html Online chat with an HP technician Email support Support telephone numbers HP service center locations HP website To obtain the latest information in this guide contact support For U S support go to http www hp com go contactHP For worldwide support go to http welcome hp com country us en wwcontact_us html Support information Ordering parts a...

Page 13: ...is not provided in printed format you may request a printed copy from http www hp com go orderdocuments or write to North America Hewlett Packard MS POD 11311 Chinden Blvd Boise ID 83714 USA Europe Middle East Africa Hewlett Packard POD Via G Di Vittorio 9 20063 Cernusco s Naviglio MI Italy Asia Pacific Hewlett Packard POD P O Box 200 Alexandra Post Office Singapore 911507 When you request a print...

Page 14: ...4 Chapter 1 Welcome ENWW ...

Page 15: ...is enabled at the factory Rapid Start Technology allows your computer to resume quickly from inactivity For more information see Using power saving states on page 40 3 Rotation lock Locks screen orientation in either Landscape or Portrait mode NOTE When you move between notebook and tablet configuration the computer screen will automatically change to vertical or horizontal To lock the current scr...

Page 16: ...ore putting on headphones earbuds or a headset For additional safety information see the Regulatory Safety and Environmental Notices To access this guide from the Start screen type support and then select the HP Support Assistant app NOTE When a device is connected to the jack the computer speakers are disabled NOTE Be sure that the device cable has a 4 conductor connector that supports both audio...

Page 17: ...flow to cool internal components NOTE The computer fan starts up automatically to cool internal components and prevent overheating It is normal for the internal fan to cycle on and off during routine operation 2 Speaker Produces sound ENWW Left 7 ...

Page 18: ...d do not force the rotating action Your computer can serve as both a standard notebook as a tablet allowing you to use its touchscreen capabilities with a large number of apps The display rotates easily clockwise into tablet position and counterclockwise back into notebook configuration 8 Chapter 2 Getting to know your computer ENWW ...

Page 19: ...eo conference and chat online using streaming video For information on using the webcam access HP Support Assistant To access HP Support Assistant from the Start screen select the HP Support Assistant app 7 Windows Home button Returns you to the Start screen The antennas are not visible from the outside of the computer For optimal transmission keep the areas immediately around the antennas free fr...

Page 20: ...vates items on the screen NOTE The TouchPad also supports edge swipe gestures For more information see Edge swipes select models only on page 27 3 Left TouchPad button Functions like the left button on an external mouse 4 Right TouchPad button Functions like the right button on an external mouse 10 Chapter 2 Getting to know your computer ENWW ...

Page 21: ... mute light Amber microphone sound is off Off microphone sound is on 4 Wireless light On An integrated wireless device such as a wireless local area network WLAN device and or a Bluetooth device is on NOTE On some models the wireless light is amber when all wireless devices are off 5 Num lock light On Num lock is on 6 TouchPad light On The TouchPad is off Off The TouchPad is on ENWW Top 11 ...

Page 22: ...the Windows desktop NOTE Pressing the Windows key again will return you to the previous screen 4 Function keys Execute frequently used system functions when pressed in combination with the fn key 5 Embedded numeric keypad When the keypad is turned on it can be used like an external numeric keypad Each key on the keypad performs the function indicated by the icon in the upper right corner of the ke...

Page 23: ...nctionality and then contact support through HP Support Assistant To access HP Support Assistant on the Start screen select the HP Support Assistant app 2 Vents 2 Enable airflow to cool internal components NOTE The computer fan starts up automatically to cool internal components and prevent overheating It is normal for the internal fan to cycle on and off during routine operation 3 Near Field Comm...

Page 24: ...display device such as a high performance monitor or projector 5 USB 3 0 charging powered port Connects an optional USB device such as a keyboard mouse external drive printer scanner or USB hub Standard USB ports will not charge all USB devices or will charge using a low current Some USB devices require power and require you to use a powered port NOTE USB charging ports can also charge select mode...

Page 25: ...ase stations similar to cell phone towers throughout large geographic areas effectively providing coverage across entire states regions or even countries Bluetooth device Creates a personal area network PAN to connect to other Bluetooth enabled devices such as computers phones printers headsets speakers and cameras In a PAN each device communicates directly with other devices and devices must be r...

Page 26: ...rs and accessories that are linked by a wireless router or a wireless access point NOTE The terms wireless router and wireless access point are often used interchangeably A large scale WLAN such as a corporate or public WLAN typically uses wireless access points that can accommodate a large number of computers and accessories and can separate critical network functions A home or small office WLAN ...

Page 27: ...ially connect your new wireless computer to the router by using the network cable provided with the router When the computer successfully connects to the Internet disconnect the cable and access the Internet through your wireless network Protecting your WLAN When you set up a WLAN or access an existing WLAN always enable security features to protect your network from unauthorized access WLANs in p...

Page 28: ...n or network A list of options is displayed allowing you to manually search for and connect to a network or to create a new network connection 6 Follow the on screen instructions to complete the connection After the connection is made place the mouse pointer over the network status icon in the notification area at the far right of the taskbar to verify the name and status of the connection NOTE Th...

Page 29: ...d in the battery bay If the SIM is not preinstalled it may be provided in the HP Mobile Broadband information provided with your computer or the mobile network operator may provide it separately from the computer For information about inserting and removing the SIM see Inserting and removing a SIM on page 19 in this chapter For information about HP Mobile Broadband and how to activate service with...

Page 30: ... remove a SIM press in on the SIM and then remove it from the slot Using GPS select models only Your computer may be equipped with a Global Positioning System GPS device GPS satellites deliver location speed and direction information to GPS equipped systems For more information see the HP GPS and Location software Help Using Bluetooth wireless devices select models only A Bluetooth device provides...

Page 31: ...quipment do not plug a modem cable or telephone cable into an RJ 45 network jack Connecting to a local area network LAN Use a LAN connection if you want to connect the computer directly to a router in your home instead of working wirelessly or if you want to connect to an existing network at your office Connecting to a LAN requires an 8 pin RJ 45 network cable To connect the network cable follow t...

Page 32: ...22 Chapter 3 Connecting to a network ENWW ...

Page 33: ... mouse Touch gestures can be used on your computer TouchPad or on a touch screen select models only Review the Windows Basics guide included with your computer The guide provides information on common tasks using the TouchPad touch screen or the keyboard Select computer models have special action keys or hot key functions on the keyboard to perform routine tasks ENWW 23 ...

Page 34: ...ointer options You can also view demonstrations of TouchPad gestures To access Mouse Properties From the Start screen type mouse click Settings and then select Mouse Using the TouchPad and gestures The TouchPad allows you to navigate the computer screen and control the pointer by using simple finger movements TIP Use the left and right buttons on the TouchPad as you would use the corresponding but...

Page 35: ...ad off and on quickly double tap the TouchPad on off button Tapping To make an on screen selection use the Tap function on the TouchPad Tap one finger on the TouchPad zone to make a selection Double tap an item to open it ENWW Using pointing devices 25 ...

Page 36: ... right 2 finger pinch zoom 2 finger pinch zoom allows you to zoom out or in on images or text Zoom in by placing two fingers together on the TouchPad zone and then moving your fingers apart Zoom out by placing two fingers apart on the TouchPad zone and then moving your fingers together 26 Chapter 4 Navigating using the keyboard touch gestures and pointing devices ENWW ...

Page 37: ...photos Anchor the forefinger of your left hand in the TouchPad zone Using your right hand slide your forefinger in a sweeping motion from 12 o clock to 3 o clock To reverse the rotation move your forefinger from 3 o clock to 12 o clock NOTE Rotating is intended for specific apps where you can manipulate an object or image It may not be functional for all apps Edge swipes select models only Edge sw...

Page 38: ...reveal the charms Left edge swipe The left edge swipe accesses your recently opened apps so that you can switch between them quickly Swipe your finger gently from the left edge of the TouchPad to switch between recently opened apps Swipe from the left edge of the TouchPad to switch between apps 28 Chapter 4 Navigating using the keyboard touch gestures and pointing devices ENWW ...

Page 39: ...ys app command options that allow you to customize apps IMPORTANT When an app is open the top edge gesture varies depending on the app Gently swipe your finger from the top edge to reveal the app command options ENWW Using pointing devices 29 ...

Page 40: ...vides shortcuts so that you can perform actions quickly Press the Windows key alone or in combination with a specific key to perform a designated action For commonly used shortcuts see the Windows Basics guide Identifying the hot keys A hot key is a combination of the esc key 1 and either the fn key 2 or one of the function keys 3 To use a hot key Briefly press the fn key and then briefly press th...

Page 41: ...deo standard The fn f4 hot key can also alternate images among other devices that are receiving video information on the computer fn f5 Mutes or restores speaker sound fn f6 Decreases speaker volume fn f7 Increases speaker volume fn f8 Mutes the microphone fn f9 Decreases the screen brightness level fn f10 Increases the screen brightness level fn f11 Turns the keyboard backlight on and off NOTE Th...

Page 42: ...eypad will not function while an external keyboard or numeric keypad is connected to the computer 5 Embedded numeric keypad When the keypad is turned on it can be used like an external numeric keypad Each key on the keypad performs the function indicated by the icon in the upper right corner of the key 32 Chapter 4 Navigating using the keyboard touch gestures and pointing devices ENWW ...

Page 43: ...rd function of a keypad key while the keypad is on Press and hold the fn key to type in lowercase Press and hold fn shift to type in uppercase Using an optional external numeric keypad Keys on most external numeric keypads function differently according to whether num lock is on or off Num lock is turned off at the factory For example When num lock is on most keypad keys type numbers When num lock...

Page 44: ...34 Chapter 4 Navigating using the keyboard touch gestures and pointing devices ENWW ...

Page 45: ...a keys Audio On your HP computer you can play music CDs download and listen to music stream audio content from the web including radio record audio or mix audio and video to create multimedia To enhance your listening enjoyment attach external audio devices such as speakers or headphones Connecting speakers You can attach wired speakers to your computer by connecting them to a USB port or the audi...

Page 46: ...For additional safety information see the Regulatory Safety and Environmental Notices Connecting a microphone To record audio connect a microphone to the microphone jack on the computer For best results when recording speak directly into the microphone and record sound in a setting free of background noise Connecting headphones and microphones You can connect wired headphones or headsets to the au...

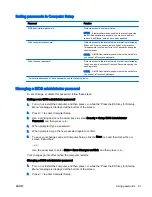
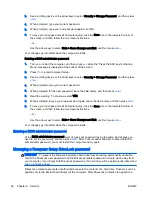
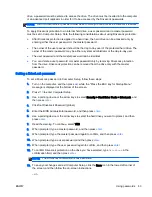
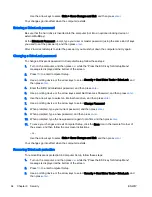
Page 47: ...uters include an integrated webcam With the preinstalled software you can use the webcam to take a photo or record a video You can preview and save the photo or video recording The webcam software enables you to experiment with the following features Capturing and sharing video Streaming video with instant message software Taking still photos Video Your HP computer is a powerful video device that ...

Page 48: ...puter 2 Connect the other end of the cable to the digital display device 3 Press fn f4 to alternate the computer screen image between 4 display states PC screen only View the screen image on the computer only Duplicate View the screen image simultaneously on both the computer and the external device Extend View the screen image extended across both the computer and the external device Second scree...

Page 49: ...riod Although you can turn off the computer with the power button the recommended procedure is to use the Windows shutdown command NOTE If the computer is in the Sleep state or in Hibernation you must first exit Sleep or Hibernation before shutdown is possible by briefly pressing the power button 1 Save your work and close all open programs 2 From the Start screen point to the upper right or lower...

Page 50: ...ctivate the TouchPad or press the power button briefly Hibernation Rapid Start Technology initiates Hibernation after a period of inactivity while in the Sleep state when running on battery power or on external power or when the battery reaches a critical level After Hibernation is initiated press the power button to resume your work NOTE Rapid Start Technology can be disabled in Setup Utility BIO...

Page 51: ...d the current power plan on the Windows desktop point over the power meter icon To use Power Options or to change the power plan click the power meter icon and select an item from the list From the Start screen you can also type power options and then select Power Options Different power meter icons indicate whether the computer is running on battery or external power The icon also reveals a messa...

Page 52: ...ttery power if the AC adapter is disconnected on the computer or an AC power loss occurs NOTE When you disconnect AC power the display brightness is automatically decreased to save battery life Select computer models can switch between graphic modes to increase battery life Finding additional battery information HP Support Assistant provides the tools and information about the battery To access ba...

Page 53: ...or maximizing battery discharge time Lower the brightness on the display Remove the battery on the computer when it is not being used or charged if the computer contains a user replaceable battery Store the user replaceable battery in a cool dry location Select the Power saver setting in Power Options Managing low battery levels The information in this section describes the alerts and system respo...

Page 54: ...vailable save your work and shut down the computer Inserting or removing the battery Inserting a battery To insert the battery 1 Turn the computer upside down on a flat surface with the battery bay toward you 2 Insert the battery 45 degree angle 1 into the battery bay until it is seated Pivot the battery downwards until it is seated 2 The battery release latch automatically locks the battery into ...

Page 55: ...ernal memory cards that you are not using Decrease screen brightness Before you leave your work initiate Sleep or shut down the computer Storing a user replaceable battery select models only CAUTION To reduce the risk of damage to a battery do not expose it to high temperatures for extended periods of time If a computer will be unused and unplugged from external power for more than 2 weeks remove ...

Page 56: ...harge the computer battery while you are onboard aircraft WARNING To reduce potential safety issues use only the AC adapter provided with the computer a replacement AC adapter provided by HP or a compatible AC adapter purchased from HP NOTE For information on connecting to AC power see the Setup Instructions poster provided in the computer box External AC power is supplied through an approved AC a...

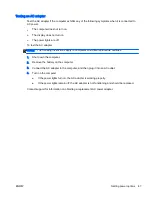
Page 57: ... apply to computers with user replaceable batteries 1 Shut down the computer 2 Remove the battery on the computer 3 Connect the AC adapter to the computer and then plug it into an AC outlet 4 Turn on the computer If the power lights turn on the AC adapter is working properly If the power lights remain off the AC adapter is not functioning and should be replaced Contact support for information on o...

Page 58: ...48 Chapter 6 Power management ENWW ...

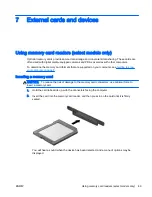
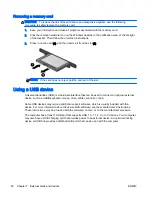
Page 59: ...on your computer see Getting to know your computer on page 5 Inserting a memory card CAUTION To reduce the risk of damage to the memory card connectors use minimal force to insert a memory card 1 Hold the card label side up with the connectors facing the computer 2 Insert the card into the memory card reader and then press in on the card until it is firmly seated You will hear a sound when the dev...

Page 60: ...us USB is a hardware interface that can be used to connect an optional external device such as a USB keyboard mouse drive printer scanner or hub Some USB devices may require additional support software which is usually included with the device For more information about device specific software see the manufacturer s instructions These instructions may be provided with the software on disc or on t...

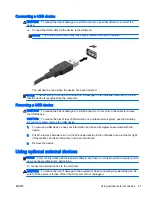
Page 61: ...isk of loss of information or an unresponsive system use the following procedure to safely remove the USB device 1 To remove a USB device save your information and close all programs associated with the device 2 Click the remove hardware icon on the Windows desktop in the notification area at the far right of the taskbar and then follow the on screen instructions 3 Remove the device Using optional...

Page 62: ... from the computer and then unplug the AC power cord Using optional external drives Removable external drives expand your options for storing and accessing information A USB drive can be added by connecting the drive to a USB port to the computer NOTE HP external USB optical drives should be connected to the powered USB port to the computer USB drives include the following types 1 44 megabyte disk...

Page 63: ...te turn the computer on and then shut it down through the operating system Do not use excessive force when inserting a drive into a drive bay Do not type on the keyboard or move the computer while an optical drive is writing to a disc The write process is sensitive to vibration Avoid exposing a drive to temperature or humidity extremes Avoid exposing a drive to liquids Do not spray the drive with ...

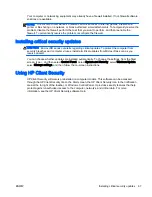
Page 64: ...emoving the service door Remove the service door to access the memory module slot hard drive and other components 1 Remove the battery see Removing a battery on page 44 2 With the service bay toward you remove the 3 captive screws at the center of the unit and the 2 screws at the edge of the unit 1 Then remove the 2 screws in the middle of the service cover 4 screws total have rubber covers which ...

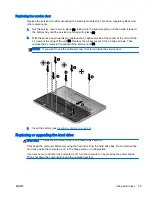
Page 65: ...e 2 edge screws Then replace the 2 screws in the middle of the service door 4 NOTE If you want to use the optional screw it is stored inside the service door 3 Insert the battery see Inserting a battery on page 44 Replacing or upgrading the hard drive CAUTION To prevent information loss or an unresponsive system Shut down the computer before removing the hard drive from the hard drive bay Do not r...

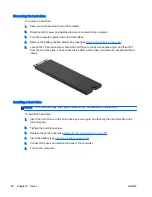
Page 66: ... hard drive bay The hard drive is an SSD which does not resemble conventional hard drives Installing a hard drive NOTE Your computer may look slightly different from the illustration in this section To install the hard drive 1 Insert the hard drive into the hard drive bay at an angle and then lay the hard drive flat in the hard drive bay 2 Tighten the hard drive screw 3 Replace the service door se...

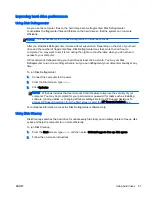
Page 67: ...y schedule but you can defragment your computer manually at any time To run Disk Defragmenter 1 Connect the computer to AC power 2 From the Start screen type disk 3 Click Optimize NOTE Windows includes the User Account Control feature to improve the security of your computer You may be prompted for your permission or password for tasks such as installing software running utilities or changing Wind...

Page 68: ...58 Chapter 8 Drives ENWW ...

Page 69: ...ssword in Computer Setup Unauthorized access to the contents of a hard drive DriveLock password or Automatic DriveLock password in Computer Setup Unauthorized startup from an optional external optical drive select models only optional external hard drive select models only or internal network adapter Boot options feature in Computer Setup Unauthorized access to a Windows user account Windows user ...

Page 70: ...lso use the same password for more than one Computer Setup feature Use the following tips for creating and saving passwords When creating passwords follow requirements set by the program Do not use the same password for multiple applications or websites and do not reuse your Windows password for any other application or website Use HP Client Security s Password Manager to store your user names and...

Page 71: ...f these passwords see the following topics Managing a BIOS administrator password To set change or delete this password follow these steps Setting a new BIOS administrator password 1 Turn on or restart the computer and then press esc while the Press the ESC key for Startup Menu message is displayed at the bottom of the screen 2 Press f10 to enter Computer Setup 3 Use a pointing device or the arrow...

Page 72: ...ord again leave the field empty and then press enter 8 To save your changes and exit Computer Setup click the Save icon in the lower left corner of the screen and then follow the on screen instructions or Use the arrow keys to select Main Save Changes and Exit and then press enter Your changes go into effect when the computer restarts Entering a BIOS administrator password At the BIOS administrato...

Page 73: ...ing a DriveLock password To set a DriveLock password in Computer Setup follow these steps 1 Turn on the computer and then press esc while the Press the ESC key for Startup Menu message is displayed at the bottom of the screen 2 Press f10 to enter Computer Setup 3 Use a pointing device or the arrow keys to select Security Hard Drive Tools DriveLock and then press enter 4 Click Set DriveLock Passwor...

Page 74: ...then press enter 5 Use a pointing device or the arrow keys select Set DriveLock Password and then press enter 6 Use the arrow keys to select an internal hard drive and then press enter 7 Use a pointing device or the arrow keys to select Change Password 8 When prompted type your current password and then press enter 9 When prompted type a new password and then press enter 10 When prompted type the ...

Page 75: ...hen any user passes the password credential the same random user and DriveLock master password will be used to unlock the drive NOTE A BIOS Administrator password must be set before you can access the Automatic DriveLock features Entering an Automatic DriveLock password To enable an Automatic DriveLock password in Computer Setup follow these steps 1 Turn on or restart the computer and then press e...

Page 76: ... to function abnormally Antivirus software can detect most viruses destroy them and in most cases repair any damage they have caused To provide ongoing protection against newly discovered viruses antivirus software must be kept up to date Windows Defender is preinstalled on your computer It is strongly recommended that you continue to use an antivirus program in order to fully protect your compute...

Page 77: ...ses install all critical updates from Microsoft as soon as you receive an alert You can choose whether updates are installed automatically To change the settings from the Start screen type c and then select Control Panel Select System and Security select Windows Update select Change settings and then follow the on screen instructions Using HP Client Security HP Client Security software is preinsta...

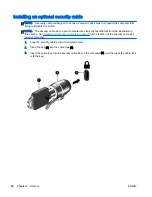
Page 78: ...ter may look slightly different from the illustration in this section See Getting to know your computer on page 5 for the location of the security cable slot on your computer 1 Loop the security cable around a secured object 2 Insert the key 1 into the cable lock 2 3 Insert the cable lock into the security cable slot on the computer 3 and then lock the cable lock with the key 68 Chapter 9 Security...

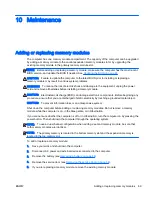
Page 79: ...rged of static electricity by touching a grounded metal object CAUTION To prevent information loss or an unresponsive system Shut down the computer before adding or replacing memory modules Do not remove a memory module while the computer is on in the Sleep state or in Hibernation If you are not sure whether the computer is off or in Hibernation turn the computer on by pressing the power button Th...

Page 80: ...odule To protect a memory module after removal place it in an electrostatic safe container 6 Insert a new memory module CAUTION To prevent damage to the memory module hold the memory module by the edges only Do not touch the components on the memory module a Align the notched edge 1 of the memory module with the tab in the memory module slot b With the memory module at a 45 degree angle from the s...

Page 81: ...he battery see Inserting a battery on page 44 9 Connect AC power and external devices to the computer 10 Turn on the computer Cleaning your computer Use the following products to safely clean your computer Dimethyl benzyl ammonium chloride 0 3 percent maximum concentration for example disposable wipes which come in a variety of brands Alcohol free glass cleaning fluid Water with mild soap solution...

Page 82: ...l in Ones or Notebooks Gently wipe the display using a soft lint free cloth moistened with an alcohol free glass cleaner Be sure that the display is dry before closing the display Cleaning the sides or cover To clean the sides or cover use a soft microfiber cloth or chamois moistened with one of the cleaning solutions listed previously or use an acceptable disposable wipe NOTE When cleaning the co...

Page 83: ...e containing computer model and SoftPaq information SoftPaq Download Manager allows you to specify one or more computer models to determine which SoftPaqs are available for download SoftPaq Download Manager checks the HP FTP site for updates to the database and software If updates are found they are downloaded and applied automatically SoftPaq Download Manager is available on the HP website To use...

Page 84: ...74 Chapter 10 Maintenance ENWW ...

Page 85: ...ties or changing Windows settings For more information see HP Support Assistant To access HP Support Assistant from the Start screen select the HP Support Assistant app Backing up your information Recovery after a system failure is as good as your most recent backup You should create system repair media and your initial backup immediately after initial system setup As you add new software and data...

Page 86: ...lities from the backup used for recovery 1 If possible back up all personal files 2 If possible check for the presence of the Recovery Image partition and the Windows partition From the Start screen type file and then click File Explorer or From the Start screen type pc and then select This PC NOTE If the Windows partition and the Recovery Image partition are not listed you must recover your opera...

Page 87: ...recovery message is displayed on the screen 5 Follow the on screen instructions Using Windows operating system media purchased separately To order a Windows operating system DVD contact support See the Worldwide Telephone Numbers booklet included with the computer You can also find contact information from the HP website Go to http www hp com support select your country or region and follow the on...

Page 88: ...before you give away or recycle your computer For more information on these features see HP Support Assistant To access HP Support Assistant from the Start screen select the HP Support Assistant app Using HP Software Setup HP Software Setup can be used to reinstall drivers or select software that has been corrupted or deleted from the system 1 From the Start screen type HP Software Setup 2 Open HP...

Page 89: ...ss the ESC key for Startup Menu message is displayed at the bottom of the screen 2 Press f10 to enter Computer Setup Navigating and selecting in Computer Setup To navigate and select in Computer Setup follow these steps 1 Turn on or restart the computer and then press esc while the Press the ESC key for Startup Menu message is displayed at the bottom of the screen NOTE You can use either a pointin...

Page 90: ...nge the hard drive mode To return all settings in Computer Setup to the values that were set at the factory follow these steps 1 Turn on or restart the computer and then press esc while the Press the ESC key for Startup Menu message is displayed at the bottom of the screen 2 Press f10 to enter Computer Setup 3 Use a pointing device or the arrow keys to select Main Restore Defaults 4 Follow the on ...

Page 91: ...f the screen and then follow the on screen instructions or Use the arrow keys to select Main Ignore Changes and Exit and then press enter Downloading a BIOS update CAUTION To reduce the risk of damage to the computer or an unsuccessful installation download and install a BIOS update only when the computer is connected to reliable external power using the AC adapter Do not download or install a BIO...

Page 92: ... software updates especially system BIOS updates BIOS installation procedures vary Follow any instructions that are revealed on the screen after the download is complete If no instructions are revealed follow these steps 1 From the Start screen type file and then select File Explorer 2 Click your hard drive designation The hard drive designation is typically Local Disk C 3 Using the hard drive pat...

Page 93: ...ultiBoot preferences You can use MultiBoot in the following ways To set a new boot order that the computer uses each time it is turned on by changing the boot order in Computer Setup To dynamically choose the boot device by pressing esc while the Press the ESC key for Startup Menu message is displayed at the bottom of the screen and then pressing f9 to enter the Boot Device Options menu To use Mul...

Page 94: ...ted or restarted follow these steps 1 Turn on or restart the computer and then press esc while the Press the ESC key for Startup Menu message is displayed at the bottom of the screen 2 Press f10 to enter Computer Setup 3 Use a pointing device or the arrow keys to select Advanced Boot Options MultiBoot Express Boot Popup Delay Sec and then press enter 4 In the MultiBoot Express Popup Delay Sec fiel...

Page 95: ...ostics UEFI 1 Turn on or restart the computer quickly press esc and then press f2 The BIOS searches three places for the diagnostic tools in the following order a Connected USB drive NOTE To download the HP PC Hardware Diagnostics UEFI tool to a USB drive see Downloading HP PC Hardware Diagnostics UEFI to a USB device on page 85 b Hard drive c BIOS 2 When the diagnostic tool opens click the type o...

Page 96: ...86 Chapter 12 Computer Setup BIOS MultiBoot and HP PC Hardware Diagnostics UEFI ENWW ...

Page 97: ...S support go to http www hp com go contactHP For worldwide support go to http welcome hp com country us en wwcontact_us html Here you can Chat online with an HP technician NOTE When support chat is not available in a particular language it is available in English E mail support Find support telephone numbers Locate an HP service center ENWW Contacting support 87 ...

Page 98: ...information to identify your computer When contacting support you will probably be asked for the serial number and possibly for the product number or the model number Locate these numbers before you contact support Your service label will resemble one of the examples shown below Refer to the illustration that most closely matches the service label on your computer Component 1 Product name 2 Serial...

Page 99: ...update or troubleshoot the operating system Regulatory label s Provide s regulatory information about the computer Wireless certification label s Provide s information about optional wireless devices and the approval markings of some of the countries or regions in which the devices have been approved for use ENWW Labels 89 ...

Page 100: ...90 Chapter 13 Support ENWW ...

Page 101: ...14 Specifications Input power Operating environment ENWW 91 ...

Page 102: ...y with an AC adapter or a DC power source supplied and approved by HP for use with this computer The computer can operate on DC power within the following specifications Input Power Rating Operating voltage and current 18 5 V dc 3 5 A 65 W 19 5 V dc 3 33 A 65 W 19 V dc 4 74 A 90 W 19 5 V dc 4 62 A 90 W 19 5Vdc 2 31A 45W NOTE This product is designed for IT power systems in Norway with phase to pha...

Page 103: ...C 41 F to 95 F Nonoperating 20 C to 60 C 4 F to 140 F Relative humidity noncondensing Operating 10 to 90 10 to 90 Nonoperating 5 to 95 5 to 95 Maximum altitude unpressurized Operating 15 m to 3 048 m 50 ft to 10 000 ft Nonoperating 15 m to 12 192 m 50 ft to 40 000 ft ENWW Operating environment 93 ...

Page 104: ...94 Chapter 14 Specifications ENWW ...

Page 105: ...and similar security devices that check carry on baggage use X rays instead of magnetism and do not damage drives In flight computer use is at the discretion of the airline If you plan to use the computer during a flight check with the airline in advance If the computer will be unused and disconnected from external power for more than 2 weeks remove the battery and store it separately If you are s...

Page 106: ... requirements for each location in which you plan to use the computer Voltage frequency and plug configurations vary WARNING To reduce the risk of electric shock fire or damage to the equipment do not attempt to power the computer with a voltage converter kit sold for appliances 96 Appendix A Traveling with the computer ENWW ...

Page 107: ...s available in English E mail HP support Find HP support worldwide telephone numbers Locate an HP service center Resolving issues The following sections describe several common issues and solutions The computer is unable to start up If the computer does not turn on when you press the power button the following suggestions may help you determine why the computer does not start up If the computer is...

Page 108: ...is on but not responding If the computer is turned on but is not responding to software or keyboard commands try the following emergency shutdown procedures in the sequence provided until shutdown occurs CAUTION Emergency shutdown procedures result in the loss of unsaved information Press and hold the power button for at least 5 seconds Disconnect the computer from external power and remove the ba...

Page 109: ...m obstructions Be sure that the cable or DSL modem and its power cord are properly connected and that the lights are on Be sure that the wireless router or access point is properly connected to its power adapter and to the cable or DSL modem and that the lights are on Disconnect and then reconnect all cables and turn the power off and then back on A disc does not play Save your work and close all ...

Page 110: ...lank area of the computer desktop and select Screen resolution b Specify a primary display and a secondary display NOTE When using both displays the DVD image will not appear on any display designated as the secondary display The process of burning a disc does not begin or it stops before completion Be sure that all other programs are closed Turn off Sleep mode Be sure that you are using the right...

Page 111: ...nstallation instructions direct you to unplug the computer unplug it after being properly grounded and before removing a cover Keep components in their electrostatic safe containers until you are ready to install them Avoid touching pins leads and circuitry Handle electronic components as little as possible Use nonmagnetic tools Before handling components discharge static electricity by touching a...

Page 112: ...102 Appendix C Electrostatic discharge ENWW ...

Page 113: ...caring for your computer 71 checking audio functions 36 cleaning your computer 71 components bottom 13 display 8 left side 7 rear 14 right side 5 top 10 Computer Setup BIOS administrator password 61 DriveLock password 62 navigating and selecting 79 restoring factory settings 80 computer traveling 45 95 connecting to a WLAN 18 connector power 14 conservation power 45 corporate WLAN connection 18 cr...

Page 114: ...ndows key 12 L labels Bluetooth 89 Microsoft Certificate of Authenticity 89 regulatory 89 serial number 88 wireless certification 89 WLAN 89 latch battery cover release 13 legacy support USB 79 lights AC adapter battery 14 caps lock 11 microphone mute 11 num lock 11 power 5 RJ 45 network 14 TouchPad 11 webcam 9 wireless 11 low battery level 43 M maintenance Disk Cleanup 57 Disk Defragmenter 57 med...

Page 115: ...ing 27 scrolling 26 TouchPad light identifying 11 TouchPad zone identifying 10 traveling with the computer 45 89 95 troubleshooting disc burning 100 disc play 99 troubleshooting external display 100 turning off the computer 39 U unresponsive system 39 USB 3 0 charging powered identifying 14 USB 3 0 port 14 USB cable connecting 51 USB devices connecting 51 description 50 removing 51 USB hubs 50 USB...

Page 116: ...106 Index ENWW ...
Reviews: