background image

2

Safety and Maintenance Guidelines

Important Safety Information

For safety and regulatory information, refer to the 

Product Notices provided on your media disc, if one

is included, or in your documentation kit. To locate updates to the user guide for your product, go to

http://www.hp.com/support

, and select your country. Select Drivers & Downloads, and then follow the

on-screen instructions
A USB cable for power and data is included with the monitor. Use only the supplied cable when

connecting the monitor to a computer.

WARNING!

To reduce the risk of serious injury, read the 

Safety and Comfort Guide. It describes

proper workstation, setup, posture, and health and work habits for computer users, and provides

important electrical and mechanical safety information. This guide is located on the Web at

http://www.hp.com/ergo

 and/or on the documentation disc, if one is included with the monitor.

WARNING!

LCD monitors that are inappropriately situated on dressers, bookcases, shelves, desks,

speakers, chests, or carts may fall over and cause personal injury.
Care should be taken to route the USB cable connected to the LCD monitor so that it can not be

pulled, grabbed, or tripped over.

CAUTION:

 For the protection of the monitor, as well as the computer, connect the computer power

cord to some form of surge protection device such as a power strip or Uninterruptible Power Supply

(UPS). Not all power strips provide surge protection; the power strips must be specifically labeled as

having this ability. Use a power strip whose manufacturer offers a Damage Replacement Policy so

you can replace the equipment, if surge protection fails.
Use the appropriate and correctly sized furniture designed to properly support your HP LCD monitor.

CAUTION:

Do not pick up the monitor by its protective case. The case and monitor are attached

together by magnets. If held improperly, the monitor could detach from the case and fall.

Maintenance Guidelines

To enhance the performance and extend the life of the monitor:

Do not open the monitor cabinet or attempt to service this product yourself. Adjust only those

controls that are covered in the operating instructions. If the monitor is not operating properly or

has been dropped or damaged, contact an authorized HP dealer, reseller, or service provider.

Use only a power source and connection appropriate for this monitor, as indicated on the label/

back plate of the monitor.

Turn the monitor off when not in use. You can substantially increase the life expectancy of the

monitor by using a screen saver program and turning off the monitor when not in use.

NOTE:

Monitors with a “burned-in image” are not covered under the HP warranty.

Slots and openings in the cabinet are provided for ventilation. These openings must not be

blocked or covered. Never push objects of any kind into cabinet slots or other openings.

Do not drop the monitor or place it on an unstable surface.

2

Chapter 2   Safety and Maintenance Guidelines

Summary of Contents for EliteDisplay S140u

Page 1: ...User Guide ...

Page 2: ...services Nothing herein should be construed as constituting an additional warranty HP shall not be liable for technical or editorial errors or omissions contained herein This document contains proprietary information that is protected by copyright No part of this document may be photocopied reproduced or translated to another language without the prior written consent of Hewlett Packard Company Fi...

Page 3: ...xt set off in this manner indicates that failure to follow directions could result in bodily harm or loss of life CAUTION Text set off in this manner indicates that failure to follow directions could result in damage to equipment or loss of information NOTE Text set off in this manner provides important supplemental information iii ...

Page 4: ...iv About This Guide ...

Page 5: ...er and Setting Up the Monitor 4 Attaching the Protective Cover 4 Setting Up the Monitor 6 Installing Drivers and Connecting an HP Notebook Computer 8 Display Modes 10 Extend Mode Default 10 Mirror Mode 11 Primary Display 11 Rear Panel Controls 12 4 Finding More Information 13 Product Support 13 Preparing to Call Technical Support 13 Locating the Rating Labels 13 5 Technical Specifications 14 Monit...

Page 6: ...vi ...

Page 7: ...reen support for lower resolutions Single USB 3 0 connection for power and video with USB 3 0 cable provided LED backlit panel with ultra thin screen Integrated adjustable stand transforms into carrying case that folds flat for fast easy transport Built in back panel control buttons for power and brightness adjustment Software and documentation disc that includes monitor drivers product documentat...

Page 8: ... UPS Not all power strips provide surge protection the power strips must be specifically labeled as having this ability Use a power strip whose manufacturer offers a Damage Replacement Policy so you can replace the equipment if surge protection fails Use the appropriate and correctly sized furniture designed to properly support your HP LCD monitor CAUTION Do not pick up the monitor by its protecti...

Page 9: ...50 50 mix of water and Isopropyl alcohol CAUTION Spray the cleaner onto a cloth and use the damp cloth to gently wipe the screen surface Never spray the cleaner directly on the screen surface It may run behind the bezel and damage the electronics CAUTION Do not use cleaners that contain any petroleum based materials such as benzene thinner or any volatile substance to clean the monitor screen or c...

Page 10: ... flap with a ridge on one side Hold the cover with the ridge facing up and the flap over the HP logo on the monitor bezel The top of the protective cover is now lined up with the top of the monitor 3 Lower the protective cover onto the monitor As the protective cover contacts the monitor magnets in the bottom edge of the cover align and attach to the monitor 4 Chapter 3 Setting Up and Using the Mo...

Page 11: ...o secure the protective cover over the screen NOTE If the flap cannot be folded over the top of the monitor then the cover has been attached with the wrong side up Carefully detach the cover turn it over and repeat the procedure Attaching the Protective Cover and Setting Up the Monitor 5 ...

Page 12: ... monitor by its protective case The case and monitor are attached together by magnets If held improperly the monitor could detach from the case and fall 1 Support the monitor with one hand and lift the flap 6 Chapter 3 Setting Up and Using the Monitor ...

Page 13: ...pen the protective case 3 Set the bottom edge of the monitor on a flat surface with the protective case behind the monitor 4 Fold the protective case toward the back of the monitor Attaching the Protective Cover and Setting Up the Monitor 7 ...

Page 14: ... exhibit compatibility issues on Windows Vista and later versions in certain circumstances NVIDIA SLI in SLI mode Other GPU configurations including the following are currently unsupported and will not function on Windows Vista and later versions Crossfire SLI not in SLI mode Multiple WDDM graphics drivers active at once Do not turn on power to the monitor until you have installed the drivers on y...

Page 15: ...e cable to the computer in one of the following configurations Insert the primary USB connector on the other end of the cable into a 3 0 USB port on the computer Insert both USB connectors on the other end of the cable into two USB 2 0 ports on the computer Installing Drivers and Connecting an HP Notebook Computer 9 ...

Page 16: ...e drivers Display Modes When the monitor is attached to your notebook or desktop computer the monitor can be configured to use either extend mode or mirror mode or it can be the primary display Extend Mode Default In extend mode the default mode your Windows desktop display spreads over to the attached monitor This mode allows you to perform multiple tasks more effectively without overlapping wind...

Page 17: ...nitor in mirror mode through the Windows display settings To use this method 1 Position the cursor anywhere on your Windows desktop right click and then On Windows Vista Windows 7 and the Windows 8 series click Personalize Display Settings On Windows XP click Properties Settings 2 In the Display drop down menu click the attached monitor and then On Windows Vista Windows 7 and the Windows 8 series ...

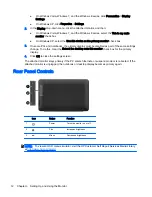
Page 18: ...of the same settings change To do this clear the Extend the desktop onto this monitor check box for the primary display 4 Click OK to close the settings screen The attached monitor stays primary if the PC enters hibernate or suspend mode or is rebooted If the attached monitor is unplugged the notebook or desktop display becomes primary again Rear Panel Controls Icon Button Function 1 Power Turns t...

Page 19: ... the monitor you may need to call technical support Have the following information available when you call Monitor model number Monitor serial number Purchase date on invoice Conditions under which the problem occurred Error messages received Hardware configuration Name and version of the hardware and software you are using Locating the Rating Labels The rating labels on the monitor provide the sp...

Page 20: ...duced power state The reduced power state will be entered into if the monitor detects the absence of either the horizontal sync signal and or the vertical sync signal Upon detecting the absence of these signals the monitor screen is blanked the backlight is turned off and the power light is turned amber When the monitor is in the reduced power state the monitor will utilize 0 5 watts of power Ther...

Reviews: