background image

19 


3.2


Add Speed Point 

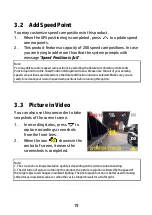
You may customize speed cam positions in this product. 
1.


When the GPS positioning is completed , press 

  to update speed 

camera points. 

2.


This product features a capacity of 200 speed cam positions. In case 
you are trying to add more than that the system prompts with 
message "

Speed Position is full

". 

Note: 
You may delete custom speed cam positions by selecting the 

Delete Last Position

 or 

Delete All 

Position

 option from the 

Speed Position Management

 menu. Please note that all of your existing 

speed cam positions are deleted once the 

Delete All Position option

 is selected. Make sure you are 

ready to recreate your custom speed cam positions before running this option. 


3.3


Picture in Video 

You can also use this camcorder to take 
snapshots of the current scene. 

1.


In recording status, press 

  to 

capture recording screen shots 
from the front lens. 

2.


When the icon 

  showes in the 

central of screen, it means the 
screenshots is completed. 


Note:   
1. The screen shots image resolution quality is depending on the video resolution setting.   
2. The definition of picture in video by this product, the picture resolution is limited by the speed of 
the target object and changes in ambient lighting. The photograph function is better used for taking 
still pictures in accident scenes or when the car is stopped to wait for a traffic light. 

Summary of Contents for f910g

Page 1: ...f910g Car Camcorder User Manual ...

Page 2: ... Insert the Memory Card 9 2 1 2 Remove the Memory Card 9 2 2 Installing in Vehicles 10 2 2 1 Mount the Camcorder to Windshield 10 2 2 2 Adjust the Camcorder 11 2 3 Connecting to Power 12 2 4 LED Indicator 12 2 5 Powering the Camcorder On Off 13 2 5 1 Auto Power On Off 13 2 5 2 Manual Power On Off 13 2 5 3 Reset 13 2 6 Initial Settings 14 2 6 1 Set Time zone 14 2 6 2 Set the Date Time 15 3 Using th...

Page 3: ...lert 23 3 4 4 Headlight Warning 24 3 4 5 LDWS 25 3 4 6 FCWS 27 3 4 7 FCMD 28 3 5 Parking Mode 29 3 5 1 Park Recording 29 3 5 2 Motion and Collision Detection 30 3 5 3 Timelapse 30 3 6 Collision Detection 31 3 7 File Playback 32 3 7 1 Playback Screen 32 3 8 Deleting Files 34 4 Adjusting the Settings 35 4 1 Using the Menu 35 4 2 Menu Items 35 5 Installing the Software 40 6 SuperCar 41 7 Specificatio...

Page 4: ... However there is no guarantee that interference will not occur in a particular installation If this equipment does cause harmful interference to radio or television reception which can be determined by turning the equipment off and on the user is encouraged to try to correct the interference by one or more of the following measures Reorient or relocate the receiving antenna Increase the separatio...

Page 5: ...CE Regulatory Notice The product herewith complies with the requirements of the Low Voltage Directive 2014 35 EU the EMC Directive 2014 30 EU RED Directive 2014 53 EU and the RoHS Directive 2011 65 EU Notes on Installation 1 Please measure the front windshield viewing area make sure not to block driver s front view install the camcorder below the rearview mirror the central higher right position o...

Page 6: ...rate the camcorder while driving Set up time zone time and date accurately before you use this camcorder Please use SuperCar software under the condition that Electronic Map are functioning normally The firmware function in the camcorder is for reference only drivers are advised to exercise discretion based on actual road conditions The results of GPS positioning are only for reference and should ...

Page 7: ...imits permitted by applicable law We do not take any responsibilities for the loss of use of the product This camcorder gets warm when in use this is normal Improper use or operation of the product may result in damage of the product or its accessories and void the warranty HP Inc is NOT responsible for the loss of any data content during operation Before you start using the product it is assumed ...

Page 8: ...ollision is detected the camcorder will automatically trigger the emergency recording Parking Mode Multifunction traffic safety reminder Support SDHC class 10 and micro SD memory storage 16GB or above support up to 32GB Built in super capacitor Delicate LED design 1 2 Package Contents The package contains the following items In case there is any missing or damaged item contact your dealer immediat...

Page 9: ...Emergency Recording Confirm Button OK 2 Power 9 GPS Antenna 3 Memory Card Slot 10 Speaker 4 USB Power Connector 11 Wide Angle Lens 5 Menu Back Button 12 Microphone 6 Add Speed Point Up Button 13 LED Indicator 7 Snapshot Down Button 14 LCD Panel 15 Knob ...

Page 10: ...tching off the camcorder completed before removing the memory card Note 1 Do not remove or insert the memory card when the camcorder is turned on This may damage the memory card 2 Support SDHC class 10 and memory storage 16GB or above support up to 32GB 3 Please format the micro SD cards before the initial use The formatted file type for this camcorder is FAT32 file 4 Periodically format the micro...

Page 11: ...ng the sticker please wipe and clean the windshield During the installation please make sure the bubbles in between the sticker and the window are all gone 2 Peel off the protective plastic sheet from the adhesive pad 3 Place and press the bracket firmly onto the electrostatic sticker on the windshield window Make sure the base is securely locked in place ...

Page 12: ...11 2 2 2 Adjust the Camcorder 1 Loosen the knob to swivel the camcorder to adjust view angle 2 Then tighten the knob to make sure the camcorder is securely locked in place ...

Page 13: ...sure front windshield viewing area so as not to block the driver s field of view and install the camcorder under the driving mirror upper central of the front windshield And we recommend that the sky and the land occupied by 50 in the recording screen please adjust the camcorder so that the alignment icon is aligning the driving lane Proper installation enables the camcorder to maximize the effici...

Page 14: ...y saves the recording and turns off the power within 3 seconds Note The camcorder is built in super capacitor After start the car engine please wait a few seconds for charging the camcorder and then the camcorder will automatically power on and start recording 2 5 2 Manual Power On Off To manually turn on the power press the POWER button To turn off press and hold the POWER button for at least 3 s...

Page 15: ...t the time zone do the following 1 Press the button to enter the OSD menu 2 Press the button to select Set Time zone and then press the OK button for entering function menu 3 Press the button to set the current time zone and then press the OK button to complete setting 4 Press the button to return to recording screen Note 1 If Time Sync is on camcorder clock will be calibrated via satellite clock ...

Page 16: ... to select Date Time and then press the OK button for entering function menu 3 Press the button to adjust the value and then press the OK button to set the next field 4 Repeat step 3 until the date and time setting is completed Note To ensure the accuracy of the video file time please reset the date and time when not in use over 7 days ...

Page 17: ...with the car engine please manually connect the power supply with the vehicle power and then power on or manually power off the camcorder and then release the connector with the car power supply 2 It can be configured to save a video file for every 30 Sec 1 or 3 minutes of recording 3 All the videos and photos are saved in the memory card if memory card is full loop recording will be generally ove...

Page 18: ...ring video recording press the button to enter the OSD menu long press 3 seconds to enter 2 GRID FUNCTION CHART 4 Add Speed Point Button During video recording press the button to add a speed cam point 5 PIV Picture in Video Button Press to capture video screen shots from the front camera 6 Emergency Recording Button During video recording press the OK button to enter emergency recording mode ...

Page 19: ...ngth is same as the recording interval setting When the emergency recording length reaches the setting the system will return to the general recording mode Note 1 If the Collision Detection function is enabled and a collision is detected the camcorder will automatically trigger the emergency recording 2 The emergency file is created as a new file and save in Emergency folder which will be protecte...

Page 20: ...ition option is selected Make sure you are ready to recreate your custom speed cam positions before running this option 3 3 Picture in Video You can also use this camcorder to take snapshots of the current scene 1 In recording status press to capture recording screen shots from the front lens 2 When the icon showes in the central of screen it means the screenshots is completed Note 1 The screen sh...

Page 21: ...d Cam Alert Speed Position Management Speed Limit Alert LDWS and FCWS to be enabled Be sure to check that Satellite positioning has been completed prior to using the product 3 The detections of LDWS FCWS and FCMD may be inaccurate when used in rain at night or in environments of insufficient lighting Drivers are advised to exercise discretion based on actual road conditions The following driving s...

Page 22: ...ring function menu 3 Press the button to select On and then press the OK button to enable the function 4 Press the button to return recording screen 5 The alarm screen turns red to remind you to slow down if you are driving faster than the speed limit Note The speed cam alert function must have the speed cam datum from the country you use The function will be void if the product is used in any oth...

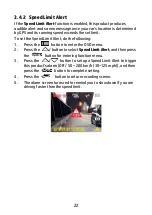
Page 23: ...llowing 1 Press the button to enter the OSD menu 2 Press the button to select Speed Limit Alert and then press the OK button for entering function menu 3 Press the button to set up a Speed Limit Alert to trigger this product s alarm Off 50 200 km h 30 125 mph and then press the OK button to complete setting 4 Press the button to return recording screen 5 The alarm screen turns red to remind you to...

Page 24: ... To enable the Driver Fatigue Alert do the following 1 Press the button to enter the OSD menu 2 Press the button to select Driver Fatigue Alert and then press the OK button for entering function menu 3 Press the button to select On and then press the OK button to enable the function 4 Press the button return to recording screen 5 This product produces audible alert and screen message when Driver F...

Page 25: ...in basements parking lots and tunnels To enable the Headlight Warning do the following 1 Press the button to enter the OSD menu 2 Press the button to select Headlight Warning and then press the OK button for entering function menu 3 Press the button to select On and then press the OK button to enable the function 4 Press the button to return recording screen 5 This product produces audible alert a...

Page 26: ...button to select LDWS and then press the OK button for entering function menu 3 Press the button to select On and then press the OK button to enable the function 4 Press the button to return to recording screen 5 After enabling LDWS the screen will display traffic lane align icon please adjust the camcorder so that the horizontal line and the eye level are overlapped and the slash lines are center...

Page 27: ...end that the sky and the ground occupied 50 of the video screen install the bracket then adjust the camcorder to make the lane is aligned to the lane alignment icon Correct installation makes the camcorder to maximize the efficiency and improve the accuracy of LDWS 2 Make sure that traffic lane align icon will not be obscured other things e g hood It may cause misjudgment if the endpoint is obscur...

Page 28: ...nd the leading vehicle distance below 15 meters it will also produce a warning screen and voice reminder To set the FCWS Forward Collision Warning System do the following 1 Press the button to enter the OSD menu 2 Press the button to select FCWS and then press the OK button for entering function menu 3 Press the button to select On and then press the OK button to enable the function 4 Press the bu...

Page 29: ...menu 2 Press the button to select FCMD and then press the OK button for entering function menu 3 Press the button to select On and then press the OK button to enable the function 4 Press the button to return recording screen 5 This product produces audible alert and screen message when FCMD activates Note The camcorder will detects the front image change to determine FCMD notification alert so if ...

Page 30: ... cable is not included in the package Please ask for more information from your distributor 3 5 1 Park Recording In normal recording press and hold OK key for 3 seconds the screen will show message Press OK key to power off or enter Park Recording after 10 sec Please wait for 10 seconds and the camcorder will enter Park Recording automatically The camcorder will turn off the screen temporarily but...

Page 31: ...will be saved in the Emergency folder 2 In this mode the event will be recorded for 10 seconds per file If the event lasts more than 10 seconds the camcorder will keep recording up to 2 minutes 3 5 3 Timelapse In normal loop recording mode press and hold OK key for 3 seconds the screen will show message Press OK to power off or enter Timelapse after 10 sec Please wait for 10 seconds and the camcor...

Page 32: ...nge the sensitivity of this camcorder s collision detection High Sensitivity Normal Sensitivity Low Sensitivity Off and then press the OK button for entering function menu 4 Press the button return to recording screen Note The emergency file is created as a new file and saves in Emergency folder which will be protected to avoid being overwritten by normal loop recording The emergency video folder ...

Page 33: ...wse video files select the video file and then press OK button to enter Playback Mode 5 Press the repetitively to return recording screen 3 7 1 Playback Screen No Icon Item Description 1 1 30 File Number Total File Indicates of the total number of files 2 4 X Fast Forward Fast Rewind icon Indicates video fast forward and rewind status 3 File name Indicates the file name of video picture 4 Return P...

Page 34: ...orward playing of video Press button to view next file 7 Playback Pause button Press the OK button to play or pause the video 8 Playback Duration Total Duration Indicates video playback time and total duration 9 Date and time Indicates the date and time of film 10 Previous File When viewing pictures press the button will switch over to the previous file 11 Next File When viewing pictures press the...

Page 35: ...K button to enter the menu Press button to browse files select the files you want to delete and then press OK button to enter the menu Press the button to select item and then press the OK button to confirm or cancel the selection Delete All Press the button to select Delete All and then press the OK button to enter the menu Press the button to select item and then press the OK button to confirm o...

Page 36: ...escription Available option Playback Select the file category that you want to view Video Emergency Picture Satellite Status Displays the current state of the satellite reception Satellite Synchronization If the satellite time is enabled the car camcorder clock will synchronize according to the satellite time zone you set When you turn on this feature it will display the satellite time preferentia...

Page 37: ...nd a warning message is displayed on the screen Press the button to set the speed limit You can set the off or set speed limit from 50 to 200km h 30 to 125mph Set Time zone Set the time zone you are in Press the button to set the satellite time You may customize it between GMT 12 00 GMT 14 00 Date Time Set the date and time Press the button to adjust the value and then press the OK button to set t...

Page 38: ...After 30 sec Off After 3 min Off LED Setting On Off Voice Record Setting for activating audio in the video On Off Key Tone Turn on off key tone and power on tone On Off Volume Adjust the sound volume Press the button to set the volume It can be set between1 10 Record Interval Save respective video files in a length of the selected duration 30 sec 1 min 3 min Parking Mode To monitor the vehicle whe...

Page 39: ... is determined by GPS and the LDWS function is enabled this camcorder produces audible alert and screen message when you drive off of or change lanes at speeds over 70 km h 43 mph On Off FCWS When FCWS is activated after satellite positioning camcorder will issue audible alert and screen message when vehicle speed is above 60 km h 37 mph and the distance with the front vehicle is less than 15m On ...

Page 40: ... is recommended that you should check the Table of voltage and frequency of different countries for the correct setting 60Hz 50Hz Format Format the memory card inserted in the equipment All the files in the card will be erased Yes No Default Setting The system reverts to the default setting Yes No Firmware Version Indicates the current firmware version ...

Page 41: ...e CD player 2 If the CD does not execute automatically please use Windows File Manager to execute the Install_CD exe file in the CD The following screen will be shown up 3 Press the Menu item to start the installation process according to the instructions on screen ...

Page 42: ...ass 15 Signal Noise Ratio SNR 8 Speed Meter 16 G Sensor Note 1 To display the route on Electronic Map please make sure the internet is connected before starting the video playback 2 Video files of front view camera MOV and GPS G Sensor files NMEA must be stored in the same folder before starting the playback 3 The SuperCar software is only applicable to Windows operating system For Mac users pleas...

Page 43: ...ens Wide Angle Fixed Focus lens F2 0 f 2 34mm Focus Range 1 5m Infinity Satellite System GPS Movie Clip Resolution 1920X1080 30fps HDR 1280X720 30fps HDR 1920X1080 27 5fps HDR 1280X720 27 5fps HDR Format MOV Still Image Resolution depends on video resolution setting Format JPEG Shutter Electronic shutter G Sensor 3 Axis G Force sensor ISO Auto White Balance Auto Microphone Yes Speaker Yes Interfac...

Page 44: ...43 Item Description Battery Super Capacitor Best Working Temperature 0 45 C Operating Humidity 20 70 RH Storage Temperature 20 70 C Dimensions 108 x 48 2 x 51 1 mm Weight Approx 92g without memory card ...

Reviews: