background image

Summary of Contents for HP LaserJet IIISi Printer

Page 1: ......

Page 2: ...User sGuide Qolo4a HP LaserJetEnvelope Feeder HP LaserJet 4Si Printer HP LaserJet IIISi Printer ...

Page 3: ...e paper source and choose envelope size This manual HP part number 5961 0509 is designed for knowledgeable HP LaserJet printer users HP LaserJet 4SiSofZware Application Notes or HP LaserJet IIISi Software Application Notes Refer to this manual for instructions on how to print envelopes using your software application Copies of individual software application notes can be obtained by calling Hewlet...

Page 4: ...splay indicates one of the keys such as m on the printer control panel or your computer keyboard Notes contain important information set off from the text Note Caution Caution messages appear before procedures which if not observed could result in loss of data or in damage to equipment Warding Warning messages alert you to a specific procedure or practice which if not followed correctly could caus...

Page 5: ...er Chapter 2 explains procedures for installing the feeder and selecting envelope size from the control panel It also describes removing the feeder from the printer Chapter 3 PrintingEnvelopes Chapter 3 provides information about printing envelopes using software or a BASIC program Chapter 4 Troubleshooting Envelope FeederProblems Chapter 4 addresses envelope printing problems and suggests the rec...

Page 6: ... 2 1 Parts of the Envelope Feeder 2 2 Installingthe Envelope Feeder 2 3 LoadingEnvelopes 2 7 SelectingEnvelope Size 2 12 Removingthe Envelope Feeder 2 14 3 Printing Envelopes 3 1 PrintingEnvelopes Using Software 3 2 printing Envelopes UsingGeneric Instructions 3 3 For the HP LaserJet 4 3 3 For the HP LaserJet IIISi 3 6 PrintingEnvelopesUsing a BASIC Program 3 8 ...

Page 7: ...Once 4 7 Image Problems 4 8 Return Address ImageProblems 4 9 Marginal Print Quality 4 9 Blank Envelopes 4 9 Clearing Envelope Jams 4 10 Testing the Envelope Feeder 4 11 To Print an EnvelopeSelf Test 4 12 Customer Support 4 15 Refer to theManuals 4 15 CallYour Dealer 4 15 CallHewlett Packard s Customer SupportCenter 4 15 Call WorldwideSales and SupportOffices 4 16 Limited Warranty 4 16 Warranty Exc...

Page 8: ...1 htruduhgthe H I LaserJet Envelope Feeder ...

Page 9: ...o 100 envelopes 0 Prints up to 12 envelopes per minute Prints up to 3 000 envelopes per month 0 Prints envelopes and letters in the same print job 0 Adds a third paper source to the HP LaserJet printer 0 Provides easy envelope size selection using software or the printer s control panel Attaches easily to the printer 0 Remains attached to the printer always ready to print envelopes or can be remov...

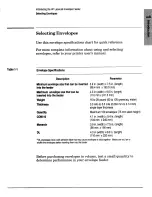
Page 10: ...3 in width x 9 5 in length insertedintothe feeder 110mmx241 3mm Weight 16to 28 pound 60to 105gramslsq meter Thickness 3 3 milsto 5 5 mils 0 084 mm to 0 14 mm single layer thickness Quantlty Maximum 100envelopes 75 mm stack height COM 10 4 1 in width x 9 4 in length 104 mm x 240 mm Monarch 3 9 in width x 7 5 in length 98 mm x 190mm DL 4 3 in width x 8 6 in length 110mm x 220 mm DLenvelopes havea se...

Page 11: ...reading now 4 Three foam packing pieces that must be removed from inside the envelope feeder Note Make sure to remove all tape from the envelope feeder and upper paper tray cover and remove the three foam packing pieces Figure1 1 Contentsof the Envelope Feeder Box Your HP LaserJet envelope feeder was inspected before it was shipped from Hewlett Packard If it has become damaged or any parts are mis...

Page 12: ...2 Ins the EnvelopeFeeder ...

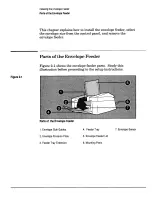
Page 13: ... panel and remove the envelope feeder Parts of the EnvelopeFeeder Figure 2 1 shows the envelope feeder parts Study this illustration before proceeding to the setup instructions Figure2 1 Partsof the EnvelopeFeeder 1 Envelope Side Guides 4 Feeder Tray 7 Envelope Sensor 2 Envelope Pressure Plate 3 Feeder Tray Extension 5 Envelope Feeder Lid 6 Mounting Posts ...

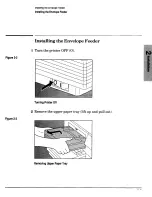
Page 14: ...tnveiope beeaer Installingthe EnvelopeFeeder Installing the Envelope Feeder 1 Turn the printer OFF 0 Figure2 2 Turning PrinterOff 2 Remove the upper paper tray lift up and pull out Figure2 3 Removing Upper Paper Tray ...

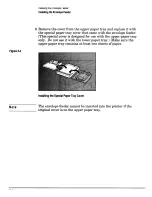
Page 15: ... that came with the envelope feeder This special cover is designed for use with the upper paper tray only Do not use it with the lower paper tray Make sure the upper paper tray contains at least two sheets of paper Installingthe SpecialPaper Tray Cover Note The envelope feeder cannot be inserted into the printer if the original cover is on the upper paper tray ...

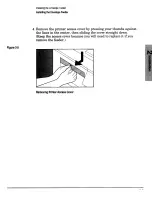
Page 16: ... EnvelopeFeeder 4 Remove the printer access cover by pressing your thumbs against the lines in the center then sliding the cover straight down Keepthe access cover because you will need to replace it if you remove the feeder Removing Printer Access Cover ...

Page 17: ...e EnvelopeFeeder 5 Replace the upper paper tray in the printer 6 Insert the envelope mounting posts into the holes in the front of the printer that were behind the access cover Push the feeder firmly into the printer InsertingEnvelopeFeeder Into Printer ...

Page 18: ...eeder holds 100 envelopes If more than 100 envelopes are loaded the feeder may not feed envelopes correctly Do not compress the envelope stack before loading Note 2 Lift the envelope feeder lid all the way up and open the feeder tray If you are loading Monarch envelopes leave the small tray extension folded up as shown in figure 2 7A If you are loading COM 10and DL envelopes unfold the tray extens...

Page 19: ...in until they stop against the back wall of the feeder Thisillustration shows loading Monarch envelopes because the feeder tray extension is not unfolded InsertingEnvelopesintothe Envelope Feeder Note Position envelopes with preprinted addresses and logos or the location for return addresses in the near left corner of the envelope feeder as you face the printer as shown above Most software applica...

Page 20: ...lopeFeeder LoadingEnvelopes 5 Push the envelope side guides toward the envelopes push from the bottom of the guides not the top The guides should barely touch the envelopes Figure 2 9 Setting Side GuidesAgainst Envelopes ...

Page 21: ...d the inside edges resting against the back wall of the feeder as shown in figure 2 1OA Do not load the envelope stack as shown in figure 2 10B with the outside edges uneven with each other Adjusting Envelopesin the Feeder Note The envelope stack must be square as shown in figure 2 10A above or the envelopes will not feed correctly ...

Page 22: ...sure plate and place it on top of the envelope stack Do not be afraid to push the lid down extra effort may be needed to release the pressure plate Figure2 11 Releasingthe PressurePlate 8 Proceed to SelectingEnvelope Size on the next page to enter the envelope size into the control panel ...

Page 23: ... is displayed on the control panel EE TRFIY size The last selected envelope size is displayed for 10 seconds on the control panel when 1 The printer is powered up 2 The envelopes are removed and then replaced or 3 The feeder is empty and then loaded with envelopes Note You must change envelope size within the 10 second limit before the display changes to E EiF i r HP LaserJet 4Si 88 F c L f E 7 or...

Page 24: ...to find the size you want If your envelope size is not listed choose the next largest envelope size Envelope sizes are listed in the table below Table2 1 Envelope Sizes _ _ DisplayReads Size EE TRRY COPllO EE TRRY MONUEC EE TRRY DL 4 1 in x 9 4 in 104mm x 240 mm 3 9 in x 7 5 in 98 mmx 190 mm 4 3 in x 8 6 in 110 mm x 220 mm 4 Click to save the selection An asterisk appears in the display 6 Click m ...

Page 25: ...om the printer 3 Remove the upper paper tray and take off the special cover Figure2 12 4 Replace the original cover on the paper tray 5 Replace the printer access cover Slide the two end tabs into the slots at the top of the opening and push straight up until the cover snaps into place Replacingthe Printer Access Cover 6 Insert the upper paper tray into the printer 7 Turn the printer ON 8 Store th...

Page 26: ...3 ...

Page 27: ...ation package If application notes are unavailable for your software look in your software manual for instructions on printing envelopes with an envelope feeder or refer to PrintingEnvelopes Using Generic Instructions on the next page of this manual Note If you did not receive the HP LaserJet Software Application Notes for your printer you can order it through Hewlett Packard s Customer Support Ce...

Page 28: ...re proceeding with these instructions If the envelope feeder is not installed follow the instructions in Instal1ing the Envelope Feeder in chapter 2 Also the envelope size must be entered into the printer s control panel see Selectingthe Envelope Size in chapter 2 before you follow these instructions If your printer is an HP LaserJet IIISi skip to the next page and follow the instructions for the ...

Page 29: ...splay Leave the printer offline 2 Enter landscape orientation into your software application If your software does not allow you to select orientation select landscape orientation from the control panel by following these steps a Click once CIRIEHTFITI0t I YF appears b Click Eto select L for landscape The display reads ORIENTFITION L c Click to save your selection An asterisk Y appears in the disp...

Page 30: ...15 mm from the edges of the envelope 2 Type the return address on your screen 3 Move the cursor down one inch from the bottom line of the return address and tab over about 3 id75mm from the left margin 4 Type the mailing address When completed your screen should look like that of an addressed envelope c Type one mailing address per page this means a return address and mailing address or just a mai...

Page 31: ...e size appears in the display COtIlQ MONFIRi DL If your envelope size is not listed choose the next largest size refer to table 2 1for envelope sizes f Click mto save your selection An asterisk appears in the display Leave the printer offline 2 Enter landscape orientation into your software application If your software does not allow you to select orientation select landscape orientation from the ...

Page 32: ... the return address on your screen 3 Move the cursor down one inch from the bottom line of the return address and tab over about 3 in from the left margin 4 Type the mailing address When completed your screen should look like that of an addressed envelope c Type one mailing address per page this means a return address and mailing address or just a mailing address Separate each address with a page ...

Page 33: ...only address 4 Access your BASIC program 5 Enter the following BASIC commands into your computer 10LPRINT CHR 27 E REMReset 2 0 LPRINT CHR 27 k 6h81alo3E 3 0 LPRINT CHR 27 a40L 4 0 REM Move down 1incW22mm 5 0 LPRINT CHR 27 450Y 60 LPRINT Mailing Address 7 0 LPRINT PO Box 123 80 LPRINT 12345 Chinden Blvd 9 0 LPRINT Boise ID 84321 1234 100 LPRINT CHR 27 E REM Reset 6 Type SAVE ENVELOPE and click 7 T...

Page 34: ...milar to the one in figure 3 1 If it does not recheck your BASIC commands They may be entered incorrectly Figure3 1 Printingan Envelopefrom a BASICProgram Note If you are printing more than one envelope with this BASIC program replace the name and address with a new name and address for each envelope ...

Page 35: ......

Page 36: ...4 t TrouubleshmtingEnvelopeFeeder Problems ...

Page 37: ...actors that often cause envelope printing problems are Envelopes are not constructed well Envelopes do not meet specifications 0 Envelopes are stored improperly This chapter contains information to help you recognize and solve these and other problems you may encounter while using the envelope feeder ...

Page 38: ...per path The decimalvalues 1 2 4 indicatethe generalarea wherethe jam is located Seefigure 4 3 to locatethese areas RecommendedAction Resetthe printerto confirmthe acceptanceof your selections temporarymacros temporary fonts and buffereddatawill be deleted If you press or instead your changes are still recorded inthe menu marked with an asterisk I but will not become activeuntilthe nexttime the pr...

Page 39: ...reads the last envelope size selectedfor any tray Printer requests a paper tray size that Loadthe correct upper paper tray and is not currentlyloaded or tray is the printerwill continue or press empty size may be w EXEC m to usethe installedtray LETTER or LEGRL Clippingmay occur if the paper is the wrong size The envelope feeder is not installed Installthe envelope feeder and load the correctenvel...

Page 40: ...rJet Software Application Notes for your printer for information about printing envelopes with your software or consult your software documentation If you are using a BASIC program you may have mistyped the command Check to see that all commands are typed properly Envelope Wrinkling Problem Envelopes are wrinkled after printing Solutions Before inserting envelopes into the feeder run a pen or penc...

Page 41: ...r have bent or damaged edges Solution Use envelopes with thin and sharply creased edges 4 Too stiff or heavy will not feed or pass through the printer Solutions Use lighter weight envelopes do not exceed 28 lb 105 g m2 Make sure envelope side guides are not tight against envelopes 5 Too shiny smooth or highly textured rough Solution Change to a different type of envelope 6 Overloaded in the feeder...

Page 42: ...ammed paper and envelope Pull out the top paper tray and remove all but two to five sheets of paper Continue your job Multiple EnvelopesFeed at Once Problem Two or more envelopes feed at the same time Solutions Discard the damaged envelopes Reload envelopes into the feeder with the edges of the envelopes uniform see figure 4 1A Do not load the envelopes with uneven outside edges see figure 4 1B Ma...

Page 43: ...s Problem Shading appears in background areas on the envelope Solution Increase the print density setting inside your printer make it darker as shown in figure 4 2 After printing envelopes readjust the density dial for your next print job Figure4 2 Adjusting PrintDensity ...

Page 44: ...top faces the right side The BASIC command for selecting reverse landscape is 20 LPRINT CHR 27 l6h8la303E Replace line 20 of the BASIC program listed in the section PrintingEnvelopes Using a Basic Program chapter 3 with this line Marginal Print Quality Problem Print quality is poor Solution Position addresses so print is not over envelope seams or closer than 6 id15 mm from the envelope edge If yo...

Page 45: ...velopes or paper 1 Open the printer top cover and examine the areas shown in figure 4 3 Figure4 3 Envelope Paper Path 1 Envelope feeder pick up area 4 Fuser assembly area error message 13 1 error message 13 2 2 Paper pick up area 5 Paper output area error message 13 2 error message 13 4 3 Image transfer area error message 13 1 CAUTION Make sure to follow correct procedures in your printer user s r...

Page 46: ...control panel The printer automatically continues with your job stingthe Envelope Feeder If you are unable to correct the problem you are experiencing while printing envelopes it may be that the envelope feeder is not working correctly Running an envelope self test determines if the printer can pull an envelope from the feeder and print it This eliminates the feeder and printer as the problem area...

Page 47: ...oes online If the printer goes online before you select the envelope size turn the printer OFF then ON again to return the display to envelope size 3 The display changes to f f_ TF F h last size selected e 4 If you want to change envelope size click the 113key until the size you want displays Note If the display changes to 88 RE X IY HP LaserJet 4Si W PC L RERDY or 88 PS RERD f HPLaserJet IIISi be...

Page 48: ...e size is not listed choose the next largest size Refer to table 2 1for a list of envelope sizes until you reach Et i IELrJrE size_7 iXiM161 tKit liiRC bL f Click to save your selection An asterisk appears in the display g Clickmuntil TEST IIlEt4 l displays Click until SELF TEST displays then click m 86 PRIHTIt43 TE T displays and an envelope similar to the one in figure 4 4prints For the HP Laser...

Page 49: ... r displays and i n envelope similar to the one in figure 4 4prints Figure4 4 EnvelopeSelf TestPrintout 8 If the envelope does not print the feeder may need repair First rerun the self test and make sure all commandsare entered correctly If the test still fails call the dealer from whom you purchased the feeder You may need to send the feeder in for service If so refer to the next section Customer...

Page 50: ...eed in the manuals listed above call the dealer from whom you purchased the feeder Your dealer understands your software and equipment and can help you solve most problems Call Hewlett Packard s Customer Support Center If your dealer cannot help you call Hewlett Packard s Customer Support Center This option connects you to a group of support personnel in Boise Idaho who can answer questions about ...

Page 51: ...sonable amount of time you will receive a refund of the purchase price This warranty does not apply if the feeder has been damaged by accident or misuse or as a result of service or modification by other than an authorized Hewlett Packard service facility No other express warranty is given by Hewlett Packard Hewlett Packard is not liable for consequential damages This warranty is valid only in the...

Page 52: ... product HP part number 2060A fails within the warranty period return it to the place you bought it Be sure to include a copy of your purchase receipt with the returned product If you are unable to return the product where you bought it you can get a replacement by providing any authorized HP dealer or HP Sales Office with the defective unit and its purchase receipt Return Service If you need to r...

Page 53: ...der Problems ReturnService Other Support Services Several types of Hewlett Packard maintenance agreements are available to meet customer support needs For more information on these services refer to your HP LaserJet user s manual ...

Page 54: ...location 4 10 image transfer area location 4 10 installation 2 3 2 6 loading envelopes into 2 7 2 11 mounting posts illustration 2 2 operational problems 4 11 paper output area location 4 10 paper pick up area location 4 10 part number C2060A 1 4 4 17 parts illustration 2 2 pressure plate illustration 2 2 removing access cover 2 5 removing 2 14 2 15 return service 4 17 sensor illustration 2 2 side...

Page 55: ...imitations warranty 4 17 loading envelopes into feeder 2 7 2 M mailing address setting margins 3 maintenance agreements 4 18 manual 11 5 LaserJet 4Si Software Application LaserJet 4si Software ADDlication Notes iii Notes 3 2 LaserJet 4Si User s Reference Man ual iii Notes iii Notes 3 2 Manual iii LaserJet IIISi Software Application LaserJet IIISi Software Application LaserJet IIISi User s Referenc...

Page 56: ...ddress margins 3 5 shading on envelopes 4 8 side guides adjust against enve size selection envelopes 1 3 2 13 software lopes 2 9 LaserJet 4Si Software Application LaserJet IIISi Software Application printing envelopes using 3 2 Notes iii 3 2 Notes iii 3 2 special cover upper paper tray 2 4 specifications chart for envelopes 1 stack height envelopes in feeder 2 7 summary of each chapter v support 3...

Page 57: ... Index 4 ...

Page 58: ...0893SZ3 PRINTEDIN JAPAN 08 93 ...

Page 59: ...Printed on Recycled Paper HEWLETT PACKARD Copyright 0 1993 Hewlett PackardCompany PrintedinJapan 3 93 Manual Part No C2060 90904 C 2 0 6 0 9 0 9 0 4 ...

Reviews: