background image

5

Connect the Stacking Cable to the Transceiver Ports

To connect the 0.5-meter Stacking Cable to the trans-
ceiver:

1.

Press the cable connector into the transceiver 
jack so that the connector snaps securely into 
place.

2.

Repeat for the Stacking Transceiver in the other 
switch at the other end of the cable.

Note:

 If you need a longer stacking connection, a

10-meter cable has also been tested and verified.
The cable is AMP part number 1-1324640-0.

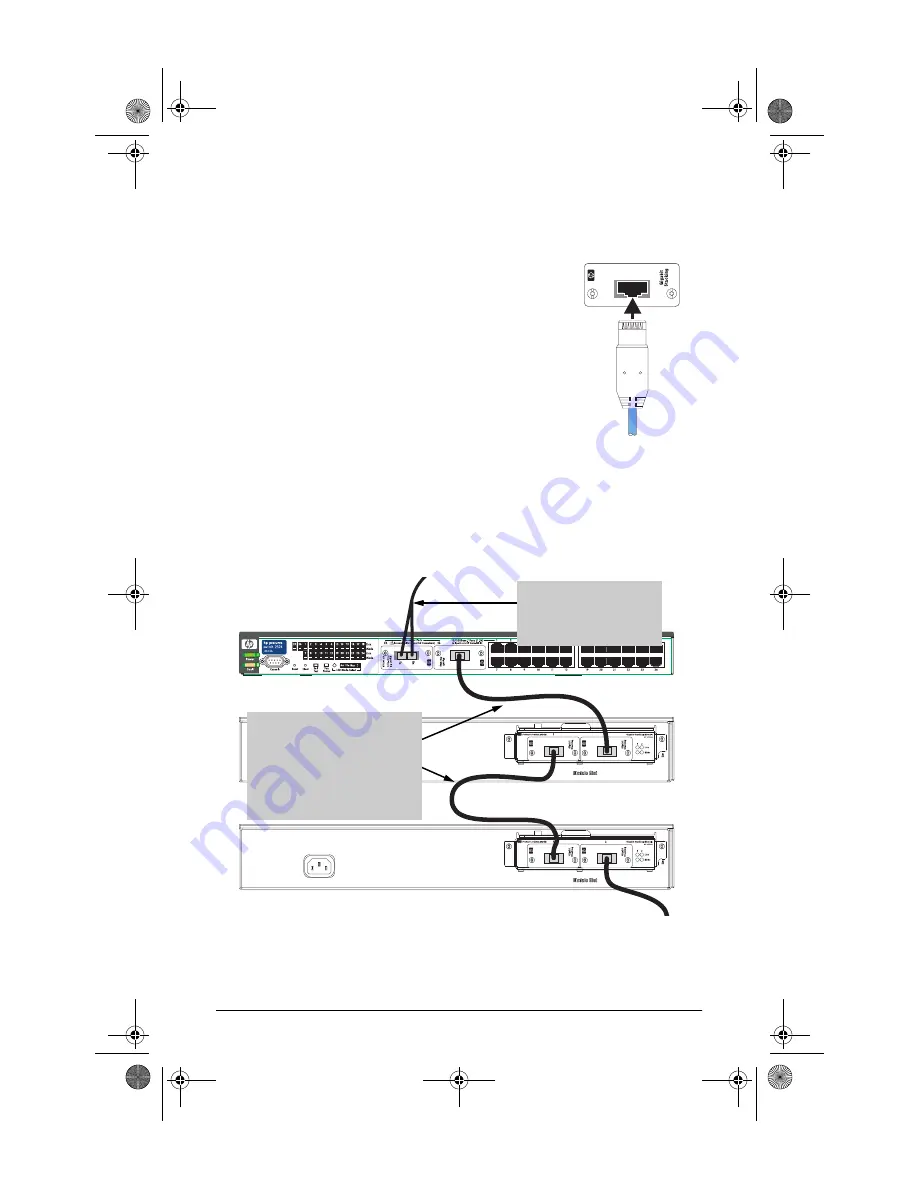
As shown in the next illustration, either or both of the transceiver slots in a 
Gigabit Stacking Module or switch can be used for a stacking connection. 
The switches at the top and bottom of the stack will have an unused 
transceiver slot that can be used for connections to other devices.

Stacking connections between 

switches.

Note

 that any transceiver slot can 

be used for a stacking connection.

Each stacking connection requires 

one Gigabit Stacking Kit

Gigabit-LX or -SX connection 

to campus backbone, other 

switches in a remote 

location, or a local server

j4116101.fm  Page 5  Tuesday, October 3, 2000  5:29 PM

Summary of Contents for HPJ4116A

Page 1: ...P ProCurve Switch 2424M Gigabit Stacking Modules HP J4130A or a transceiver slot in any other HP ProCurve switch that supports these transceivers If you are using the Gigabit Stacking Module the module is then installed into the module slot of an HP ProCurve Switch 2424M that you want to stack The Gigabit Stacking Transceivers installed in modules or directly in switches are then connected through...

Page 2: ...nd 2524 For all of the networking devices that support the Gigabit Stacking Transceivers it is not necessary to turn off power to the device before installing the transceiver into it For the Switch 2424M Gigabit Stacking Module you can leave the power on to the switch but to avoid possible damage to the transceiver circuitry remove the Gigabit Stacking Module from the switch before installing tran...

Page 3: ... is being installed in a Switch 2424M Gigabit Stacking Module first remove the module from the Switch 2424M or unplug the Switch 2424M from the AC power source 3 Using a flat bladed or Torx T 10 screwdriver unscrew the two retaining screws on the slot cover plate or existing transceiver and remove it from the module or switch Keep the cover plate for future use unused transceiver slots should be k...

Page 4: ...module LEDs associated with the transceiver to verify that the transceiver has been installed correctly For the Gigabit Stacking Module the Link and Mode LEDs come on briefly as the transceiver port is self tested FortheSeries2300and2500 Switches the Link LED for the transceiver port stays off When the transceiver self test completes the LEDs go off until a stacking cable is plugged in to the port...

Page 5: ...rt number 1 1324640 0 As shown in the next illustration either or both of the transceiver slots in a Gigabit Stacking Module or switch can be used for a stacking connection The switches at the top and bottom of the stack will have an unused transceiver slot that can be used for connections to other devices Stacking connections between switches Note that any transceiver slot can be used for a stack...

Page 6: ... performed which does test the transceivers The switch Link LED for the transceiver port is flashing This condi tion occurs on the Series 2300 and 2500 Switches After installing the transceiver these switches must be reset or rebooted to initialize the transceiver TheflashingLEDtellsyouthatthetransceiverisnotoperational until the switch is reset or rebooted The switch Fault LED and Link LED for th...

Page 7: ...istance both with services that they offer and with services offered by HP Gigabit Stacking Transceiver Specifications Environmental Electromagnetic Emissions FCC part 15 Class A EN55022 CISPR 22 Class A VCCI Class A Complies with Canadian EMC Class A requirements The Gigabit Stacking Kit is designed for operation with the HP ProCurve Switch 2424M and the HP ProCurve Series 2300 and 2500 Switches ...

Page 8: ...t Packard Company 2000 All rights reserved Reproduction adaptation or translation without prior written permission is prohibited except as allowed under the copyright laws Printed in Singapore 10 2000 Manual Part Number J4116 90101 J4116 90101 j4116101 fm Page 8 Tuesday October 3 2000 5 29 PM ...

Reviews: