ENWW
Testing the substrate transport system 171
21
Repeat steps 6 through 8. Verify that the paper feeds past the flat spring of the front
static guide, make sure that there is a gap of 2 mm (0.078 inch) between the paper
and the tip of the spring.
22
If the paper is touching the spring, the paper stock in the Paper Feed Unit must be
moved to the rear of the press. If the paper gap is more than 2 mm (0.078 inch), then
the input tray must be moved to the front. Make sure the front springs touch the paper
stock in the Paper Feed Unit.
Note
If necessary, bend the flat spring on the front static guide to obtain a gap of 2 mm (0.078 inch)
between the paper and the front static guide.
23
Lower the secondary conveyor.
24
Make sure that the paper in tray B (the upper paper stack) is the same size as that
used in tray A (the lower paper stack). Other paper parameters (such as glossy) are
unimportant.
25
Push the tray B
Paper Feed
button, and the
Inching Forward
button to advance the
creased paper.
26
When the creased paper is under the feed rollers of the Paper Feed Unit, push the
Paper Feed
button again to stop the vacuum.
27
From the exit side of the Paper Feed Unit, press the
Inching Forward
button until the
creased paper arrives at the front static guide flat spring.
28
Make sure that there is a gap of 2 mm (0.078 inch) between the paper and the tip of
the spring.
29
Adjust the stack in tray B, as necessary.
Testing the substrate transport system
Test the loaded substrate every time you replace the substrate. Fine-tune the press
adjustment in this mode before printing. Check the performance of the feed control, paper
transport rotors, and the exit stack paper setting.
1
On the control panel, click the
Maintenance
menu, and then select
Transport
. The
Substrate transport
window opens.
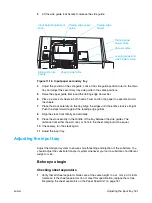
Figure 11-32. Gap between flat spring and paper
2 mm (0.078 inch) gap
Paper
Front static
guide
Paper feed
direction
Summary of Contents for Indigo press 3050
Page 1: ...HP Indigo press 3050 User guide English version ...
Page 2: ...hp indigo press 3050 user guide ...
Page 13: ...12 Chapter 1 Preface ENWW ...
Page 23: ...22 Chapter 2 Getting started ENWW ...
Page 41: ...40 Chapter 4 HP Indigo press 3050 basics ENWW Figure 4 5 Related topics ...
Page 53: ...52 Chapter 5 The main windows ENWW ...
Page 83: ...82 Chapter 6 Operating the press ENWW ...
Page 91: ...90 Chapter 7 Operator routines ENWW Figure 7 7 Inner front wall O O O O ...
Page 99: ...98 Chapter 7 Operator routines ENWW ...
Page 136: ...ENWW 135 10PIP This chapter contains the following sections z Overview z Replacing the PIP ...
Page 189: ...188 Chapter 11 Paper transport ENWW ...
Page 219: ...218 Chapter 15 Scorotron ENWW ...
Page 257: ...256 Chapter 17 Pre transfer erase PTE ENWW ...
Page 271: ...270 Chapter 19 Chiller ENWW ...


