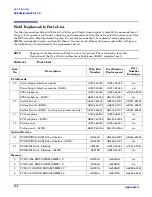
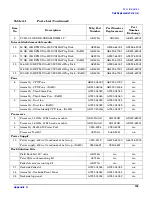
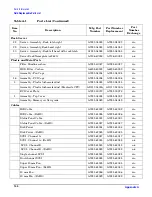
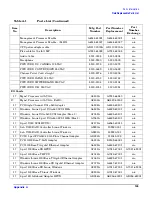
background image

Appendix B

147

B

Booting the Operating System

This chapter covers procedures for booting and shutting down an operating system on the HP Integrity 
rx2620 server. The following operating systems are supported on HP Integrity servers: HP-UX 11i Version 2 
(B.11.23), HP OpenVMS, Microsoft Windows Server 2003, Red Hat Enterprise Linux, and SuSE Linux 
Enterprise Server.

This chapter addresses the following topics:

“Operating Systems Supported on HP Integrity Servers” on page 148.

“Configuring System Boot Options” on page 148.

“Booting and Shutting Down HP-UX” on page 149.

“Booting and Shutting Down HP OpenVMS” on page 155.

“Booting and Shutting Down Microsoft Windows” on page 159.

“Booting and Shutting Down Linux” on page 163.

Summary of Contents for Integrity rx2620

Page 1: ...User Service Guide HP Integrity rx2620 Server Manufacturing Part Number AD117 9003A First Edition August 2006 Copyright 2006 Hewlett Packard Development Company L P ...

Page 2: ...rvices Nothing herein should be construed as constituting an additional warranty HP shall not be liable for technical or editorial errors or omissions contained herein Printed in U S A Intel Intel Inside Itanium and the Intel Inside logo are trademarks or registered trademarks of Intel Corporation or its subsidiaries in the United States and other countries Linux is a U S registered trademark of L...

Page 3: ...bility 20 Enhanced Server Manageability Using the Integrated Lights Out Management Processor 20 Hard Disk Drives 21 System Board Components 22 Processor Sockets 23 Processor Bus 23 ZX1 I O and Memory Controller 23 Memory 23 I O Bus Interface 25 Processor Dependent Hardware Controller 26 Dual Serial Controller 26 Field Programmable Gate Array 26 Baseboard Management Controller 27 SCSI Controller 27...

Page 4: ...ing and Replacing Internal Components 61 Removing and Replacing Airflow Guides 61 Removing and Replacing the Memory Airflow Guide 62 Removing and Replacing the Processor Airflow Guide 62 Removing and Replacing Memory DIMMs 65 Removing and Replacing a Processor 68 Removing and Replacing the System Battery 77 Removing and Replacing PCI Card Cage 79 Removing and Replacing PCI Cards 81 Removing and Re...

Page 5: ...ne Support Tools List 134 General Diagnostic Tools 135 Fault Management Overview 135 HP UX Fault Management 135 Recommended Cleaning Procedures 136 Where to Get Help 137 Information to Collect Before you Contact Support 137 Online Support 137 Phone Support 138 A Parts Information Field Replaceable Parts View 140 Field Replaceable Parts List 142 B Booting the Operating System Operating Systems Supp...

Page 6: ...s Extensible Firmware Interface Boot Manager 168 EFI Commands 170 EFI POSSE Commands 172 help 172 baud 175 boottest 176 cpuconfig 177 ioconfig 177 default 178 errdump 178 info 179 lanaddress 185 monarch 185 pdt 186 sysmode 187 Specifying SCSI Parameters 187 Using the SCSI Setup Utility 188 Using the Boot Configuration Menu 194 Paths 194 Using the System Configuration Menu 202 Using the Security Co...

Page 7: ... 4 1 Component Locations 47 Table 4 2 Connector Locations 48 Table 5 1 Problem Symptoms Repair Actions 113 Table 5 2 System LED States 116 Table 5 3 Power and System LED States 120 Table 5 4 Diagnostic LEDs Fault and Warning Categories 121 Table 5 5 Unknown Warning 122 Table 5 6 Memory Warnings 122 Table 5 7 System Board Warnings 123 Table 5 8 Fan Warnings 123 Table 5 9 Processor Warnings 124 Tabl...

Page 8: ... 1 Parts List 142 Table C 1 EFI Commands 170 Table C 2 Communications Parameters 175 Table C 3 HP Integrity rx2620 Slots 194 Table C 4 HP Integrity rx2620 Drives 195 Table C 5 Console Output Devices 199 Table C 6 Console Output Devices 200 Table C 7 Console Output Devices 201 Table C 8 Console Output Devices 202 Table C 9 iLO MP Main Menu Commands and Descriptions 211 Table C 10 Command Menu Comma...

Page 9: ...1 Figure 4 6 Closing the Top Metal Cover 52 Figure 4 7 Front Bezel Retaining Clip 52 Figure 4 8 Replacing the Front Bezel 53 Figure 4 9 Fan 1A or Fan 1B Removal 54 Figure 4 10 Fan 2 Removal 55 Figure 4 11 Fan 3 Removal 55 Figure 4 12 Releasing the Power Supply Retaining Clip 56 Figure 4 13 Removing the Power Supply 57 Figure 4 14 Replacing the Power Supply 57 Figure 4 15 Unlocking the Disk Drive i...

Page 10: ...Status Panel 91 Figure 4 50 Remove System Board Mounting Screws 93 Figure 4 51 Remove the System Board Mounting Screw 93 Figure 4 52 Remove the System Board 94 Figure 4 53 Slide System Board into Chassis 94 Figure 4 54 Align the System Board PCI Connector 95 Figure 4 55 Slide System Board in Chassis 96 Figure 4 56 Install the Rear Panel Mounting Screws 96 Figure 4 57 Reinstall the Power Connectors...

Page 11: ...Figures 11 Figure C 1 EFI Boot Sequence 168 Figure C 2 Password Reset Jumper 204 ...

Page 12: ...Figures 12 ...

Page 13: ... document can be found on line at http www docs hp com Intended Audience This document is intended to provide technical product and support information for authorized service providers system administrators and HP support personnel This document is not a tutorial New and Changed Information in This Edition This guide has been updated with This document is being updated as part of a processor upgra...

Page 14: ...g system on the server Appendix C Utilities Use this appendix for information regarding the utilities available for the server Appendix D Console Setup and Connection Use this appendix to learn about the process for setting up a console session and connecting to the server Typographic Conventions This document uses the following conventions WARNING A warning lists requirements that you must meet t...

Page 15: ...er information on HP server hardware management Microsoft Windows and diagnostic support tools in the following publications Web Site for HP Technical Documentation http docs hp com Server Hardware Information http docs hp com hpux hw Windows Operating System Information You can find information about administration of the Microsoft Windows operating system at the following Web sites among others ...

Page 16: ... com hpbooks prentice ptr_0130352128 html HP Books are available worldwide through bookstores online booksellers and office and computer stores HP Encourages Your Comments HP encourages your comments concerning this document We are truly committed to providing documentation that meets your needs Please send comments to netinfo_feedback cup hp com Please include title manufacturing part number and ...

Page 17: ...ux and OpenVMS The server is available in either rack mount or pedestal configurations The server accommodates up to 12 DIMMs and internal peripherals including disks and a DVD Its high availability features include hot swap fans power supplies and hot plug disk drives This chapter addresses the following topics Server Overview on page 18 Server Components on page 19 System Board Components on pag...

Page 18: ...R or DVD RW There are N 1 redundant hot swappable server fans all clearly identified and easily accessible Server status indication a power switch server locator switch and LED are located in the front within the bezel There is also a server locator switch and LED in the back of the server for easy identification in the rack See Figure 1 1 Figure 1 2 and Figure 1 3 for front and back views of the ...

Page 19: ... Minimum memory size of 1 GB with four 256 MB DIMMs Maximum memory size of 32 GB with eight 4 GB DIMMs Upgrades must be made by quads of DIMMs DIMMs loaded by quads enable interleaved mode and chip spare PCI Riser Four independent PCI X 133 MHz 64 bit 3 3 V 15 W slots There is no 5 V card and hot plug support NOTE Some 25 W cards are supported See the following slot matrix by server http www docs ...

Page 20: ...tion modules on the system board step down the front end DC voltage to the required voltages Redundant and hot pluggable power supplies front end block only System Board Manageability Baseboard Management Controller BMC Temperature monitoring and fans regulation by BMC BMC manageability console shared with server console and general purpose serial port IPMI protocol for communication between BMC s...

Page 21: ...e Shell SSH access Group actions through the HP Systems Insight Manager HPSIM Directory based authentication and authorization LDAP Hard Disk Drives The following hard disk drives are supported by the rx2620 server 36 GB 15K HotPlug Ultra320 SCSI drive 73 GB 15K HotPlug Ultra320 SCSI drive 146 GB 10K HotPlug Ultra320 SCSI drive 300 GB 10K HotPlug Ultra320 SCSI drive The server holds up to three ha...

Page 22: ... 68p USB 2 0 IDE DVD RW Slim Line PCI 33 32 I2C etc Itanium 2 IPF Itanium 2 IPF DMD BMC SRAM 512KB on battery scratch RAM NVM FPL forward progress log BMC FLASH 1MB Channel B Channel A Keyboard Mouse 267MHz 8 5GB S Peak Data BandWidth 267MHz 8b data 533MB s Peak Data Bandwidth per rope 133 MHz bus clock 267 MT s data rate 8 5GB s peak data bandwidth DUART System BMC Console Serial Port Serial Port...

Page 23: ...2 V to 1 2 V power pod Other power for the system board comes from multiple on board DC to DC converters Each processor is attached to the board through a ZIF socket and the entire FRU secured by a heatsink Processor Bus The FSB in this product runs at 200 MHz Data on the FSB are transferred at a double data rate which allows a peak FSB bandwidth of 6 4 Gb sec ZX1 I O and Memory Controller The HP ...

Page 24: ...logy utilizing industry standard PC 1600 type DDR SDRAM DIMMs 1 2 tall The DIMMs use a 184 pin JEDEC standard connector Memory Controller DIMM1B MC1 MC0 CS1 0 CS1 4 SA0 1 SA1 0 SA2 0 SA0 1 SA1 0 SA2 1 SA0 1 SA1 1 SA2 0 SA0 0 SA1 0 SA2 0 SA0 0 SA1 0 SA2 1 SA0 0 SA1 1 SA2 0 SA0 0 SA1 1 SA2 0 SA0 0 SA1 0 SA2 1 SA0 0 SA1 0 SA2 0 SA0 1 SA1 1 SA2 0 SA0 1 SA1 0 SA2 1 SA0 1 SA1 0 SA2 0 DIMM0B CS1 0 CS1 4 ...

Page 25: ...nt from the original quad that was loaded must be loaded into the next quad However if you are using 4 GB DIMMS the only configuration supported is eight 4 GB DIMMS in the first three quads with no other DIMMs in the remaining quad For slot and quad locations see Figure 4 23 on page 66 Serial Presence Detect Each DIMM contains an I2C electronically erasable programmable read only memory EEPROM who...

Page 26: ...ters on this chip provide onboard error indications and operation status An internal loopback capability provides onboard diagnostics Features include Data rates up to 115 2 kbps 16550A fully compatible controller A 16 byte transmit FIFO to reduce the bandwidth requirement of the external CPU A 16 byte receive FIFO with four selectable interrupt trigger levels and error flags to reduce the bandwid...

Page 27: ...used for IPMB Low pin count LPC bus provides access to three keyboard controller style KCS and one block transfer BT interface 32 bit ARM7 processor 160 pin low profile flat pack LQFP package Firmware is provided for the following interfaces Intelligent platform management interface IPMI Intelligent platform management bus IPMB SCSI Controller The SCSI controller is an LSI Logic 53C1030 chip This ...

Page 28: ...WP0002 200 PCI 1 0 4 PCI X 133 Mhz 64 bit Bottom slot HWP0002 600 PCI 1 0 Core I O 1 USB Port Rear bulkhead Mouse icon HWP0002 0 PCI 1 0 USB 0 0 Core I O 2 USB Port Rear bulkhead stacked top HWP0002 0 PCI 1 0 USB 1 0 Core I O 3 USB Port Rear bulkhead Kybd icon HWP0002 0 PCI 1 1 USB 0 0 Core I O 4 USB Port Rear bulkhead stacked bottom HWP0002 0 PCI 1 1 USB 1 0 Core I O 5 IDE Controller System board...

Page 29: ... port Rear bulkhead Serial B connector N A Table 1 4 Data Pathing Part 2 PCI Slot MAPPER Path HP UX Path Linux Path Windows Path 1 0 4 1 0 0 4 1 0 80 01 0 2 0 3 1 0 0 3 1 0 60 01 0 3 0 2 1 0 0 2 1 0 40 01 0 4 0 6 1 0 0 5 1 0 C0 01 0 Core I O 1 0 0 1 0 0 0 1 0 00 01 0 Core I O 2 0 0 1 0 0 0 1 0 00 01 0 Core I O 3 0 0 1 1 0 0 1 1 00 01 1 Core I O 4 0 0 1 1 0 0 1 1 00 01 1 Core I O 5 0 0 2 0 0 0 2 0 ...

Page 30: ... 0 0 Core I O 3 0 HWP0002 0x000 0x00 0x1F 0 0 Core I O 4 0 HWP0002 0x000 0x00 0x1F 0 0 Core I O 5 0 HWP0002 0x000 0x00 0x1F 0 0 Core I O 6 0 HWP0002 0x000 0x00 0x1F 0 0 Core I O 7 1 HWP0002 0x100 0x20 0x3F 1 1 Core I O 8 1 HWP0002 0x100 0x20 0x3F 1 1 Core I O 9 1 HWP0002 0x100 0x20 0x3F 1 1 Core I O 10 1 HWP0002 0x100 0x20 0x3F 1 1 Core I O 11 1 HWP0002 0x100 0x20 0x3F 1 1 Core I O 12 1 HWP0002 0x...

Page 31: ...ols Ports and LEDs This chapter describes the controls ports and LEDs on the front and rear panels of the HP Integrity rx2620 server This chapter addresses the following topics Front Panel on page 32 Rear Panel on page 36 ...

Page 32: ...e 2 1 Front View Figure 2 2 Control Panel Table 2 1 Control Panel LEDs and Switches Name Function Power On Off LED The green on off LED is illuminated when the power is on Power On Off Button This is the power on off switch for the server See Table 2 2 for detailed operation Control Panel DVD Drive System Product Label pull out Drive 3 Drive 2 Drive 1 PS AC Present LED PSU On LED Visible behind be...

Page 33: ...tton Switch Description Power Button Controls the power supply turns system power on off if power is available to the power supply Controls both power supplies if two are installed If power is off but power is available to the power supplies pressing the power button Momentarily less than 5 seconds turns on the power supplies and applies power to server circuits For more than 5 seconds and then re...

Page 34: ...is accessed Figure 2 3 Hot Plug Disk Drive LED Indicators Power Supply LEDs The HP Integrity rx2620 server is typically delivered with a single power supply PS 1 An additional power supply PS 2 may be installed for redundant n 1 power capability See Figure 2 4 and Table 2 4 for the location and description of the power supply LEDs Figure 2 4 Power Supply LEDs Table 2 3 Hard Disk Drive LED Definiti...

Page 35: ...able 2 5 for the location and description of the DVD LEDs Figure 2 5 DVD LEDs Table 2 4 Power Supply LED Definitions LED State Description AC Present LED Solid green AC line voltage within the operation voltage specification is present PSU On LED Solid green DC line voltage within the operation voltage specification is present Table 2 5 DVD Drive LED Definitions LED State Description Activity LED ...

Page 36: ... 100 1000 LAN 10 100 1000 base T ethernet LAN connector LAN Gb B 10 100 1000 LAN 10 100 1000 base T ethernet LAN connector Serial A console and Serial B 9 pin male serial connectors Serial Port A is used as the console connection when the optional iLO MP is not installed USB Four universal serial bus USB 2 0 connectors TOC Transfer of control button Halts all system processing and I O activity and...

Page 37: ... On LAN Power On LAN and Alert On LAN functions Refer to the HP Integrity and HP 9000 Integrated Lights Out Management Processor Operations Guide for details on the iLO MP commands a Graphics cards may include a 15 pin connector a 18 pin connector or both Only one connecting cable is needed for each monitor Some video cards are pre installed in the system while others are packaged separately and s...

Page 38: ...ure 2 7 10 100 1000 base T ethernet Gb LAN A Connector LEDs Table 2 7 10 100 1000 base T ethernet Gb LAN A Connector LEDs LED Description 1000BT Blinking amber the 1000 MHz with ethernet protocol and twisted pair wiring is enabled off no link 100BT Blinking green the 100 MHz with ethernet protocol and twisted pair wiring is enabled off no link Activity Blinking green LAN activity With all other LE...

Page 39: ... Figure 2 8 10 100 1000 base T ethernet Gb LAN B Connector LEDs Table 2 8 10 100 1000 base T ethernet Gb LAN B Connector LEDs LED Description Speed upper left Yellow the 1000 MHz with ethernet protocol and twisted pair wiring is enabled off no link Speed upper left Green the 100 MHz with ethernet protocol and twisted pair wiring is enabled off no link Link upper right Green link Link upper right O...

Page 40: ... Critical Service support See Figure 2 9 and Table 2 9 for the location and description of the MP LAN LEDs Figure 2 9 iLO MP LAN LEDs Table 2 9 iLO MP LAN LEDs LED Description Self test Yellow iLO MP is running self test or error detected 10 BT Green 10 BT link established blinking green 10 BT link activity off no link 100 BT Green 100 BT link established blinking green 100 BT link activity off no...

Page 41: ...On the Server This chapter provides information and procedures for powering off and powering on the server This chapter addresses the following topics Power States on page 42 Powering Off the Server on page 42 Powering On the Server on page 43 ...

Page 42: ...the server may automatically power on to the full power state Powering Off the Server Power off the server using the following methods if the server is in either the standby or full power state iLO MP PC command Power button Powering Off the Server Using the iLO MP To power off the server through the MP follow these steps Step 1 Gracefully shut down the operating system See Appendix B Booting the ...

Page 43: ...rver IMPORTANT The main DC voltage is now removed from the server however AC voltage for standby power is still present in the server Step 3 Unplug all power cables from the receptacles on the rear panel of the server Powering On the Server Power on the server to full power using the following methods if the server is in the standby power state iLO MP PC command Power button Powering On the Server...

Page 44: ...he power restore feature is set to Always On through the iLO MP PR command the server may automatically power on to the full power state To manually power on the server follow these steps Step 1 Plug all power cables into the receptacles on the rear panel of the server Step 2 Press the power button to start the server Step 3 Start the operating system See Appendix B Booting the Operating System on...

Page 45: ...x2620 server This chapter addresses the following topics ESD Information on page 46 Service Tools Required on page 46 Location of Internal Components and Connectors on page 47 Removing and Replacing System Top Metal Cover and Bezels on page 49 Removing and Replacing Hot Swap and Hot Plug Devices on page 53 Removing and Replacing Internal Components on page 61 ...

Page 46: ...accessory boards and components by the edges only Do not touch any metal edge connectors or any electrical components on accessory boards Do not wear clothing subject to static charge build up such as wool or synthetic materials Service Tools Required Service of this product may require one or more of the following tools IPF CPU Install Tool Kit P N 5069 5441 consisting of Disposable ESD Kit Label...

Page 47: ... PWR 1 right PWR 2 left 8 Hot pluggable hard drives up to 3 2 Memory airflow guide 9 Hard disk lock 3 Processor airflow guide 10 System fans fan 2 memory fan 3 I O cage 4 System fans fan 1A right fan 1B left 11 Intrusion switch 5 Slimline optical drive 12 Memory sockets 6 Power supplies PSU1 center PSU2 to the right 13 PCI cage 7 Status panel board 14 Management controller Optional 1 2 3 4 5 7 8 9...

Page 48: ...wer module power connector 18 Optical drive connector 3 CPU 0 slot 11 ZX1 memory and I O controller under heatsink 19 iLO hardware connector 4 CPU 1 slot 12 Memory sockets 20 HP ZX1 I O adapter 5 Turbo fan power connectors 13 Status panel connector 21 Serial ports 2 6 Fan Connector 14 Power module auxiliary connector 22 USB connectors 4 7 Five VRM cards 15 SCSI backplane power connector 23 LAN con...

Page 49: ...ck Mount System To access the internal components on a rack mounted server pull the server out on the rail guides and remove the top metal cover Accessing a Rack Mounted Server The HP Integrity rx2620 server is designed to be rack mounted The following procedure explains how to gain access to a server that is mounted in an approved rack For rack installation instructions review the HP Integrity rx...

Page 50: ...ng and Replacing the Top Metal Cover The following procedures describe how to remove and replace the top metal cover Removing the Top Metal Cover Step 1 Turn off the server and disconnect the power cable and all other cables from the back of the server NOTE If you are removing only a hot swappable fan you can leave the server on and the power cables connected However you must replace the top metal...

Page 51: ...cing the Top Metal Cover CAUTION Secure any wires or cables in your server so they do not get cut or interfere with the replacement of the top metal cover Step 1 Align the front edge of the top metal cover with the alignment mark on the optical drive bay See Figure 4 5 for more information Figure 4 5 Aligning the Top Metal Cover Front of server To replace cover align front edge here then slide for...

Page 52: ...re 4 6 Closing the Top Metal Cover Step 3 Slide the server into the rack enclosure and connect the power cables Removing and Replacing the Front Bezel You must remove the front bezel from the chassis to remove or replace the power supplies or the optical drive Removing the Front Bezel Step 1 Press in on the retaining clips located on the right side of the front panel See Figure 4 7 for more inform...

Page 53: ...grity rx2620 has hard disk drives that are hot pluggable and power supplies and fans that are hot swappable This section explains how to swap the following devices while the server is running System fans Power supplies Hard drives There is a significant difference between the terms hot swap and hot plug Hot swapping happens at the device level A hot swappable device manages insertion or removal on...

Page 54: ... components from overheating If the top metal cover is not replaced within 30 minutes the server automatically shuts down If the server has shut down replace the top metal cover before restarting the server Removing a Server Fan Step 1 Extend the server from the rack See Extending the Server from the Rack on page 49 Step 2 Remove the top metal cover See Removing the Top Metal Cover on page 50 Step...

Page 55: ...ter 4 55 Figure 4 10 Fan 2 Removal Figure 4 11 Fan 3 Removal Replacing a Server Fan Step 1 Remove the top metal cover if necessary See Removing the Top Metal Cover on page 50 Step 2 Grasp the replacement fan module and insert it into its fan socket Fan 2 Front of server Fan 3 Front of server ...

Page 56: ...tional hot swap PSU may be installed to provide redundant N 1 capability The power supplies in the server are hot swappable that is if one power supply stops working or exhibits voltage problems the remaining supply can support the server until the failed unit is replaced A power supply can be removed and replaced without turning off the server on servers with two power supplies CAUTION Before rem...

Page 57: ...ove the front bezel from the server and remove the defective power supply if you have not already done so Step 2 Open the power supply release lever on the replacement power supply and push the power supply into place See Figure 4 14 for more information Figure 4 14 Replacing the Power Supply Step 3 Push in and up on the power supply release lever to lock the retaining clip in place Step 4 Verify ...

Page 58: ...rating system before the device can be safely installed into the server Verify that the operating system supports installing disk drives while the operating system is running If the operating system does not support this feature shut down the operating system before attempting this procedure Failure to observe this caution results in server failure Removing a Hard Disk Drive To remove a hard disk ...

Page 59: ...d Hot Plug Devices Chapter 4 59 Figure 4 15 Unlocking the Disk Drive if necessary Step 3 Squeeze inward on the colored release clip on the hard drive release lever See Figure 4 16 for more information Figure 4 16 Releasing the Disk Drive Front of server Front of server ...

Page 60: ...e server Step 2 Release the lock on the drive being installed and swing the drive ejection handle to the open position Step 3 Slide the hard disk drive into the slot until it is nearly seated Step 4 If desired lock the hard drives in place Replace the server top metal cover if it was removed to unlock drives Step 5 Validate the hard disk drive installation by a If the server does not have iLO MP h...

Page 61: ...he server is running the top metal cover must be replaced within 30 minutes to prevent components from overheating If the top metal cover is not replaced within 30 minutes the server automatically shuts down If the server has been shut down always replace the cover s before turning the server back on Removing and Replacing Airflow Guides The server has the following airflow guides The processor ai...

Page 62: ...9 Removing the Memory Airflow Guide Replacing the Memory Airflow Guide Step 1 Align the guides on both sides of the airflow guide with the slots on the chassis Step 2 Insert the memory airflow guide in the slots Step 3 Replace the top metal cover and reconnect all of the power cables Removing and Replacing the Processor Airflow Guide The following procedures show how to remove and replace the proc...

Page 63: ...ck end of the airflow guide and lift the guide out of the server Figure 4 20 Removing the Processor Airflow Guide Step 5 Disconnect the power cable connected to the guide from the system board Step 6 Remove the front portion of the airflow guide by doing the following a Remove server fans 1A and 1B b Rotate the clip clockwise to release the latch See Figure 4 21 and Figure 4 22 for more informatio...

Page 64: ...ace b Connect power connector on the front portion of the guide to the connector on the system board c Replace server fans 1A and 1B Step 2 Replace the main portion of the airflow guide a Hold the opening on top of the processor airflow guide b At the same time grasp the back end of the airflow guide and insert the airflow guide into the server c Connect the power module cable and place the power ...

Page 65: ...ected This voltage is present even when the main power switch is in the off position Failure to observe this warning could result in personal injury or damage to equipment CAUTION Observe all ESD safety precautions before attempting this procedure Failure to follow ESD safety precautions could result in damage to the server Supported DIMM Sizes Supported DIMM sizes are 256 MB 512 MB 1 GB 2 GB and ...

Page 66: ...l Cover on page 50 Step 3 Identify the DIMM to be removed and push the appropriate extraction levers found on either side of the DIMM slot outward to the open position The DIMM ejects from the slot Step 4 Remove the DIMM from the socket If the removed memory is functional store it in a static free container for future use Rear Front of server Pair 5 4A and 4B Pair 2 1A and 1B 1B 3B Pair 4 3A and 3...

Page 67: ...and 3B Slots 4A 4B 5A and 5B remain empty The memory subsystem supports chip spare functionality Chip spare enables an entire SDRAM chip on a DIMM to be bypassed logically replaced in the event that a multi bit error is detected on that SDRAM In order to use the chip spare functionality only DIMMs built with x4 SDRAM parts can be used and these DIMMs must be loaded in quads two DIMMs per memory ce...

Page 68: ...disconnected from the server prior to removing or replacing a processor Voltages are present at various locations within the server whenever an AC power source is connected This voltage is present even when the main power switch is in the off position Failure to observe this warning could result in personal injury or damage to equipment CAUTION Failure to properly complete the steps in this proced...

Page 69: ... Ensure that the cache size is identical for all processors Failure to observe this caution will result in server failure Ensure that all processors are rated for use at the same speed Failure to observe this caution will result in performance degradation Valid processors are identified in Appendix A Parts Information on page 139 Figure 4 25 Processor Locations CPU 0 CPU 1 Front of server ...

Page 70: ... the Server on page 42 Step 2 Remove the top metal cover See Removing and Replacing the Top Metal Cover on page 50 Step 3 Remove the processor airflow guide See Figure 4 27 for more information a Remove the IDE cable and power module cables from the processor airflow guide cable clips CAUTION Record the cable routing of these cables to ensure the cables are returned to their correct routes b Hold ...

Page 71: ...r Airflow Guide Step 4 Disconnect the processor power cable from the server power cable Step 5 Disconnect the turbo fan power cable from the system board Step 6 Unscrew the two heat sink captive screws and the four processor captive screws See Figure 4 28 for the screw locations and removal sequence Figure 4 28 Unscrew the Captive Screws Front of server Front of server 5 3 Processor unscrewing pat...

Page 72: ...he special processor tool P N 5069 5441 or equivalent 2 5 mm hex tool shipped with your replacement processor assembly Insert the tool through the turbo fan blades into the lock and rotate the processor tool 180 degrees counterclockwise See Figure 4 30 for more information CAUTION The zero insertion force ZIF socket for the processor is locked and unlocked by 1 2 of a full turn of the 2 5 mm hex t...

Page 73: ...talled in the CPU 0 slot See Figure 4 26 for the CPU slot locations CAUTION Do not modify the settings of the DIP switches located on the system board These switches are for factory use Failure to observe this caution will result in server failure Step 1 Turn off the server and disconnect all cables See Powering Off the Server on page 42 Step 2 Remove the top metal cover See Removing and Replacing...

Page 74: ...ection will severely damage the socket Step 5 Use the two alignment pins on the processor to properly align the processor on the system board The two alignment pins fit in the alignment holes on the system board processor mount Figure 4 32 shows the location of the alignment pins on the processor Figure 4 33 shows the alignment holes on the system board The turbo fan power cable must be positioned...

Page 75: ...lacing Components Removing and Replacing Internal Components Chapter 4 75 Figure 4 33 CPU Slot Alignment Holes Figure 4 34 Installing the Processor Module Front of server Alignment holes Front of server Turbo fan cable ...

Page 76: ...ipped with your replacement processor module to lock the processor module in place on the system board To do this insert the special processor tool through the turbo fan blades into the ZIF socket Rotate the tool clockwise 180 degrees See Figure 4 35 for more information Figure 4 35 Locking the Processor Module in Place Step 7 Slide the sequencing retainer plate toward the rear of the server See F...

Page 77: ...hell prompt or Run cpu diag from Offline Diagnostic CD for full functional check Monitor the SEL to ensure there are no events showing processor problems Removing and Replacing the System Battery The main server battery is located on the system board Servers with iLO hardware have an additional battery located on the iLO MP card See Removing and Replacing the iLO MP Battery on page 89 for more inf...

Page 78: ...nd Replacing the Top Metal Cover on page 50 Step 3 Lift up on the battery and push on the back of it with a flat head screwdriver to remove the battery from its holder See Figure 4 38 for the battery location on the system board CAUTION Only lift the battery high enough to clear the holder Excessive stress on the battery holder retaining clip may damage the clip Figure 4 38 Removing the System Bat...

Page 79: ...ge Accessory cards are installed in a removable PCI cage This section explains how to access the PCI card cage as well as how to remove and install accessory cards WARNING Ensure that the server is powered down and all power sources have been disconnected from the server prior to removing or replacing a processor module Voltages are present at various locations within the server whenever an AC pow...

Page 80: ...for more information on removing the PCI card cage Figure 4 39 Removing the PCI Cage Step 4 Grasp the PCI cage cover and slide it away from the bulkhead end of the cage then lift the cover off See Figure 4 40 for more information Figure 4 40 Removing the PCI Cage Cover Step 5 Unscrew the bulkhead screw that holds the accessory card in place Step 6 The PCI cards are now accessible for removal and r...

Page 81: ... unpopulated slots Failure to observe this caution results in server degradation or server failure The server has the following accessory card sockets Four 64 bit 133 MHz PCI X card sockets WARNING Ensure that the server is powered down and all power sources have been disconnected from the server prior to removing or replacing a PCI card Voltages are present at various locations within the server ...

Page 82: ...d being removed and gently rock the card releasing the connector from the PCI backplane connector Place the removed PCI card in an electrostatic container Step 6 Install a PCI slot cover to close the cavity left by the removal of the PCI card This maintains the proper airflow within the chassis See Figure 4 41 for more information Figure 4 41 Installing a PCI Slot Cover Replacing a PCI or Graphics...

Page 83: ... See accessory manuals Run PERFVER from the Offline Diagnostics CD to insure that all PCI cards are identified Monitor the SEL to ensure there are no events showing peripheral problems Step 11 Replace the top metal cover See Removing and Replacing the Top Metal Cover on page 50 Step 12 Connect all server power PCI and LAN cables Removing and Replacing the PCI Backplane The server backplane is call...

Page 84: ... Backplane Replacing the PCI Backplane Step 1 Place the backplane in the cage by aligning the cage standoffs with the holes on the backplane and slide it into place Step 2 Secure the PCI backplane by screwing in its mounting screws Figure 4 44 Replacing the PCI Backplane Step 3 Replace any accessory and graphics cards ...

Page 85: ...oltage is present even when the main power switch is in the off position Failure to observe this warning could result in personal injury or damage to equipment CAUTION Observe all ESD safety precautions before attempting this procedure Failure to follow ESD safety precautions could result in damage to the server Failure to properly complete the steps in this procedure will result in erratic server...

Page 86: ...filler Step 2 Slide the replacement drive into the drive bay until it stops sliding and the retaining clips on both sides of the drive snap into place Step 3 Connect the IDE cable on the back of the drive Step 4 Replace the top metal cover Step 5 Reconnect the power and external cables and turn on the server Step 6 Verify the drive replacement by using the utilities identified in Appendix C Utilit...

Page 87: ...are before beginning this task Step 2 Turn off the server disconnect all power and external cables and remove the top metal cover Step 3 Unscrew the two mounting screws that connect the iLO MP hardware to the internal chassis post as shown in Figure 4 46 Figure 4 46 Removing the iLO MP Card Step 4 Unscrew the two external mounting screws that are located on both sides of the 25 pin serial connecto...

Page 88: ...ings from your iLO MP before beginning this task Step 2 Turn off the server disconnect all power and external cables and remove the top metal cover Step 3 If you are installing a new card remove the iLO MP blank Step 4 Unscrew the mounting screw for the iLO MP blank located on the external connector side of the server chassis Step 5 Remove the blank retaining tab out of its socket on the server ch...

Page 89: ...ries may explode if mistreated Do not recharge disassemble or dispose of in a fire Failure to observe this warning could result in personal injury or damage to equipment Replace only with the same or equivalent type recommended by the manufacturer Dispose of used batteries according to the manufacturer s instructions Removing the iLO MP Battery Step 1 Record the iLO MP configuration settings from ...

Page 90: ... holder The positive terminal of the battery faces up CAUTION Only lift the battery high enough to clear the holder Excessive stress on the battery holder retaining clip may damage the clip Step 2 Perform all of the steps described in the procedure for Removing and Replacing iLO MP Hardware on page 87 Step 3 Verify the battery replacement by using the utilities identified in the HP Integrity rx262...

Page 91: ...avoid loss of server settings First replace one component then turn on the server and boot to the EFI prompt After confirming that the first component has been replaced successfully shut down the server and replace the second component Removing the LED Status Panel Step 1 Turn off the server disconnect all power cables and remove the top metal cover Step 2 Disconnect the LED status panel s control...

Page 92: ...s of server settings First replace one component then turn on the server and boot to the EFI prompt After confirming that the first component has been replaced successfully shut down the server and replace the second component Removing the System Board Step 1 Turn off the server disconnect all power and external cables and remove the top metal cover Step 2 Remove these components from the system b...

Page 93: ...nting Screws Step 6 Disconnect all cables that are connected to the system board To help with re assembly make note of which cables were connected to which port NOTE To access the three power cables near the PCI cage you must lift up the connector bridge for the PCI cage fan Step 7 Unscrew the system board mounting screw A screw symbol is adjacent to the mounting screw See Figure 4 51 for more inf...

Page 94: ...e processor module side of the system board and slide it free of the PCI cage bay See Figure 4 52 for more information Figure 4 52 Remove the System Board Replacing the System Board Step 1 Remove the old system board Step 2 Grasp the new system board by its edges and carefully align it in the server a Angle the board to allow the PCI connector to slide into the PCI cage bay area See Figure 4 53 fo...

Page 95: ... system board into their slots on the server chassis NOTE The PCI cage must be removed from the chassis to install the system board See Removing the PCI Card Cage on page 79 Step 3 Slide the system board back toward the rear of the server to secure the system board on its standoffs See Figure 4 54 and Figure 4 55 for more information Figure 4 54 Align the System Board PCI Connector Front of server...

Page 96: ...in Chassis Step 4 Screw in the system board mounting screw See Figure 4 56 for more information Step 5 Connect all cables to their appropriate connectors on the system board Step 6 Screw in the six rear backplane system board mounting screws Figure 4 56 Install the Rear Panel Mounting Screws Front of server Rear of server ...

Page 97: ...er Fan on page 55 Processors See Replacing a Processor on page 73 Processor airflow guide See Replacing the Processor Airflow Guide on page 64 Memory DIMMs See Installing DIMMs on page 67 Memory airflow guide See Replacing the Memory Airflow Guide on page 62 Step 10 Replace the top metal cover See Replacing the Top Metal Cover on page 51 Step 11 Reconnect all of the power and external cables Step ...

Page 98: ... Step 18 Use the EFI date and time commands to set the correct local date and time Step 19 Review the system configuration in the Boot Configuration Menu and or EFI shell and reconfigure settings as necessary Step 20 Boot the server and resume normal operation Removing and Replacing the Power Supply Interface Module The power supply interface PSI module supports up to two redundant power supplies ...

Page 99: ...omponents Chapter 4 99 Figure 4 58 Power Cables and Holding Clips Step 5 Unscrew the PSI mounting screw and remove the PSI module from the server See Figure 4 59 and Figure 4 60 for more information Figure 4 59 Remove the Mounting Screw Front of server Front of server ...

Page 100: ... 1 Place the PSI module into the chassis by sliding the module retaining tab into the socket on the hard disk drive bay wall See Figure 4 61 for more information Figure 4 61 Replacing the Power Supply Interface Module Step 2 Screw in the PSI module mounting screw and secure the power cables behind the holding clips See Figure 4 62 for more information Front of server Front of server ...

Page 101: ...y the PSI replacement by using the utilities identified in Appendix C Utilities on page 167 Use the iLO MP commands to verify operation Removing and Replacing the Hard Disk Drive SCSI Backplane Removing the Hard Drive Disk SCSI Backplane Step 1 Turn off the server disconnect all power and external cables and remove the top metal cover Step 2 Lift up on the PCI cage release lever and the back edge ...

Page 102: ... 4 102 Figure 4 63 Open the Fan Power Bridge Step 4 Remove any installed hard disk drives Step 5 Disconnect the SCSI cables and unscrew the backplane mounting screws See Figure 4 64 and Figure 4 65 for more information Figure 4 64 Disconnect SCSI Cables Front of server Front of server ...

Page 103: ...rnal Components Chapter 4 103 Figure 4 65 Remove Mounting Screws Step 6 Remove the hard drive backplane by sliding it in the direction of the arrow and pulling it outward from its standoff posts See Figure 4 66 and Figure 4 67 for more information Front of server ...

Page 104: ...rom Chassis Replacing the Hard Disk Drive SCSI Backplane Step 1 Insert the hard drive backplane onto its four chassis standoffs and slide it to the left as you face it This locks the hard drive backplane in place Step 2 Screw in the two backplane mounting screws and connect the two SCSI cables Step 3 Replace any removed hard disk drives Front of server Front of server ...

Page 105: ...r the fan power bridge until it snaps in place Step 5 Replace the PCI cage in the server and secure it Step 6 Replace the top metal cover and reconnect all of the power and external cables Step 7 Verify the backplane replacement by using the utilities identified in Appendix C Utilities on page 167 Use the iLO MP commands to verify operation ...

Page 106: ...Removing and Replacing Components Removing and Replacing Internal Components Chapter 4 106 ...

Page 107: ...ng Tips on page 108 Possible Problems on page 109 Troubleshooting and FRU identification on page 113 Verifying Hard Disk Drive Operation on page 115 Identifying and Diagnosing Hardware Problems on page 116 Command Line Interface on page 128 System Board Diagnostic LEDs on page 130 LAN LEDs on page 131 Diagnostics on page 133 Recommended Cleaning Procedures on page 136 Where to Get Help on page 137...

Page 108: ...System LED blinking System Alert present on console System won t power up System won t boot Error Event Message received Machine Check Abort MCA occurred Step 2 This step narrows down the observed problem to the specific troubleshooting procedure required Here you isolate the failure to a specific part of the server so that you can perform more detailed troubleshooting For example Problem System L...

Page 109: ...f the Power On Off LED is illuminated steady green the DC power supply s is on Step 4 Check the normal operation of the power supply s and fans The PS command of the iLO MP interrogate the status of the power subsystem Step 5 Check the system board diagnostic LEDs for proper operation See System Board Diagnostic LEDs later in this chapter Step 6 Verify that both LEDs of the power supply visible be...

Page 110: ...o be accomplished by the SS command of the iLO MP Step 8 Check the boot order with the Boot Configuration menu Step 9 If the server will still not boot it may be necessary to replace the base unit The System Has Intermittent Failures Step 1 Examine the display panel LEDs for warning or fault indications The server LED will be flashing yellow with a warning indication and flashing red with a fault ...

Page 111: ...with the new board for correct installation method If the new board is preventing the server from powering on it is likely to have a serious electrical problem Step 7 If the server still does not work remove all boards and options that you have installed do not remove the hard disk drives and turn on the server Step 8 Add the boards and options one at a time to determine which one is causing the p...

Page 112: ...p 5 Check for proper ventilation for the server The server should have at least three inches of space around the front and rear for proper airflow when installed in a rack NOTE Temperature problems may be caused by a fluctuating power supply Step 6 Check the server specifications and make sure the environmental temperature and voltage are in the specified guidelines Step 7 Monitor the server to ma...

Page 113: ...s on steady BMC heartbeat LED on system board is flashing if installed should be lit solid green 1 AC must be present Check that PDU is plugged in 2 Ensure there is a working power supply The LED on the supply should be lit 3 Check for an EFI shell prompt CTRL B at console No AC present Power Supply Power Distribution System board Display board System won t power on when display panel Power switch...

Page 114: ...s Also known as power pods Memory 3 Check for red LED on the iLO Manageability card if installed If red the problem is with the iLO MP 4 Reduce to minimum configuration and troubleshoot from there Processors Processor Support Modules Memory System board Console Can t boot to operating system OS Boot error messages System LED blinking OS prompt OS boot messages System LED on steady green 1 Check co...

Page 115: ...eady green until the drive spins up Step 3 If the activity LED were illuminated on any disk drives the drive cage may not be correctly installed Check installation as follows a Turn off the HP server power switch and unplug the AC power cords and any cables b Disconnect the power distribution cable between the drive cage and the power distribution module and then reconnect it c Verify that the SCS...

Page 116: ...blink in different patterns to help identify specific problems LEDs on the front and rear panels of the server display LAN activity The SEL provides detailed information about the errors identified by the LEDs If the LEDs and SEL do not give you enough information for you to identify the problem you are experiencing HP also provides diagnostic tools with each operating system Power and System LEDs...

Page 117: ...form the following Step 1 Login with proper username and password NOTE Default administrator login and password login Admin password Admin Step 2 Enter cl to display the console history log This log displays console history Step 3 Enter sl to display the status logs The status logs consist of System Event Forward Progress Current Boot Previous Boot Live Events Clear SEL FPL Logs Step 4 For a compl...

Page 118: ...ward in time e g from 3 to 4 View previous block backward in time e g from 3 to 2 CR Continue to the next or previous block D Dump the entire log F First entry L Last entry J Jump to entry number H View mode configuration Hex K View mode configuration Keyword T View mode configuration Text A Alert Level Filter options U Alert Level Unfiltered Display this Help menu Q Quit and return to the Event L...

Page 119: ...rning 5 Critical 7 Fatal Enter alert level threshold or Q to quit filter setup 3 Alert threshold level 3 filter will be applied Step 5 Select t to change the display to text mode Display Mode Configuration H Hex mode Current K Keyword mode T Text mode Enter new value or Q to Quit Step 6 To decode the blinking state of server LED review the entire SEL and look at events with alert level 3 and above...

Page 120: ...s chapter The diagnostic LEDs warn of impending failures or present failures and allow you to take preventive or corrective action such as making a server backup or replacing a component These diagnostic LEDs are labeled 1 2 3 and 4 If no iLO MP is installed the boot progress is monitored by diagnostic LEDs 1 through 4 During the boot up the LEDs will turn on in sequence until the EFI prompt is re...

Page 121: ...s of the failure The server LED indicates the severity of the error Check the server LED before proceeding to analyze the sequence of diagnostic LEDs System LED blinking YELLOW indicates a WARNING System LED blinking RED indicates a FAULT The diagnostic LEDs provide details about the specific error Solid red indicates the failing part or subsystem Off or solid green diagnostic LEDs provide additio...

Page 122: ...nown warning View the SEL cli sl e for additional information For further assistance contact your HP Support Engineer Table 5 6 Memory Warnings System LED LED 1 LED 2 LED 3 LED 4 Problem Solution Flashing yellow RED GREEN OFF OFF Mismatched memory pairs View the SEL for additional information Review the information on installing memory in the HP Integrity rx2620 Installation Guide Chapter 3 Flashi...

Page 123: ...llow OFF GREEN OFF RED Fan1B is not functioning properly Replace the fan that is not functioning See the HP Integrity rx2620 Server User Service Guide for detailed instructions on the maintenance action Flashing yellow OFF OFF GREEN RED CPU0 Fan is not functioning properly Replace the fan that is not functioning See the HP Integrity rx2620 Server User Service Guide for detailed instructions on the...

Page 124: ...hing is blocking the server s airflow and locate your server in an air conditioned room Table 5 10 Temperature Warnings System LED LED 1 LED 2 LED 3 LED 4 Problem Solution Flashing yellow RED GREEN GREEN RED External air temperature too high Make sure nothing is blocking the server s airflow and locate your server in an air conditioned room Table 5 11 Video Warnings System LED LED 1 LED 2 LED 3 LE...

Page 125: ... LED LED 1 LED 2 LED 3 LED 4 Problem Solution Flashing Red RED GREEN OFF OFF Mismatched memory pairs Review the information on installing memory in the HP Integrity rx2620 Installation Guide Chapter 3 Flashing Red OFF OFF OFF GREEN Fatal memory error Replace memory Flashing Red RED GREEN GREEN OFF No memory installed Install memory Flashing Red RED GREEN GREEN GREEN Bad Memory One or more DIMMs ar...

Page 126: ...eplace the fan that is not functioning See the HP Integrity rx2620 Server User Service Guide for detailed instructions on the maintenance action Flashing red OFF OFF GREEN RED CPU0 Fan fault Replace the fan that is not functioning See the HP Integrity rx2620 Server User Service Guide for detailed instructions on the maintenance action Flashing red GREEN GREEN OFF RED CPU1 Fan fault Replace the fan...

Page 127: ...r or processors are correctly installed See the HP Integrity rx2620 Installation Guide Chapter 3 for installation procedures Table 5 19 BMC Faults System LED LED 1 LED 2 LED 3 LED 4 Problem Solution Flashing Red RED GREEN RED OFF BMC firmware is damaged Turn off and unplug the server Wait 20 seconds then plug in and restart the server If the error repeats replace the base unit Flashing Red RED GRE...

Page 128: ...y help List available commands ipmi Send IPMI cmd loc System locator LED passwd Change password pc Power control pr Power restore policy ps Power status rs System reset sl Show logs sr Display firmware revisions tc System reset exit Exit Table 5 21 Power Supply Errors System LED LED 1 LED 2 LED 3 LED 4 Problem Solution Flashing Red OFF RED OFF RED VRM or power pod fault View the SEL for additional...

Page 129: ...the SEL to display error message indicating that fan 2 memory fan has failed cli sl e Sev Generator Sensor Description Event ID Data Timestamp 0010 BMC Chass cntrl 00 12 70 A3 81 03 2003 10 31 22 39 02 0020 BMC LPC reset 00 12 70 02 2003 10 31 22 39 03 0030 Fan 1 PSU OK 11 0A 07 00 2003 10 31 22 39 04 0040 Fan 3 CPU OK 13 0A 07 00 2003 10 31 22 39 04 0050 ACPI State S0 on FA 22 6F 00 2003 10 31 22...

Page 130: ...he STBY F W and BMC LEDs Table 5 22 details the LED states of the STBY F W and BMC LEDs on the system board Table 5 22 System Board LEDs LED Description STBY power good This green standby LED comes on as soon as the server power cord is plugged in BMC heartbeat A few seconds after the server is plugged in this green LED starts blinking indicating the BMC software is operational F W A few seconds a...

Page 131: ... are LAN A and LAN B LAN A Connector LEDs The 1 Gb LAN A interface provides four LEDs on the rear panel Table 5 23 details the LED locations and states for the LAN A connector Table 5 23 Gb LAN A Connector LEDs LAN LED Location Color State Not used Top None None 1000mb 2nd from top Amber Blinking amber the 1000 Mbps with ethernet protocol and twisted pair wiring is enabled Off no link 100mb 2nd fr...

Page 132: ...he 1000 MHz with ethernet protocol and twisted pair wiring is enabled off no link Speed upper left Green the 100 MHz with ethernet protocol and twisted pair wiring is enabled off no link Link upper right Green link Link upper right Off No link Table 5 25 Optional Management Processor LAN LEDs LAN LED Location Color State Self test Top Yellow Management processor running selftest or error Off Manag...

Page 133: ... Support Tool Manager STM tools and the additional Web Based Enterprise Management WBEM features added by SysFaultMgmt The STM suite of tools includes verifiers diagnostics exercisers information modules and expert tools Verifiers quickly determine whether or not a specific device is operational by performing tasks similar in nature to the way applications use the device No license is required to ...

Page 134: ...om the HP web Offline Support Tools List The following offline support tools are available Table 5 26 Online Support Tools List Functional Area Information Verify Exercise Diagnose Expert System Yes No No No No CPU FPU No No Yes No Yes Memory Yes No Yes No No Graphics Yes Yes Yes No No Core I O LAN Yes Yes Yes Yes No Disk Arrays Yes Yes Yes No No Tape Yes Yes Yes Yes Yes M O Yes No No No Yes Add O...

Page 135: ...s by the Event Management Service EMS The Event Management Service and WBEM provide frameworks for monitoring and reporting events SysFaultMgmt WBEM indication providers and the EMS Hardware Monitors allow users to monitor the operation of a wide variety of hardware products and alert them immediately if any failure or other unusual event occurs By using hardware event monitoring users can virtual...

Page 136: ...e server when cleaning it Table 5 29 details the components and procedures that need cleaning for the server CAUTION DO NOT use petroleum based cleaners such as lighter fluid or cleaners containing benzene trichlorethylene ammonia dilute ammonia or acetone These chemicals could damage all plastic and painted surfaces Table 5 29 Cleaning Component Time Frame Procedure Keyboard Regularly Dust with d...

Page 137: ...for example rx2620 The product number of your server This can be found on the identification label which is found on the pull out label at the front of the server The serial number of your server This can be found on the identification label Step 3 Be familiar with your server configuration Are you using the LAN RS 232 or web interface to monitor the server How many processors DIMMs and PCI cards ...

Page 138: ... this web site Software and firmware updates The latest drivers and utilities Additional documentation Phone Support To contact HP customer support by phone go to the HP IT Resource Center ITRC near you at http www itrc hp com Local phone numbers are listed in your native language for help ...

Page 139: ...provides server part information such as Description Manufacturing part number Replacement part number Exchange part number This appendix addresses the following topics Field Replaceable Parts View on page 140 Field Replaceable Parts List on page 142 ...

Page 140: ...Parts View The items in this list and the corresponding item numbers are the field replaceable units FRUs for the HP Integrity rx2620 server See Figure A 1 for an exploded view of the server Figure A 1 Parts Identification 1 2 3 4 5 6 7 8 9 10 11 12 13 14 15 16 17 18 19 20 21 22 23 ...

Page 141: ...Parts Information Field Replaceable Parts View Appendix A 141 Figure A 2 shows the parts used for a tower mounted server Figure A 2 Tower Parts 24 25 26 27 28 29 30 25 ...

Page 142: ...pply Interface module A7231 04018 A7231 04018 n a Power Supply Interface module RoHS A7231 04048 A7231 04048 n a SCSI backplane A7231 66520 A7231 66520 A7231 69520 SCSI backplane RoHS AB587 60005 AB587 60005 n a 23 System Board AB331 60001 AB331 67001 AB331 69101 System Board RoHS AB331 60101 AB331 67101 AB331 69201 System Board RoHS for dual core processors only AB331 60101 AB331 67101 AB331 6930...

Page 143: ...a Assembly Thin 80mm Fan RoHS A7321 04060 A7321 04060 n a 8 Assembly Dual fan A7231 04033 A7231 04033 n a Assembly Dual fan RoHS A7231 04059 A7231 04059 n a Assembly Office friendly CPU fans RoHS AD117 2000A A7231 04017 n a Processors 5 Processor 1 4 GHz 12 Mb cache module AD122A A2 AD122AX AD122 69001 5 Processor 1 6 GHz 18 Mb cache module AD123A A2 AD123AX AD123 69001 4 Assembly McPod II Power P...

Page 144: ...1 Assembly Top Cover A7231 04003 A7231 04003 n a Assembly Memory air flow guide A7231 04049 A7231 04049 n a Cables IDE Cable A7231 63002 A7231 63002 n a IDE Cable RoHS A7231 63026 A7231 63026 n a Status Panel Cable A7231 63003 A7231 63003 n a Status Panel Cable RoHS A7231 63027 A7231 63027 n a Disk Power A7231 63004 A7231 63004 n a Disk Power RoHS A7231 63028 A7231 63028 n a SCSI Channel A A7231 6...

Page 145: ...6829 60101 n a 17 Windows Linux Ultra160 SCSI Adapter Max 3 A7059A A6828 60101 n a 17 Windows Linux 2 port Ultra160 SCSI HBA Max 3 A7060A A6829 60101 n a 17 2 port U320 SCSI HPUX A7173A A6961 60011 n a 17 2 ch U320 RAID Controller Linux Windows A9890A 309520 001 n a 17 4 ch U320 RAID Controller Linux Windows A9891A 305920 001 n a 17 PCI X 1 port FCA2404 2 Gb Fibre Channel Adapter AB232A 313045 002...

Page 146: ...2G FC Combo Card HPUX A8784A A9784 60001 A9784 69001 17 2 port 2 Gb FC HPUX Linux Windows A6826A A6826 60001 A6826 69001 17 Fibre Channel Card 2 Gb Single Port A6795A A6795 62001 A6795 69001 17 PCI LAN Adapter 4 Port 100Base TX A5506B A5506 60102 A5506 69102 17 LAN Adapter 1000 SX Gigabit Next Gen A6847A A6847 67101 n a 17 PCI HyperFabric2 Fiber Adapter A6386A n a A6386 69001 17 USB keyboard and U...

Page 147: ... B 11 23 HP OpenVMS Microsoft Windows Server 2003 Red Hat Enterprise Linux and SuSE Linux Enterprise Server This chapter addresses the following topics Operating Systems Supported on HP Integrity Servers on page 148 Configuring System Boot Options on page 148 Booting and Shutting Down HP UX on page 149 Booting and Shutting Down HP OpenVMS on page 155 Booting and Shutting Down Microsoft Windows on ...

Page 148: ...ng the boot options list and the autoboot setting for the server Boot Options List The boot options list is a list of loadable items available for you to choose from the EFI Boot Manager menu Ordinarily the boot options list includes the EFI Shell and one or more operating system loaders The following example includes boot options for HP OpenVMS Microsoft Windows HP UX and the EFI Shell The final ...

Page 149: ...es at startup whether a server automatically loads the first item in the boot options list or remains at the EFI Boot Manager menu When autoboot is enabled EFI loads the first item in the boot options list after a designated timeout period Configure the autoboot setting for an HP Integrity server using either the autoboot EFI Shell command or the Set Auto Boot TimeOut menu item from the EFI Boot C...

Page 150: ... access the EFI Shell environment Step 2 Access the EFI System Partition fsX where X is the file system number for the device from which you want to boot HP UX For example enter fs2 to access the EFI System Partition for the bootable file system number 2 The EFI Shell prompt changes to reflect the file system currently accessed The full path for the HP UX loader is EFI HPUX HPUX EFI and it should ...

Page 151: ...Enter to initiate booting using the chosen boot option Step 4 Exit the console and iLO MP interfaces when finished using them Press Ctrl B to exit the server console and return to the iLO MP Main Menu To exit the iLO MP type X at the Main Menu Booting HP UX EFI Shell From the EFI Shell environment boot HP UX on a device by first accessing the EFI System Partition for example fs0 for the root devic...

Page 152: ...pi 000222F0 269 Pci 0 0 Scsi Pun8 Lun0 HD Part1 Sig72550000 blk0 Acpi 000222F0 269 Pci 0 0 Scsi Pun8 Lun0 blk1 Acpi 000222F0 269 Pci 0 0 Scsi Pun8 Lun0 HD Part1 Sig72550000 blk2 Acpi 000222F0 269 Pci 0 0 Scsi Pun8 Lun0 HD Part2 Sig72550000 blk3 Acpi 000222F0 2A8 Pci 0 0 Scsi Pun8 Lun0 blk4 Acpi 000222F0 2A8 Pci 0 1 Scsi Pun2 Lun0 Shell fs0 fs0 hpux c Copyright 1990 2002 Hewlett Packard Company All...

Page 153: ...EFI interface the HP UX Boot Loader prompt HPUX launches For help using the HPUX EFI loader enter the help command To return to the EFI Shell enter exit fs0 hpux c Copyright 1990 2002 Hewlett Packard Company All rights reserved HP UX Boot Loader for IA64 Revision 1 723 Press Any Key to interrupt Autoboot efi hpux AUTO boot vmunix Seconds left till autoboot 9 User Types A Key to Stop the HP UX Boot...

Page 154: ...er on the device you are accessing Step 4 Type any key within the 10 seconds given for interrupting the HP UX boot process This stops the boot process at the HPUX EFI interface the HP UX Boot Loader prompt HPUX Step 5 At the HPUX EFI interface enter the boot lm vmunix command to boot HP UX the stand vmunix kernel in LVM maintenance lm mode Step 6 Exit the console and iLO MP interfaces when finishe...

Page 155: ...down HP OpenVMS refer to Shutting Down HP OpenVMS on page 158 Adding HP OpenVMS to the Boot Options List On HP Integrity servers you can use the following procedures to manage boot options list entries for HP OpenVMS You can add the efi vms vms_loader efi loader to the boot options list from the EFI Shell or EFI Boot Configuration Menu or in some versions of EFI the Boot Option Maintenance Menu NO...

Page 156: ...st for the server bcfg boot rm Removes the item number specified by from the boot options list bcfg boot mv a b Moves the item number specified by a to the position specified by b in the boot options list bcfg boot add file efi Description Adds a new boot option to the position in the boot options list specified by The new boot option references file efi and is listed with the title specified by D...

Page 157: ... another EFI menu choose the Exit option from the submenus until you return to the screen with the EFI Boot Manager heading From the EFI Boot Manager menu choose the EFI Shell menu option to access the EFI Shell environment Step 2 At the EFI Shell environment issue the map command to list all currently mapped bootable devices The bootable file systems of interest typically are listed as fs0 fs1 an...

Page 158: ... DCL prompt issue the SYS SYSTEM SHUTDOWN command and specify the shutdown options in response to the prompts given SYS SYSTEM SHUTDOWN SHUTDOWN Perform an Orderly System Shutdown on node RSNVMS How many minutes until final shutdown 0 Reason for shutdown Standalone Do you want to spin down the disk volumes NO Do you want to invoke the site specific shutdown procedure YES Should an automatic system...

Page 159: ...em console When accessing the console confirm that you are at the EFI Boot Manager menu the main EFI menu If you are at another EFI menu choose the Exit option from the submenus until you return to the screen with the EFI Boot Manager heading From the EFI Boot Manager menu choose the EFI Shell menu option to access the EFI Shell environment Step 2 Access the EFI System Partition fsX where X is the...

Page 160: ...FI Boot Manager to choose the appropriate Windows item from the boot options list Refer to Shutting Down Microsoft Windows on page 161 for details on shutting down the Windows operating system Step 1 From the EFI Boot Manager menu choose an item from the boot options list to boot Windows using the chosen boot option Step 2 Access the EFI Boot Manager menu for the server on which you want to boot W...

Page 161: ... the shutdown command to shut down gracefully To shut down Windows use either of the following methods Choose Shut Down from the Start menu and choose either Restart or Shut down from the pull down menu The Restart menu item shuts down and restarts the server The Shut down menu item shuts down the server You can use this method when using a graphical interface to the server Issue the shutdown comm...

Page 162: ...iate options to shut down the Windows Server 2003 on the server You have the following options when shutting down Windows To shut down Windows and reboot shutdown r or choose the Start Shut Down action and choose Restart from the pull down menu To shut down Windows and halt power off server hardware shutdown s or choose the Start Shut Down action and choose Shut down from the pull down menu To reb...

Page 163: ...ell or EFI Boot Configuration menu or in some versions of EFI the Boot Option Maintenance Menu NOTE On HP Integrity servers the operating system installer automatically adds an entry to the boot options list Step 1 Access the EFI Shell environment Log in to the iLO MP and enter CO to access the system console When accessing the console confirm that you are at the EFI Boot Manager menu the main EFI...

Page 164: ...nux operating system on HP Integrity servers using either of these methods Choose a Red Hat Enterprise Linux entry from the EFI Boot Manager menu To load the Red Hat Enterprise Linux operating system at the EFI Boot Manager menu choose its entry from the list of boot options Choosing a Linux entry from the boot options list boots the operating system using ELILO EFI loader and the elilo conf file ...

Page 165: ...0 operating system on HP Integrity servers using either of these methods Choose a SuSE Linux Enterprise Server entry from the EFI Boot Manager menu To load the SuSE Linux Enterprise Server operating system at the EFI Boot Manager menu choose its entry from the list of boot options Choosing a Linux entry from the boot options list boots the operating system using ELILO EFI loader and the elilo conf...

Page 166: ...wn command to shut down Red Hat Enterprise Linux or SuSE Linux Enterprise Server The Red Hat Enterprise Linux and SuSE Linux Enterprise Server shutdown command has the following options h Halts power off after shutdown Use the PC command at the iLO MP Command menu to manually power on or power off server hardware as needed r Reboots after shutdown c Cancels an already running shutdown time When to...

Page 167: ...erver These include the EFI boot manager and EFI POSSE This appendix addresses the following topics Extensible Firmware Interface Boot Manager on page 168 EFI POSSE Commands on page 172 Specifying SCSI Parameters on page 187 Using the Boot Configuration Menu on page 194 iLO MP on page 205 ...

Page 168: ...ervers such as the Boot Console Handler BCH and platform firmware into a single platform firmware EFI allows the selection of any EFI OS loader from any boot medium that is supported by EFI boot services An EFI OS loader supports multiple options on the user interface EFI supports booting from media that contain an EFI OS loader or an EFI defined server partition An EFI defined server partition is...

Page 169: ...see Using the Boot Configuration Menu Boot From File Allows the user to explore the EFI file system and to choose a file to boot The selected file will not be added to the boot option list Add Boot Entry Adds a boot option to the EFI boot manager You select the boot option by exploring the available file systems for the EFI file you wish to add After selecting the file you will be prompted for the...

Page 170: ...FI shell MAin Return to the main menu MAin EFI boot manager change boot order PAth PRI HAA ALT CON KEY path Display or modify a path bcfg SEArch ALL Search for boot devices bcfg SEArch DIsplay IPL path Search for boot devices many commands offer a b parameter to cause 25 line breaks ScRoll ON OFF Display or change scrolling capability COnfiguration autoboot AUto BOot SEarch STart ON OFF Display or...

Page 171: ... major VLSI MP command df FRU Display FRU information info fw FwrVersion Display firmware version for PDC ICM and complex info io IO Display firmware version for PDC ICM and complex lanaddress LanAddress Display core LAN station address info mem Memory Display memory information info cpu PRocessor Display processor information SERvice errdump clear CLEARPIM Clear zero the contents of PIM mm MemRea...

Page 172: ...n which to display information Operation If help is initiated with no parameters it displays a list of shell command categories To list all of the commands within a category the user should type help category see examples If initiated with the b switch any output longer than one page pauses after each page is displayed If a shell command name is used as a parameter verbose help is displayed for th...

Page 173: ...full documentation Example C 2 help bch Command COnfiguration help bch co INformation help bch in PAth help bch pa ScRool help bch sr SEArch help bch sea SERvice help bch ser BOot help bch bo HElp help bch he RESET help bch reset MAin help bch ma For more help on one of the commands above at the prompt type help bch bchcmd Example C 3 help configuration Command Shell help configuration Configurati...

Page 174: ...f To enable cpu threads fs0 cpuconfig threads on cpuconfig Threads will be on after a reset To disable cpu threads fs0 cpuconfig threads off cpuconfig Threads will be off after a reset Example C 5 help ioconfig Command Shell help ioconfig Deconfigure or reconfigure IO components or settings IOCONFIG fast_init wol on off fast_init Specifies device connection policy setting wol Specifies System Wake...

Page 175: ...te Parameters index 0 through the total number of UARTS minus one baudrate baud rate Operation This command is used to change the speed for a UART in the server This command works for all UARTs visible to EFI POSSE If the UART is part of processor dependent hardware PDH space and is initialized by the core firmware this command communicates the settings to core firmware so the UART can be initiali...

Page 176: ... platform Enable disable system board hardware tests chipset Enable disable CEC tests io_hw Enable disable EFI driver Core I O tests mem_init Enable disable memory initialization mem_test Enable disable full destructive memory tests Example C 6 boottest Command Shell boottest BOOTTEST Settings Default Variable Selftest Setting booting_valid On OS speedy boot aware early_cpu Run this test late_cpu ...

Page 177: ...e deconfigured Example C 8 cpuconfig Command Shell cpuconfig PROCESSOR INFORMATION Proc Arch Processor CPU Speed Rev Model Family Rev State 0 1 6Ghz B1 0 31 0 Sched Deconf 1 1 6Ghz B1 0 31 0 Active ioconfig Use this command to deconfigure or reconfigure I O components or settings Syntax ioconfig fast_init wol on off Parameters fast_init specify device connection policy setting wol specify system w...

Page 178: ...ng is disabled Examples To display the current settings fs0 ioconfig Fast initialization Enabled System Wake On LAN Disabled To display the current device connection policy setting fs0 ioconfig fast_init Fast initialization Enabled To disable fast initialization fs0 ioconfig fast_init off Fast initialization Disabled To enable the System Wake On LAN setting fs0 ioconfig wol on System Wake On LAN E...

Page 179: ... targets are all display everything cpu display information on cpus cache display information on cache mem display information on memory io display information on io boot display boot related information chiprev display information on chip revisions fw display firmware version information sys display system information warning display warning and stop boot information Example C 10 info all Command...

Page 180: ...00 Pci 1 1 00 20 02 00 0x8086 0x1079 XX Acpi HWP0002 100 Pci 2 0 00 20 02 01 0x8086 0x1079 XX Acpi HWP0002 100 Pci 2 1 00 40 01 00 0x1000 0x0021 03 Acpi HWP0002 200 Pci 1 0 00 60 01 00 0x1077 0x2312 02 Acpi HWP0002 300 Pci 1 0 00 60 01 01 0x1077 0x2312 02 Acpi HWP0002 300 Pci 1 1 00 80 01 00 0x1000 0x000F 01 Acpi HWP0002 400 Pci 1 0 00 80 01 01 0x1000 0x000F 01 Acpi HWP0002 400 Pci 1 1 00 C0 01 00...

Page 181: ...033 0x0035 XX Acpi HWP0002 0 Pci 1 0 00 00 01 01 0x1033 0x0035 XX Acpi HWP0002 0 Pci 1 1 00 00 01 02 0x1033 0x00E0 XX Acpi HWP0002 0 Pci 1 2 00 00 02 00 0x1095 0x0649 XX Acpi HWP0002 0 Pci 2 0 00 20 01 00 0x1000 0x0030 XX Acpi HWP0002 100 Pci 1 0 00 20 01 01 0x1000 0x0030 XX Acpi HWP0002 100 Pci 1 1 00 20 02 00 0x8086 0x1079 XX Acpi HWP0002 100 Pci 2 0 00 20 02 01 0x8086 0x1079 XX Acpi HWP0002 100...

Page 182: ...E07FA Acpi HWP0002 100 Pci 2 0 Mac 000E7F7E07FA Mac 000E7F7E07FB Acpi HWP0002 100 Pci 2 1 Mac 000E7F7E07FB FIRMWARE INFORMATION Firmware Revision 86 10 4432 PAL_A 7 31 5 37 PAL_B 5 69 EFI Spec 1 10 EFI Intel Drop 14 62 EFI Build 86 10 SAL Spec 3 01 SAL_A 2 00 SAL_B 86 10 POSSE 0 10 ACPI 7 00 SMBIOS 2 3 2a BMC Revision 3 42 IPMI 1 00 Management Processor Revision E 03 02 Updatable EFI Drivers Float...

Page 183: ...Bridge 0007 122e 0032 Other Bridge 0 0 0002 Other Bridge 0 0 0009 Baseboard MC 0 0 0342 Example C 11 info cpu Command Shell info cpu PROCESSOR MODULE INFORMATION of L3 L4 Family CPU Logical Cache Cache Model Processor Module CPUs Speed Size Size hex Rev State 0 1 1 3 GHz 3 MB None 1F 01 B1 Active Example C 12 info mem Command Shell info mem MEMORY INFORMATION DIMM A DIMM B DIMM Current DIMM Curren...

Page 184: ...2 01 0x8086 0x1079 XX Acpi HWP0002 100 Pci 2 1 00 40 01 00 0x1000 0x0021 03 Acpi HWP0002 200 Pci 1 0 00 60 01 00 0x1077 0x2312 02 Acpi HWP0002 300 Pci 1 0 00 60 01 01 0x1077 0x2312 02 Acpi HWP0002 300 Pci 1 1 00 80 01 00 0x1000 0x000F 01 Acpi HWP0002 400 Pci 1 0 00 80 01 01 0x1000 0x000F 01 Acpi HWP0002 400 Pci 1 1 00 C0 01 00 0x1000 0x0021 04 Acpi HWP0002 600 Pci 1 0 00 E0 01 00 0x103C 0x1290 XX ...

Page 185: ...MAC address Syntax lanaddress Parameters none Example C 16 lanaddress Command LAN Address Information LAN Address Path Mac 00306E4C4F1A Acpi HWP0002 0 Pci 3 0 Mac 00306E4C4F1A Mac 00306E4C0FF2 Acpi HWP0002 100 Pci 2 0 Mac 00306E4C0FF2 monarch Displays or modifies the ID of the bootstrap processor The preferred monarch number is stored in NVM Syntax monarch cpu Parameters cpu specifies a cpu Operat...

Page 186: ...cified the command displays the PDT information for the server The PDT is cleared and a reboot is required for memory reallocation and safe booting Example C 18 pdt Command Shell pdt PDT Information for PD Last Clear time for PD PDT has not been cleared Number of total entries in PD PDT 100 Number of used entries in PD PDT 0 Number of free entries in PD PDT 50 Number of permanent correctable SBE e...

Page 187: ... alone sysmode displays the system mode If a mode is specified as a parameter then the system mode is changed This new mode takes effect immediately The system mode is retained on successive boots Interaction with sysmode in a variety of scenarios is outlined below Example C 20 sysmode Command Shell sysmode System Mode NORMAL Shell sysmode admin You are now in admin mode Shell sysmode service You ...

Page 188: ...tility Step 1 At the EFI shell prompt type this command to map the parameters for all PCI cards installed in the server info io A list of all the devices that are installed in the HP Integrity rx2620 server and managed by EFI drivers is displayed The output may look like this ...

Page 189: ...ing example a single SCSI interface is shown in the listing The information for both channels of the SCSI interface is shown in bold for highlighting purposes For each channel of the SCSI board you need to note certain information As an example look at the information for the SCSI interface the first two bold lines For each channel of this SCSI interface note the following information Bus identifi...

Page 190: ...displayed The output could look like this Shell devtree Device Tree Ctrl 04 Ctrl 06 VenHw SysROM Ctrl 0B Acpi HWP0002 0 Ctrl 15 Usb Open Host Controller Ctrl 16 Usb Open Host Controller Ctrl 17 Acpi HWP0002 0 Pci 1 2 Ctrl 18 PCI IDE ATAPI Controller Ctrl 56 DV 28E C Ctrl 91 FAT File System FAT32 118 MB Ctrl 0C Acpi HWP0002 100 Ctrl 1C LSI Logic Ultra320 SCSI Controller Ctrl 1D LSI Logic Ultra320 S...

Page 191: ...ver is displayed The output may look like this Shell drvcfg Configurable Components Drv 3D Ctrl 15 Lang eng Drv 3F Ctrl 19 Lang eng Drv 45 Ctrl 17 Lang eng Drv 45 Ctrl 18 Lang eng This listing shows which driver controls which device controller In the above example the SCSI interface information is shown highlighted bold You can tell the information is for this SCSI interface because the values sh...

Page 192: ...o command CAUTION Do not select the Global Properties option on the main menu TIP To move the cursor in the EFI SCSI Setup Utility you can use these keys Arrow keys Alternate keys H left J down K up L right I home O end Step 6 The Adapter Properties screen for this channel of the SCSI interface is displayed If you like you can make sure the utility is running for the channel of the SCSI interface ...

Page 193: ... Adapter Properties screen You are given these choices Cancel the exit from the screen to stay in the Adapter Properties screen for the channel of the SCSI interface Save the changes you made and then exit the screen Discard the changes you made and then exit the screen Step 11 Move the cursor to the action cancel save or discard you want to take press Enter If you selected cancel you remain in th...

Page 194: ...uration System Reset These items are described in the following sections In all menus select Refer to the status bar on the bottom of the screen for help on menus and navigation Enter to select an item after using the arrow keys to highlight the item Save Settings to NVRAM to save your changes NOTE The options shown here are examples Your server may have different options available based on the se...

Page 195: ...oad File EFI Shell Built in Load File Acpi HWP0002 0 Pci 3 0 Mac 00306E4C4F1A Exit In this example NO VOLUME LABEL is a hard drive When you format a hard drive the EFI tools provide an option to LABEL the disk In this example the volume was not labelled CD_FORMAT is the label created for the disk currently inside the DVD drive Removable Media Boot allows you to boot from a removable media drive CD...

Page 196: ... Most of the items are the same options in Boot From a File NO VOLUME LABEL is a hard drive You can search through the disk for bootable applications to add to the Boot Manager list of Boot options Removable Media Boot will treat the Removable Media generally a CD as a bootable device Load File EFI Shell adds a new instance to the EFI Shell Load File with the MAC address adds a network boot option...

Page 197: ...C 71E5 4DF0 A909 F0D2992B5AA9 Boot0000 BootNext Configuration Use this option to run the selected boot option immediately upon entering the main Boot Manager menu This option is useful for booting an option that only needs to be booted once without changing any other setting in the main Boot Manager menu This is a one time operation and does not change the permanent system boot settings This optio...

Page 198: ...Console Input and Active Console Output device lists NOTE Some operating systems support multiple consoles such as a simultaneous serial and VGA output See your OS documentation to determine how many consoles are supported with your server Multiple consoles are not supported for HP UX or Windows use the Smart Setup CD to switch between COM A and the iLO MP on Windows servers For example Select the...

Page 199: ...l port in both the Active Console Input and Active Console Output device lists NOTE Some operating systems support multiple consoles such as a simultaneous serial and VGA output See your OS documentation to determine how many consoles are supported with your server Multiple consoles are not supported for HP UX or Windows use the Smart Setup CD to switch between COM A and the iLO MP on Windows serv...

Page 200: ...port for directing output to a terminal emulation package NOTE If you install a modem in your server make sure you disable the modem serial port in both the Active Console Input and Active Console Output device lists NOTE Some operating systems support multiple consoles such as a simultaneous serial and VGA output See your OS documentation to determine how many consoles are supported with your ser...

Page 201: ...hat display output from the system console This list normally includes the VGA monitor and a serial port for directing output to a terminal emulation package NOTE If you install a modem in your server make sure you disable the modem serial port in both the Active Console Input and Active Console Output device lists NOTE Some operating systems support multiple consoles such as a simultaneous serial...

Page 202: ... baud command VenMsg Vt100 is the current emulation type several different terminal emulation protocols are supported see list above Only one terminal emulation type PcAnsi Vt100 etc can be selected for each serial console but multiple serial consoles can be selected at a time Using the System Configuration Menu The System Configuration Menu on servers with EFI firmware version 2 0 or higher inclu...

Page 203: ...strator Password Options User Password Options Administrator Password Options Administrator Password Options lets the user set and clear the administrator password User Password Options User Password Options lets the user set and clear the administrator password If you forget your passwords they can be reset using an iLO MP command Follow these steps If your server has an iLO Manageability card Ru...

Page 204: ...system board to start blinking green This should take about 5 seconds from the time you plug in the power cord Step 4 Unplug the AC power cord again and remove the jumper Step 5 Plug in the power cord and boot the server Step 6 The passwords have been cleared Follow the instructions above to set new server passwords Step 7 Store the server in a secure location and keep the server case locked at al...

Page 205: ...eferred to as management processor functionality All legacy MP functionality has been carried forward and combined with new features all under the heading of iLO MP Therefore iLO and MP mean the same thing for Entry Class servers Firmware version E 03 13 or later supports the following iLO MP features Always on capability iLO is active as long as the power cord is plugged in Multiple access method...

Page 206: ...Access Protocol MAC See Configure an IP Address on page 207 to determine the MAC address If no DNS access is available the telnet session can use the assigned IP address If you are using DHCP proceed to Accessing the iLO MP on page 207 For more information on configuring DHCP see Configuring the iLO MP LAN Information on page 209 For a non DHCP implementation perform the following steps to configu...

Page 207: ...ore information Step 4 Use the ping command from the host that has the new ARP table entry The destination address is the IP address that is mapped to the MAC address of the iLO MP The iLO MP LAN port should now be configured with the appropriate IP address Step 5 Use the telnet command to connect to the iLO MP from a host on the local subnet Accessing the iLO MP You can connect to the iLO MP usin...

Page 208: ...ite www hp com go hpsim Step 1 Log in using your iLO MP user account name and password NOTE If you are logged in the iLO MP Main Menu displays To follow this procedure make sure you are at the iLO MP Main Menu Use Ctrl B to return to the iLO MP Main Menu Step 2 Use the iLO MP menus and commands as needed Main Menu commands are shown in iLO MP Main Menu You can access commands not displayed in the ...

Page 209: ...A to choose all parameters Step 4 The screen displays the current DHCP status If DHCP is used to acquire IP address information enter E to enable D to disable or Q unless you are using the local serial port Step 5 Enter the LC command to disable DHCP CAUTION Modifying the DHCP status IP address gateway IP address or subnet mask parameters drops all present LAN and Web connections NOTE Changing DHC...

Page 210: ... the desired values have been accepted When prompted to enter a parameter for revision Y to confirm or Q to Quit enter Y to confirm all parameters Check all LAN parameters to ensure they are correct before commit SP_NAME_STR will be reset if you confirm the changes MP Host Name mpserver Step 14 Enter XD reset to reset the iLO MP only necessary if you are connected through a serial port Step 15 Aft...

Page 211: ...Menu by first using the CM command at the MP prompt The following tables provide a reference for commands available through the command line interface iLO MP Main Menu Commands Commands are listed in Table C 9 Command Menu Commands Commands are listed in Table C 10 Table C 9 iLO MP Main Menu Commands and Descriptions Command Description CL View console log CM Enter command mode CO Select console m...

Page 212: ...D LS LAN status MR Modem reset MS Modem status PC Remote power control PG Paging parameter setup PR Power restore PS Power management module status RB Reset BMC RS Reset server through RST signal SA Set access options SO Configure security options SS Display server processor status SYSREV Display all firmware revisions TC Reset through transfer of control TOC TE Tell send a message to other users ...

Page 213: ...locations 47 configurable components EFI capable displaying 191 connector locations 48 control panel LEDs 32 controller handle determining 191 controls CD DVD controls 34 35 control panel 32 hard disk drive controls 34 core I O specifications external 20 internal 20 customer support 137 D data paths 28 ACPI 194 DDNS 206 devtree command controller handle determining 191 EFI capable devices and cont...

Page 214: ...ress non DHCP 206 configuring the IP address 206 207 LED status panel remove and replace 91 LED warnings fault 121 system 122 LEDs 115 116 120 control panel 32 diagnostic 33 DVD 35 DVD drive 35 ethernet LAN 38 39 front control panel 32 front panel 32 hard disk drive 34 LAN 33 38 39 troubleshooting 131 LAN A 38 LAN B 39 locator 33 MP 40 MP LAN 40 troubleshooting 132 power supply 34 rear panel 36 sy...

Page 215: ...ty 206 R rear panel LEDs 36 ports 36 Reflection 1 206 removable media drive remove and replace 85 remove and replace DIMMs 65 front bezel 52 hard disk drive 58 hard disk drive backplane 101 internal hard disk drive 58 LED status panel 91 memory airflow guide 62 MP card 87 MP card battery 89 PCI AGP backplane 83 PCI and graphics cards 79 power supply 56 power supply interface module 98 processor ai...

Page 216: ...d bezels remove and replace 49 System Event Log 116 system fans remove and replace 54 system fans remove and replace 54 system LED warnings 122 system LEDs 33 116 system memory remove and replace 65 T terminal access 206 tools required 46 top metal cover remove and replace 50 trichlorethylene 136 U unlocking a hard disk drive 58 USB specifications 28 W weight of server 19 Z ZX1 I O 23 ...

Reviews: