Chapter 6
Replacing Parts
82
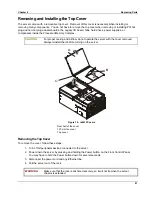
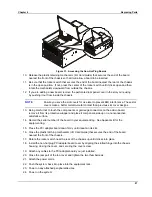
5. Loosen the thumbscrew at the front of the chassis that secures the 120 mm fan bay and fold the
fan cover open.
6. Loosen the two thumbscrews that secure the top cover to the rear of the chassis and fold the
rear half of the top cover open.
7. Loosen the screw that secures the non-hot plug PCI adapter board cover and remove that
cover.
8. Place your hands on the sides of the chassis near the hinge of the rear part such that your
thumbs can aggressively slide the entire top cover toward the rear of the chassis. Sliding the
cover in this direction disengages the hooks on both sides of the top cover from the chassis
housing.
9. Lift the top cover off the chassis.
Installing the Top Cover
To replace the cover, complete these steps:
1. Provide ESD protection by wearing an antistatic wrist strap attached to chassis ground of the
system when handling components.
2. Before installing the top cover, check that you have not left loose tools or parts inside the
system.
3. Check that cables, add-in boards, and other components are properly installed.
4. Make sure that the 120 mm fan cover is lifted and open.
5. Fold the rear part of the top cover open and set it down on the chassis, aligning the hooks on
both sides of the front half of the cover.
6. Place your hands on the sides of the chassis near the hinge of the rear part such that your
thumbs can aggressively slide the entire top cover toward the front of the chassis. Sliding the
cover in this direction engages the hooks on both sides of the top cover into the chassis
housing.
7. Close the 120 mm fan cover and tighten the thumbscrew. If the door does not close then the
top cover hooks have not fully engaged into the chassis.
8. Replace the PCI adapter board cover and install the screw that secures it to the top cover.
9. Close the rear half of the top cover and tighten the two thumbscrews.
10. Push the chassis back into the rack.
11. Connect the keyboard, mouse, and monitor before powering up the system.
12. Power on the system.
13. Power on any peripherals connected to the server that you shut down.
Summary of Contents for Integrity rx4610
Page 1: ...hp server rx4610 Service Manual Online Version 1 0 Last Updated June 2001 ...
Page 8: ...8 ...
Page 16: ...Chapter 1 General Information 8 ...
Page 38: ......
Page 86: ......
Page 144: ...Chapter 6 Replacing Parts 136 ...

