background image

Learning the Basics

 User’s Guide

2–10

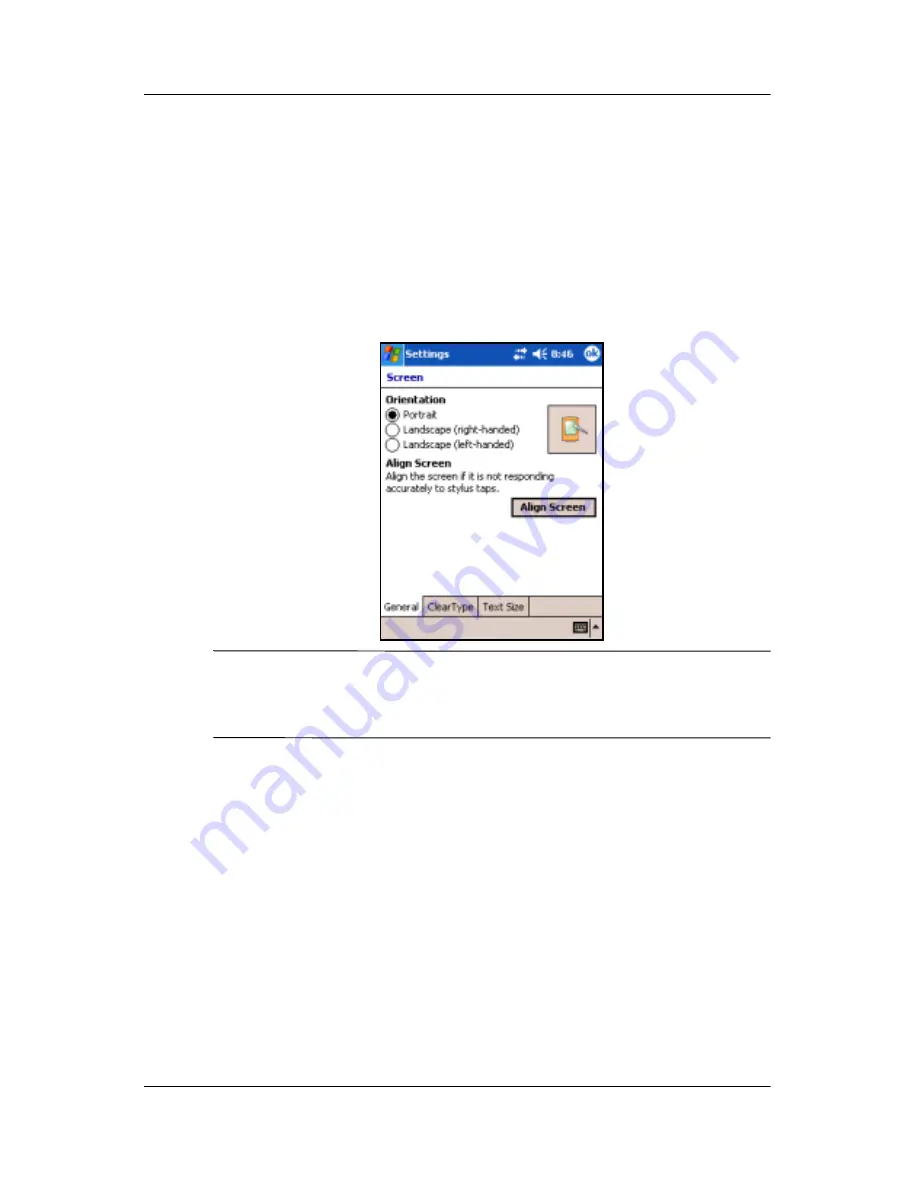
1. Tap 

Start 

Settings.

2. Tap the 

System

 tab at the bottom of the 

Settings

 screen.

3. Tap the 

Screen

 icon. The Screen Orientation options are 

displayed.

4. Make your selection and press the 

OK 

button. Your display 

screen is now in the new orientation.

Note: 

Some applications only work in Portrait mode and may 

switch the orientation automatically when you start the 
application.

Minimizing Applications

To minimize an open application, tap the 

x

 at the top right of the 

screen.

Closing Applications

Applications automatically close based on available memory. 
However, if your HP iPAQ is running slowly, you can close 
applications using iTask or the 

Settings 

menu.

Summary of Contents for iPAQ rx3000 series

Page 1: ...User s Guide HP iPAQ rx3000 series Mobile Media Companion Document Part Number 364351 002 August 2004 ...

Page 2: ...consequential damages in connection with the furnishing performance or use of this material The information in this document is provided as is without warranty of any kind including but not limited to the implied warranties of merchantability and fitness for a particular purpose and is subject to change without notice The warranties for HP products are set forth in the express limited warranty sta...

Page 3: ...rmal Reset 1 7 Performing a Full Reset 1 9 Aligning the Screen 1 11 Routine Care 1 11 2 Learning the Basics Using the Launch Page or Traditional Today Screen 2 1 Navigation Bar and Command Bar 2 3 Status Icons 2 4 Pop Up Menus 2 5 Creating information 2 6 Customizing the Today Screen 2 7 Using Applications 2 7 Using the iTask Launcher 2 7 Launching Applications 2 8 Pocket Internet Explorer 2 9 Swi...

Page 4: ...alling a Program 3 6 Backing up and Restoring Files 3 6 Synchronizing Links 3 7 Sending and Receiving E mail Messages 3 7 Sending a Meeting Request 3 8 4 Learning Input Methods Using Input Software 4 1 Changing Word Suggestion Options 4 1 Using the On Screen Keyboard 4 4 Writing with the Stylus and the Letter Recognizer 4 4 Writing with the Stylus and Microsoft Transcriber 4 5 Writing with the Sty...

Page 5: ...ing HP Instant Share Printing 5 58 Printing With a Memory Card 5 59 Sharing 5 60 Setting up Your Share Menu 5 61 Tagging Photos With Destinations 5 62 Tips for Taking Better Pictures 5 64 6 Getting to Know iPAQ Mobile Media Using the iPAQ Mobile Media Features 6 1 Setting Up iPAQ Mobile Media on Your HP iPAQ 6 3 Setting Up iPAQ Mobile Media On Your Personal Computers 6 6 Minimum System Requirement...

Page 6: ... the Details of Media Stored in the Server 6 26 Removing Individual Media Folders 6 26 Removing Your Entire Collection 6 27 Exiting NevoMedia Server 6 27 Using NevoMedia Player 6 28 Understanding the NevoMedia Player Options 6 29 The File Menu 6 29 The View Menu 6 29 The Help Menu 6 30 The Context Menu 6 30 Performing Common NevoMedia Player Tasks 6 31 Playing Multiple Media Types Simultaneously 6...

Page 7: ...Playing Music 6 46 Controlling Music Play 6 47 Viewing Pictures 6 48 Controlling Pictures 6 49 Navigating the Controls View 6 50 Playing Videos 6 51 Controlling Video Play 6 53 Deleting Media 6 53 Deleting Individual Tracks 6 55 Deleting All Media in a Storage Location 6 55 Streaming Media Media Stream Mode 6 56 Selecting a Media Server 6 56 The Media Stream Customize Menu 6 57 Playing Music 6 58 ...

Page 8: ... 6 73 Selecting Pictures to Download 6 73 Downloading Videos 6 73 Selecting Videos to Download 6 74 Controlling Home Entertainment Devices NevoHome Control 6 74 Starting Up NevoHome Control 6 75 Navigating the NevoHome Control Screens 6 75 Setting up the Key Guides 6 77 Adding a Device 6 77 Downloading Device Codes 6 78 Controlling a Device 6 79 Contol multiple home entertainment devices with just...

Page 9: ... 91 Deleting a Room 6 92 Adding Users 6 92 Editing Users 6 93 Deleting Users 6 93 Adding Activities 6 94 Editing an Activity 6 95 Deleting an Activity 6 95 Downloading Additional Features 6 96 Downloading Graphics 6 96 Downloading Device Key Functions 6 96 7 Getting to Know the iPAQ Wireless Manager Power Buttons 7 2 Settings Buttons 7 2 Wi Fi Settings Button 7 3 Bluetooth Settings Button 7 3 Blue...

Page 10: ... 8 13 Editing VPN Server Connections 8 13 Starting VPN Server Connections 8 14 Setting Up Proxy Server Settings 8 14 9 Using Bluetooth Getting Acquainted with Bluetooth 9 2 Understanding Terms 9 3 Supported Services 9 4 Working with Bluetooth Settings 9 4 Turning On Bluetooth 9 5 Opening Bluetooth Settings 9 5 Setting Accessibility Properties 9 5 Enabling Bluetooth Services 9 6 Setting a Shared Fo...

Page 11: ... 9 21 Opening a Connection 9 24 Viewing Connection Status 9 24 Closing a Connection 9 25 Viewing Connection Information 9 25 10Managing the Battery Installing the Battery 10 1 Removing the Battery 10 5 Charging the Battery 10 5 Charging with the AC Adapter 10 5 Charging with the Desktop Cradle and AC Adapter 10 7 Changing the Backlight Settings 10 9 Changing the Wireless LAN Power Saving Modes 10 ...

Page 12: ...h the FCC logo United States only A 2 Canadian Notice A 3 Avis Canadien A 3 Japanese Notice A 3 Korean Notice A 3 European Regulatory Notice A 3 Declaration of Conformity A 4 Battery Warning A 5 Equipment Warning A 6 Airline Travel Notice A 7 Wireless Notices A 7 U S Regulatory Wireless Notice A 7 Canadian Regulatory Wireless Notice A 7 Japanese Regulatory Wireless Notice A 8 Brazilian Regulatory ...

Page 13: ...Contents User s Guide xiii ...

Page 14: ...our HP iPAQ loses power You can find detailed information for using these programs in the Help files on your HP iPAQ To access these Help files from the Start menu tap Help and select a program In addition Microsoft Pocket PC Basics provides instructions on operating the HP iPAQ To locate Pocket PC Basics tap Start Help Pocket PC Basics Note The built in HP Photosmart camera is available only in s...

Page 15: ...s on your HP iPAQ iPAQ Mobile Media Tap Start Help iPAQ Mobile Media Browse and play your music photo and video collections over a wireless network from anywhere in your home Nevo Home Control Tap Start Help Nevo Control your home entertainment devices using your HP iPAQ HP Image Zone for iPAQs Tap Start Help HP Image Zone View edit annotate share and print photos from your HP iPAQ Print send or v...

Page 16: ... iTask Tap Start Help iTask Quickly access the most frequently used features on your HP iPAQ Microsoft Pocket PC Software Functions ActiveSync Synchronize the information between your HP iPAQ and computer so you have the latest information in both locations Be sure you install ActiveSync on your computer before connecting the desktop cradle and HP iPAQ to your computer Calculator Perform calculati...

Page 17: ... employer to send and receive e mail Notes Create handwritten or typed notes drawings and recordings Pocket Excel Create and edit workbooks or view and edit Excel workbooks created on your computer Pocket Internet Explorer Browse the Internet and download pages through synchronization or by connecting to the Internet Pocket Word Create new documents or view and edit Word documents created on your ...

Page 18: ...drag an item across the screen without lifting the stylus until you have completed the selection Dragging is equivalent to dragging with the left mouse button pressed on your computer Tap and hold Hold the stylus pointer on an item for a short time until a menu displays Tapping and holding is equivalent to right clicking your computer mouse button When you tap and hold a circle of red dots appears...

Page 19: ...ystem tab Clock icon 2 Tap the down arrow next to the date 3 Tap the left or right arrow to select a month and year 4 Tap a day 5 Tap OK 6 Tap Yes to save the date settings You need to reset your time zone time and date if The location time Home or Visiting needs to be changed All power to the HP iPAQ is lost which removes all saved settings You perform a full reset of your HP iPAQ Entering Owner ...

Page 20: ...ude 5 To display owner information at startup tap in the Show information when device is turned on checkbox 6 Tap on the Notes tab to enter any notes 7 Tap OK to save the information and return to the Launch page Resetting the Unit Performing a Normal Reset A soft reset does not erase any programs or saved data Before performing a soft reset be sure to save any unsaved data since any unsaved data ...

Page 21: ...ser s Guide 1 8 3 Tap Close All Tasks 4 Locate the recessed Reset button on the bottom of your HP iPAQ 5 Use the stylus to lightly press the Reset button The HP iPAQ restarts and displays the Launch Page or traditional Today screen ...

Page 22: ...document If the battery installed in your HP iPAQ discharges completely once the battery has been recharged your HP iPAQ operates as if a hard reset had been performed Refer to How Do I Check the Battery Level in this document for more information ÄCAUTION If you perform a hard reset your HP iPAQ returns to its default settings and loses all information files settings etc that is recorded in main ...

Page 23: ...e Reset button The HP iPAQ resets and powers on If the HP iPAQ does not power on after a reset try the following Check the battery door to ensure it is locked If not replace the battery door by matching the tabs on the cover to the latches on the HP iPAQ and snap it into place This action locks the battery door If the battery door is not locked the HP iPAQ does not power on For more information re...

Page 24: ... hair object at each location Be precise when tapping the cross hair object 4 Tap OK Routine Care You should observe the following practices to protect the screen and camera lens of your HP iPAQ from damage Note The built in camera is available only in select HP iPAQ models When transporting your HP iPAQ in a purse pocket briefcase etc ensure the device does not get compressed bent dropped hit or ...

Page 25: ...er extras at www hp com go ipaqaccessories Clean your HP iPAQ by wiping the screen the camera lens and the exterior with a soft damp cloth lightly moistened only with water ÄCAUTION To reduce the risk of damage to the internal components do not spray liquid directly on the screen or allow excess liquid to drip inside your HP iPAQ Using soap or other cleaning products on the screen may discolor the...

Page 26: ...ilable only in select HP iPAQ models To upgrade your model please refer to the Accessories Brochure for information on the HP Photosmart Mobile Camera Tap to view Programs menu Tap to change volume or mute all sounds Tap to view connections Tap to open iPAQ Mobile Tap to create a new item Tap to view and set Wi Fi and or Bluetooth settings Media Tap to launch HP Image Zone Tap to open Nevo Univers...

Page 27: ...f the Launch page 3 Under the Items tab check the options you want to view on the traditional Today screen 4 Click OK to accept your selections The traditional Today screen displays Tap to view Programs menu Tap to change volume or mute all sounds Tap to view Connections Tap to change date and time Tap to set appointment or view existing appointment Tap to read e mail Tap to create a new item Tap ...

Page 28: ... refer to the Accessories Brochure for information on the HP Photosmart Mobile Camera Navigation Bar and Command Bar The Navigation bar is located at the top of the screen It displays the current time the status of sounds and connections and allows you to open new programs Use the Start menu to select a program Launch Page Traditional Today Screen ...

Page 29: ...y see the following status icons displayed on the Navigation bar or Command bar Tap the icon on the screen to view more information related to the item Tap to view and set Wi Fi and Bluetooth settings Tap to view online Help Tap to select a program Tap to select a program you used recently Tap to customize the settings Tap to see additional programs New button Input panel button Menu Buttons actio...

Page 30: ... menu appears tap the desired action or tap anywhere outside the menu to close it without performing an action Active connection to computer or wireless network Inactive connection to computer or wireless network Microsoft ActiveSync is synchronizing Speaker is on Speaker is off HP iPAQ and the desktop cradle are connected This icon appears only when there is an active connection Wireless icon Whe...

Page 31: ...luding Appointments Contacts Messages Excel Workbook Notes Tasks Word documents 1 Tap or from the Start menu tap Today New 2 Tap an option to create a new item 3 Tap OK after you finish creating a new item Tap and hold to display the pop up menu Tap the action you want Tap outside the menu to close it without performing an action ...

Page 32: ...plorer 4 Tap the Items tab to select or reorder the information on the Today screen 5 Tap an item to highlight it 6 Tap Move Up or Move Down to change the order of items on the Today screen 7 Tap the down arrow associated with Display Today screen if device is not used for hours checkbox to determine how many hours must pass before the Today screen displays Note You cannot change the placement of ...

Page 33: ...n To assign Applications buttons from the Launch page or Today screen tap Start Settings Buttons To open an application 1 Tap Start Programs Icon Default Button Functions Today Displays the Launch page or Today screen Contacts Displays your contacts Calendar Launches the Calendar and displays your appointments Screen Off Turns the screeen off Mute Unmuted Sound Turns sound on and off Backlight Off...

Page 34: ... Internet Explorer application is displayed 2 Make your selection from the Home page Switching Between Landscape and Portrait Screen Orientations To change the display setting on your HP iPAQ Icons Button Function Back Takes you back to previous page Refresh Refreshes the current page Home Takes you back to the Internet Explorer Home Page Star Takes you to your Favorites list ...

Page 35: ...y screen is now in the new orientation Note Some applications only work in Portrait mode and may switch the orientation automatically when you start the application Minimizing Applications To minimize an open application tap the x at the top right of the screen Closing Applications Applications automatically close based on available memory However if your HP iPAQ is running slowly you can close ap...

Page 36: ...Learning the Basics User s Guide 2 11 Closing with iTask 1 Press the iTask button 2 Tap and hold the program to be closed 3 From the pop up menu tap Close This Task ...

Page 37: ...plication file that has an exe or cef extension When installing applications look for the correct version for your HP iPAQ model Follow the instructions provided with the application and next to the installation Wizard to install applications from your computer Tap the application file in File Explorer on your HP iPAQ Then follow the instructions on the Installation Setup Wizard to install applica...

Page 38: ...ng iPAQ Backup 1 Tap or from the Start menu tap Programs iPAQ Backup 2 Tap the Backup tab or the Restore tab 3 Select the files and folders to be backed up or restored 4 Select file location for backed up data 5 Set backup or restore options 6 Press the Backup or Restore button and press the Start button on the next screen Backup Restore Using ActiveSync Close all programs on your HP iPAQ before b...

Page 39: ...t of your HP iPAQ or if the battery discharges completely To store files in iPAQ File Store 1 Browse for programs and files in your HP iPAQ by tapping Start Programs File Explorer 2 Copy the programs or files you want to store To select one file to copy tap and hold to highlight the file To select several files to copy tap and drag to highlight the files then tap and hold the files 3 In the pop up...

Page 40: ... list Note Before saving files to the iPAQ File Store folder it is a good idea to determine how much memory is available in the folder To view the amount of memory from the Start menu tap Settings System tab Memory Storage Card tab then select iPAQ File Store from the drop down menu ...

Page 41: ... a computer to Copy files data audio or video between your HP iPAQ and up to two host computers so you always have the latest information in all locations Install programs on your device Back up and restore files Synchronize web links Send and receive e mail messages Request meetings Installing ActiveSync These instructions assume the battery has been previously charged ÄCAUTION The first time you...

Page 42: ... follows If you have an rx3700 series connect the USB connector to the USB port on your computer Insert the HP iPAQ into the desktop cradle Connect the AC adapter to the desktop cradle to charge it If you have an rx3100 or rx3400 series connect the sync cable to the USB port on your computer and the other end to the HP iPAQ Connect the AC adapter to the sync cable to charge it Note The HP iPAQ sup...

Page 43: ...the synchronized folder is named PC1 When you synchronize the files are automatically moved to and from the PC1 folder Changing Synchronization Settings You can modify the synchronization settings to Set a time for synchronization to occur Change the type of connection Select the types of files to synchronize Select the files and information you do not want to synchronize ex e mail attachments Det...

Page 44: ... you can synchronize your HP iPAQ and your computer using an infrared connection instead of the sync cable The infrared connection option only works on computers with Microsoft Windows 98SE Me 2000 or XP operating systems To set up an infrared connection to your computer 1 Follow your computer manufacturer s instructions to set up the infrared port 2 Line up the HP iPAQ infrared port with the comp...

Page 45: ...s Options 4 From the PC Synchronization menu tap the Options button 5 Select Bluetooth ActiveSync from the drop down arrow list 6 Tap OK 7 Then tap OK again You can now synchronize your HP iPAQ with your computer using Bluetooth instead of the sync cable Manually Copying or Moving Files You can copy or move files to and from your computer using Explore in ActiveSync and Windows Explorer To copy a ...

Page 46: ...n be used in the HP iPAQ answer yes 10 If you want on your HP iPAQ open File Explorer Tap My Device See the file s you have just copied or moved Installing a Program To install a program from your computer using ActiveSync 1 Connect your HP iPAQ to your computer using the sync cable 2 Follow the instructions on the computer screen for installing that particular program 3 Check the screen on your H...

Page 47: ...mobile favorite to your HP iPAQ the next time you synchronize If you have not selected Favorites as an information type to be synchronized ActiveSync will not copy your mobile favorite to your HP iPAQ the next time you synchronize To manually synchronize your favorite links follow the instructions described in this chapter Sending and Receiving E mail Messages You can send and receive e mail messa...

Page 48: ...t via ActiveSync You create the meeting information in Messaging and the next time you synchronize with your computer the meeting request will be sent Note The person s you invite must use Outlook or Pocket Outlook on their computer s For more information view Calendar Help by going to Start Help View All Installed Help Calendar ...

Page 49: ... can use the stylus to draw and write on the screen in the Notes application and from any Notes tab in the Calendar Contacts and Tasks applications Changing Word Suggestion Options As you type or write the HP iPAQ suggests words for you in a box above the keyboard Letter Recognizer or Block Recognizer but not in the Transcriber You determine If words are suggested The number of letters you enter b...

Page 50: ...ord Completion tab 3 Tap the down arrow associated with letters and select the number of letters you want to type before a word is suggested t 4 Tap the down arrow associated with words and select the number of words you want suggested Need new Need new ...

Page 51: ...Learning Input Methods User s Guide 4 3 5 Tap OK Note If you do not want any words suggested remove the checkmark by tapping the checkbox next to Suggest Words When Entering Text ...

Page 52: ...l icon 2 Tap Keyboard to display a keyboard on the screen Note To see symbols tap the 123 or Shift key 3 Tap a letter symbol or number to enter information 4 Tap OK Writing with the Stylus and the Letter Recognizer Use the stylus and Letter Recognizer to write letters numbers and symbols on the screen Create words and sentences by writing in uppercase ABC lowercase abc and symbols 123 as instructe...

Page 53: ...you write will be converted to text Note A question mark within a program indicates a Help file Note For the Letter Recognizer to work effectively write characters between the dashed line and baseline If you are writing a letter like p write the top portion within the dashed line and baseline and the tail portion below the baseline If you are writing a letter like b write the bottom portion within...

Page 54: ...o text Note To teach Transcriber your style of writing tap on the a icon at the bottom of the screen to display the Letter Shapes screen and follow the instructions Writing with the Stylus and Block Recognizer Write letters numbers and symbols using the stylus and Block Recognizer Create words and sentences by writing letters and numbers in specific areas 1 From any application tap the up arrow ne...

Page 55: ...mbers or symbols write a number or symbol between the hatch marks labeled 123 What you write will be converted to text Drawing and Writing on the Screen Use the stylus as a pen to draw and write on the screen in the Notes program or from the Notes tab in Calendar Contacts or Tasks 1 From the Start menu tap Notes New 2 Draw and write on the screen 3 Tap the Pen icon 4 Tap OK ...

Page 56: ...m or from the Notes tab in Calendar Contacts Tasks To convert writing to text 1 From the Start menu tap Notes or tap the Notes tab in Calendar Contacts or Tasks 2 Tap a note to open it 3 Tap Tools 4 Tap Recognize Note To convert a particular word or phrase highlight it before you tap Recognize If a word is not recognized it will not be converted 5 Tap OK ...

Page 57: ...nly in select HP iPAQ models To upgrade your model please refer to the Accessories Brochure for information on the HP Photosmart Mobile Camera The software programs described below are included on your HP iPAQ or on the Companion CD Software Function HP Photosmart camera available only in select models Snap photos record video and modify camera settings on your HP iPAQ HP Image Zone for iPAQs View...

Page 58: ...e button allows you to launch the HP Photosmart camera software so you can capture photos or record video HP Image Zone for PC Manage your still photos and video clips that are from your HP iPAQ Edit photos use photos in printing projects and on multimedia CDs and send photos to friends and family HP Image Transfer Transfer photos to your personal computer automatically when you synchronize using ...

Page 59: ...ra to take photos and videos of all of your memories In this section we discuss taking photos and videos understanding and using instant review and how to change the HP Photosmart camera settings HP Photosmart Camera When you launch the HP Photosmart camera application the following camera icons are displayed on the screen Icon Definition Tap to close the HP Photosmart camera application Tap for H...

Page 60: ...to zoom in or press down to zoom out 4 To ensure a clear photo make sure that both you and your subject do not move Tap the icon or press down on the Navigation Touch pad to zoom out Tap the icon or press up on the Navigation Touch pad to zoom in Tap to switch between video and camera modes Tap to take a photo or start stop recording a video Resolution currently selected Compression type currently...

Page 61: ...elf portrait Taking Video Your HP iPAQ has the ability to record and save videos using the HP Photosmart camera To record a video 1 From the Start menu tap Programs HP Photosmart or from the Launch page tap Photosmart camera 2 Tap the Video icon in the camera application to switch to the video mode 3 Tap the Shutter icon to start recording video Tap it again when you are ready to stop recording 4 ...

Page 62: ...r taking a photo Instant Review automatically displays three icons so you can decide to either discard send or keep the photo Tap one of the three icons to perform the following functions Trash icon use to delete the current photo E mail icon use to attach the photo to an e mail message OK icon use to close Instant Review because you are finished reviewing the photo and want to keep it Note Instan...

Page 63: ... timer File Video Recording To make changes to the camera settings 1 From the Start menu tap Programs HP Photosmart or from the Launch page tap Photosmart camera 2 Tap Settings or Setup tab 3 Tap the category you want to change and then tap the Change button 4 Select the desired setting and tap OK 5 Tap OK again to exit the Capture menu ...

Page 64: ...you want and tap OK The white balance settings that are available are Auto default Automatically selects the best white balance for the photo Sun Best for outdoor shots with natural lighting sunny or cloudy conditions Tungsten Best for indoor shots using incandescent yellow lighting Fluorescent Best for shots taken with fluorescent white lighting Modifying Color With your HP iPAQ you can capture p...

Page 65: ... size To change the compression setting 1 From the Start menu tap Programs HP Photosmart or from the Launch page tap Photosmart camera 2 Tap Settings tab Compression Change button 3 Select the compression type you want and tap OK The compression types available are Good smallest file size and lowest quality Better default medium file size and medium quality Best largest file size and best quality ...

Page 66: ...Photosmart camera displays on the top right side of the screen the estimated number of images remaining at the current resolution and compression settings For an example refer to the Using Compression section discussed earlier in this chapter The four resolutions available are 1280x960 default 640x480 pixels 320x240 pixels 160x120 pixels Changing AE Metering AE Metering settings allow you to speci...

Page 67: ...mera Sounds Change button Setting Description Average The camera uses the entire photo area to calculate the exposure Use this setting when you want everything in the photo to be used equally to calculate the exposure for example when you are taking pictures of a mountain scene Center weighted default setting The camera uses a large area in the center of the photo area to calculate the exposure Us...

Page 68: ...he Instant review photo to remain on the screen 4 Tap one of the four setting options to perform the following functions Off disables Instant Review 2 seconds allows a 2 second review 4 seconds allows a 4 second review 6 seconds default allows a 6 second review 5 Tap OK to exit the Instant Review menu Using the Self Timer The Self Timer allows you to set a short delay before a photo is taken You c...

Page 69: ...ou capture and adjust the image counter The combination of these two filename prefix and counter value provide the actual filename of your photo or video You also can specify the folder on your HP iPAQ where photos and videos are stored To access the File Settings menu 1 From the Start menu tap Programs HP Photosmart or from the Launch page tap Photosmart camera 2 Tap File tab 3 Make your changes ...

Page 70: ...lutions must be used but longer video clips can be stored in less memory space Note MotionJPEG video can only be saved to main memory or iPAQ File Store You cannot record MotionJPEG video directly to an SD MMC card H 263 video can be saved to main memory iPAQ File Store or to an SD MMC card To check the amount of memory in any of these locations refer to the topic How Do I Manage Available Storage...

Page 71: ...ved in the My Documents My Pictures folder on your HP iPAQ You can use HP Image Zone to View photos stored on your HP iPAQ or SD card Record and playback sound clips attached to photos Send photos by HP Instant Share E mail Infrared or personal e mail attachments Organize folders create rename and delete Print using HP Mobile Printing or HP Instant Share View a slideshow Add text comments to JPEG ...

Page 72: ...the screen Icon Definition Tap to switch between video and camera mode Tap to view the photo in full screen Tap to start slideshow mode Tap to change folders Tap to delete photo or video Tap to record and attach an audio clip to the photo Tap to send the photo or video using your favorite method Tap to print using your favorite method ...

Page 73: ...te By default the viewer opens in Browse mode Browse mode displays a thumbnail view of the photos in the current folder 2 Tap a thumbnail i e a small representation of a larger image to select the photo A preview of the photo and information about it is displayed To view photos in a different folder 1 Tap File in the Command bar and then tap Open 2 Select the folder you want ...

Page 74: ...p on the preview window 4 Zoom in or out using the tool bar buttons If the photos are too large to fit on the screen you can display other parts of the photo by dragging the stylus on the screen You also can use the Navigation buttons to resize photos 5 Tap OK to close the View Image screen Viewing a Slideshow You can view a slideshow of the photos in a specified folder 1 From the Start menu tap P...

Page 75: ...show tab 3 Select the settings and effects you want to use in your slideshow 4 Tap OK to exit the menu Exiting HP Image Zone To exit from HP Image Zone from the Command Bar tap File Exit You also can tap the in the upper right corner of the screen to close this application DockWare Screen Saver Application Your HP iPAQ is preinstalled with a screen saver application called DockWare The Ilium DockW...

Page 76: ...ears Be aware of the following If your HP iPAQ is running on battery power DockWare does not automatically start If DockWare is running and you take your HP iPAQ out of the cradle DockWare will continue to run on battery power until you stop it To disable DockWare tap and hold anywhere on the screen and then uncheck Starts Automatically from the popup menu This menu item acts as a toggle switch to...

Page 77: ...y of editing functions For more information on the HP Image Zone Editor and its functions refer to Start Help HP Image Zone Recording Audio Files You can record audio sound files for each of your photos When you display a photo with an associated sound file attached HP Image Zone displays the photo and plays the associated sound file at the same time Note If you disabled the Auto play associated s...

Page 78: ...ak into the microphone or record the sound you want to associate with the photo 6 Tap the Stop button on the Sound toolbar All photos with associated sound files have a speaker icon on the thumbnail To change audio options 1 From the Start menu tap Programs HP Image Zone or from the Launch page tap Photos 2 Tap Tools located on the Command bar at the bottom of the screen 3 Tap Settings Audio tab I...

Page 79: ...age Zone for PCs The HP Image Zone for PCs application allows you to view print and edit photos that were captured using your HP iPAQ This application is located on the HP Image Zone CD that came with your HP iPAQ You can use HP Image Zone for PCs to mange your still photos and video clips edit your photos create multimedia CDs use your photos in printing projects using HP Instant Share send photo...

Page 80: ...our computer The HP Image Zone CD starts automatically If the HP Image Zone CD doesn t start automatically auto run click Start Run Type D where D is the location of your CD ROM drive in the Open text box Select setup exe then double click OK to run the Setup program Note Additional software may be required to view H 263 MPEG4 video files on your personal computer that are recorded by your HP iPAQ...

Page 81: ...our HP iPAQ to your PC transfer from a SD or MMC card to your PC modify the image transfer settings Note To transfer images you must first install Microsoft ActiveSync 3 7 1 to establish a standard partnership between your HP iPAQ and desktop computer To install HP Image Transfer 1 From the Companion CD select Software and Accessories Desktop Software and then select the Install this checkbox next...

Page 82: ... ActiveSync window displays the Image checkbox To enable and modify HP Image Transfer settings 1 Open ActiveSync on your personal computer if it is not already open 2 Double click Image under the Details window or select Options from the ActiveSync menu 3 Select Image on the Sync options tab and then select the Settings button ...

Page 83: ...es in the following ways The Mobile Device setting displays the location of the images you want to transfer from your HP iPAQ Also if you want to transfer images to storage cards check the Include camera images on storage cards checkbox The Computer setting allows you to create subfolders on your desktop computer where images can be saved For example you can configure the images to be transferred ...

Page 84: ... only can be changed while your HP iPAQ is connected to your desktop computer If your HP iPAQ is not connected you are notified that some settings cannot be changed and some settings are inaccessible Printing Use HP Mobile Printing and HP Instant Share Printing to print your photos and share videos Using HP Mobile Printing The HP Mobile Print program allows you to print from your HP iPAQ to a vari...

Page 85: ... 2 Tap the photo you want to print Note If you want to print several photos tap Tools Select Range Tap the first and last photo in the desired range Once the photos are selected for printing a green flag is displayed on each photo 3 Tap File Print 4 Choose HP Mobile Printing 5 Tap the Next button 6 Select Configure and then tap Add ...

Page 86: ...nter you want to use You do not need to install drivers when you add a printer to your list Note Use of dial up and wireless Internet e mail corporate networks and other wireless communications such as Bluetooth enabled devices may require separately purchased additional hardware and other compatible equipment in addition to a standard Wi Fi infrastructure and a separately purchased service contra...

Page 87: ...yed out it is because HP Mobile Print does not currently support the document type you have chosen Note There might be other software applications available that can enable printing of this document type through HP Mobile Print To select a printer 1 Select a printer from the list 2 Tap the Print button To change your print options before printing refer to Print Options discussed later in this chap...

Page 88: ...inter Make sure the selected Bluetooth printer is in range of your device and the Bluetooth radio of your device is on Printing to a network printer via 802 11 Make sure you have an active network connection and that the selected printer is connected to the same network Print Options To change print options 1 Select a printer from the Printer Selection screen 2 Tap the Print Options button ...

Page 89: ...The Configuration screen allows the user to add or remove printers modify printer settings or change system settings Copies Number of copies to be printed Quality Print quality to use Note Some printers that can sense the type of media that is loaded will over ride this setting Paper size Paper size Note If you load a paper size other than the size you specify you will not receive an error The doc...

Page 90: ...Using Digital Imaging Features User s Guide 5 34 To access the Configuration screen 1 Enter the Print Manager or tap the Configure button on the Printer Selection screen ...

Page 91: ...thod can be set up at a time For example the HP DeskJet 995c supports both IR and Bluetooth connections thus both IR and Bluetooth are valid selections for connecting to this printer The user can set up a connection to print via Bluetooth right now and later set up an IR connection to the same printer Selecting a connection method depends on what connections your printer supports To determine if a...

Page 92: ...ng the fastest For more information refer to Adding a Network Printer Once you have determined what connection you will use choose the connection method from the Choose Kind of Printer list and tap the Next button As previously mentioned the next screen displayed depends on which connection method was chosen Adding a Bluetooth Printer Bluetooth connectivity differs from device to device Also a dev...

Page 93: ...creen gives the user the option to choose Search for a Bluetooth printer near me or to Add a Bluetooth printer The option Search for a Bluetooth printer near me discovers Bluetooth printers near you and automatically sets up the connection The option to Add a Bluetooth printer requires you to set up your Bluetooth connection using the Bluetooth Manager ...

Page 94: ...been tapped a Searching for devices message indicates the HP Mobile Print is searching for and will list the Bluetooth printers discovered Tapping the Stop button will cancel discovery and allow you to choose any printer already discovered After discovery is complete select a printer to add and then tap Next ...

Page 95: ...inter family until one is found that works Printer Address This field will auto populate with BT denoting Bluetooth My Printer Name Enter a unique name to identify the printer It will be helpful to choose a name that describes the printer type and connection method used An example of a good name is Joe s DJ 995c over Bluetooth Enable Raw File Types This is an advanced option and can be ignored by ...

Page 96: ...rinter with the IR port of the HP iPAQ 2 Align the IR ports and tap the OK button This brings up the Specify IR Printer screen The Mfg and Model fields are filled if the printer is identified 3 Specify the IR Printer by filling in the blank information fields Mfg Select Hewlett Packard from the drop down menu HP Mobile Print currently supports only Hewlett Packard printers Model Choose the printer...

Page 97: ... Types This is an advanced option and can be ignored by most users This option enables certain file types to be sent directly to the printer in their native format Raw PCL JPG and PS files are examples of file types that might be candidates for sending directly to the printer Set As Default This check box indicates you are choosing this printer to be your default printer Print Test Page This butto...

Page 98: ... easy to establish If the target printer s family isn t on the list choose the closest possible match and try to print If that fails then try a different printer family until one is found that allows a good quality print to come out Address Enter the network address of your Printer The network address is usually of the form server printer_share_name Note A Windows CE device cannot connect to a pri...

Page 99: ...sure you can print to the selected printer using the settings you have chosen by printing a test page 3 Tap the Finish button to add the printer Note Use of dial up and wireless Internet e mail corporate networks and other wireless communications such as Bluetooth enabled devices may require separately purchased additional hardware and other compatible equipment in addition to a standard Wi Fi inf...

Page 100: ...inter from the Printer Selection List highlight the printer you want to remove on the Configuration screen and then tap the Remove button Because the printer will be removed permanently a message box will ask you to confirm the deletion Tap Yes and the printer will be permanently removed deleted from your HP iPAQ ...

Page 101: ...er Selection List On the Configuration screen select the printer you want to modify and tap the Modify button The following window can vary depending on the printer type selected Make any modifications necessary and tap Update to save the changes or tap Cancel to discard the changes ...

Page 102: ...em settings on the Configuration screen as shown here Tap the System tab at the bottom of the Configuration screen The System Configuration screen is displayed with its current settings If necessary change the Bluetooth COM Port to the COM port that your HP iPAQ uses To identify the outbound COM port ...

Page 103: ... Mobile Print This is the application that actually does the printing for the system It also can show what print jobs are currently submitted what print jobs have printed what default Content Transformation Providers are selected and allows you to configure your printer s Getting Started To start the Print Manager tap Start Programs Print Manager The Current Print Jobs Screen The current print job...

Page 104: ...er s Guide 5 48 the target printer for each print job is shown next to a or Users can expand a print job to view its details by tapping the sign Note Jobs are identified by printer name therefore a printer can be listed more than once ...

Page 105: ...printed Canceling the currently printing document may take a few minutes to complete Canceling a document that is not printing takes less time To cancel an entire print job select the name of the job to cancel and tap the Cancel button All documents to be printed in that job that have not already printed will be canceled The Pause Continue Button Tapping the Pause or Continue button either stops d...

Page 106: ...r chooses to fix the problem before proceeding printing will remain paused Tap Continue to resume printing once the error has been fixed Printing resumes with the last document that had an error The Tools Menu Tap on the Tools menu at the bottom of the screen to bring up the menu shown here Tap the Past Print Jobs to display the Past Print Jobs screen history of past print jobs where information o...

Page 107: ...t Print Jobs Screen The Past Print Jobs screen displays a list of past print jobs Next to each print job s or is the name of the printer where the document was printed When an item is expanded in the list view it displays the documents printed to that target ...

Page 108: ...rint Jobs screen to clear the print history The Configuration Screens Configuration allows users to add modify or remove printers and change system settings For more information refer to Configuration section of this chapter The Content Transformation Preferences Screen To print a document its content must be transformed into data that the target device can understand Application developers can in...

Page 109: ...ication does not distinguish which module it uses to print a given file type the one highlighted in the bottom list will be used to transform the content of that file so that it can be printed Select which module will be used for a given file type by choosing a file type from the upper list and then choosing a module from the lower list For instance a bmp file bitmap can be printed through a CT mo...

Page 110: ...ng on for errors only Medium Warnings record more information about what is happening in the system High Informational record more information about what is happening in the system Usually logging can be off Keeping logging on at a higher setting affects performance Notifications When a user is not viewing the Print Manager and a print job is printing a notification will be displayed in the title ...

Page 111: ... Printing Notification displays whenever a document in a print job is printing Clicking on the notification brings up a bubble window that allows for easy access to the Print Manager to view the current status of print jobs Tap on Go To Print Manager to open the Print Manager ...

Page 112: ...efault the Printing notification will not show the message on the screen when printing Checking Display Message on Screen will not change this Flash light for time flashes the notification light on the device for the specified amount of time when this notification is raised The Error Occurred Dialog When an error occurs a dialog asks the user if it should cancel the document wait while the user fi...

Page 113: ... You can print a photo by using File Explorer on your HP iPAQ The HP Mobile Printing Utility automatically adds tap and hold print support To print a photo using File Explorer 1 Tap and hold on a supported file type A context menu appears with Print as an option 2 Tap Print on the menu ...

Page 114: ...ct your HP iPAQ to your PC To tag a photo for HP Instant Share Printing 1 From the Start menu tap Programs HP Image Zone or from the Launch page tap Photos 2 Select the photo that you want to print 3 Tap File on the Command bar located at the bottom of the screen 4 Tap Print and in the Print window select HP Instant Share Printing 5 Tap Next 6 Select the number of copies to print 7 Tap Save ...

Page 115: ...ter To move a file to a memory card 1 From the Start menu tap Programs HP Image Zone or from the Launch page tap Photos 2 Select the photo s you want to move Note If you want to move several photos tap Tools Select Range Tap the first and last photo in the desired range Once the photos are selected a green flag is displayed on each photo 3 Tap File on the Command bar located at the bottom of the s...

Page 116: ...tos upload photos order prints The Instant Share process is described in the following picture 1 Capture photos using your HP iPAQ Photosmart camera Tag the photos that you want to share or print 2 Synchronize your HP iPAQ with your PC 3 Photos are automatically transferred to your PC from the My Documents My Pictures folder and from your SD Memory card ...

Page 117: ...ur HP iPAQ you can add or modify these destinations at any time Setting up Your Share Menu To set up your HP Instant Share E mail Share Menu Note You must install HP Image Zone for PCs from the Companion CD on to your desktop before you set up your Share Menu 1 Connect and synchronize your HP iPAQ to your desktop computer 2 Connect to the Internet 3 Double click startup on the HP Instant Share Set...

Page 118: ... the HP Instant Share Setup Tagging Photos With Destinations While using your HP iPAQ HP Image Zone allows you to tag your photos so you can share them using HP Instant Share The HP Instant Share application sends the tagged photos the next time you connect your HP iPAQ to your PC Note You must install HP Image Zone for PCs on to your desktop for HP Instant Share to work To tag a photo 1 From the ...

Page 119: ...to be sent 2 Tap File Send E mail Attachment and then tap Next 3 Enter the appropriate e mail address or tap the Contacts icon in the Navigation toolbar and select the appropriate Contact name Note When attaching a photo to an e mail message the file appears at the end of the e mail message 4 Enter the subject and or message and then tap Send Sending Files Via Infrared You can send files to other ...

Page 120: ... quality Use the Best compression setting when the pictures have scenes with many fine details and many colors Frame subjects so that bright lights do not appear in the picture Change the White Balance setting to the appropriate type of lighting Or choose None under the following conditions Pictures taken with indoor lighting appear tinted either bluish or yellowish Pictures are composed of a unif...

Page 121: ...ends And you can use the universal remote control to access your home entertainment devices With iPAQ Mobile Media you can Play digital media stored on your HP iPAQ Local Media mode Stream digital media from personal computers on your Wi Fi network to play on your HP iPAQ Media Stream mode Play and control digital media on PCs connected to your Wi Fi network Media Control mode Transfer digital med...

Page 122: ...onal information about iPAQ Mobile Media in the online Help on your HP iPAQ Tap Start Help iPAQ Mobile Media to access help topics The following table defines the iPAQ Mobile Media icons and software buttons Icon Name Definition Media Control play and control digital media on PCs connected to your Wi Fi network Media Stream stream digital media from personal computers on your Wi Fi network to play...

Page 123: ... Start Programs iPAQ Mobile Media You can also press the Mobile Media button on your HP iPAQ Icon Functions Goes back to the iPAQ Mobile Media main menu Switches between List View and Controls View Searches for media if the selected media server supports the search function Accesses Help Opens the Customize menu This menu is mode specific so you ll see different options depending on the iPAQ Mobil...

Page 124: ...ned on the Wi Fi networking feature of your HP iPAQ Your wireless settings on you HP iPAQ are incorrectly configured to connect to your network You are outside the range of your wireless network You have not installed the Mobile Media for PC components onto the personal computers connected to your wireless network or they are not currently operating The Media Control Media Stream and Media Copy fe...

Page 125: ...connected You will also see the in the task bar when you are connected to your network If this is the first time you are connecting to your network please refer to Chapter 8 Using Wi Fi 3 Select the Start Settings Connections tab then the Connections Advanced tab Select Networks and verify your wireless network is set for Programs that automatically connect to a private network should connect usin...

Page 126: ...you must install the Mobile Media components on your personal computer iPAQ Mobile Media works with these components to allow you to Stream digital media from personal computers on your Wi Fi network to play on your HP iPAQ Media Stream mode Play and control digital media on PCs connected to your Wi Fi network Media Control mode Play digital media on a uPnP media receiver or player connected to yo...

Page 127: ...Wi Fi home network your personal computer connected to your Wi Fi home network Microsoft Windows XP Home Professional Media Center or Tablet editions Microsoft ActiveSync 3 7 1 or higher 37 300MB available hard disk space actual requirements will vary based on selection of features and user s current system configuration 256MB RAM recommended To install Mobile Media for PC follow these steps 1 Ins...

Page 128: ...y default these three applications are configured to run on your personal computer at startup and remain either in your system tray or minimized in your application tray until you are ready to use them When you run NevoMedia Server for the first time the NevoMedia Collection wizard launches This wizard helps you quickly locate and organize the digital media that is stored on your personal computer...

Page 129: ...sonal computer you want to access with iPAQ Mobile Media Using Digital Media with iPAQ Mobile Media iPAQ Mobile Media plays digital music pictures and video that is stored on personal computers on your home network either on your networked personal computers or on your HP iPAQ However before fully enjoying iPAQ Mobile Media it is helpful to understand how to organize your digital media on your per...

Page 130: ...AQ Mobile Media You will receive a notification that you are attempting to play an unsupported format To play unsupported media using iPAQ Mobile Media you need to convert these files to a supported format or play them with a different application that supports this format If you have copy protected music in your collection either because it is music you have purchased or you have added copy prote...

Page 131: ...e NevoMedia Server is running If it is not open select Start All Programs Hewlett Packard Mobile Media for PC NevoMedia Server 2 Double click the NevoMedia Server icon in your System tray 3 Select Media Collection and click Run Media Collection Wizard 4 Follow the wizard instructions and select Custom Setup 5 Select the appropriate location from the Folder View screen 6 Select Next to add this loc...

Page 132: ...aloged in a NevoMedia Server library To view other home movies or pictures and listen to music not stored on your personal computer using iPAQ Mobile Media you must first transfer this media to your personal computer Music To transfer a traditional music CD to your computer 1 Select Start All Programs Windows Media Player 2 Insert a CD into the CD ROM drive of your personal computer ...

Page 133: ...ts appropriate use Home Movies To transfer a home movie to your personal computer use Windows Movie Maker 1 Select Start All Programs Windows Movie Maker If you do not have Windows Movie Maker 2 installed download a free version of the software at the Microsoft Windows Update site at http windowsupdate microsoft com The following instructions apply to Windows Movie Maker2 2 Connect your video came...

Page 134: ... File My Computer Next Within the Save Movie Wizard enter a filename and the location you want to save your movie Click Next When the movie is saved click Finish If you want to save your movie to play on your HP iPAQ during the Save Movie Wizard click on the Show more choices link Click Other settings then select a Video for Pocket PC setting from the drop down menu ...

Page 135: ...er For more information on using HP Image Zone refer to Chapter 5 Using Digital Imaging Features Note By default HP Image Zone displays photos that are saved in the My Documents My Pictures folder on your HP iPAQ Organizing Digital Media on Your HP iPAQ You can use iPAQ Mobile Media to play or view digital media stored on personal computers connected to your home network or stream this content to ...

Page 136: ...ools Menu select Options 3 Check the box labeled Files 4 Select the Settings box to identify the location to synchronize your files This will create a Pocket PC My Documents folder in your main My Documents folder on your personal computer 5 Drag and drop the media files you want to transfer to this folder When your HP iPAQ is connected to your personal computer and ActiveSync is running your file...

Page 137: ...fy your storage settings 1 Launch iPAQ Mobile Media then select the Local Media mode 2 Tap the Wrench menu in the lower left corner and select Storage Settings 3 Tap plus to expand the My Documents folder and select the folder where you want iPAQ Mobile Media to look for digital media Note By default HP Image Zone stores pictures in the My Pictures folder located in My Documents on your HP iPAQ To...

Page 138: ... follow these steps 1 Place your HP iPAQ in its desktop cradle or connect it to the sync cable 2 Ensure that your cradle or sync cable is connected to your personal computer 3 Open Windows Media Player on your personal computer 4 From the Media Guide view select Copy to CD or Device from left menu 5 Find and select the items you want to copy from the Items to Copy drop down menu 6 Find and select ...

Page 139: ...Q you must use Windows Media Player on your personal computer To play copy protected media you must use Windows Media Player on your HP iPAQ Using NevoMedia Server NevoMedia Server collects and organizes your digital music photos and videos and makes them available to be controlled and played with iPAQ Mobile Media or played on a NevoMedia Player By default NevoMedia Server is configured to launch...

Page 140: ... column indicates that all subfolders within the named folder are scanned If the icon is not present only the named folder is scanned Rename this option allows you to change the name of your media server When you access the server from your HP iPAQ the new name appears in the Media Server Selection area Exit choose this option to close NevoMedia Server and remove it from the System tray of your pe...

Page 141: ...of files contained in each main digital media folder Watch indicates that NevoMedia Server is keeping watch over the folder to look for changes media additions or deletions Yes is the default No indicates that NevoMedia Server is not looking for changes in folder activity Status There are four possible values for Status Synchronized All processing for that folder has been completed Processing Proc...

Page 142: ...the Media Collection Wizard which steps you through the process of adding digital media to the media server database Quick Add select this option if you want NevoMedia Server to search for digital media in folders that you designate in addition to the My Music My Pictures and My Videos folders without using the wizard Scan choose this option to scan a selected folder for digital media Remove choos...

Page 143: ...the data is deleted select all the folders and perform a scan using the Scan icon or Media Collection Scan Note The Drop All Rows option won t delete the media files from your personal computer Rebuild Database select this option to re populate the NevoMedia Server database from scratch This option does the same thing as Drop All Rows followed by Scan but also renumbers all of the items in the dat...

Page 144: ...computer When NevoMedia Server is enabled but you ve closed the window an icon appears in the System tray on your personal computer Icon Functions Select to quickly access the NevoMedia Collection Wizard Select to quickly delete selected folder s from the NevoMedia Server database Select to scan a selected folder for new media Switch between List View and Controls View Indicates that the NevoMedia...

Page 145: ...your personal computer In addition any changes made to folders that are watched are reflected in the database At times you may want to scan these folders to update the file and folder count You can also manually scan folders using the icons or the drop down menu options To scan a folder 1 Select the folder you want to scan Note The scan function is inactive if you haven t selected a folder The ina...

Page 146: ...trl key as you make your selection 2 Click Media Collection Scan Viewing the Details of Media Stored in the Server If you want to view the details of your digital media that are stored in NevoMedia Server switch to Details View There are two ways to view these details By clicking you can switch between the two views Click View Details If you want to switch back to List View click View List Note In...

Page 147: ...ntire Collection Remove your entire collection of digital media from the NevoMedia Server using one of the Database Tools Go to Tools Database Tools then select Drop All Rows When the warning message appears select OK Note If you remove your entire collection you ll need to rebuild the database to play or stream digital media through your HP iPAQ Exiting NevoMedia Server To exit NevoMedia Server g...

Page 148: ...ital media that you have added to NevoMedia Server Before you use NevoMedia Player you need to confirm all your digital media is cataloged in NevoMedia Server See the NevoMedia Server section of this guide for more information All of the NevoMedia Player features are available from the main menu You can also view pictures videos and visualizations associated with music Visualizations are set and c...

Page 149: ...menu Rename this option allows you to change the name of your media player When you access the player from your HP iPAQ the new name displays in the Media Player Selection area Exit choose this option to shut down NevoMedia Player Note If you click the Close icon NevoMedia Player hides until you use it again to play media The View Menu Using the NevoMedia Player View menu you can switch between tw...

Page 150: ...ou have three options on the NevoMedia Player Help menu NevoMedia Player Help Topics select this option to access the NevoMedia Player help file Check for Updates select this option to go to the myNevo web site and search for product updates About NevoMedia Player select this option to view information about your NevoMedia Player such as the version number The Context Menu Access the Context menu ...

Page 151: ...you want to view Using the View menu follow these steps 1 Select View to open the View menu 2 From the list of currently playing media click one to make a selection Switching between Full Screen and Regular Screen Modes You can view your digital media files using the default screen size or you can resize the window by dragging any of the corners In addition you can switch to full screen mode for e...

Page 152: ...Currently Playing Media In the View menu you can view information about currently playing media using the Now Playing option To access this function go to View Now Playing A checkmark next to the option indicates that Now Playing is on To turn it off click Now Playing When Now Playing is on NevoMedia Player displays information about the currently playing media file The information displayed depen...

Page 153: ...click the Close icon NevoMedia Player hides until you use it again to play media Using NevoBackup NevoBackup is installed along with NevoMedia Server and NevoMedia Player when you install the Mobile Media for PC components from the Companion CD This application automatically protects your Universal Remote Control settings from loss due to a power failure or full reset of your HP iPAQ Once NevoBack...

Page 154: ... earlier backup Your previous two configurations are automatically saved Creating a Custom Backup 1 Place your HP iPAQ in its desktop cradle or connect it to the sync cable 2 Right click on the NevoBackup icon in the system tray and select Open 3 Select Next at the Welcome screen 4 On the Backup Tasks screen select Create a custom backup of my current Nevo configuration then select Next 5 Choose a...

Page 155: ... icon in the system tray and select Open 3 Select Next at the Welcome screen 4 On the Backup Tasks screen select Restore my Nevo configuration to an earlier backup 5 Then select the appropriate configuration from the list then select Next 6 Select Next from the Restore screen to begin 7 You will be returned to Backup Tasks screen where you can perform another task or select Cancel to exit NevoBack...

Page 156: ...all the media servers and media players that are available When a new media server or player becomes available an icon is displayed in the Navigation bar When you tap this icon the names of each media server or player that is now available displays When a media server or player is shut down you will also be notified through this same icon in the Navigation bar Tapping this icon shows the media ser...

Page 157: ...h time you tap one of the mode icons Mobile Media will displays a swirling working icon in the middle of the screen as it starts the selected mode This icon might be a folder a media player a radio antenna a musical note a picture a video film or the Mobile Media icon Navigating the Media Play Screens When you select a media type Music Pictures or Videos the media List View screen appears You can ...

Page 158: ...ile Media User s Guide 6 38 Navigating Pop up Menus You can also navigate iPAQ Mobile Media by using the pop up menus An example of a pop up menu is the Select Media Server menu To select another item make it the current item ...

Page 159: ...lus Use the Navigational Touch Pad Navigating the List View To play music from the list view simply tap a song To easily switch between the List View and Controls view tap or at the top right screen You can also control music play The following table shows what you can do ...

Page 160: ...when you play music Tap this key To Stop music play Control the volume Mute the sound Icon Functions Starts music play when no music is playing otherwise functions to pause music Pauses music when music is playing otherwise functions to play music Skips to the next track in the music list Goes to the previous track in the music list Shuffles music play Repeats music play Controls duration ...

Page 161: ...ibrary drop down menu The Storage Settings screen appears 2 Tap to select where you want to store your media Choose from the following My Documents default iPAQ File Store SD Card recommended 3 Tap OK Note You can also see the available storage space of the selected folder on the Download toolbar Quick Links Quick Links allows you to view the file structure of the media you have selected so you ca...

Page 162: ...enu allows you to view the type s and title s of currently playing media From this menu you can choose which media you want to control To access the Currently Playing pop up menu 1 While in Controls View tap the Currently Playing arrow The Currently Playing menu opens 2 To control other currently playing media tap its title ...

Page 163: ...er s Guide 6 43 Playing Digital Media on My HP iPAQ There are two ways you can play media on your HP iPAQ You can Play media stored in your local library Local Media mode Stream media from a media server to your HP iPAQ Media Stream mode ...

Page 164: ...our local media Note The default storage location for Local Media is My Device My Documents Note Since your HP iPAQ will sometimes be called upon to help run programs we recommend that you purchase a Secure Digital SD card to store your local media For more information on external storage cards refer to the Chapter 11 Expansion Cards Selecting a Media Location 1 To access Local Media mode tap from...

Page 165: ...tored in a single flat directory If you create a hierarchical file structure in any of the three Local Library locations then you should specify the exact locations by using the Storage Settings items on the Customize menu The Local Media Customize Menu The pop up menu gives you different options based on the mode you re in The Local Media Customize menu allows you to ...

Page 166: ...sic from the folder you ve selected Refresh Servers and Players View an updated list of media servers and media players Refresh Folder Refresh the list of items in your local library or refresh the contents of the currently highlighted folder Storage Settings Access the Storage Settings screen Delete Delete media from your local library Note You have to select a media type music pictures or videos...

Page 167: ...2 To start play a Navigate to a song then tap it Or b If you navigate using the up and down arrow keys press the Navigational Touch Pad Controlling Music Play You can choose between two different My Music screen views the List View and the Controls View ...

Page 168: ...isplay to Play is set on the Customize menu To set the default to List View uncheck the Change Display on Play option from the Customize menu Viewing Pictures You can view many different types of pictures on your HP iPAQ Note You have to add media to your Local Library before you can view pictures 1 From the main Local Media screen tap My Pictures The My Pictures menu appears ...

Page 169: ...ols view because the Change Display on Play option is selected by default Note You can also change the media location from the My Pictures screen If you do the main Local Media screen appears and you have to select My Pictures again Controlling Pictures Like the My Music screen the My Pictures screen has two different views the list view and the controls view ...

Page 170: ...en defaults to controls view To set the default to List View uncheck the Change Display on Play option from the Customize menu Navigating the Controls View The Controls View allows you additional control over pictures Icon Function View previous picture in the picture list View next picture in the picture list ...

Page 171: ...irection Press it again to rotate picture back to portrait orientation Playing Videos You can also play videos on your HP iPAQ 1 From the main Local Media screen tap My Videos The My Videos menu appears Tap this key To Rotate the picture View the picture in full screen mode To return to Controls view tap the screen View previous picture in the picture list View next picture in the picture list ...

Page 172: ...saving your videos for diplay on your HP iPAQ refer to the Copying Music CDs and Videos section of this document Note When you start the media the screen automatically switches to Controls View because the Change Display on Play option is selected by default Note You can change the media location from the My Videos screen If you do the main Local Media screen appears and you have to select My Vide...

Page 173: ...eos screen defaults to controls view To set the default to list view uncheck the Change Display on Play option from the customize menu Deleting Media You can delete media stored in your local library either individually or you can delete all media in a selected storage location 1 From the main Local Media screen tap My Music My Pictures or My Videos depending on which type of media you want to del...

Page 174: ...now iPAQ Mobile Media User s Guide 6 54 3 From the pop up menu tap Delete The following screen appears The Wrench icon starts blinking If you want to exit Delete mode tap the blinking wrench then tap Cancel Delete ...

Page 175: ...you ve selected Deleting Individual Tracks 1 Select the tracks you want to delete by tapping in the checkbox 2 Tap 3 To exit Delete mode tap the blinking wrench then tap Cancel Delete Deleting All Media in a Storage Location 1 Tap 2 Then tap 3 To exit Delete mode tap the blinking wrench then tap Cancel Delete ...

Page 176: ...s Media Stream mode tap from the main Mobile Media screen The Media Stream screen appears Selecting a Media Server Before you can stream media you have to select a media server 1 Tap the media server selection arrow at the bottom of the Media Stream screen The Select Media Server pop up menu appears 2 From the pop up list of available media servers select one by tapping it ...

Page 177: ...in the Name box The current input panel appears 3 Input a new media server name 4 Tap Update 5 Then tap Close Edit Media Player Disabled in Media Stream mode Change Display on Play Set up your Mobile Media so that it automatically switches to Control view when you start play To undo tap the option again Play All Play all digital music from the folder you ve selected Search Search for media if the ...

Page 178: ...ting the Media Stream Music Folders 1 Tap to select a folder 2 To start play Navigate to a song then tap it If you navigate using the Up and Down keys press the center Navigational Touch Pad Note In Media Stream mode streaming mp3 formatted music is not supported Only non copy protected wma formatted music can be streamed to play on your HP iPAQ Cancel Download Exit Download mode Refresh Servers a...

Page 179: ...he My Music screen defaults to Controls View To set the default to List View uncheck the Change Display on Play option from the customize menu Viewing Pictures Stream pictures stored on a media server and view them on your your HP iPAQ To stream pictures 1 From the main Media Stream screen tap My Pictures The My Pictures menu appears In Media Stream mode the My Pictures list view is organized by f...

Page 180: ...edia screen tap My Videos The My Videos menu appears 2 Navigate to the video you want to play then tap it Note iPAQ Mobile Media can play wma videos that have been created for using the pocket PC screen For more information on saving your videos for diplay on your HP iPAQ refer to the Copying Music CDs and Videos section of this document Searching for Media In Media Stream mode you can search the ...

Page 181: ...their name Any album or song that includes the word Pat in the title To search for media 1 From any of the Media Stream screens tap The Media Search toolbar appears Note The Search remains depressed until you end the search session 2 Tap the drop down menu then select how you want to search by tapping Title Artist or All Note The default search method is Title 3 Then tap in blank box and the curre...

Page 182: ... media server Note It may take up to 60 seconds for iPAQ Mobile Media to locate your uPnP server If you do not see all of your media servers or players select refresh servers and players You can easily access Nevo Media Control from the main Mobile Media screen by tapping Media Control The Media Control screen appears Selecting a Media Server Select the server from which you want to access the med...

Page 183: ... you different options based on the mode you re in The Media Control Customize menu allows you to Menu option Task Edit Media Server Edit your Media Server information 1 Select a Media Server from the drop down menu 2 Tap in the Name box The current input panel appears 3 Input a new media server name 4 Tap Update 5 Then tap Close Edit Media Player Edit your Media Player information 1 Select a Medi...

Page 184: ...all digital music from the folder you ve selected Note If you re using both a NevoMedia Server and a NevoMedia Player your media will continue playing even if you turn off your HP iPAQ or if your HP iPAQ goes to sleep after a period of inactivity Search Search for media if the selected media server supports the search function For more information see Searching for Media described in this chapter ...

Page 185: ...ia Control Music Folders 1 Select a folder by tapping it 2 To start play Navigate to a song then tap it or If you navigate using the Up and Down keys on your HP iPAQ press the Navigational Touch Pad Controlling Music Play You can choose between two different My Music screen views the List View and Controls View ...

Page 186: ... List View To play music from the List view simply tap a song in the list Viewing Pictures You can simultaneouly view pictures on your HP iPAQ and other digital media players 1 From the main Media Control screen tap My Pictures The My Pictures menu appears In Media Control Mode the My Pictures list view is organized by folders 2 Tap a folder List View Controls View ...

Page 187: ... You can also play videos from your HP iPAQ to any recognized digital media player 1 From the main Media Control screen tap My Videos The My Videos menu appears In Media Control mode the My Videos list view is organized by folders 2 Tap to select a folder 3 Navigate to the video you want to play then tap it Note When you start the media the screen automatically switches to controls view because th...

Page 188: ...at Metheny All albums by artists with Pat in their name All titles by artists with Pat in their name Any album or song that includes the word Pat in the title To search for media 1 From any of the Media Control screens tap The Media Search toolbar appears Note The Search icon remains depressed until you end the search session 2 Tap the drop down menu then select how you want to search by tapping T...

Page 189: ...P iPAQ to enjoy later You can access Media Copy three different ways From the main Mobile Media screen tap From the Media Stream screen tap then tap Download From the Media Control screen tap then tap Download The Media Copy Customize Menu As previously mentioned the pop up menu gives you different options based on the mode you re in The Media Copy Customize menu allows you to Task Function Edit M...

Page 190: ...oading Music 1 From the main Media Copy screen tap My Music The My Music menu appears Search Searches for media if the selected media server supports the search function Cancel Search Exits Search mode Download Accesses Media Copy mode Cancel Download Exits Media Copy mode Refresh Servers and Players Views an updated list of media servers and media players Refresh Folder Refreshes the contents of ...

Page 191: ... Server the My Music list view is organized by folders You can select music to download by Albums Artists Albums Artists Titles Genres Artists Genres Titles All Titles Selecting Music to Download 1 Select a folder album by tapping it A checkbox appears to the left of each track name ...

Page 192: ...orage space in the folder you ve selected the storage pie chart appears full and Media Copy won t allow you to select media If you select a track that s already stored in the download folder you ve selected the File Name Dialog appears Choose an option then tap OK 3 Tap The Download Status screen appears 4 To cancel the download tap Cancel 5 When Media Copy finishes downloading tap Close ...

Page 193: ...h available storage space in the folder you ve selected the storage pie chart appears full and Media Copy won t allow you to select media Refer to the section in this guide that discusses Expansion Cards If you select a picture that s already stored in the download folder you ve selected the File Name Dialog appears Choose an option then tap OK 3 Tap The Download Status screen appears 4 To cancel ...

Page 194: ...age space in the folder you ve selected the storage pie chart appears full and Media Copy won t allow you to select media If you select a video that s already stored in the download folder you ve selected the File Name Dialog appears Choose an option then tap OK 3 Tap The Download Status screen appears 4 To cancel the download tap Cancel 5 When Media Copy finishes downloading tap Close Controlling...

Page 195: ...l To access NevoHome Control from your HP iPAQ tap on the Launch page You can also tap Start Programs iPAQ Mobile Media Navigating the NevoHome Control Screens The NevoHome Control screens are divided into three main tabs Home tab this is the main NevoHome Control screen You can add delete or customize devices users rooms and activities ...

Page 196: ...ng Users described in this chapter Controls tab from here you can control devices you ve added customize the controls for each device and learn new controls from IR infrared remotes Favorites tab from here you can create and customize favorites lists There are also icons that are common to all NevoHome Control screens The following table lists some of these icons and their basic functions Tap this...

Page 197: ...to increase decrease the volume increase decrease the channel number and mute the sound Transport this allows you to use the middle navigational key icon to play pause stop rewind fast forward videos video accessories PVRs DVDs and CDs To set up the Navigational Touch Pad 1 Tap 2 From the Key Guides pop up menu select Navigation Controls or Transport The Key Guides icon changes accordingly Adding ...

Page 198: ...de Browse Device Codes choose this option to browse available device codes Select Brand downloaded from myNevo com choose this option if you can t find the right code for your device 3 Select the device setup method you want to use then follow the on screen instructions When you re done tap Next 4 Select the image you want to associate with your device then tap Next 5 Choose a label for your devic...

Page 199: ...ices with just a few taps To control a device 1 From the Home tab tap the device you want to control It will move to the top of the device wheel Note The device at the top has focus controls and favorites apply only to this device To change the device you want to control or customize simply tap it 2 To quickly power on tap 3 For full control Tap the Controls tab Or tap on the device icon again 4 T...

Page 200: ...creen is device specific ensure you first select the device you want to customize Adding a Key You can add a new key function three different ways Add a device function Learn a key from another remote control Add an automated activity To add a function key 1 Tap to bring up the Customize menu 2 From the pop up menu tap Add Key or tap Express Learning 3 From the Key Wizard Initialization screen tap...

Page 201: ...s you add a new function 1 Tap to bring up the Customize menu 2 From the pop up menu tap Edit Key The wrench icon starts blinking If you want to exit edit key mode tap the blinking wrench then tap Cancel Edit 3 Tap the key you want to edit 4 From the Key Wizard Initialization screen tap Next 5 From the Key Action Selection screen select how you want to edit a key then tap Next 6 Follow the on scre...

Page 202: ...ere you want to copy the key Moving a Key 1 Tap to bring up the Customize menu 2 From the pop up menu tap Move Key The wrench icon starts blinking If you want to exit move key mode tap the blinking wrench then tap Cancel Move 3 Tap the key you want to move 4 Tap an empty space on the Control screen where you want to move the key Note If you want to move the key to a different page tap the arrows a...

Page 203: ...g a key follow the steps in the Adding a Key section to add it again Display Labels Another way you can customize the look of your control screen is by choosing whether or not you want the key s label to appear under its icon To choose the Display Labels setting 1 Tap to bring up the Customize menu 2 From the pop up menu tap Display Labels A checkmark appears 3 To hide labels repeat steps 1 and 2 ...

Page 204: ...existing remote so that the IR areas are facing each other 5 Press and hold the source key you want to Nevo to remember A mini help tip appears to notify you that Nevo is processing your request Note For NevoHome Control to successfully learn a key you must press the source key within 5 seconds of tapping the Nevo key 6 Repeat steps 3 through 5 for each key you want to learn Adding and Deleting Pa...

Page 205: ...lly add a favorite using the Customize menu Adding a Favorite Using the Icons Your NevoHome Control already has logos for commonly viewed networks All you have to do is set them up by assigning a channel number to each one you want to use Then you ll have one touch access to your favorite channels Favorites are organized by room and are device specific so before you assign favorites channels make ...

Page 206: ...ap Next 5 Select the icon you want to associate with your favorite then tap Done Tasks Functions 2 Digits Your device allows you to change to a 2 digit channel by only pressing 2 digits 3 Digits Your device requires you to enter 3 digits to change the channel 4 Digits Your device requires you to enter 4 digits to change the channel 10 100 or required Your device requires you to press 10 100 or to ...

Page 207: ...ecific step when you record 3 To verify your keystroke recording tap Test from the Customize Wrench menu 4 Tap Finish Wizard from the Customize Wrench menu 5 Label your favorite then tap Next 6 Select the icon you want to associate with your favorite then tap Done Note If you choose not to set up some favorites their network icons still appear on the screen You can move or delete the unused icons ...

Page 208: ... Edit Note While the wrench icon is blinking a mini help tip appears to step you through customizing your NevoHome Control 3 Tap the favorite you want to edit The Favorites Wizard Initialization screen appears 4 From the Favorites Wizard Initialization screen tap Easy Channel Setup or Custom Favorites Setup then tap Next 5 Follow the instructions on the screen Copying a Favorite 1 Tap to bring up ...

Page 209: ... Favorite The wrench icon starts blinking If you want to exit move favorite mode tap the blinking wrench then tap Cancel Move 3 Tap the favorite you want to move 4 Tap an empty space on the screen where you want to move the favorite Note If you want to move the key to a different page tap the arrows at the bottom right of the screen Deleting a Favorite 1 Tap to bring up the Customize menu 2 From t...

Page 210: ...ges You can also add or delete entire favorites pages To add a blank page 1 Tap to bring up the Customize menu 2 From the pop up menu tap Add Blank Page To delete a page 1 Tap to bring up the Customize menu 2 From the pop up menu tap Delete Page 3 On the Confirm Favorites Page Delete screen tap Yes Appending Favorites Pages You can quickly add a favorites list that has already been set up by anoth...

Page 211: ... added to that room Note The default is the living room To add a room 1 From the Home screen tap 2 From the pop up menu tap Add Room 3 From the Room Wizard screen tap Next 4 Select the image you want to associate with your room then tap Next 5 Choose a label for your room 6 Select the region you re in from the Region drop down menu then tap the Done Note Once you set the room s region preference a...

Page 212: ...ur currently installed devices Your new changes only affect future devices Deleting a Room 1 From the Home screen tap 2 From the pop up menu tap the room you want to delete 3 Tap again 4 From the pop up menu tap Delete Room 5 From the Confirm Room Delete screen tap Yes Adding Users NevoHome Control allows you to set up various user accounts Each user can then create their own Favorites list Note T...

Page 213: ... be unique Editing Users 1 From the Home screen tap 2 From the pop up menu tap the user you want to edit 3 Tap again 4 From the pop up menu tap Edit User 5 From the User Wizard screen tap Next 6 From the Name User screen edit the user name then tap Done The new user name now appears on the Home screen Deleting Users 1 From the Home screen tap 2 From the pop up menu tap the user s name you want to ...

Page 214: ...ard Initialization screen tap Next 4 From the How to Record Keystrokes screen tap Next 5 Follow the mini wizard tips to record keystrokes Note While you re recording keystrokes you can tap Stop and re record or you can tap Pause then later continue to record from your previous stopping point 6 Select the image you want to associate with your activity then tap Next 7 Choose a label for your activit...

Page 215: ... want to select a new image to associate with your activity then tap Next If not just skip this step 7 If you want to choose a new label for your activity select one If not just skip this step 8 If you want to check or uncheck the Display last Device page after running the Activity checkbox tap it If not just skip this step 9 When you re finished tap Done Deleting an Activity 1 Ensure that you ve ...

Page 216: ...voHome Control also on myNevo com To find the information you need to register your product such as the serial number 1 From the Home tab tap 2 Tap About Nevo Note You can also download additional device codes from myNevo com Downloading Graphics To download additional graphics enter information about your device on myNevo com Select the device type Select the brand Downloading Device Key Function...

Page 217: ...for the current user and room appears 3 When you re finished tap Close Enter the device code information on myNevo com Select the device type Select the brand For additional information tips and troubleshooting on using Home Control refer to the Nevo Help Tap Start Help Nevo to access the help topics ...

Page 218: ...urn wireless features on and off one at a time and one All Off button to turn off all wireless features at the same time The screen also includes a Settings buttons to configure Wi Fi and Bluetooth To access the iPAQ Wireless screen from the Today screen or Launch page tap the iPAQ Wireless icon in the Command bar at the bottom of the screen The iPAQ Wireless icon displays an x on the icon when al...

Page 219: ... available but not connected Green background when the wireless radios are on and connected or associated with another device Note If a button does not immediately respond when tapped it may be busy performing a task you suggested The All Off button displays a Gray background with an x on the icon when all wireless radios are off Green background when one or more wireless radios are on Settings Bu...

Page 220: ...ettings Button This button is enabled whenever the Bluetooth button is on Press the Bluetooth Settings button to open the Bluetooth settings page where you can add or delete profiles and change device accessibility and services Note For information on configuring Bluetooth settings refer to Chapter 9 Using Bluetooth Bluetooth Manager Button This button is enabled whenever the Bluetooth button is o...

Page 221: ...nformation Use virtual private networks VPNs for secure remote access Use hotspots for wireless connectivity Note Use of dial up and wireless Internet e mail corporate networks and other wireless communications such as Bluetooth enabled devices may require separately purchased additional hardware and other compatible equipment in addition to a standard Wi Fi infrastructure and a separately purchas...

Page 222: ...rns amber Once you connect to a wireless network the Wi Fi button turns green Note Before accessing your wireless network you must turn on Wi Fi When the blue Wireless LED is on and the arrows at the top of the screen show connected your HP iPAQ is connected to the wireless network To turn off Wi Fi tap the Wi Fi button again When Wi Fi is off the Wireless LED is no longer blue and the Wi Fi butto...

Page 223: ...re networks are present the Network indicator icon appears in the Navigation bar Tap the network you want to connect to then tap whether the network connects to the Internet does not use proxy settings or Work uses proxy settings Note To use iPAQ Mobile Media you must select Work to use the wireless network For more information about the iPAQ Mobile Media features refer to the Special Features Gui...

Page 224: ...er when the network is detected when the Network Indicator icon displays in the Navigation bar or manually by entering setting information To manually set up a wireless network connection 1 To turn on Wi Fi from the Launch page or traditional Today screen tap the Wireless icon and then tap the Wi Fi button 2 From the iPAQ Wireless screen tap the Settings button The Configure Wireless Networks scre...

Page 225: ... present the Network indicator icon appears in the Navigation bar Note If your network name is not listed you need to add it to the preferred network lists If Wi Fi is turned on tap the Settings button then tap Add New from the Configure Wireless Networks list Enter your network name then choose if it connects to Work or Internet ...

Page 226: ... select Work to use the wireless network For more information about the iPAQ Mobile Media features refer to the Special Features Guide 4 Tap the Network Key tab enter any data encryption settings 5 Tap the 802 1x tab enter any applicable data for your wireless network ...

Page 227: ...o access 1 From the iPAQ Wireless screen tap Settings Wireless tab 2 In the Networks to access box tap the type of network you want to connect to All Available Only access points or Only computer to computer 3 To connect only to networks that have already been configured clear the Automatically connect to non preferred networks checkbox Note If you check the Automatically connect to non preferred ...

Page 228: ...ork 1 Be sure Wi Fi is on 2 From the iPAQ Wireless screen tap Settings Wireless tab 3 In the Wireless networks box tap and hold the network you want to delete 4 Tap Remove Settings Monitoring Signal Strength and Status To view the signal strength between your HP iPAQ and an access point Wi Fi connection 1 Tap the Connections icon or in the Navigation bar 2 When the Connectivity box displays you wi...

Page 229: ...ized access Device to computer or ad hoc The mode that does not use access points It is used in peer to peer network communications Domain Name System DNS The way that Internet domain names are located and translated into IP addresses It is an easy to remember the name for an Internet address For example www horseshow com instead of the IP address xxx xxx xxx xxx Hotspots Public or private areas w...

Page 230: ...ections screen set up your Dialing Rules and Exceptions and press OK 5 From the iPAQ Wireless screen tap the Wi Fi Settings button Network Adapters tab 6 Tap the appropriate adapter to modify the settings The IP address appears in the IP Address box SSID or Network Name SSID is the acronym for the service set identifier This identification number uses a maximum number of 32 characters and is case ...

Page 231: ...rator To change TCP IP Settings 1 Contact your ISP or network administrator to determine your IP address subnet mask and or default gateway if needed 2 Be sure Wi Fi is on 3 From the iPAQ Wireless screen tap Settings Network Adapters tab 4 In the My network card connects to listbox tap either The Internet or Work Note If you are connecting to your ISP at home tap The Internet If you are connecting...

Page 232: ...two name resolution options DNS WINS To change server settings 1 Contact your ISP or network administrator to determine which name resolution to use obtain the specific server address and determine whether alternate addresses are available Note An alternate address may enable you to connect when the primary server is unavailable 2 Be sure the Wi Fi is on 3 From the iPAQ Wireless screen tap Setting...

Page 233: ...or in the Navigation bar Settings Task tab on the Connections screen 3 Under My Work Network tap Add a new VPN server connection 4 Follow the instructions on the Make New Connection screen Note For online Help for any screen in the Make New Connection screen or while changing settings tap the Editing VPN Server Connections 1 Tap the Connections icon or in the Navigation bar and then Settings Task ...

Page 234: ...r or need to be changed you will need to set them up manually To set up proxy server settings 1 Contact your ISP or network administrator for the proxy server name server type port type of Socks protocol used and your user name and password 2 Be sure Wi Fi is on 3 Tap the Connections icon or in the Navigation bar and then Settings Task tab 4 Under My Work Network tap Edit my proxy server Proxy Set...

Page 235: ...o Bluetooth devices within a range of approximately 30 feet 10 meters Exchange contacts calendar items and tasks Send or exchange business cards Transfer files Synchronize with a computer through an ActiveSync connection Partner with a Bluetooth enabled cell phone and use the cell phone as a wireless modem Partner with a Bluetooth enabled portable notebook and use your HP iPAQ as a wireless modem ...

Page 236: ...rvice contract Check with your service provider for availability and coverage in your area Not all Web content may be available Some Web sites may not be formatted to fit HP iPAQ screens and may require installation of additional software Getting Acquainted with Bluetooth Before you start using Bluetooth to establish wireless connections take a few minutes and familiarize yourself with Terms used ...

Page 237: ...ice does not require authentication or authorization Device address Unique electronic address of a Bluetooth device Device discovery Location and recognition of another Bluetooth device Device name Name that a Bluetooth device provides when discovered by another device Encryption Method of protecting data Passkey Code you enter to authenticate connections or activities requested by other devices P...

Page 238: ...le OBEX Object Exchange profile OPP Object Push profile PAN Personal Area Network profile SPP Serial Port profile ActiveSync Uses SPP to connect to ActiveSync on a computer Working with Bluetooth Settings From the tabs in Bluetooth Settings you can Select or add a user profile Turn Bluetooth on and off Enter or change your HP iPAQ Bluetooth Identification Set your connection preferences Enable Blu...

Page 239: ...Opening Bluetooth Settings 1 From the Today screen tap the iPAQ Wireless icon in the Command bar 2 On the iPAQ Wireless screen tap Bluetooth Settings Setting Accessibility Properties Before your HP iPAQ interacts with other Bluetooth devices you need to enter or change the accessibility properties to define how you want your HP iPAQ to interact To display the Accessibility screen 1 From the Today ...

Page 240: ...n discover me if you want to allow other devices to search and locate your HP iPAQ Otherwise leave this box unchecked Note If another device has your device s address and you have selected Other devices can discover me that device may be able to locate and connect to your device even though you did not select for it to be discovered 7 Tap OK to save your changes Enabling Bluetooth Services You can...

Page 241: ...e checkbox to change these Service settings to your preference 5 Tap OK to return to the iPAQ Wireless screen Note If you select Authorization required in the Service Settings you must authorize each connection Your HP iPAQ will then always ask you if the connection should be permitted Secure Connections using a Passkey or Bond To establish a secure connection with another device you can use the p...

Page 242: ...e Transfer Information Exchange Serial Port or Personal Network Server 3 Select Authentication Passkey required 4 Select Encryption Required if you want to require all data exchanged between the devices to be encrypted 5 Tap OK Setting a Shared Folder You can determine the folder that other devices access when they connect to your HP iPAQ To select a shared folder 1 From the Today screen tap the i...

Page 243: ...e to return to the iPAQ Wireless screen Understanding Profiles Use profiles to quickly enable selected personal settings in multiple environments Creating a Profile To create a profile 1 From the Today screen tap the iPAQ Wireless icon in the Command bar 2 Tap Bluetooth Settings General tab Lookup icon ...

Page 244: ...you must activate it to function as the current profile To activate a profile after creating it 1 From the Today screen tap the iPAQ Wireless icon in the Command bar Bluetooth Settings 2 From the General tab select it from the Current Profile drop down arrow list 3 Tap OK Saving Bluetooth Configuration Settings in a Profile To save the HP iPAQ Bluetooth configuration settings to any profile ...

Page 245: ...nd close Bluetooth Services Renaming a Profile 1 From the Today screen tap the iPAQ Wireless icon in the Command bar Bluetooth Settings 2 From the General tab tap the Lookup icon 3 Select a profile from the Add Delete Profiles list 4 Tap the Rename button 5 Enter a new descriptive name 6 Tap OK Deleting a Profile 1 From the Today screen tap the iPAQ Wireless icon Bluetooth Settings 2 From the Gene...

Page 246: ...tapping the Bluetooth power on button is included in all following instructions If Bluetooth is already powered on when you perform the tasks do not tap the Bluetooth button again Tapping the Bluetooth button when it is already on turns it off Locating and Selecting a Device Several tasks require you to locate a device and connect to it When you are required to locate a device the Bluetooth browse...

Page 247: ...2 Tap Tools Paired devices 3 Tap Add 4 Tap the Lookup icon 5 Tap a device 6 Enter a password in the Passkey field 7 Tap OK 8 Enter the same password into the other device Note Some devices such as mobile phones need to be placed in a mode to accept a bond from another device Refer to that device s user instructions for more information Unpairing Devices You can remove a paired relationship between...

Page 248: ...devices initiate a serial connection Use the outbound COM port when you initiate a serial connection to another device To identify the communications port 1 From the Today screen tap iPAQ Wireless Bluetooth Settings Services tab 2 Under Services tap Serial Port and tap the Advanced button 3 Note the names of your inbound and outbound COM ports 4 Tap OK Working with Connections You can create short...

Page 249: ...e and tap Next 3 Follow the connection wizard instructions Note Paired devices are designated by a checkmark Deleting a Shortcut 1 From the Today screen tap the iPAQ Wireless icon Bluetooth Manager 2 Tap and hold the connection icon or list name to be deleted 3 Tap Delete from the menu 4 Tap Yes to verify the selected shortcut should be deleted 5 Tap OK ...

Page 250: ...Bluetooth enabled computer by first setting up your computer then setting up your HP iPAQ If you are using other Bluetooth modules or cards on your computer refer to the Bluetooth Configuration Manager or Settings for similar setup procedures then skip to Setting Up an ActiveSync Partnership on Your HP iPAQ Setting Up an ActiveSync Partnership on Your HP iPAQ To establish an ActiveSync connection ...

Page 251: ...ection wizard instructions Note Be sure the ActiveSync COM port setting on your HP iPAQ is the same as the COM port setting used for Bluetooth on your computer 4 From the Bluetooth Browser screen select the computer you want to synchronize with Tap Next ...

Page 252: ...al cable connection You must configure the application that will use the connection to the correct serial port To establish a serial connection 1 From the Today screen tap the iPAQ Wireless icon Bluetooth Manager 2 Tap New Explore a Bluetooth device Next 3 Follow the connection wizard instructions Joining a Personal Area Network Connect two or more Bluetooth devices to share files collaborate or p...

Page 253: ...e Today screen tap the iPAQ Wireless icon Bluetooth Manager 2 Tap New Connect to Internet via phone 3 Follow the connection wizard instructions Working with Files You can exchange information with a connected device and use the Bluetooth File Explorer to Navigate through the directories View files and folders Create new folders Send and receive files from a remote device Delete and rename files on...

Page 254: ...ap File Send a File 3 Locate the file s to send 4 Tap the file s to send it 5 Tap OK Creating a Folder on a Remote Device 1 Tap and hold the file transfer shortcut icon and tap Connect 2 Navigate to the location you want for the new folder 3 Tap File Create a folder 4 Enter a folder name while New Folder is selected and tap Enter 5 Tap OK Receiving a File from a Remote Device 1 Tap and hold a file...

Page 255: ...ss card Send a business card to one or more devices Request a business card from one or more devices Exchange business cards with one or more devices You must establish a default contact name to send or exchange business card information You must first specify your default business card on the Information Exchange tab in Bluetooth Settings This name becomes the default for business card transfers ...

Page 256: ...n 5 Tap the My business card vCard icon 6 Select your contact from the Contacts list 7 Tap OK Note To create a new business card tap the Contacts icon next to the vCard icon and create a new business card Tap OK when you are finished Sending Business Cards 1 From the Today screen tap the iPAQ Wireless icon in the Command bar Bluetooth Manager 2 Tap Tools Business Card Exchange ...

Page 257: ...OK Note Be sure the receiving device has been enabled to accept the transfer Requesting Business Cards 1 From the Today screen tap the iPAQ Wireless icon in the Command bar Bluetooth Manager 2 Tap Tools Business Card Exchange 3 Tap the Request icon 4 Tap the device from which you want to request a business card 5 Tap OK ...

Page 258: ... Business Card Exchange 3 Tap the Exchange icon 4 Tap the device with which you want to exchange your business card 5 Tap OK Opening a Connection 1 From the Today screen tap the iPAQ Wireless icon in the Command bar Bluetooth Manager 2 Tap New Explore a Bluetooth Device and allow the discovery process to search for the Bluetooth enabled device 3 When the discovered device icon displays on your scr...

Page 259: ...icon or list name and tap Status 3 Tap OK Closing a Connection 1 From the Today screen tap the iPAQ Wireless icon in the Command bar Bluetooth Manager 2 Tap and hold the connection icon or list name 3 Tap Disconnect from the menu 4 Tap OK Viewing Connection Information 1 From the Today screen tap the iPAQ Wireless icon in the Command bar Bluetooth Manager 2 Tap and hold the connection icon or list...

Page 260: ...tery before setting up the unit and recharge regularly Your HP iPAQ uses some power to maintain files in main memory and the clock While working at your desk keep the HP iPAQ charging When you travel it is recommended that you carry the AC adapter Charger adapter plug or an optional spare battery with you Your HP iPAQ is shipped with the battery partially charged To install the removable rechargea...

Page 261: ...tery User s Guide 10 2 Note The built in HP Photosmart camera is available only in select HP iPAQ models To upgrade your model please refer to the Accessories Brochure for information on the HP Photosmart Mobile Camera ...

Page 262: ...de of the HP iPAQ with the connectors lined up on the upper right 1 and push the left side of the battery into place 2 Note Ensure the large battery label is visible when the battery is installed 3 Replace the cover by matching the tabs on the cover to the latches on the HP iPAQ and snap into place ...

Page 263: ... The cover must be tightly latched in place for the HP iPAQ to operate Note If the battery is not fully charged you must connect the AC adapter to the HP iPAQ to fully charge it before continuing It takes about four hours to fully charge the battery ...

Page 264: ...s of time You do not need to reinstall applications and data installed in the iPAQ File Store folder because they are saved in nonvolatile memory Charging the Battery Battery Saving Tip Leave your HP iPAQ connected to AC power at all times when you re not using it Charging with the AC Adapter The standard AC adapter works in any household outlet You can also purchase one that works in your vehicle...

Page 265: ... 3 Insert the charger adapter into the bottom of the HP iPAQ 3 ÄCAUTION To avoid damaging your HP iPAQ or the AC adapter check to be sure all connectors are properly aligned before connecting them 4 When the power indicator on the top of the HP iPAQ turns solid amber the unit is fully charged and you can disconnect the AC adapter The approximate time to fully charge a unit is four hours ...

Page 266: ... with Your Computer To charge the HP iPAQ using the desktop cradle 1 Plug the AC adapter into an electrical outlet 1 and connect the other end of the AC adapter to the AC connector on the desktop cradle 2 2 Slide the bottom of your HP iPAQ into the cradle 3 and push firmly to seat it ÄCAUTION To avoid damaging your HP iPAQ or the cradle check to be sure the HP iPAQ and cradle connectors are proper...

Page 267: ...Managing the Battery User s Guide 10 8 Note The amber charge light on the HP iPAQ blinks while the battery is recharging and turns solid nonblinking when the battery is fully charged ...

Page 268: ...ent when the HP iPAQ is connected to external power or running on battery power Set the brightness level of the display lower while you are using your HP iPAQ on battery power Tap Start Settings System tab Backlight Brightness tab Move the slide bar down to reduce the brightness or to turn off the backlight completely Turn the backlight off when you are not using the screen such as when you are li...

Page 269: ...ughput It is not recommended for large file transfers Note The Extended power saving mode is not recommended if Bluetooth is also on Disabling the Application Buttons Pressing the Application Buttons on your HP iPAQ will turn on your device by default Battery Saving Tip To reduce incidence of accidentally powering on the HP iPAQ you may choose to disable the Application and Image Capture Buttons A...

Page 270: ... Guide 10 11 3 Tap OK Note If you disable the Auto Power On feature for the Application Buttons the Power Button still turns on the unit Once the unit is turned on all buttons will function according to their programmed functions ...

Page 271: ...om the Start menu tap Settings System tab Power icon 2 Tap OK Battery Saving Tip Set your HP iPAQ to turn off automatically after you stop using it Tap Start Settings System tab Power Advanced tab Tap the On battery power checkbox then tap the drop down arrow to specify how long before your HP iPAQ turns itself off ...

Page 272: ...dia Companion Use optional expansion cards for Expanding the memory of your HP iPAQ Viewing the content of memory cards SD MMC Note Expansion cards must be purchased separately and are not included with your HP iPAQ To locate information about expansion cards visit the following HP web site www hp com go ipaqaccessories ...

Page 273: ...rd into the expansion slot on the HP iPAQ 1 Locate the slot on the top of the HP iPAQ 2 Remove the protective plastic card 3 Insert the expansion card into the expansion slot and push the connection edge of the card firmly into the expansion slot Note If your expansion card is not recognized follow the card manufacturer s instructions to install it ...

Page 274: ...e expansion card 2 Remove a card from the Secure Digital expansion slot by slightly pushing down on the card 1 to unlock it 3 When the card disengages and pops up 2 pull it from the expansion slot ÄCAUTION SD cards must first be unlocked before removal Do not try to pull a locked SD card out of the expansion slot Be sure to unlock the SD card before removal Failure to do so may damage the expansio...

Page 275: ...f Memory Cards Use File Explorer to view the files that are located on your optional SD or MMC card 1 From the Start menu tap Programs File Explorer 2 Tap the root directory of My Device and select the Storage Card folder to see a list of files and folders ...

Page 276: ...Camera Common Problems Problem Solution I cannot see anything on the screen Be sure the HP iPAQ is powered on Be sure the HP iPAQ is connected to the AC adapter and the Desktop Cradle Reset the device by using the stylus to lightly press the Reset button Remove and replace the battery I cannot keep my battery charged Always keep the HP iPAQ connected to the AC adapter when you are not using it In ...

Page 277: ... case and keep it in your carry on luggage I want to travel internationally with my HP iPAQ Be sure you have the plug adapter appropriate for the country you are visiting I want to turn off Bluetooth and Wireless LAN for air travel To turn off all wireless features from the Launch page or Today screen tap Start iPAQ Wireless Then tap the All Off button I want to ship my HP iPAQ to a repair facilit...

Page 278: ...Q is properly configured and operational Reset the device by using the stylus to lightly press the Reset button When I try to open the Inbox I receive an error or the application hangs Limit the number of e mail services you create I get an error when I try to record a note in Calendar or in Tasks Try using a more compressed recording format in Calendar or Tasks 8 000 Hz Mono 8 KB s is the most co...

Page 279: ...nts in that folder will not be shown To find your document or workbook tap Start Programs File Explorer Open the folder you created then tap the file you re looking for My device is always asking me for a password Tap Start Settings Personal tab Password to be sure the password settings are configured as you want I cannot find files sent to me by another device Check My Documents which is the defa...

Page 280: ...ft ActiveSync 3 7 or a later version on your computer Also be sure you are connecting directly to a USB port on your computer and not through a USB hub Uninstall and reinstall ActiveSync If you are running personal firewall software try disabling it If you are then able to synchronize contact the software vendor to information on configuring the required exclusions to eliminate this problem I conn...

Page 281: ... the stylus to lightly press the Reset button Check Connection Settings in ActiveSync on your computer to ensure the communications port you are using is active I cannot open e mail in the Inbox after I restore using Microsoft ActiveSync Use Microsoft ActiveSync to synchronize your HP iPAQ with your computer For more information refer to the Chapter 3 Synchronizing with Your Computer I tried to sy...

Page 282: ...e sure any third party drivers are installed I cannot insert my card Be sure the label is facing the front of the unit Be sure you are not inserting the card at an angle Be sure you insert the connection area first I cannot remove my SD card Push the SD card in to release the locking mechanism The card will pop out slightly and can then be easily removed My HP iPAQ cannot recognize my card Be sure...

Page 283: ...e sure the other device has not restricted your access Try initiating pairing from the other device Some Bluetooth enabled devices can only initiate pairing and cannot respond to pairing requests from other devices Other devices cannot find or connect to my device Be sure Bluetooth is turned on Move closer to the device Be sure you have not restricted other devices from finding yours Check your Bl...

Page 284: ...f the wireless network you are connected to connects to Work the network may require a proxy To set up the proxy 1 Ask your network administrator for the proxy settings 2 Tap the Connections icon Add Proxy Server 3 Refer to Chapter 8 Using Wi Fi for more information I do not see my wireless network on my HP iPAQ Your wireless network could be a non broadcasting network 1 Tap the Connections icon S...

Page 285: ...ections Advanced tab Network Card 2 Select Add New Settings 3 Enter the network name SSID 4 Select the appropriate values in the Connects to box 5 If WEP settings are required tap the Authentication tab and enter them I cannot connect reliably to an available network or connections are frequently dropped Be sure there is ample signal strength available in the area If you are using one of the WLAN ...

Page 286: ... the task bar If the Wi Fi icon is amber then Wi Fi is turned on but not connected Select the Settings button and confirm you have entered the appropriate network name and security settings for your network Verify your Wi Fi connection settings are not improperly configured Tap Start Settings Connections tab Connections Advanced tab Select Networks and verify your wireless network is set for Progr...

Page 287: ...a media mode that is available tap on the Customize Wrench menu and select Refresh Servers and Player and then return to the main iPAQ Mobile Media screen I cannot find the digital media I am looking for in a particular Media Server For Media Control Media Stream or Media Copy verify that the media you are looking for has been cataloged by NevoMedia Server Open NevoMedia Server on your computer an...

Page 288: ...h NevoMedia Server and NevoMedia Player tap Start All Programs Hewlett Packard Mobile Media for PC Verify that you do not have incompatible settings in Internet Explorer on your computer Some corporate networks or other special networks require proxy or configuration scripts or access the Internet these must be disabled for iPAQ Mobile Media to work properly On your computer launch Internet Explor...

Page 289: ...se Windows Movie Maker to save your video in the proper playback setting for your HP iPAQ Open Windows Movie Maker from the File menu select Import into Collections Select your video and choose Import Edit your video as appropriate then select Save to My Computer In the Movie Setting screen of the Save Movie Wizard select Show More Choices and select Other settings and choose a Pocket PC format to...

Page 290: ...o transfer the music to your HP iPAQ and then use Windows Media Player on your HP iPAQ to play Your music may also be in a different format that what is supported with iPAQ Mobile Media Only wma and mp3 except Media Stream mode are supported with iPAQ Mobile Media I get an un supported error message when I try to install Mobile Media for PC on one of my computers Mobile Media for PC is supported o...

Page 291: ...l not occur in a particular installation If this equipment does cause harmful interference to radio or television reception which can be determined by turning the equipment off and on the user is encouraged to try to correct the interference by one or more of the following measures Reorient or relocate the receiving antenna Increase the separation between the equipment and receiver Connect the equ...

Page 292: ...ed States only This device complies with Part 15 of the FCC Rules Operation is subject to the following two conditions 1 this device may not cause harmful interference and 2 this device must accept any interference received including interference that may cause undesired operation For questions regarding your product contact Hewlett Packard Company P O Box 692000 Mail Stop 530113 Houston Texas 772...

Page 293: ...ing Equipment Regulations Avis Canadien Cet appareil numérique de la classe B respecte toutes les exigences du Règlement sur le matériel brouilleur du Canada Japanese Notice Korean Notice European Regulatory Notice Radio product for indoor use in Home and Office environment operating in the 2 4 GHz band Wireless LAN 0984 ...

Page 294: ... 8 11 Electromagnetic Immunity EN 61000 3 2 IEC 61000 3 2 Power line harmonics EN 61000 3 3 IEC 61000 3 3 Power line flicker EN 60950 IEC 60950 Product safety EN 300 328 2 Data transmission equipment operating in the 2 4 GHz ISM band and using 2 4 GHz radio equipment using spread spectrum techniques EN 301 489 1 17 General EMC requirements for radio equipment The radio functionality of this equipm...

Page 295: ...quipement peut etre utilise a l interieur d un batiment en utilisant toutes les frequences de 2400 a 2483 5MHz Chaine 1 13 Pour une utilisation en environement exterieur vous devez utiliser les frequences comprises entre 2454 2483 5MHz Chaine 10 13 Pour les dernieres restrictions voir http www art telecom fr Battery Warning ÅWARNING This computer contains a lithium ion rechargeable battery To redu...

Page 296: ...al shock fire or damage to the equipment Plug the AC Adapter into an electrical outlet that is easily accessible at all times Disconnect power from the equipment by unplugging the AC Adapter from the electrical outlet or unplugging the Synchronization cable from the host computer Do not place anything on the AC Adapter cord or any of the other cables Arrange them so that no one may accidentally st...

Page 297: ...ory Wireless Notice ÅWARNING Exposure to Radio Frequency Radiation The radiated output power of this device is below the FCC radio frequency exposure limits Nevertheless the device should be used in such a manner that the potential for human contact during normal operation is minimized To avoid the possibility of exceeding the FCC radio frequency exposure limits human proximity to the antenna shou...

Page 298: ... Brazilian Regulatory Wireless Notice Este equipamento opera em caráter secundário isto é não tem direito a proteção contra interferência prejudicial mesmo de estações do mesmo tipo e não pode causar interferência a sistemas operando em caráter primário ...

Page 299: ...ochure for information on the HP Photosmart Mobile Camera System Feature Description Processor Samsung 2440 Memory available to the User rx3700 series 152 MB rx3417 88 MB rx3415 56 MB rx3115 56MB SD I O slot SD memory card support Display 3 5 inch transflective color QVGA 240 x 320 pixels 64K color support LED Backlight Multi level brightness adjustment Audio Integrated Microphone speaker 3 5 mm s...

Page 300: ...put voltage and current 5 VDC 2 A typical Bluetooth 1 1 compliant Class II device typical 10 meters 30 feet range LED Indicators Left LED Right LED 3 mode charge notify Notification blinking green Charging blinking amber Full charge solid amber Bluetooth WLAN radio activity Solid blue radio ON Battery rx3700 series Removable rechargeable 1440 mAh optional extended 2880 mAh Lithium ion battery avai...

Page 301: ...d rx3100 series US Metric Length 4 5 in 114 3 mm Width 2 8 in 71 2 mm Depth 0 64 in 16 3 mm Weight including standard battery and stylus 147 g 147 g Environment US Metric Temperature Operating 32 to 104 F 0 to 40 C Nonoperating 4 to 140 F 20 to 60 C Relative Humidity Operating 90 90 Nonoperating 90 90 Maximum Altitude Operating 15 000 ft 0 4 572 m Nonoperating 40 000 ft 0 12 192 m ...

Reviews: