background image

5   Hewlett-Packard Support and Information Services

Introduction

104

English


Introduction

Hewlett-Packard computers are engineered for quality and reliability to 
give you many years of trouble-free service. To ensure that your system 
maintains its reliability and to keep you up-to-date with the latest 
developments, HP and a worldwide network of trained and authorized 
resellers provide a comprehensive range of service and support options 
which are listed below:

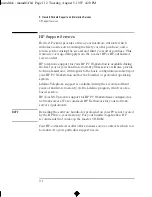
HP-Authorized Reseller

HP SupportPack

HP Support Assistant CD-ROM

HP Information Services

HP Support Services

Technical phone support
Lifeline phone support
Network phone-in support.

NOTE

When calling any of the international telephone numbers listed in this 
chapter, replace the ‘+’ with your international telephone access code.

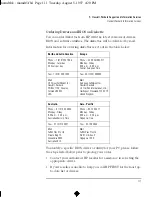
Service

Means of Access

HP Forum on CompuServe

Modem

HP Forum on America Online (US only)

Modem

HP BBS Library

Modem

HP World Wide Web Site

World Wide Web Access

HP FIRST Faxback

Phone and Fax

Audio Tips (US only)

Phone

HP Drivers/BIOS diskettes

Delivered by mail

mamdt.bk : mamdt5.fb4  Page 104  Tuesday, August 5, 1997  4:20 PM

Summary of Contents for Kayak XA

Page 1: ...User s Guide HP Kayak XA PC Workstation mamdt bk mamdtfc2 fb4 Page i Tuesday August 5 1997 4 20 PM ...

Page 2: ...by copyright All rights are reserved No part of this document may be photocopied reproduced or translated into another language without the prior written consent of Hewlett Packard Company CompuServeTM is a U S registered trademark of CompuServe Inc Microsoft MS MS DOS and Windows are U S registered trademarks of Microsoft Corporation NetscapeTM is a U S trademark of Netscape Communications Corpor...

Page 3: ...User s Guide mamdt bk title fb4 Page iii Tuesday August 5 1997 4 20 PM ...

Page 4: ... easily accessible For your safety never remove your PC Workstation s cover without first removing the power cord from the power outlet and any connection to a telecommunications network Always replace the cover on the PC Workstation before switching it on again WARNING To avoid electric shock do not open the power supply There are no user serviceable parts inside Your PC Workstation is a class 1 ...

Page 5: ...Workstation s Hardware Control Panel 12 Starting and Stopping Your PC Workstation 14 Starting Your PC Workstation 14 Changing the Boot Order 14 Starting the PC Workstation for the First Time 15 Stopping Your PC Workstation 16 Using the Flexible Disk Drive 17 Using Your HP Enhanced Keyboard 18 Setting Passwords 21 Setting an Administrator Password 21 Setting a User Password 22 Using Power Managemen...

Page 6: ...31 Installing Video Memory 33 Installing Mass Storage Devices 35 Connecting Devices 35 Installing a Hard Disk Drive in the Top Rear Shelf 37 Replacing the Hard Disk Drive in the Bottom Rear Shelf 40 Installing a Drive in a Front Shelf 43 Completing the Installation of a Drive 47 Installing Accessory Boards 48 Configuring Accessory Boards with Plug and Play 48 Configuring non Plug and Play ISA Acce...

Page 7: ... 64 If Your Keyboard Does Not Work 66 If Your Mouse Does Not Work 66 If Your Printer Does Not Work 67 If Your Flexible Disk Drive Does Not Work 67 If Your Hard Disk Does Not Work 68 If there is a Problem with Your CD ROM Drive 68 If an Accessory Board Does Not Work 70 If You Have Forgotten Your Password 71 If Your PC Workstation Has a Software Problem 72 If Your Application Software Does Not Work ...

Page 8: ... Features 85 System Board Switches 86 The HP Summary Screen and Setup Program 87 HP Summary Screen 87 Using the HP Setup Program 88 Saving Your Changes and Leaving the Setup Program 91 Configuring Your Network Connection 92 Controlling the Network Security Features 93 Selecting the Boot Device Priority 93 Using the SCSI Configuration Utility 94 Default Settings You Can Change 94 Starting the SCSI ...

Page 9: ...on Services 107 HP Forum on CompuServe 107 HP Forum on America Online 108 HP BBS Library 109 HP World Wide Web Site 109 HP FAXback on Demand HP FIRST 110 HP Audio Tips USA only HP Automated Support Directory 110 Ordering Drivers and BIOS on Diskette 111 HP Support Services 112 Hewlett Packard Telephone Support 113 Lifeline Telephone Support 114 HP Network Phone in Support Service NPS 115 Summary 1...

Page 10: ...x English Glossary 119 Index 123 Physical Characteristics of Your PC Workstation 135 mamdt bk mamdt toc Page x Tuesday August 5 1997 4 20 PM ...

Page 11: ...1 Setting Up and Using Your PC Workstation mamdt bk mamdt1 fb4 Page 1 Tuesday August 5 1997 4 20 PM ...

Page 12: ...ts side with the flexible disk drive at the top 3 Position the computer so that its rear connectors are easily accessible 4 Position the display and computer close to each other Operating System Your PC Workstation s operating system is preloaded on the hard disk Installation Tools No tools are required to set up your PC Workstation However if you plan to install a disk drive or an accessory board...

Page 13: ...en the attachment screws Use the connector labeled Parallel 25 pin parallel connector for a parallel device Serial 9 pin serial connector for a serial device NOTE The Universal Serial Bus USB connectors can be used for USB accessories Most USB accessories are automatically configured as soon as they are physically attached to the PC Workstation USB is not supported by all operating systems Keyboar...

Page 14: ...cting the Mouse Keyboard Printer and Display 4 English Connect the display to the back of the computer The connector is shaped to go in one way only Tighten the display cable attachment screws mamdt bk mamdt1 fb4 Page 4 Tuesday August 5 1997 4 20 PM ...

Page 15: ...k Interface submenu in the Advanced menu of the Setup program You can find additional information in the online Network Administrator s Guide Connecting to the Internet Via a Network Once you are connected to a LAN and have configured your PC Workstation s network hardware and software you can access the Internet via your company s gateway server You can use Netscape which is preinstalled on your ...

Page 16: ...mfort from unexpected noise always turn down the volume before connecting a headset or speakers Listening to loud sounds for prolonged periods may permanently damage your hearing Before putting on a headset place it around your neck and turn the volume down When you put on the headset slowly increase the volume until you find a comfortable listening level then leave the volume control in that posi...

Page 17: ...lied with your PC Workstation Connect to LINE IN Connect to MIC IN and LINE OUT Connect to LINE OUT Connect to LINE OUT LINE OUT LINE IN MIC IN NOTE The internal speaker and the LINE OUT jack on the rear of your PC Workstation are deactivated when you use the Headphones jack on the front of the PC Workstation The internal speaker is also deactivated when you use the LINE OUT jack on the rear of th...

Page 18: ...o use the headphones jack and the volume control on the front of the CD ROM drive To access these controls 1 Remove the CD ROM drive s front filler by carefully pulling it off 2 Replace it with the generic filler You will find a spare generic filler inside your PC Workstation refer to page 46 mamdt bk mamdt1 fb4 Page 8 Tuesday August 5 1997 4 20 PM ...

Page 19: ...ult for narrow and wide SCSI devices Refer to the manual provided with the SCSI accessory for instructions on selecting a SCSI address NOTE You don t need to set a SCSI address for Plug and Play SCSI devices SCSI devices which support the SCAM protocol 2 Using a shielded SCSI cable connect the SCSI accessory to your PC Workstation s external 8 bit SCSI connector The SCSI connector is next to the L...

Page 20: ... length of the external SCSI cables should not exceed 3 meters approximately 10 feet Contact your dealer to order shielded HP SCSI cables to connect external SCSI accessories For information on how to install an internal SCSI device refer to page 36 mamdt bk mamdt1 fb4 Page 10 Tuesday August 5 1997 4 20 PM ...

Page 21: ...ional regulations Your PC Workstation is disconnected from the power by removing the power cord from the power outlet This means the PC Workstation must be located close to a power outlet that is easily accessible 1 Connect the power cords to the display and the computer The connectors are shaped to go in one way only 2 Connect the display s power cord and the computer s power cord to grounded out...

Page 22: ... on off button is software controlled If there is a problem during the shutdown procedure and the software hangs preventing the power from being turned off then after 1 minute press the on off button for 4 seconds This turns off the power but data may be lost You should only use this method of turning off the PC Workstation when the normal shutdown procedure does not work Power On Status Light Har...

Page 23: ... To unlock the PC Workstation enter either password Power On Status Light This light glows while mains power is supplied to the PC Workstation Hard Disk Activity Light This light flickers when your hard disk drive is being accessed The hard disk activity light also works for a second hard disk drive supplied by HP Network Activity Light This light flickers when network activity is taking place PC ...

Page 24: ...h is the default setting refer to page 86 When you turn on the PC Workstation it carries out the Power On Self Test POST while the PC Workstation s logo is displayed If you wish to view the POST details press to get the HP Summary Screen If there is an error in the POST the error is automatically displayed For details refer to page 59 3 If you have set a password in the Setup program the password ...

Page 25: ...s a Power On Self Test POST Press if you want to view the POST details in the HP Summary Screen refer to page 87 If an error is detected during the Power On Self Test the PC Workstation automatically displays the error You may be prompted to press to start the Setup program to correct the error 2 The software initialization routine starts It displays the software license agreement gives you an opp...

Page 26: ...sition Adjust the screen s brightness and contrast to suit your needs If the picture does not fill the screen or is not centered adjust it using the controls on the display Refer to the display s manual for details Stopping Your PC Workstation To stop the PC Workstation make sure that you have exited all programs and the operating system if necessary and then press the power button on the control ...

Page 27: ...Disk Drive Using the Flexible Disk Drive Your PC Workstation has a flexible disk drive for 3 inch flexible disks Ensure that you insert the flexible disk correctly when using the drive Inserting a disk Ejecting a disk mamdt bk mamdt1 fb4 Page 17 Tuesday August 5 1997 4 20 PM ...

Page 28: ...r open URLs on the WWW Launch the Internet browser supplied with your system Lock or suspend your PC Workstation Access HP TopTOOLS and customer information Mute or adjust the volume of the audio system Menu key Lock Suspend key Internet key HP TopTOOLS Shortcut key HP Customer Information Volume control keys Shortcut keys Mute key Windows key displays the Start menu Application key right mouse bu...

Page 29: ... browser configured on the PC Workstation default setting Microsoft Internet Explorer 3 0 is also available Lock Suspend Key The action of the Lock Suspend key is configured by pressing the Menu key then clicking the Lock Suspend key on the keyboard displayed on your screen The actions you can specify for the Lock Suspend key are Lock the keyboard and system Suspend enters power saving mode if the...

Page 30: ...Pressing the Mute key mutes the audio or restores the audio if it has been muted The Volume keys can be used to control the volume level NOTE By default the volume on your system can be controlled with the Mute and Volume keys on the keyboard or through the HP Volume Control software The volume control on the audio front panel is disabled For information on how to enable the volume control on the ...

Page 31: ...Administrator and a User password are set If you have set both an Administrator password and a User password and you enter the Setup program by using the User password you are restricted in your ability to change setup items If you enter the Setup program with an Administrator password you have no restrictions To set an Administrator Password 1 Start the Setup program Refer to page 87 2 Choose the...

Page 32: ...icted in your ability to change setup items If you enter the Setup program with an Administrator password you have no restrictions To set a User Password 1 Start the Setup program Refer to page 87 2 Choose the Security menu 3 Choose the User Password submenu 4 Choose the Set User Password setup item You are asked to enter your password twice Save your changes when you exit the Setup program by sel...

Page 33: ...mplement power management Additional Information and Help Additional information about your PC Workstation is preloaded on your hard disk drive This information includes Working in comfort guidance on ergonomic issues HP support similar to chapter 5 in this User s Guide Using Sound on Your PC comprehensive online book describing how to use the multimedia features of your PC Workstation Network Adm...

Page 34: ...its useful life In several countries HP has a product take back program Collected equipment is sent to one of HP s recycling facilities in Europe or the USA As many parts as possible are reused the remainder are recycled Special care is taken with batteries and other potentially toxic substances which are reduced to non harmful components through a special chemical process If you require more deta...

Page 35: ...ries in Your PC Workstation This chapter explains how to install accessories such as extra memory accessory boards and additional disk drives in your PC Workstation mamdt bk mamdt2 fb4 Page 25 Tuesday August 5 1997 4 20 PM ...

Page 36: ...ny connection to a telecommunications network Always replace the cover on the PC Workstation before turning it on again Main Memory Modules 64 bit SDRAM 3 DIMM slots Non ECC ECC 16 MB D5361A 32 MB D5362A D5365A 64 MB D5363A D5366A 128 MB D5367A Four Accessory Board Slots Bottom Front Access Shelf for accessories such as Tape drive Zip drive Mounting Rails can be ordered for front access devices 5 ...

Page 37: ...unications network 3 Press the central latch down to unlock the front panel 4 Remove the front panel by pressing the two tabs down pivoting the front panel downward and lifting it off 5 If necessary unlock the cover using the key provided with the PC Workstation 6 Placing your hands on the sides of the cover push it by about 2 cm about 1 inch away from the front of the computer and then lift it cl...

Page 38: ...he cover lock is unlocked 4 Lower the cover onto the computer aligning the front of the cover with the inner front edge of the computer frame and firmly slide it forwards into position 5 If required lock the cover using the key 6 Replace the front panel by first inserting the two lower hinges then pivoting it upwards into place The two tabs will click into place 7 Close the central latch on top of...

Page 39: ...he power supply unit also improves access to the drive connectors and cables Moving the Power Supply Unit 1 Disconnect the computer s power supply cord and any connection to a telecommunications network Remove the computer s cover refer to page 27 2 Lift the front of the power supply to free the two side catches then slide it horizontally out Lift the power supply clear and lay it upside down on t...

Page 40: ...and power cables are properly connected and correctly routed 2 Lift the front of the power supply unit the fan end and slide it into the rear of the PC Workstation Ensure that the hinge on the back of the power supply engages the notch on the chassis Then lower the front of the power supply unit so that the catch on either side slides into place 3 Always replace the PC Workstation s cover before c...

Page 41: ...28 MB Main memory is available in modules of 32 MB 64 MB and 128 MB ECC SDRAMs and 16 MB 32 MB and 64 MB non ECC SDRAMs TIP To take advantage of memory Error Correction Capabilities ECC all modules need to be of ECC type Correct selection must also be made in the Setup program Advanced Memory and Cache Error Checking To install a main memory module 1 Disconnect the PC Workstation s power supply co...

Page 42: ...he cover refer to page 28 Reconnect all cables and power cords 8 Turn on the display and then turn on the computer The new memory is automatically detected and configured If you want to check this press the key while F2 Setup is displayed at the bottom of the screen This displays a summary of the PC Workstation s configuration details If you experience any problems as a result of the upgrade refer...

Page 43: ... it with a 4 MB module To install a video memory module 1 Turn off the display and computer and disconnect the power supply cords and any connection to a telecommunications network 2 Remove the computer s cover refer to page 27 3 If there is an accessory board preventing access to the video memory upgrade socket you must remove it first refer to page 52 4 There is a 2 MB video memory module alread...

Page 44: ...ll fit one way only 6 Install any other accessories before replacing the cover Reconnect all cables and power cords 7 After turning on the PC Workstation you can change the video resolution and the number of colors displayed If you experience any problems as a result of the upgrade refer to Chapter 3 starting on page 55 mamdt bk mamdt2 fb4 Page 34 Tuesday August 5 1997 4 20 PM ...

Page 45: ... board installed on this shelf If this is the case a second hard disk drive cannot be installed The PC Workstation has two front access shelves for CD ROM zip or disk drives a CD ROM drive is already installed on the top shelf Connecting Devices Data Connectors If you install a drive you need to connect it to power and data cables The data cables are shown below IDE HDD cable Flexible Disk Drive d...

Page 46: ...cted to the 3 5 inch flexible disk drive Before Installing an IDE Device Refer to the IDE drive s manual to see if you must set jumpers or if there is a special installation procedure to follow Before Installing a SCSI Device If you are installing an additional SCSI drive you should assign an unused SCSI address ID to the accessory SCSI addresses range from 0 to 7 for 8 bit narrow SCSI and from 0 ...

Page 47: ...he case or indeed if any PCI board has been installed in the slot you cannot install a hard disk drive in the shelf If the shelf is free you can install a 3 5 inch hard disk drive CAUTION Handle the hard disk drive with care Avoid shocks and violent movement as this can cause damage to the hard disk drive s internal components Make sure that you back up your files before you install a hard disk dr...

Page 48: ...e Devices 38 English 3 At the rear of the computer unscrew the retaining bracket you can use a coin to do this and remove it 4 Remove the rear tray by sliding it forward about 1 5 cm inch and lifting it up and out mamdt bk mamdt2 fb4 Page 38 Tuesday August 5 1997 4 20 PM ...

Page 49: ...t backwards into place 7 At the rear of the PC Workstation replace the retainer bracket and screw it in place securing the tray 8 Connect the power cable and the data cable to the rear of the drive The connectors are shaped to go in one way only If you are not sure which connector to use refer to page 35 9 Install any other accessories before replacing the power supply unit and cover Reconnect all...

Page 50: ...e sure that you back up your files before you install a hard disk drive Refer to your operating system documentation for information on how to do this 1 Turn off the display and computer and disconnect the power supply cords and any connection to a telecommunications network 2 Remove the computer s cover refer to page 27 and move the power supply unit refer to page 29 3 At the rear of the computer...

Page 51: ...ive from the tray by unscrewing it from the back of the tray 7 Secure the new drive onto the tray with the screws provided Ensure that the drive connectors face the correct way 8 Slide the tray back into the rear of the computer pushing it firmly into position Securing 3 5 inch hard disk drive to tray Securing 5 25 inch hard disk drive to tray mamdt bk mamdt2 fb4 Page 41 Tuesday August 5 1997 4 20...

Page 52: ...Connect the power cable and the data cable to the rear of the drive The connectors are shaped to go in one way only If you are not sure which connector to use refer to page 35 11 Install any other accessories before replacing the power supply unit and cover Reconnect all cables and power cords 12 Refer to page 47 to complete the installation Step 8 Step 9 mamdt bk mamdt2 fb4 Page 42 Tuesday August...

Page 53: ...length These products are Class 1 laser products Refer to the drive s manual to see if you must set jumpers or if there is a special installation procedure to follow 1 Turn off the display and computer and disconnect the power supply cords and any connection to a telecommunications network 2 Remove the computer s cover refer to page 27 3 Press the two retaining clips of the front drive unit inward...

Page 54: ...he drive to be installed has a tray attach the drive to the tray Many devices such as the HP Zip drive require an HP supplied tray before they can be installed 8 Lower the drive into the free groove of the mounting bracket ensure that the top of the drive is facing the right way Use the two pins on the mounting bracket to slot the drive into place 9 Position the other mounting bracket on top align...

Page 55: ...nly If you are not sure which connector to use refer to page 35 11 Using both hands lift the drive unit and slide it back into the computer about halfway 12 Move the power supply unit refer to page 29 and place it upside down on the front drive unit 13 Connect the power cable to the rear of each drive The connectors are shaped to fit one way only Top mounting bracket IDE CD ROM Data cable mamdt bk...

Page 56: ...ce 15 Retrieve the generic filler from the PC Workstation s chassis by opening the two clips 16 Remove the existing filler from the front panel and replace it with the generic filler to give access to the newly installed drive 17 Install any other accessories before replacing the cover Reconnect all cables and power cords 18 Refer to page 47 to complete the installation mamdt bk mamdt2 fb4 Page 46...

Page 57: ...you experience any problems as a result of the upgrade refer to Chapter 3 starting on page 55 Completing the Installation of an IDE Drive 1 Make sure that all the IDE cable connections are secure 2 Turn on the display and then turn on the computer 3 The new drive is automatically detected and configured If you want to check this press the key while F2 Setup is displayed at the bottom of the screen...

Page 58: ...CI or a 16 bit ISA board maximum length 17 cm 6 7 inches Slot 4 the bottom slot can be used for a 16 bit ISA board maximum length 17 cm 6 7 inches Slot 5 the supplementary slot is under the power supply unit There is probably already a LAN board or a SCSI LAN board installed in this slot If not and there is no hard disk installed in the corresponding shelf refer to page 37 you can install a 32 bit...

Page 59: ... the operating system to see whether the operating system can automatically recognize and configure Plug and Play boards Configuring non Plug and Play ISA Accessory Boards If you install an ISA accessory board that is not Plug and Play you will need to configure the board before your PC Workstation can use it Refer to the documentation supplied with the operating system for details on your operati...

Page 60: ...Some boards may have preferred locations and special installation instructions detailed in their manuals 5 Remove the slot cover Store it in a safe place 6 Hold the board horizontally by its top edge Slide it into the board guide of the chosen slot Refer to diagram on facing page 7 Align the board s connector with the slot s socket and firmly press into the socket Do not bend the board Ensure the ...

Page 61: ...ous page Step 3 Unscrew the retaining bracket Step 5 Remove slot cover Step 6 Slide board into the slot Step 8 Replace the retaining bracket Ensure boards are correctly aligned Step 9 If necessary connect the accessory board s cable to the VESA connector on the system board mamdt bk mamdt2 fb4 Page 51 Tuesday August 5 1997 4 20 PM ...

Page 62: ...e display and computer and disconnect the power supply cords and any connection to a telecommunications network 2 Remove the computer s cover refer to page 27 3 Unscrew and remove the retaining bracket Put the screw to one side 4 Carefully remove the board from its connector holding the board at each end by its top edge Do not bend the board If you intend to replace the board later note which conn...

Page 63: ...tion has a slot at the rear for securing the cable 1 Insert the lock on the end of the cable into the slot located at the rear of the PC Workstation 2 Turn the key to lock the cable to the PC Workstation 3 Remove the key and store it in a safe place NOTE The Kensington security cable is not an HP accessory It cannot be ordered from HP Contact your reseller for more information mamdt bk mamdt2 fb4 ...

Page 64: ...mamdt bk mamdt2 fb4 Page 54 Tuesday August 5 1997 4 20 PM ...

Page 65: ...3 Troubleshooting Your PC Workstation This chapter can help you solve problems that you may encounter when using your PC Workstation mamdt bk mamdt3 fb4 Page 55 Tuesday August 5 1997 4 20 PM ...

Page 66: ... PC Workstation s current configuration To view the Summary Screen press just after your PC Workstation is turned on and while the PC Workstation s logo is displayed during the Power on Self Test POST Refer to page 87 for more information HP Diagnostics An HP Hardware Diagnostic utility is either preloaded on your hard disk drive or available on the World Wide Web With this utility you can diagnos...

Page 67: ...follow this procedure 1 Check external items 2 Check internal items 3 Rebuild your PC Workstation s components Check External Items Make sure the following external items are functioning properly Check that the power outlet is working Check that all cables and power cords are connected and firmly plugged in Check that the computer and display are turned on The power light should be illuminated Che...

Page 68: ... If the PC Workstation still does not start properly remove all accessory boards and other accessories except the hard disk drive If you have a SCSI based system do not remove the SCSI board from accessory board slot 5 refer to page 48 Start the PC Workstation If the PC Workstation now works add the boards and accessories one at a time to determine which one is causing the problem Action Reference...

Page 69: ...e PC Workstation appears to start successfully Press to accept validate the change and update the Setup program s configuration information Press to see more details about the message After viewing these details you are returned to the original POST display screen If the message is actually a change to the configuration you have made for example you have just removed some memory you can then press...

Page 70: ... Workstation has started A message is displayed similar to this Configuration has been cleared set switch Clear CMOS to the OPEN position before rebooting Turn off the PC Workstation disconnect the power cord and remove the cover e Set the system board switch 6 CMOS STATUS on the switch block to OPEN to re enable the configuration 2 Replace the cover and reconnect the power cord and all cables 3 T...

Page 71: ...e Power On Password item in the Setup program Security Administrator Password and to page 21 Check whether you are in a suspend sleep mode in which case a power off is not allowed refer to the Power menu in the Setup program Wake up the PC Workstation first and then shut it down If the PC Workstation is not locked and you have pressed the power on off button but without success press the button ag...

Page 72: ...ctioning correctly Diagnose hardware related problems Provide precise information to HP dedicated Support Agents so that they can solve any problems quickly and effectively To use the utility you must first install it and then ensure that it is ready for use Information on how to do this is given in the Vectra Hardware Diagnostics user s guide You can download a PDF version of this guide from the ...

Page 73: ...yed press to continue and then follow the on screen instructions to carry out the diagnostic tests The utility automatically detects the complete hardware configuration of your system before any tests are performed Basic System Tests To verify the correct operation of your system s hardware you need to carry out the Basic System Tests Advanced System Tests To perform more in depth testing of your ...

Page 74: ... during the Power On Self Test POST but goes blank when Windows starts your screen s refresh rate may be set too high To resolve the problem try one or more of the following steps You may be able to start your operating system in safe mode which allows you to change the display settings Refer to your operating system documentation for more information If your display is DDC compliant check that Vi...

Page 75: ... and mouse to be locked after a certain period of inactivity refer to the Autosoft Lock item in the Setup program Security User Password Check that the brightness and contrast controls are properly set Check that the display video cable is correctly connected Turn off the display and unplug it from the power outlet Disconnect the video cable and examine the video cable connector pins If the pins a...

Page 76: ...r Keyboard Does Not Work Check that the keyboard is correctly connected If when you turn on your PC Workstation the operating system boots the keyboard is correctly connected but your keyboard is still not available the power on password may be set to keyboard locked You need to enter a password to unlock the keyboard and mouse Refer to the Power On Password item in the Setup program Security Admi...

Page 77: ...properly by running another peripheral connected to the port Refer to the printer s manual for further help If Your Flexible Disk Drive Does Not Work Check that you are using a formatted diskette and it is inserted correctly Check that you are using a diskette of the correct density Check that the flexible disk drive is correctly configured in the Setup program Advanced Flexible Disk Drives Check ...

Page 78: ...rd Disk Activity Light Does Not Work If the hard disk activity light does not flicker when the PC Workstation is accessing the hard disk drive Check that the control panel connector is firmly attached to the system board Check that the disk power and data cables are correctly connected refer to page 35 If there is a Problem with Your CD ROM Drive WARNING Make sure that you disconnect the power cor...

Page 79: ...p program Security Hardware Protection Check the Boot Device Security settings in the Setup program Security Boot Devices Security Check that the Integrated Bus IDE Adapters item is set to Both in the Setup program Advanced IDE Devices For further information refer to the CD ROM documentation If the CD ROM Drive is Idle If the CD ROM drive does not appear to be working try accessing the disk by cl...

Page 80: ... CD ROM drive door is released opening slightly Carefully pull it open fully and retrieve the disk 4 To close the CD ROM drive door push it gently closed without forcing it The CD ROM drive door may not close completely until it is fully functional for example when the power comes back on 5 If required replace the CD ROM drive s front bezel If an Accessory Board Does Not Work Check that the access...

Page 81: ... password that you have forgotten 9 Press to save the new password and exit the Setup program If you forget the Administrator password 1 Turn off the PC Workstation and remove the cover 2 Set switch 7 on the system board switch block to CLOSED refer to page 86 3 Turn on the PC Workstation and allow it to complete its startup routine The message Passwords have been cleared power off your PC and set...

Page 82: ...s The time has changed to reflect the beginning or end of Summer Time The PC Workstation has been unplugged from the mains for too long and the battery is discharged The on board battery automatically recharges itself as soon as the PC Workstation is plugged into a power outlet again To change the date and time use your operating system utilities or the Setup program If You Can t Start the Setup P...

Page 83: ...driver Audio for Analog Devices SoundComm Driver Click this and then click Settings 4 Click the Enable Hardware Volume Control checkbox and then click OK to exit 5 Check that the HP Front Panel Volume Control is enabled by first double clicking the speaker symbol in the right corner of the taskbar Then select the Volume Control window and try to move the volume level If the volume level does not m...

Page 84: ...el Volume Control from the Main program group as follows 1 Open the Main program group and then double click the Control Panel 2 Double click the Drivers icon 3 In the Installed Drivers list select Analog Devices SoundComm Driver click Setup then click the Setting tab 4 Click the Enable Hardware Volume Control checkbox and then click OK to exit 5 Check that the HP Front Panel Volume Control is ena...

Page 85: ...to the dealer from whom you purchased your PC Workstation or to HP so that they can be either recycled or disposed of in an environmentally sound way Returned batteries will be accepted free of charge If the installed battery stops working you can install an external battery in the PC Workstation You can order this from your HP authorized reseller The battery is not covered by the HP Warranty Conn...

Page 86: ...mamdt bk mamdt3 fb4 Page 76 Tuesday August 5 1997 4 20 PM ...

Page 87: ...4 Technical Information mamdt4 fb4 Page 77 Tuesday August 5 1997 5 25 PM ...

Page 88: ...h fidelity with high end mixing capability and SigmaDelta converters Disk drive controller Two Master IDE channels on the PCI bus On some models Ultra SCSI 16 bit wide controller on a PCI board Rear connectors on system board Mini DIN mouse Mini DIN keyboard 25 pin parallel 15 pin VGA 9 pin serial buffered Two USB Stereo In jack 3 5 mm Stereo Out jack 3 5 mm Microphone In jack 3 5 mm 25 pin parall...

Page 89: ... speaker connector One external start connector One external battery connector SCSI accessory board some models One Ultra wide SCSI 16 bit connector One Ultra narrow SCSI 8 bit connector external Accessory slots Five accessory board slots seven connectors Two 32 bit PCI Peripheral Component Interconnect slots one slot slot 5 may be already occupied by a SCSI LAN or LAN board or there may be a hard...

Page 90: ...ation will lose its time settings within a few days Typical Power Consumption Availability for ISA Accessory Slots Typical Power Consumption Availability for PCI Accessory Slots There is a maximum per slot limit of 15 W between all supply rails 115V 60 Hz 230V 50Hz On idle no file transfer Windows 95 32W 35W On idle no file transfer Windows NT 4 0 45W 45W Sleep Suspend Mode Windows 95 25 5W 29W Of...

Page 91: ...d by PC Workstation IRQ0 system timer IRQ1 keyboard IRQ2 system cascade IRQ3 COM4 IRQ4 COM1 IRQ5 AD1816 or parallel port IRQ6 flexible disk drive controller IRQ7 LPT1 IRQ8 real time clock IRQ9 PCI or ISA or Ethernet adapter IRQ10 PCI or ISA or SCSI controller IRQ11 PCI or ISA or AD1816 IRQ12 mouse IRQ13 processor IRQ14 primary IDE controller IRQ15 secondary IDE controller DMAs used by PC Workstati...

Page 92: ...interrupt controller 00C0 00DF DMA controller 2 00F0 00FF Coprocessor error 0130 013F AD1816 sound system 0170 0177 IDE secondary channel 01F0 01F7 IDE primary channel 0220 0232 AD1816 Sound Blaster 0278 027F LPT 2 02E8 02EF Serial port 4 COM4 02F8 02FF Serial port 2 COM2 0372 0377 IDE secondary channel secondary flexible disk drive 0378 037A LPT1 0388 038B AD1816 Adlib FM 03B0 03DF VGA 03E8 03EF ...

Page 93: ...nd digitized sounds Output mixing of all audio sources to the LINE Out or integrated PC Workstation speaker Multiple source recording and Left Right channels swapping or mixing Line Input Input impedance 15 kohms Input range 0 to 2 Vpp Line Output Stereo output of 5 mW per channel with headphone speakers impedance 600 ohms Audio Front Panel Microphone input jack Stereo output jack Master volume co...

Page 94: ...display for details of the refresh rates supported by your display Resolution Minimum video memory required for these color scales Refresh rates1 256 colors 8 bits per pixel 64 K colors hi color 16 bits per pixel 16 7 M colors true color 24 bits per pixel 16 7 M colors true color 32 bits per pixel 640 480 2 MB 60 75 85 Hz 800 600 2 MB 60 75 85 Hz 1024 768 2 MB 4 MB i43 60 75 85 Hz 1280 1024 2 MB 4...

Page 95: ...ured AutoMatically HDD activity light on the control panel Transfer rates of up to 40 MB sec Board Characteristics PCI board dimensions 170 x 98 mm 6 69 x 3 85 inches Universal 32 bit card edge connector Feature Description LAN Controller AMD PCNET Fast chip RJ45 Connector 10BT 100TX autonegotiation Remote Boot Protocols integrated in System BIOS ExtStart Connector Connection to CPU board LAN remo...

Page 96: ...in Setup 7 Password Open enabled default Closed disabled clear User and Administrator passwords 8 Keyboard power on Open disabled Closed enabled default 9 Boot block Open idle default Closed recovery boot active 10 Reserved Do not use Processor Frequency Bus Frequency Switch 2 Switch 3 Switch 4 Switch 5 233 66 MHz Open Open Closed Closed 266 66 MHz Open Closed Open Open 300 66 MHz Open Closed Open...

Page 97: ... If the PC Workstation is already turned on save your data and exit all programs then restart the PC Workstation Consult your operating system documentation for any special instructions concerning turning off and then restarting your PC Workstation 2 While the PC Workstation s logo is displayed on your screen press This takes you to the HP Summary Screen To go immediately into the Setup program an...

Page 98: ...RKSTATION XA 6 xxx Copyright 1997 Hewlett Packard 3 0 BIOS Version HC 08 xx PC Serial Number FR74011111 CPU Date Code N A LAN Mac Address 00 60 B0 5D C9 2D System RAM 64MB Processor Type Pentium II Bank A 64MB COM1 3F8H Bank B None COM2 None Bank C None COM3 None Bank D Not available COM4 None System Cache 512 KB Synchronous LPT1 378H Video Device Cirrus Logic LPT2 None 1st IDE Device CD ROM LPT3 ...

Page 99: ...to the one shown below Note that Main is initially highlighted NOTE In addition to the Exit menu you can also use the key to save your settings and exit the Setup program P h o e n i x B I O S S e t u p U t i l i t y Main Advanced Security Boot Power Exit Item Specific Help Operating System PnP OS Reset Configuration Data No System Time System Date 13 06 48 11 13 1997 Key click Disabled Keyboard a...

Page 100: ...ms or allows you to exit from a sub menu The and arrows select menus from the menu bar loads factory installed default values restores previous values from CMOS or displays the general help screen exits from the general help screen Use the key to save your settings and exit Setup Pressing the or arrow keys while you are on a main menu screen takes you to the next menu option If however you are on ...

Page 101: ...am To save changes and exit the Setup Program 1 Press one or more times to enter the Exit menu 2 Choose Exit Saving Changes and then Yes to save your changes and exit the Setup program The PC Workstation automatically restarts If you have set a User Password the PC Workstation displays the power on prompt Enter the User Password to use the PC Workstation mamdt4 fb4 Page 91 Tuesday August 5 1997 5 ...

Page 102: ...g up your network refer to the online Network Administrator s Guide which comes with your PC Workstation Network Setup Items1 Location in Setup Enable the integrated network interface Integrated Network Interface submenu Advanced menu Enable your PC Workstation to be started booted and logged on from the network Boot Device Security submenu Security menu From Suspend Wakeup mode enable your PC Wor...

Page 103: ...tion from booting if the network or server ever fails a Press to go to the Start From Floppy line Press or to change the option to Disabled b Press to go to the Start From IDE CD ROM line Press or to change the option to Disabled c Press to go to the Start From HDD line Press or to change the option to Disabled Selecting the Boot Device Priority You can determine the order in which your PC Worksta...

Page 104: ... You Can Change The following two tables show the configuration settings you can change The first table shows the global settings which impact your host adapter and all SCSI devices connected to it Be very careful if you change any of these settings The second table shows the device settings which apply to individual devices Settings for the Host Adapter and All Devices Default Settings SCAM Suppo...

Page 105: ... your screen may be different from those shown below Use the and keys and the key or just press the corresponding key B C D etc to make a selection from this menu You can only select an adapter if the current status is On Changes are possible only if NVRAM non volatile memory on your adapter is present Symbios Logic SCSI Configuration Utility Version 1 07 MAIN MENU Port Irq Status NvRAM Num Level ...

Page 106: ... a change When you select this option the Change Status on Next Boot menu is displayed To toggle an adapter s status on or off from the Change Status on Next Boot menu select it and press When you are satisfied with your selections press to exit this menu D Display Mode This option determines how much information about your host adapter s and SCSI devices is displayed on the screen during the PC W...

Page 107: ...ections This option lets you view and change settings for the devices attached to the selected adapter After you have made changes to the configuration of a host adapter or to any connected SCSI device you will return to this menu Symbios Logic SCSI Configuration Utility Version 1 07 1 SYM53C875 Utilities A Adapter Setup D Device Selections F1 Help ESC Exit this menu Use arrow keys to select from ...

Page 108: ...ost adapters always generate parity but some SCSI devices do not For this reason you can disable parity checking NOTE When disabling parity checking you may have to disable disconnects for certain devices as parity checking for the reselection phase is not disabled If a device does not generate parity and it disconnects the I O never completes because the reselection never completes Symbios Logic ...

Page 109: ...tions from the Adapter Utilities menu the Device Selections menu is displayed This menu provides information about individual SCSI devices attached to the selected host adapter and the adapter itself To make changes to these settings select a device from the list and press to display the individual Device Setup menu Symbios Logic SCSI Configuration Utility Version 1 07 1 SYM53C875 Device Selection...

Page 110: ...ple for a Fast SCSI device you would select 10 MB sec W Width bits This option lets you set the width in bits for the device The choices are 8 or 16 For example if the device is an external SCSI device you would set the width to 8 bits Symbios Logic SCSI Configuration Utility Version 1 00 1 SYM53C875 Dev0 N A Setup R Sync Rate Mega Bytes sec 40 MB sec W Width bits 16 D Disconnect On T Read Write I...

Page 111: ...can for Device at Boot Time This option lets you specify whether the device is scanned for at boot time The choices are Yes or No L Scan for SCSI LUNS More advanced SCSI devices can have several logical units LUNs This option lets you specify whether SCSI LUNs are scanned for at boot time The choices are Yes or No Q Queue Tags This option lets you specify whether queue tags are enabled or disabled...

Page 112: ...mamdt4 fb4 Page 102 Tuesday August 5 1997 5 25 PM ...

Page 113: ...5 Hewlett Packard Support and Information Services mamdt bk mamdt5 fb4 Page 103 Tuesday August 5 1997 4 20 PM ...

Page 114: ...ted below HP Authorized Reseller HP SupportPack HP Support Assistant CD ROM HP Information Services HP Support Services Technical phone support Lifeline phone support Network phone in support NOTE When calling any of the international telephone numbers listed in this chapter replace the with your international telephone access code Service Means of Access HP Forum on CompuServe Modem HP Forum on A...

Page 115: ...o your specific needs regarding product development or custom installations as can third party support services or the HP Customer Support organization in your country HP SupportPack Hewlett Packard s three year SupportPack is available from your local reseller It must be purchased within 30 days of purchasing your HP PC Workstation The concept of SupportPack is simple It allows you to extend your...

Page 116: ...vice manuals Installation and configuration information Troubleshooting information Technical reference manuals Subscriptions to HP Support Assistant can be obtained with an order form which is available from the HP FIRST Faxback system Request document number 9025 US and Asia Pacific or 19025 Europe Subscriptions can also be obtained by contacting the following numbers Region Phone Number Fax Num...

Page 117: ...ation and HP products You can also download the latest versions of drivers BIOS and software utilities for HP PC Workstations As a preferred Hewlett Packard customer you are invited to join CompuServe at no initial charge For the United States and the United Kingdom call the number shown below and ask for representative 51 For all other locations first call the worldwide number to obtain the numbe...

Page 118: ...ess the HP Forum select Keyword Search from the menu type HP press This will load the HP Home Page directly onto your screen In the HP Forum you can ask and answer questions about HP products and you can also download drivers software application notes or utilities for HP products Membership information can be obtained by calling 1 800 827 6364 then giving the preferred customer number 1118 mamdt ...

Page 119: ...ide Web site gives you access to information about HP its products including product data sheets service and support information electronic newsletters and technical tips You can also download the latest versions of drivers BIOS and software utilities The Access Guide Directory guides you through the information and services available Country Number Baud Rate United States 1 208 344 1691 300 1200 ...

Page 120: ...ckard electronic services is provided in document 9020 HP Audio Tips USA only HP Automated Support Directory HP Audio Tips is an automated system containing recordings which can direct you to Hewlett Packard support services Live support is not available through this service Dial 1 800 333 1917 and press 3 to access HP Audio Tips Country Region Number Access Method United States 1 800 333 1917 Pho...

Page 121: ...up to date list of drivers North and Latin America Europe Phone 1 970 339 7009 Monday Saturday 24 hours per day Phone 44 1429 865511 Monday Friday 8 30 a m 6 00 p m Central European Time Fax 1 970 330 7655 Fax 44 1429 866000 Mail US Driver Fulfillment for Hewlett Packard PO Box 1754 Greeley Colorado 80632 USA Mail European Fulfillment for Hewlett Packard c o StarPak International Ltd Hartlepool Cl...

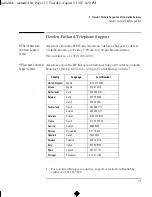
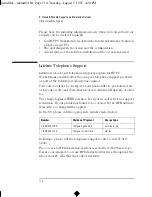
Page 122: ... the basic configuration and setup of your HP PC Workstation and for the bundled or preloaded operating system Lifeline Telephone support is available during the second and third years of hardware warranty via the Lifeline program which is a fee based service HP does NOT provide support for HP PC Workstations configured as network servers We recommend HP NetServers for your network server requirem...

Page 123: ...to 6 00 pm Central European time 1 1 For non listed European countries support is available in English by calling 44 171 512 5202 Country Language Local Number United Kingdom English 0171 512 5202 Ireland English 01 662 5525 Netherlands Dutch 020 606 8751 Belgium Dutch 02 626 8806 French 02 626 8807 Switzerland French 084 880 1111 German 084 880 1111 Germany German 0180 525 8143 France French 01 4...

Page 124: ... either be charged to your phone bill at a per minute rate or to your credit card Visa Mastercard or American Express at a flat fee The charge begins AFTER you have been put in contact with a support technician If your problem is found to be covered by the HP Hardware Warranty no charge will be applied In the US please call the appropriate number listed below In Europe please call the telephone su...

Page 125: ...h leading Network Operating Systems and Network manufacturers Support your HP and non HP products with a single telephone call Increase network uptime You can purchase the HP NPS service as an annual contract billable in advance annually bi annually quarterly or at an hourly rate This contract service provides unlimited toll free access to HP Response Center Engineers RCEs To obtain an HP NPS cont...

Page 126: ...N A Annual subscription Anytime HP Electronic services Technicalinformation drivers utilities tools and diagnostics Anytime 24 hour access No charge Anytime HP BBS WWW CompuServe America Online Technical Phone support Basic assistance for PC setup configuration start up and hardware diagnosis First year Business hours No charge At time of purchase HP Lifeline phone support Basic assistance for PC ...

Page 127: ...F Peregrine Tower Lipp Centre 89 Queensway Central Hong Kong Hewlett Packard LATIN AMERICA Prolongación Reforma No 700 Col Lomas de Santa Fe Del Alvaro Obregón México 01210 Mexico D F EUROPE European Operations Hdqtrs Hewlett Packard S A 150 route du Nant d Avril P O Box 1217 Meyrin 2 Geneva Switzerland USA Intercon Operations Hdqtrs Hewlett Packard Company 3495 Deer Creek Road P O Box 10495 Palo ...

Page 128: ...mamdt bk mamdt5 fb4 Page 118 Tuesday August 5 1997 4 20 PM ...

Page 129: ... A mass storage device that uses compact disc technology to read data on CDs and write data to CDs CMOS memory An area of your computer s memory whose contents are preserved when you turn off the computer CMOS memory stores information that must be maintained such as your computer s configuration controller A device that enables another device such as a hard disk to communicate with the computer d...

Page 130: ...mputer is running as an unattended network server Pentium II MMX A Pentium processor with an extended instruction set specifically geared towards multimedia processing functions such as video 3 D and sound pixel Picture element The smallest addressable spot on the screen POST Power On Self Test A series of tests your computer performs when you switch the computer on RAM Random Access Memory This m...

Page 131: ... Single In line Memory Module 32 bit data path A small board containing several RAM chips terminator A resistor at the end of a SCSI cable that prevents the signal from reflecting back along the cable video controller A chip or expansion card which converts signals in the computer into displayable signals video RAM Memory that enables or speeds up drawing to the screen or increases resolution or c...

Page 132: ...mamdt bk glossary fb4 Page 122 Tuesday August 5 1997 4 20 PM ...

Page 133: ...t 72 display connecting 3 problems with 57 64 drivers obtaining via HP BBS 109 obtaining via World Wide Web 109 ordering by mail 111 E enhanced keyboard 18 F features PC Workstation 78 flexible disk drive problems with 67 using 17 G glossary 119 H hard disk activity light 13 hard disk drives installing 3 5 inch drive 37 40 installing 5 25 inch drive 40 installing in bottom rear shelf 40 installing...

Page 134: ... using 23 power on status light 13 power on off button 12 power supply unit removing 29 replacing 30 printer connecting 3 problems 67 problems accessory board 70 application software 72 audio 73 battery 75 CD ROM drive 68 date and time are incorrect 72 display 64 display is blank 57 flexible disk drive 67 hard disk drive 68 keyboard 66 mouse 66 password forgotten 71 PC Workstation does not start p...

Page 135: ... Wide Web site 109 USB connector 3 using flexible disk drive 17 V VESA connector 50 video memory installing 33 video resolutions available 84 volume control does not work 73 volume key keyboard 20 W World Wide Web access to HP 109 Z Zip drive installing 43 mamdt bk mamdt ix Page 125 Tuesday August 5 1997 4 20 PM ...

Page 136: ...mamdt bk mamdt ix Page 126 Tuesday August 5 1997 4 20 PM ...

Page 137: ...Regulatory Information and Warranty mamdt bk bckmttr fb4 Page 127 Tuesday August 5 1997 4 20 PM ...

Page 138: ... A1 A2 A3 EMC CISPR 22 1993 EN 55022 1994 Class B EN 50082 1 1992 IEC 801 2 1992 prEN 55024 2 1992 4 kV CD 8 kV AD IEC 801 3 1984 prEN 55024 3 1991 3 V m IEC 801 4 1988 prEN 55024 4 1992 0 5 kV Signal Lines 1 kV Power Lines IEC 555 2 1982 A1 1985 EN 60555 2 1987 IEC 1000 3 3 1994 EN 61000 3 3 1995 Supplementary information The product herewith complies with the requirements of the EMC Directive 89...

Page 139: ...ve the PC s cover without first removing the power cord and any connection to a telecommunication network Always replace the cover before switching on again Si le cordon secteur n est pas livré avec votre ordinateur utiliser un cordon secteur en accord avec votre code electrique national USA utiliser un cordon secteur UL listed de type SVT Canada utiliser un cordon secteur certifié CSA Pour votre ...

Page 140: ...sgefahr Zu ihrer eigenen Sicherheit sollten Sie nicht versuchen die Batterie wiederaufzuladen zu zerlegen oder die alte Batterie zu verbrennen Tauschen Sie die Batterie nur gegen den gleichen oder ähnlichen Typ aus der vom Hersteller empfohlen wird Bei der in diesem PC intergrierten Batterie handeltes sich um eine Lithium Batterie die keine Schwermetalle enthält Batterien und Akkumulatoren gehören...

Page 141: ...nce Limitation of Liability and Remedies THE REMEDIES PROVIDED ABOVE ARE THE CUSTOMER S SOLE AND EXCLUSIVE REMEDIES IN NO EVENT SHALL HP BE LIABLE FOR ANY DIRECT INDIRECT SPECIAL INCIDENTAL OR CONSEQUENTIAL DAMAGES WHETHER BASED ON WARRANTY CONTRACT TORT OR ANY OTHER LEGAL THEORY The foregoing limitation of liability shall not apply in the event that any HP product sold hereunder is determined by ...

Page 142: ...tracts which provide after hour or weekend coverage faster response time or service in an Excluded Travel Area are often available from HP an authorized dealer or authorized distributor at additional charge Customer Responsibilities The customer may be required to run HP supplied diagnostic programs before an on site visit or replacement part will be dispatched The customer is responsible for the ...

Page 143: ...software other than ownership of the physical media Customer acknowledges and agrees that the software is copyrighted and protected under the copyright laws Customer acknowledges and agrees that the software may have been developed by a third party software supplier named in the copyright notices included with the software who shall be authorized to hold the Customer responsible for any copyright ...

Page 144: ...e defective during the warranty period Customer s remedy shall be to return the media to HP for replacement Should HP be unable to replace the media within a reasonable amount of time Customer s alternate remedy shall be a refund of the purchase price upon return of the product and destruction of all other non removable media copies of the software product Notice of Warranty Claims Customer must n...

Page 145: ...e temperature 40 ºC to 70º 40 ºF to 158 ºF Storage humidity 8 to 80 relative non condensing at 40 ºC 104 ºF Operating temperature 5 ºC to 40 ºC 41 ºF to 104 ºF Operating humidity 15 to 80 relative Power supply Input voltage 100 127 200 240V Input frequency 50 60 Hz Maximum output power 120W continuous Acoustic noise emission Sound power Sound pressure as defined ISO 7779 LwA 42 db LpA 37 db mamdt ...

Page 146: ...installing accessories HP Help Start Help Contents Operating System Online Help Start Help Contents Operating System User s Guide HP User s Guide Installing Accessories in Your PC Workstation HP User s Guide Setting Up and Using Your PC Workstation Find out about the different support options available and how to troubleshoot your HP Kayak XA PC Workstation HP Help Start Help Contents HP User s Gu...

Page 147: ...HP Kayak XA PC Workstation User s Guide D4790 90001 mamdt bk mamdtsp fb4 Page 137 Tuesday August 5 1997 4 20 PM ...

Page 148: ...mamdt bk mamdtsp fb4 Page 138 Tuesday August 5 1997 4 20 PM ...

Reviews: