509
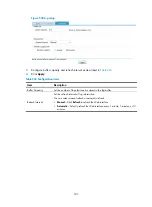
To customize the background image, click
Browse
, locate the image you want to use, and click
Upload
.
To remove the customized background image, click
Clear
.
Managing WiNet
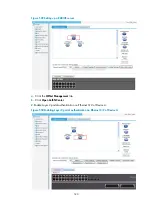
To manage WiNet members, make sure the port that connects your host to the administrator permits
packets of the management VLAN. Select
WiNet
from the navigation tree to enter the default
WiNet
Management
page.
Figure 533
WiNet management page
On the
WiNet Management
page, you can perform these operations:
1.
Set the refresh period for automatic refreshing of the WiNet topology diagram. Or you can select
Manual
for
Refresh Period
and click
Refresh
to display the latest WiNet topology diagram.
2.
Click
Collect Topology
.
After that the administrator starts to collect topology information. Note that, in addition to manual
topology collection, the system automatically collects topology information every minute.
3.
Click
Network
Snapshot
to save the current WiNet topology as the baseline topology. The
baseline topology is used to show changes in network topology at different time points.
4.
Click
Initialize Topology
to clear the stored baseline topology and cookies.
5.
Click
Open AuthN Center
to configure a RADIUS server for security authentication on the
administrator device. The administrator device automatically generates a guest user
guest
and its
password and updates the user and password at 24:00.
Summary of Contents for MSR SERIES
Page 17: ...xv Documents 835 Websites 835 Conventions 836 Index 838 ...
Page 20: ...3 Figure 3 Initial page of the Web interface ...
Page 42: ...25 Figure 13 Firefox Web browser setting ...
Page 59: ...42 Figure 27 Checking the basic service configuration ...
Page 73: ...56 Figure 35 Sample interface statistics ...
Page 156: ...139 Figure 139 Rebooting the 3G modem ...
Page 168: ...151 Figure 152 Configuring Web server 2 ...
Page 174: ...157 Figure 158 Configure the URL filtering function ...
Page 242: ...225 Figure 233 Enabling the DHCP client on interface Ethernet 0 1 ...
Page 247: ...230 Figure 236 The page for configuring an advanced IPv4 ACL ...
Page 255: ...238 Figure 241 Advanced limit setting ...
Page 298: ...281 e Click Apply 2 Configure Router B in the same way Router A is configured ...
Page 400: ...383 Figure 387 Verifying the configuration ...
Page 405: ...388 ...
Page 523: ...506 Figure 530 Ping configuration page ...
Page 775: ...758 Figure 785 Configuring a jump node ...


