261
Configuring RIPng basic functions
This section presents the information to configure the basic RIPng features.
You must enable RIPng first before configuring other tasks, but it is not necessary for RIPng-related
interface configurations, such as assigning an IPv6 address.
Before you configure RIPng basic functions, complete the following tasks:
•
Enable IPv6 packet forwarding.
•
Configure an IP address for each interface, and make sure that all neighboring nodes can reach
each other.
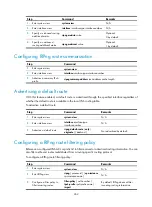
To configure the basic RIPng functions:
Step Command
Remarks
1.
Enter system view.
system-view
N/A
2.
Create a RIPng process and
enter RIPng view.
ripng
[
process-id
] [
vpn-instance
vpn-instance-name
]
Not created by default.
3.
Return to system view.
quit
N/A
4.
Enter interface view.
interface
interface-type
interface-number
N/A
5.
Enable RIPng on the interface.
ripng
process-id
enable
Disabled by default.
If RIPng is not enabled on an
interface, the interface will not
send or receive a RIPng route.
Configuring RIPng route control
Before you configure RIPng, complete the following tasks:
•
Configure an IPv6 address on each interface, and make sure that all neighboring nodes can reach
each other.
•
Configure RIPng basic functions.
•
Define an IPv6 ACL before using it for route filtering. For related information, see
ACL and QoS
Configuration Guide
.
•
Define an IPv6 address prefix list before using it for route filtering. For related information, see
"
."
Configuring an additional routing metric
An additional routing metric can be added to the metric of an inbound or outbound RIP route.
The outbound additional metric is added to the metric of a sent route. The route’s metric in the routing
table is not changed.
The inbound additional metric is added to the metric of a received route before the route is added into
the routing table, so the route’s metric is changed.
To configure an inbound or outbound additional routing metric:


