background image

Chapter 9

Configuring the NetServer Using the HP NetServer Navigator CD-ROM

57

You can also download the TopTools software and documentation from
the NetServer Web Site at

http://www.hp.com/go/netserver_mgmt

pcANYWHERE32

pcANYWHERE32 is remote-control graphics-redirection software from
Symantec Corporation included with your HP NetServer (on the 

HP NetServer

Navigator CD-ROM

) that allows you to take control of Microsoft Windows NT

servers across the network or over a modem. Refer to the

 HP NetServer Online

Documentation CD-ROM

 for details.

NetServer Utilities

NetServer Utilities displays a menu where you can directly execute utilities, such
as the following (only utilities supported on your system will be available):

Diskette Library: Allows you to conveniently generate any flexible diskette
available on the 

HP NetServer Navigator CD-ROM

. For example, you can

create the following diskettes: BIOS Update, and NOS Drivers.

Print or View Information: Allows you to print or view the current system
configuration, including details of which boards are detected in the system
and which resources are allocated to the boards.


System BIOS Update Utility: Allows you to update the BIOS of your
NetServer. Depending upon the language selected in User Preferences, it
will also update the system language of your HP NetServer E 60.

Another utility, 

DiagTools

, provides an easy-to-use hardware diagnostic for

system verification, burn-in, and rapid troubleshooting. It must first be copied to
diskette and then executed from the diskette.

User Preferences

User Preferences lets you change the language and the system date and time. You
can also change the system language displayed by the HP NetServer E 60 BIOS.

Summary of Contents for NetServer E60

Page 1: ...Online Version B Updated May 1999 HP NetServer E 60 Installation Guide ...

Page 2: ...Packard Company Adaptec is a registered trademark of Adaptec Inc ATI is a registered trademark of ATI Technologies Inc Intel and Pentium are registered trademark of Intel Corporation Microsoft Windows NT Windows 95 and Windows 2000 are registered trademarks of Microsoft in the U S and other countries Torx is a registered trademark of CamCar Textron Inc Novell and NetWare are registered trademarks ...

Page 3: ...ls Required 15 Removing the Cover 15 Replacing the Cover 17 Adjusting the System Feet 18 4 Installing Mass Storage Devices 19 Introduction 19 Boot Priority 19 Installing Mass Storage Devices 20 Embedded SCSI Controller Configuration 21 Tools Required 21 Installing Hard Disk Drives 21 Installing the Optional HP NetServer E 60 Duplexing Cable Kit 26 Installing the Optional HP NetServer E 60 External...

Page 4: ...e the Processor Module 42 Install the Processor Module 42 Upgrading the Firmware 44 Reinstalling the NOS 44 Removing a Processor Module 45 8 Connecting the Monitor Keyboard Mouse and UPS 47 9 Configuring the Server Using the HP NetServer Navigator CD ROM 49 Contents of the HP NetServer Navigator CD ROM 49 Obtaining NetServer Product History 49 Readme File 50 Viewing the Readme File 50 Configuratio...

Page 5: ...nd Play Boards 65 Configuring an ISA Non Plug and Play Board 65 Enabling the Remote Console Feature 67 About the Remote Console Feature 68 Using the SCSI Select Utility 69 Configure View Host Adapter Setting 69 SCSI Disk Utilities 70 12 Troubleshooting 71 Troubleshooting Tools 71 Common Installation Problems 71 If the System Will Not Power On 72 Troubleshooting Sequence 72 Error Messages 73 No Err...

Page 6: ...munications Commission 87 Notice for Canada Industry Canada 88 Notice for Japan 89 Notice for Korea 90 Notice for Taiwan Class A Warning Statement 91 Notice for European Union 91 Notice for the United Kingdom General Approval 91 Declaration of Conformity US EU Australia 92 Regulatory Notices Product Safety 93 CD ROM Electrical Safety Statement 93 Laser Safety Statements 93 Batteries 95 Noise Decla...

Page 7: ...propriate lifting precautions when you move it Verify Contents Unpack the contents of the shipping box Verify the contents of the shipping box against the Contents list included with your HP NetServer E 60 If anything is missing or damaged call your reseller Save Packaging Store the empty boxes and packing material in a safe place This is especially important if you plan to ship the HP NetServer E...

Page 8: ...ched to the inside of the E 60 Installation Options WARNING Before removing the cover always disconnect the power cord and unplug telephone cables Disconnect the power cord to avoid exposure to high energy levels that may cause burns when parts are short circuited by metal objects such as tools or jewelry Disconnect telephone cables to avoid exposure to shock hazard from telephone ringing voltages...

Page 9: ...isk Drives For details see Chapter 4 Installing Mass Storage Devices An optional external SCSI port cable kit is available to extend one of the system s embedded SCSI ports to the rear of the system Add Memory Use HP DIMMs only Supported DIMMs may be installed in any combination in any sockets For details see Chapter 5 Installing Additional Memory ...

Page 10: ...he HP NetServer E 60 supports either Pentium II or Pentium III processors Do not mix Pentium II and Pentium III processors in the system Do not mix processors with different clock speeds in the system For details see Chapter 7 Installing a Second Processor Replace the Cover Be sure cables are properly routed and all components are fully seated For details see Chapter 3 Removing and Replacing the S...

Page 11: ...the HP Navigator starts you can set the time and date and change the display language For details see Chapter 9 Configuring the Server Using the HP NetServer Navigator CD ROM 3 Read the System Readme File Select View Readme from the HP Navigator main menu The Readme file contains the latest information to help you install your HP NetServer 4 Run Configuration Installation Assistant If you want to ...

Page 12: ...card or a third party card install the NOS manually 7 Read Configuration Advisor Configuration Advisor will appear It provides information on optimizing hardware configuration and resource settings It includes notes on specific operating systems 8 Configure Disk Array If you ve installed an optional HP NetRAID 3Si disk array controller accessory select Execute on the Configure Disk Array screen to...

Page 13: ... Remote Console feature and other server management options 12 Install Information Assistant Optional Information Assistant is an online documentation viewer that will help you support your HP NetServer It includes all system documentation It may be run from any PC running Windows The software is installed from the HP NetServer Online Documentation CD ROM included with your system Insert this CD i...

Page 14: ......

Page 15: ...lation familiarize yourself with the HP NetServer E 60 s switches and LED Light Emitting Diode indicators The connections switches indicators ports and the user serviceable internal components of the NetServer E 60 are shown in Figure 2 1 Figure 2 1 Front Panel ...

Page 16: ...r certain types of LAN activity the system will become fully operational The prerequisite here is that the operating system must support power management based on the ACPI Advanced Configuration and Power Interface standard For example Microsoft Windows 98 and 2000 allow the function of the button to be configured via a user interface The power button also has the capability to unconditionally pow...

Page 17: ...tandard serial port The Parallel Port is a standard parallel port which supports Extended Capabilities Port ECP Enhanced Parallel Port EPP The Mouse Port accepts a standard mouse with a PS 2 connector The Keyboard Port accepts a standard keyboard with a PS 2 connector The Monitor Port interface specifications are listed in the Video Display Modes section of Appendix A The Power Connector accepts a...

Page 18: ...Chapter 2 Controls Indicators and Ports 12 Key Lock External SCSI Port Knock out Video SVGA Power Keyboard Mouse Serial Port A Parallel Port Serial Port B LAN RJ45 Figure 2 2 Rear Panel and Ports ...

Page 19: ...nitor connected to the E 60 before you power on the E 60 This allows proper auto configuration of video output of the E 60 as it boots up When you press the power button on the control panel the E 60 powers up and loads the operating system The system runs a set of Power On Self Tests POST during this process For details refer to Chapter 12 Troubleshooting Power Down Procedure 1 Log off all users ...

Page 20: ...r switch on the HP NetServer s control panel when prompted by the operating system Normally this is the complete procedure NOTE The power supply will continue to provide standby current to the NetServer until the power cable is disconnected from the rear panel ...

Page 21: ...s Required To remove and replace the cover you will need a Torx 15 driver or inch flat blade screw driver Removing the Cover To remove the cover follow these steps NOTE These steps do not include the removal of the front bezel of the system You do not need to remove the front bezel of the HP NetServer E 60 to install internal accessories such as memory or mass storage 1 Turn off the NetServer and ...

Page 22: ...ews Figure 3 1 Screws and Lock Holding on Cover 4 Remove the NetServer cover Place your hands near the bottom front of the cover one along each side Pull the cover slightly back to release it and then lift up and off the chassis see Figure 3 2 Figure 3 2 Removing the Cover ...

Page 23: ...and on either side of the cover and press inward lightly while lowering the cover onto the chassis The cover has flanges that rest on the rails inside the chassis see Figure 3 3 Bottom of Chassis Front of Chassis Figure 3 3 Replacing the Cover 3 Push the cover forward until it is seated in place 4 Replace the six 6 Torx 15 slotted screws in the rear see Figure 3 1 5 Relock the cover ...

Page 24: ...e System Cover 18 Adjusting the System Feet When adding internal accessories to the system turn the feet inward so that the system will lay flat on its side on the floor Figure 3 4 Turn Feet Inward before Laying the NetServer on Its Side ...

Page 25: ...pe drive The embedded dual channel Ultra Wide PCI SCSI controller includes SCSI channels A and B Channel A is used for cabling the factory installed hard disk drive and up to four additional SCSI drives including an optional tape drive Channel B may be used in a duplexing arrangement or to accommodate an external mass storage solution either require an additional cable kit Duplexing requires that ...

Page 26: ... installed CD ROM drive in shelf 2 Primary Ultra Wide SCSI Channel A up to 5 Optional Tape Drive in shelf 3 address ID 4 Factory installed Hard Disk in shelf 4 address ID 0 Embedded SCSI controller address ID 7 Ultra Wide SCSI Channel B up to 7 Embedded SCSI controller address ID 7 The primary connector is cabled to the factory installed CD ROM drive A secondary connector is available but requires...

Page 27: ... high voltage differential HVD SCSI devices on the embedded SCSI bus or you will damage the devices Tools Required To secure the hard disk drives in the hard disk drive cage you will need a Torx 15 driver or inch flat blade screw driver Check your device s documentation for additional tool requirements Installing Hard Disk Drives 1 If the system is already installed and working gracefully power do...

Page 28: ... duct and move it out of the way see Figure 4 1 Figure 4 1 Moving the Air Duct 5 Loosen three captive screws on the mass storage cage see Figure 4 2 6 Unplug the power and SCSI cables to any hard disk drives already in the cage CAUTION Install and remove connectors carefully and avoid displacing any the pins ...

Page 29: ...nternal damage to the mass storage device Damage caused by incorrect mounting screws is not covered by the HP warranty 8 Slide the drive into the cage opening with the cable connectors toward the rear of the system see Figure 4 3 Align the screw holes on the drive or the shelf or brackets with the screw holes in the hard disk drive cage NOTE If the hard disk drive you are planning to install alrea...

Page 30: ...nstall the screws that secure the drive or the shelf or the brackets to the mass storage cage First attach one of the screws through the round screw hole at the rear of the cage then through the elongated hole at the front of the cage Repeat on the other side of the cage see Figure 4 4 ...

Page 31: ... hard disk drive positions in the hard disk drive cage The end connector is intended for the optional tape drive 12 Connect the power cable to the drives The power cable is split into two cables each with three power connectors The designed distribution is One string of three CD ROM optional tape drive top hard disk drive Second string of three lower three hard disk drives If a power connector has...

Page 32: ... drives be installed in the hard disk drive cage and a second SCSI cable HP NetServer E 60 SCSI Duplex Cable Kit P N D8212A To cable the duplex configuration refer to the figure below Figure 4 5 Duplex and Non Duplex Cabling Installing the Optional HP NetServer E 60 External SCSI Cable Kit The E 60 can be configured to extend one of its SCSI channels typically channel B to an external connector Th...

Page 33: ...Card on the chassis for location 2 Using a flat blade screwdriver pop out the external SCSI knock out at the rear of the system see Figure 4 7 for location 3 Thread the cable from the SCSI channel B connector between the processor cage and the factory installed AGP Video board to the cutout at the rear of the chassis see Figure 4 6 Figure 4 6 Threading External SCSI Cable ...

Page 34: ...age Devices 28 4 Install the external connector end of the cable to the rear where the knockout was removed and insert the two threaded studs from the outside see Figure 4 7 Figure 4 7 Connecting the Cable to the Rear of the System ...

Page 35: ...IMMs may be installed in any combination in any socket However HP recommends starting at socket 0 and filling the sockets in order 1 2 and 3 Use only HP DIMMs For availability of DIMM upgrade kits for the NetServer E 60 check the web site at http www hp com netserver products accessories Installing Additional DIMMs 1 If the system is already installed and working gracefully power down the system a...

Page 36: ... handling Do the following when handling the accessory kit Leave the memory module in the anti static container until you are ready to install it Use an anti static wrist strap and a grounding mat Before you remove a memory module from the anti static container touch a grounded unpainted metal surface on the HP NetServer E 60 to discharge static electricity 6 Locate the DIMM sockets see Figure 5 1...

Page 37: ...alled in any combination in any socket CAUTION Use only HP DIMMs c Spread the two retaining clips on the socket outward d Align the notches on the DIMM with the keys on the socket see Figure 5 2 Retaining Clips DIMM Keys Notches Figure 5 2 DIMM to Socket Alignment e Holding the DIMM at 90 degrees to the system board press the DIMM fully into the socket until the retaining clips close see Figure 5 ...

Page 38: ...es and checking that it remains in continuous contact with all of the DIMMs Removing DIMMs You may need to remove a DIMM module to downsize your memory configuration or to replace a defective DIMM 1 If the system is already installed and working gracefully power down the system as described in Chapter 2 2 Disconnect the power cables and all external cables and if necessary label them to support re...

Page 39: ...Remove the top cover from the NetServer See Chapter 3 for details 4 Open the retaining clips 5 Lift the DIMM completely away from the socket 6 Place the DIMM in its anti static container 7 Repeat steps 4 6 for as many DIMMs as you need to remove ...

Page 40: ......

Page 41: ...wrist strap Installation Basics For every accessory board you install the system needs to set aside available resources to support it An accessory board typically requires resources such as an IRQ Interrupt Request and port address When installing PCI accessories the system uses their Plug and Play feature to correctly assign these resources automatically In the case of some ISA cards you may need...

Page 42: ...d SCSI and slot 3 Embedded LAN and slot 4 NOTE The AGP Video board shipped with the NetServer E 60 has the interrupt jumper disabled The performance of some video intensive operations such as 3D rendering can be improved by enabling this jumper on the video board You should also be aware that the AGP slot on the system board is physically connected to PCI Interrupt A shared with slots 1 and 5 Usin...

Page 43: ...y s drives This boot order can be changed under the Configuration menu of the server s BIOS Setup utility under Boot Device Ordering Hard Drive Priority Bootable Cards Installing Accessory Boards To install an accessory board 1 If the system is already installed and working gracefully power down the system as described in Chapter 2 2 Disconnect the power cables and any external cables connected to...

Page 44: ...ing Mass Storage Devices and see the subsection Boot Priority 6 Identify the accessory slot number to be used Note that Slot 6 closest to the edge is a shared slot for ISA and PCI This means that you may only use one of these slots at a time see Figure 6 1 Slot 1 PCI Slot 3 Full length PCI Slot 4 Full length PCI Slot 6 Full length PCI or ISA Slot 5 Full length PCI Slot 2 PCI Figure 6 1 Accessory S...

Page 45: ... Use the T15 driver or flat blade screw driver to remove the PCI slot cover for each slot to be used and store it for future use see Figure 6 2 Figure 6 2 Removing the Accessory Slot Cover 8 Slide the accessory board into the slot see Figure 6 3 ...

Page 46: ...or flat blade screw driver Once the accessory board is installed you may need to install software drivers The drivers for the new board are either part of your existing system software or included on a floppy diskette that accompanies the accessory Removing Accessory Boards Apply the same steps as in the installation procedure Replace the slot cover See the preceding sections for details ...

Page 47: ...atic service kit 3M 8501 8502 8503 or equivalent This kit includes a static dissipating work surface a chassis clip lead and a wrist strap Installation Steps Open the NetServer E 60 1 If the system is already installed and working gracefully power down the system as described in Chapter 2 2 Disconnect the power cables and any external cables connected to the system If necessary label them to exped...

Page 48: ...cessor speed even though some processor modules do not read the system switch settings instead relying on settings internal to the CPU These processors will still perform at their normal rated speed in the NetServer E 60 regardless of the system switch settings On Off Off KBD Power On Unused On Clear Password 400MHz 450MHz 500MHz Figure 7 1 System Switch Settings 3 Check your upgrade kit to ensure...

Page 49: ...terminating resistor module from the secondary processor slot as shown in the following illustration First unclip the two plastic securing clips that hold down the resistor module Hold the resistor module by its edges and pull directly upward see Figure 7 2 Figure 7 2 Removing the Terminating Resistor Module 2 Align the second processor module over the secondary processor module slot so that the h...

Page 50: ...ur processor included a new HP NetServer Navigator CD ROM insert the CD into the HP NetServer E 60 CD ROM drive and power on the system Follow instructions to ensure that the BIOS is up to date Reinstalling the NOS You may have to reinstall your Network Operating System in order to use the additional processor If you have gone from a uni processor to dual processor configuration check your NOS doc...

Page 51: ...pter 7 Installing a Second Processor 45 Removing a Processor Module Use the same procedure as above and simply remove rather than add the processor module BE SURE to replace the terminating resistor module ...

Page 52: ......

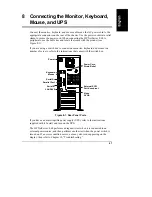
Page 53: ...use to a number of servers refer to the instructions that came with the switch box External SCSI Port Knock out Video SVGA Power Keyboard Mouse Serial A Parallel Port Serial B LAN RJ45 Power Cord Strain Relief Figure 8 1 Rear Panel Ports If you have an uninterruptible power supply UPS refer to the instructions supplied with it Install and turn on the UPS The HP NetServer E 60 performs a diagnostic...

Page 54: ......

Page 55: ...d the time and date The following is a description of the contents of the HP NetServer Navigator CD ROM as accessed from the Main Menu Obtaining NetServer Product History When the NetServer is connected to its monitor keyboard and power supply you are ready to begin installation and configuration As you configure the NetServer for use it s important to have the very latest configuration informatio...

Page 56: ...ile The Readme file contains the latest information to help you install your HP NetServer Read it carefully before beginning your installation Configuration Assistant and Installation Assistant HP Configuration Assistant guides you through the steps necessary to configure the NetServer Three methods of configuration are available Express Custom and Replicate HP Installation Assistant guides you th...

Page 57: ...owing steps Update System BIOS This step appears if Configuration Assistant detects that a newer version of the BIOS is available on the HP NetServer Navigator CD ROM You must update your BIOS to the new version if you want to continue in Express mode You can also update the language that the BIOS displays Select NOS You will be asked to select the NOS and version that you plan to install Select N...

Page 58: ...n about standard and accessory boards and devices in the system as well as the used and available system resources Select View System Information on the Show System Information screen to display information about standard and accessory boards and devices in the system Select View Resources on the Show System Information screen to display used and available system resources such as memory ranges I ...

Page 59: ...ation files to use when you install the NOS Print and Read Instructions On the Show NOS Installation Instructions screen select Save to Disk to copy the Network Operating System Installation Instructions to disk Then print them out from the disk Read the instructions first and follow them to manually install the NOS Custom Configuration In Custom configuration mode you perform the same configurati...

Page 60: ...on on the Show System Information screen to display information about standard and accessory boards and devices in the system Select View Resources on the Show System Information screen to display used and available system resources such as memory ranges I O port ranges DMA channels and interrupt IRQ levels Show NOS Installation Instructions Select this option and Save to Disk to copy the Network ...

Page 61: ...ardware configuration or load a previously saved configuration This method saves time when configuring multiple identical systems Select Replicate on the Configuration Assistant menu HP Management Solutions HP Management Solutions is a comprehensive suite of utilities applications and built in features to manage servers locally or from remote locations If you are unfamiliar with these products or ...

Page 62: ...ms and advice on quick resolution through a friendly traffic light user interface Support for DMI 2 0 which provides the same Desktop Management Interface inventory information for NetServers as for desktop PCs TopTools is included with every HP NetServer and should be installed to help your service provider troubleshoot your HP NetServer systems TopTools is located on the HP TopTools CD ROM For s...

Page 63: ...you to conveniently generate any flexible diskette available on the HP NetServer Navigator CD ROM For example you can create the following diskettes BIOS Update and NOS Drivers Print or View Information Allows you to print or view the current system configuration including details of which boards are detected in the system and which resources are allocated to the boards System BIOS Update Utility ...

Page 64: ......

Page 65: ...u better understand your NetServer and make choices compatible with your network Using Information Assistant Information Assistant has many features that help you quickly find the information you need The following is a brief description of these features To understand how to use each function use the Information Assistant help system Restart from the HP NetServer Online Documentation CD ROM on th...

Page 66: ...s Previous button Displays the previous topic in a module Next button Displays the next topic in a module Back button Displays the previous topic viewed Clicking this button more than once backtracks through topics in the order that you viewed them You can also navigate between topics by using hot spots and by using the History button to revisit previously viewed topics For example Hot Spot Text C...

Page 67: ...the client system that will manage the NetServer The installation program gives you the option of accessing the data files from your hard disk or from the CD ROM The default is to access the data files from the CD ROM You can copy the data files to your hard disk to improve access time but this could take up a significant amount of disk space Installing from the CD ROM To install Information Assis...

Page 68: ...Chapter 10 Information Assistant 62 In Program Manager or the Programs group the Setup utility creates a new program group called NetServer Information Assistant with an icon for running the application ...

Page 69: ...hoices are described here User Preferences Use this menu option to set the system time date and keyboard functions Security Use this menu option to set Power on password protections and hardware security options Two choices are available under Security Power On Password Use this option to set the power on password you can set a requirement that a password be provided upon powering on Hardware Secu...

Page 70: ... slot as master and PCI IRQ locking BIOS warns of conflict Boot Device Ordering Set the boot order including bootable boards ISA non Plug and Play Devices Allows you to manually configure ISA non plug and play boards in the system see the next section Wake on LAN Wakes the system from its sleep state upon receiving a Magic Packet While the system is in the sleep state the embedded LAN adapter scan...

Page 71: ...essory board such as certain modem boards network interface boards or multi port boards in a NetServer you must reserve system resources for the board by using the Setup utility 1 Read the documentation for the accessory board and determine what system resources it requires These resources may include memory range I O port range DMA channel and interrupt IRQ level For some resources there may be o...

Page 72: ...bmenu 11 Use the up and down arrow keys to select the DMA channel that corresponds to the DMA channel required for the ISA board you are installing and press the or key on the keypad to reserve it Reserve all DMA channels needed for the board 12 When all the necessary DMA channels are reserved press ESC to return to the ISA non Plug and Play Devices submenu 13 Use the up and down arrow keys to hig...

Page 73: ...menu Use the right arrow key to select the Exit menu Use the down arrow key to highlight Exit Discarding Changes In the Setup Warning dialog box use the spacebar or right arrow key to highlight Yes Press Enter to answer Yes to the question Enabling the Remote Console Feature HP Remote Console is built into the NetServer BIOS and is NOS independent Use HP s BIOS level remote access to diagnose and ...

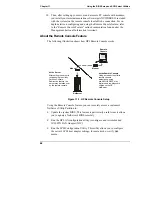
Page 74: ...er to receive using the Utility Partition Console Redirection feature the server may be taken over by the remote console At the Remote Console Using a modem the offsite remote console workstation using pcANYWHERE32 may dial into and run diagnostic utilities on the HP NetServer Remote Console Modem Modem Figure 11 1 HP Remote Console Setup Using the Remote Console feature you can remotely access a ...

Page 75: ...ation Assistant Using the SCSI Select Utility Shortly after the system begins the boot process a message appears that says Ctrl A for SCSI Select SCSI Select is used for configuring embedded SCSI controllers and devices connected to SCSI controllers NOTE You typically would not need to use this utility unless you are an experienced administrator or requested to do so by a support provider You are ...

Page 76: ...eset SCSI display Ctrl A message enables or disables SCSI BIOS and features SCSI Disk Utilities Use this menu option to format and verify media Select device Select a device for low level formatting or media verification CAUTION Low level formatting of a disk drive will destroy all of its data ...

Page 77: ...S Drivers HP DiagTools Utility An easy to use hardware diagnostic for system verification burn in and rapid troubleshooting Copy DiagTools to floppy from the HP NetServer Navigator CD ROM and execute from the floppy Common Installation Problems The following sections contain general procedures to help you locate installation problems If you need assistance it is recommended that you contact your r...

Page 78: ... 6 Check that the front power switch is connected to the System board Troubleshooting Sequence To troubleshoot an installation problem do the following First make sure that the system is configured properly Most system problems are the result of incorrect system and SCSI subsystem configurations If it is a network related error determine if the server has enough memory and hard disk drive capacity...

Page 79: ...eshooting steps in the section Hardware Problems If you get an error message see the section Error Messages below 4 If the system still will not boot clear the CMOS memory and reboot see Clearing the CMOS Configuration Error Messages If you get a POST error message press Enter View System Error to get a more detailed explanation and a possible solution No Error Messages Displayed General Checks 1 ...

Page 80: ... the NetServer still does not work Repeat steps 1 2 and 3 of this section Remove all accessories except the primary boot hard disk drive and AGP video board Replace the cover and connect all cables Turn on the monitor and the computer If the NetServer now works replace the boards and accessories one at a time to determine which one is causing the problem If a Power On System Hardware Test Error Me...

Page 81: ...witch 4 on the system board to the OFF position 6 Replace the cooling duct cover and the cover 7 Turn on power to the NetServer The message Incorrect PC Configuration Option ROM error is displayed 8 Press F2 to run the Setup program when F2 Setup appears 9 Make any configuration changes that are required 10 Choose the Exit option and save the changes to save the configuration and exit the Setup pr...

Page 82: ...on and save the changes to set the correct monitor configuration Exit the Setup utility and reboot the system Keyboard error Check that the keyboard is connected to the correct connector not the mouse connector at the rear of the system Check system board switch one is in the OFF position Replace the keyboard If the problem persists contact your HP support organization Mouse error Check that the m...

Page 83: ...roperly set Check that the monitor video cable is securely connected to the computer Turn off the monitor and computer and unplug them from the power outlet Disconnect the video cable from the computer and examine the video cable connector pins to see if they are bent If they are carefully straighten them If you have manually configured any accessories check that each does not use the same I O add...

Page 84: ...nfigured correctly in the Startup Center menu located under the Security menu in the Setup program 4 If you intend to boot from the CD make sure that option is enabled in the Setup program 5 For further information see your CD ROM documentation A SCSI Device Does Not Work If error messages display on the monitor indicating a failure of a SCSI hard disk or tape backup device perform these checks 1 ...

Page 85: ...er Password option 5 Set the User password Enter the Administrator password as the old password This will replace the old forgotten password 6 Choose the Exit option and save the changes to save the new password Administrator Password If you have forgotten the Administrator password your NetServer will function normally but you will not be able to change the system configuration settings including...

Page 86: ...ation or the CPU clock stops you should replace the battery or install an external battery an external battery with a 5 year life span is available from HP order 1420 0513 from your authorized reseller WARNING There is a danger of explosion if the battery is incorrectly installed For your safety never attempt to recharge disassemble or burn the old battery Replace only with the same or equivalent ...

Page 87: ...t the retaining clip is in place and holds the battery firmly 5 Replace the cooling duct cover and the NetServer cover Problems Running the Setup Program If you cannot run the Setup program the NetServer s configuration in CMOS memory may have become corrupt The only way to recover from a corrupted configuration is to clear it See Clearing the CMOS Configuration earlier in this chapter ...

Page 88: ......

Page 89: ...erating 20 to 80 relative humidity non condensing Non operating 5 to 95 relative humidity non condensing Altitude Operating 30 to 3 000 m 10 000 ft Non operating 30 to 12 000 m 40 000 ft Thermal Output Maximum Operating 1116 BTU hr Hardware Processors Intel Pentium II or III up to 2 processors supported speeds 400 450 and 500MHz 512KB level 2 cache on processor Chipset Intel 440BX AGPset with 66 1...

Page 90: ...ded Ultra DMA 33 E IDE dual channel PCI controller LAN Embedded Intel 82559 10 100 PCI Fast Ethernet Controller Wake up on LAN enable disable via BIOS setup PCI Bus 32 bit 33MHz speed PCI rev 2 1 compliant I O Two Serial ports One bi directional parallel port with ECP EPP high speed support PS 2 style mouse and keyboard connectors CD ROM Bundled HP D4384A CD ROM drive IDE interface 32x speed Video...

Page 91: ...inches 434 mm Width 7 1 inches 180mm 11 67 inches 296 5mm Feet opened Depth 19 57 inches 497mm Power Supply Specifications Type Auto ranging Input Maximum Range 100 to 127 VAC 5 A at 50 60 Hz 200 to 240 VAC 2 85 A at 50 60 Hz Operating Current 100 VAC 5 3 A 120 VAC 4 6 A 200 208 VAC 3 2 A 220 230 VAC 2 8 A In rush Current 25 A Operating Power 305 W ...

Page 92: ...A slot Full sized Status connector System switches Memory slots Processor Terminator IDE 1 SCSI A Serial B Parallel System board screw not visible when Processor installed System board screw FDD Snap Snap PS 2 style Keyboard Mouse IDE 2 0 1 2 3 Figure A 1 NetServer E 60 System Board ...

Page 93: ...iance label to indicate where it may be used with reasonable protection to the environment in which it is used Additional statements are provided below as required by the requirements of international and domestic regulations NOTE Check the label on your product to determine the level of operation Notice for United States Federal Communications Commission Class B Equipment This equipment has been ...

Page 94: ...imits are designed to provide reasonable protection against harmful interference when the equipment is operated in a commercial environment This equipment generates uses and can radiate radio frequency energy and if not installed and used in accordance with the instructions manual may cause harmful interference to radio communications Operation of this equipment in a residential area is likely to ...

Page 95: ...on Technology Equipment VCCI Although aimed for residential area operation radio interference may be caused when used near a radio or TV receiver Read the instructions for correct operation For products labeled as Class A This equipment is in the Class A category information technology equipment based on the rules of Voluntary Control Council For Interference by Information Technology Equipment VC...

Page 96: ...een approved for business purposes with regards to electromagnetic interference if purchased in error for use in residential area you may wish to exchange the equipment where you purchased it Class B Equipment Please note that this equipment has been approved for non business purposes with regards to electromagnetic interference This equipment can be allowed for use in all areas as well as residen...

Page 97: ...use of a Class A accessory creates a system that meets the requirements for industrial and commercial environments However in a domestic environment this product may cause radio interference in which case the user may be required to take adequate measures Notice for the United Kingdom General Approval This HP NetServer E 60 Product is approved under approval number NS G 1234 J 100003 for indirect ...

Page 98: ...a typical configuration with Hewlett Packard peripherals 2 Models were configured with a network interface board and shielded twisted pair data cable 3 The product complies with Part 15 of the FCC rules Operation is subject to the following two conditions ŸThis device may not cause harmful interference and ŸThis device must accept any interference received including interference that may cause und...

Page 99: ...ains a laser system and is classified as a Class 1 Laser Product under a U S Department of Health and Human Services DHHS Radiation Performance standard according to the Radiation Control for Health and Safety Act of 1968 To ensure proper use of this product please read this instruction manual carefully and retain for future reference Should the unit ever require maintenance contact an authorized ...

Page 100: ...60825 1991 mukaisesti Laser Safety Germany VORSICHT Diese Gerät enthält ein Laser System und ist als LASER PRODUKT DER KLASSE 1 klassifiziert Für den richtigen Gebrauch dieses Modells die Bedienungsanleitung sorgfältig durchlesen und als Referenz aufbewahren Falls Probleme mit diesem Modell aufreten die nächste authorisierte Services Verrtetung benachrichtigen Um einen direkten Kontakt mit dem Las...

Page 101: ... befindet sich der Obersiete des Geräts Batteries This product uses a lithium battery WARNING Danger of explosion if battery is incorrectly replaced Replace only with the same or equivalent type recommended by the manufacturer Dispose of used batteries according to the manufacturer s instructions AVERTISSEMENTIl y a danger d explosion s il y a remplacement incorrect de la batterie Remplacer unique...

Page 102: ...nomics Germany Sound Pressure LpA 50 dB A am Arbeitsplatz Beobachter Position workplace bystander position normaler Betrieb normal operation nach DIN 45635 T 19 per ISO 7779 This product has not been evaluated for compliance with the ZH1 618 ergonomic requirements ...

Page 103: ...97 C Service and Support For all service and support information see the HP NetServer Warranty and Service Support Booklet included with your product ...

Page 104: ......

Page 105: ...he following License Terms govern your use of the accompanying Software unless you have a separate signed agreement with HP License Grant HP grants you a license to Use one copy of the Software Use means storing loading installing executing or displaying the Software You may not modify the Software or disable any licensing or control features of the Software If the Software is licensed for concurr...

Page 106: ... of the Software Upon transfer you must deliver the Software including any copies and related documentation to the transferee The transferee must accept these License Terms as a condition to the transfer Termination HP may terminate your license upon notice for failure to comply with any of these License Terms Upon termination you must immediately destroy the Software together with all copies adap...

Page 107: ... parts components or assemblies for the planning construction maintenance or direct operation of a nuclear facility Customer is solely liable if Products or Support purchased by Customer are used for these applications Customer releases HP and will hold HP harmless from all loss damage expense or liability in connection with such use ...

Page 108: ......

Page 109: ...BIOS setup 64 boot device priority 19 CD ROM 19 SCSI A 19 SCSI B 19 boot device priority floppy drive 19 Boot order default 19 modifying 20 C cables 25 CD ROM drive troubleshooting 78 CMOS memory clearing 75 configuration custom 53 express 51 HP Management solutions 55 ISA non Plug and Play boards 64 65 NetServer utilities 57 PcANYWHERE 32 57 replicate 55 TopTools 55 Configuring with BIOS 64 Conne...

Page 110: ...up 13 I I O port range 65 I O Resources 66 IDE BIOS setup 64 IDE devices BIOS setup 64 indicator active bus 10 ON OFF 10 Information Assistant 59 installing 61 installing duplex 26 integrate I O port BIOS setup 64 interference 87 interrupt IRQ level 65 interrupt resources 66 Interrupt sharing 35 IRQ resources 67 ISA non Plug and Play board 64 65 ISA non Plug and Play boards reserving resources 50 ...

Page 111: ...word s 79 Procesor modules 41 clock speed 41 Processor 44 Processor modules installation 43 Product Safety 93 R Readme file 50 rear panel ports 47 Regulatory Notices Electromagnetic Compliance 87 Regulatory Notices Product Safety 93 remote console 67 removing the cover 15 replacing the cover 17 replicate configuration 55 reset switch 13 Resource sharing 35 resources system 65 S SCSI configuring th...

Page 112: ...stem board features 86 system resources 65 system support 97 T tape backup device troubleshooting 78 Technical Reference Card 2 Terminating resistor module 45 Terminating Resistor Module 43 TopTools configuration 55 troubleshooting basics 71 error messages 73 finding the problem 72 tools 71 Troubleshooting service and support 97 turning feet 18 U UPS 47 utilities SCSI Select 50 Setup 50 65 V verif...

Reviews: