Making Connections
Using OmniBook Plug-In Modules
4-4
To replace a plug-in module
Note
•
For Windows 95/Windows 98, if Agaté Tioman hot-swap software is installed, a
plug-in module icon appears at the right end of the taskbar. This software lets
you swap most plug-in modules without shutting down the computer.
•
If you are removing a battery and inserting another battery, you do not have to
do steps 1 and 2 below—you can just change the batteries.
C A U T I O N
If you are inserting or removing a CD-ROM drive, DVD drive, or any other type
of drive, you must use the hot-swap software or shut down the computer
otherwise, you could lose data.
1. Close all files that are open from the plug-in module.
2. If the plug-in module icon is present in the taskbar, right-click the icon, then
click Remove Device. When prompted to remove the module, click OK. (You do
not have to do this if the bay is empty or contains a battery.)
–or–
Click Start, Shut Down to shut down the computer.
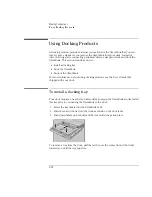
3. Slide the safety latch for the plug-in module bay into its recess.
4. Slide
and hold
the release latch, then pull out the module, as shown.
5. Slide the new plug-in module into the OmniBook until it clicks into place.
Summary of Contents for OmniBook 2100
Page 1: ...HP OmniBook 2100 Reference Guide ...
Page 9: ...1 Introducing the OmniBook ...
Page 25: ...2 Operating the OmniBook ...
Page 46: ......
Page 47: ...3 Managing Battery Power ...
Page 58: ......
Page 59: ...4 Making Connections ...
Page 79: ...5 Expanding the OmniBook ...
Page 87: ...6 Using the Recovery CD ...
Page 93: ...7 Troubleshooting ...
Page 110: ......
Page 111: ...8 Specifications and Regulatory Information ...


