Making Connections
Using OmniBook Plug-In Modules
4-5
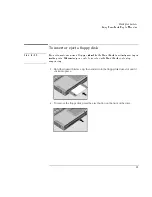
To insert or eject a floppy disk
C A U T I O N
Do not insert or remove a floppy disk while the OmniBook is actively reading or
writing data. Otherwise, you could lose data or the OmniBook could stop
responding.
1. Hold the disk with its face up, then slide it into the floppy disk drive slot until it
clicks into place.
2. To remove the floppy disk, press the eject button on the front of the drive.
Summary of Contents for OMNIBOOK 4150
Page 1: ...HP OmniBook 4100 Reference Guide ...
Page 9: ...1 Introducing the OmniBook ...
Page 26: ......
Page 27: ...2 Operating the OmniBook ...
Page 49: ...3 Managing Battery Power ...
Page 60: ......
Page 61: ...4 Making Connections ...
Page 80: ......
Page 81: ...5 Expanding the OmniBook ...
Page 90: ......
Page 91: ...6 Using the Recovery CD ...
Page 111: ...7 Troubleshooting ...
Page 128: ......
Page 129: ...8 Specifications and Regulatory Information ...
Page 142: ......


