background image

7

ZHCN

KO

JA

FR

DE

ID

EN

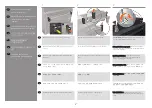
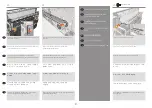
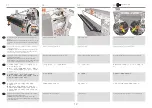
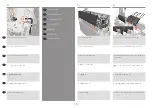
Remove the top screw from both gas springs, and then remove 

the gas springs.

Retirez la vis du haut des deux ressorts à gaz, puis retirez les 

ressorts à gaz.

Entfernen Sie die obere Schraube von beiden Gasfedern und 

nehmen Sie dann die Gasfedern heraus.

両方のガス スプリングから上部のネジを外し、ガス ス

プリングを取り外します。

卸下两个气弹簧的顶部螺钉,然后取出气弹簧。

두 개의 가스 스프링 모두에서 위쪽 나사를 제거하고 가스 
스프링을 제거합니다.


Lepaskan sekrup atas dari kedua pegas udara, dan kemudian 

lepaskan pegas udara tersebut.

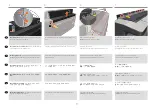
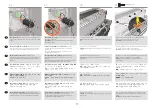
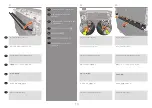
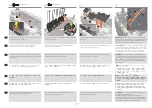
Remove the bottom screw from both gas springs. 

Note:

 You can lock it with the L screwdriver inside, and then 

rotate the outside.

Retirez la vis du bas des deux ressorts à gaz. 

Remarque : 

Vous pouvez la verrouiller à l’aide du tournevis en 

L à l’intérieur, puis faire pivoter l’extérieur.

Entfernen Sie die untere Schraube von beiden Gasfedern. 

Hinweis: 

Sie können sie mit dem Schraubendreher L innen 

festziehen und dann die Außenseite drehen.

両方のガス スプリングから下部のネジを外します。


注記: 

内側にL字型ドライバを使用して固定しながら、

外側を回転することができます。

从两个气弹簧上卸下底部螺钉。

注意:

 您可以在内侧使用 L 螺丝刀将其锁定,然后在外

侧旋转。

두 개의 가스 스프링 모두에서 아래쪽 나사를 제거합니다. 

참고: 

내부의 L자형 드라이버로 잠글 수 있습니다. 그러고 

나서 바깥쪽을 회전시킵니다.

Lepaskan sekrup bawah dari kedua pegas udara. 

Catatan: 

Anda dapat menguncinya dengan obeng L di dalam, 

dan kemudian memutarnya dari bagian luar.

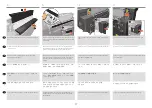
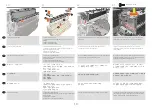
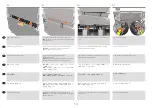
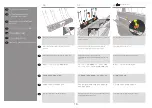
Install the new gas springs. 

Note:

 For the bottom screw you can lock it with the L 

screwdriver inside, and then rotate the outside.

Note:

 If the hole and screw are not aligned, push the output 

module horizontally to align them.

Installez les nouveaux ressorts à gaz. 

Remarque : 

Pour la vis du bas, vous pouvez la verrouiller avec 

le tournevis en L à l’intérieur, puis faites pivoter l’extérieur. 

Remarque :

 Si le trou et la vis ne sont pas alignés, poussez la 

sortie pour les aligner horizontalement.

Setzen Sie die neuen Gasfedern ein. 

Hinweis: 

Für die untere Schraube können Sie sie mit dem 

L-Schraubendreherinnen festziehen und dann die Außenseite 

drehen. 

Hinweis: 

Wenn das Bohrloch und die Schraube nicht 

ausgerichtet sind, drücken Sie das Ausgabemodul waagerecht, 

um sie auszurichten.

新しいガス スプリングを取り付けます。


注記:

 下部のネジは、内側にL字型ドライバを使用して

固定しながら、外側を回転することでロックできます。


注記:

 穴とネジの位置が合っていない場合、排紙モジ

ュールを水平に押して合わせます。

安装新的气弹簧。

注意:

 对于底部螺钉,可以在内侧使用 L 螺丝刀将其锁

定,然后在外侧旋转。

注意:

 如果孔和螺钉未对齐,水平推动输出模块将其对

齐。

새 가스 스프링을 설치합니다. 

참고: 

아래쪽 나사는 내부의 L자형 드라이버로 잠글 수 

있습니다. 그러고 나서 바깥쪽을 회전시킵니다. 

참고: 

구멍과 나사가 정렬되지 않은 경우에는 출력 모듈을 

수평으로 밀어 정렬합니다.

Pasang pegas udara yang baru. 

Catatan: 

Untuk sekrup bawah, Anda dapat menguncinya 

menggunakan obeng L di bagian dalam, dan kemudian 

memutarnya dari luar. 

Catatan:

 Jika lubang dan sekrup tidak sejajar, tekan modul 

output secara horizontal untuk menyelaraskannya.

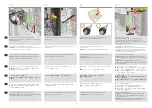
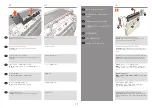
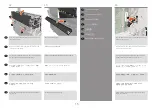
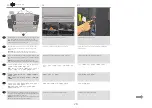
Take the new gas springs from the box and lock them. 

Note: 

The spring goes in the bottom part.

Prenez les nouveaux ressorts à gaz du carton et 

verrouillez-les. 

Remarque 

: Le ressort se place dans la partie inférieure.

Nehmen Sie die neuen Gasfedern aus dem Karton und 

verriegeln Sie sie. 

Hinweis: 

Die Feder gehört in den unteren Teil.

箱から新しいガス スプリングを取り出し、ロックしま

す。

注記:

 スプリングは、下部に取り付けます。

将新的气弹簧从包装箱中取出,并将其锁定。

注意:

 弹簧进入底部。

상자에서 새 가스 스프링을 꺼내 잠급니다. 

참고: 

스프링은 하단 부분으로 들어갑니다.

Ambil pegas udara yang baru dari kotak dan kunci. 

Catatan: 

Pegas akan berada di bagian bawah.

19

20

21

22

Summary of Contents for PageWide XL

Page 1: ... ID Diperlukan 2 orang untuk menjalankan tugas tertentu EN Box number Subsystem 1 Accessories 2 Structure 3 Media path 4 Top Tray 5 Arms 6 Cover FR Numéro de boîte Sous système 1 Accessoires 2 Structure 3 Chemin du support 4 Bac supérieur 5 Bras 6 Capot DE Box Num mer Teilsystem 1 Zubehör 2 Struktur 3 Medienpfad 4 Oberes Papierfach 5 Arme 6 Abdeckung JA 箱番号 サブシステム 1 アクセサリ 2 骨組み 3 用紙経路 4 上部トレイ 5 アー...

Page 2: ...an penutup lateral atas 1 dari setiap sisi Printer preparation for top stacker installation Préparation de l imprimante pour l installation de l empileur supérieur Vorbereitung des Druckers für die Installation des oberen Staplers トップ スタッカの取り付けに備 えたプリンタの 安装顶部堆纸器前的 打印机准备工作 상단 스태커를 위한 프린터 준비 설치 Persiapan printer untuk pemasangan penumpuk atas 1 2 3 HP PageWide XL Pro uniquement Utilisez une clé Alle...

Page 3: ...f der Rückseite プリンタの電源をオフにした状態で 背面の排紙モジ ュールを開きます 在打印机关闭的情况下 打开背面的输出模块 프린터를 끄고 후면에 있는 출력 모듈을 엽니다 Saat printer mati buka modul output di bagian belakang Remove the 10 black screws Note Take care not to drop the screws Retirez les 10 vis noires Remarque Prenez soin de ne pas faire tomber les vis Entfernen Sie die 10 schwarzen Schrauben Hinweis Lassen Sie die Schrauben nicht fallen 卸下 10 颗黑色的螺钉 注意 小心...

Page 4: ...Entfernen Sie die 2 Abdeckungen des Ausgabemoduls beginnend mit der oberen 卸下 2 个输出模块盖子 先卸上面一个 2個の排紙モジュールカバーを上のカバーから取り外 します 2개의 출력 모듈 덮개 중 위의 것부터 제거합니다 Lepas 2 penutup modul output dimulai dengan bagian atas Remove the plastic pieces there is a tab in the inner part pull it down in order to easily remove the pieces The tabs can then be discarded Retirez les pièces en plastique il y a une languette...

Page 5: ...iscard the circlips as they will be required later Retirez le circlip des deux côtés et relâchez la manivelle Remarque Ne jetez pas les circlips car ils seront nécessaires ultérieurement Entfernen Sie den Sicherungsring von beiden Seiten und lösen Sie die Kurbel Hinweis Werfen Sie die Sicherungsringe nicht weg da sie später noch benötigt werden 両側からサークリップを外して クランクを解放します 注記 後で必要になるため サークリップを廃棄しな いで...

Page 6: ...び金属片に1本のネジと 上部に2本のネ ジを使用して固定ツールを固定します 将输出模块向上移动直至安装孔对齐 然后使用 1 颗螺 钉固定底部和金属条并在上方安装 2 颗螺钉 以此固定 夹持工具 구멍과 맞도록 출력 모듈을 움직여 지지 도구를 고정한 다음 아래쪽에서 나사 한 개와 금속 띠로 위쪽에서 나사 두 개로 고정합니다 Pasang pemegang alat dengan menggerakkan modul output ke atas hingga sejajar dengan lubang kemudian pasang 1 sekrup di bagian bawah dan setrip logam dan 2 sekrup di atas Remove the cables from the belt motor Retirez les câbles du m...

Page 7: ...nstallez les nouveaux ressorts à gaz Remarque Pour la vis du bas vous pouvez la verrouiller avec le tournevis en L à l intérieur puis faites pivoter l extérieur Remarque Si le trou et la vis ne sont pas alignés poussez la sortie pour les aligner horizontalement Setzen Sie die neuen Gasfedern ein Hinweis Für die untere Schraube können Sie sie mit dem L Schraubendreherinnen festziehen und dann die A...

Page 8: ...쪽 나사와 금속 띠를 제거한 다음 아래쪽 나사를 제거합니다 Lepaskan alat pemegang pertama tama sekrup atas dan setrip logam kemudian sekrup bagian bawah Close the crank and replace the circlips removed earlier on both sides Fermez la manivelle et replacez les circlips retirés précédemment des deux côtés Schließen Sie die Kurbel und setzen Sie die zuvor entfernten Sicherungsringe auf beiden Seiten wieder ein クランクを閉じ 前の手順で外し...

Page 9: ... 仅限 HP PageWide XL Pro 型号 安装皮带电机 但仅拧 紧 3 个内螺钉 重要提示 请勿拧紧外螺钉 因为这样可能会损坏打印 机 HP PageWide XL Pro 모델만 해당 벨트 모터를 설치하며 내부 나사 3개만 조입니다 중요 프린터가 손상될 수 있으므로 외장 나사를 넣지 마십시오 Khusus model HP PageWide XL Pro Pasang motor sabuk dengan hanya mengencangkan 3 sekrup internal Penting Jangan pasang sekrup eksternal karena dapat menyebabkan kerusakan pada printer Install the 7 white clamps Note 3 of the same type are pl...

Page 10: ...epas kantong plastik 4 Lepas kantong penyerap kelembaban Install the structure making sure the pin matches on the front panel side Installez la structure en vous assurant que la broche correspond au côté du panneau avant Montieren Sie die Struktur und achten Sie darauf dass der Stift auf der Seite des Anzeigebildschirms passt ピンがフロントパネル側面に合うことを確認しなが ら 骨組みを取り付けます 安装结构 确保前面板侧的销钉匹配 핀이 전면 조작부 쪽과 일치하도록...

Page 11: ...dul installieren 用紙経路モジュールを取り付け ます 安装纸路模块 용지 경로 모듈 설치 Pasang modul jalur kertas Remove the desiccant bag and packaging Warning Never handle the top stacker paper path door in the middle always hold it at the sides Retirez le sachet déshydratant et l emballage Avertissement Ne manipulez jamais la porte d accès papier de l empileur supérieur au milieu tenez la toujours par les côtés Entnehmen Sie de...

Page 12: ...うに注意 してください 在打开端盖的情况下 插入顶部挂钩以安装模块 注意 小心不要缠住或损坏电缆或送纸道辊 也不要弄 伤手指 因为端盖在打开时可能会掉下 도어가 열린 상태로 상단 고리를 삽입하여 모듈을 설치합니다 참고 케이블이나 용지 경로 롤러를 잡지 않도록 또는 케이블이나 용지 경로 롤러가 손상되지 않도록 주의하고 도어가 저절로 열릴 수 있으므로 손가락을 다치지 않도록 주의하십시오 Saat pintu dalam keadaan terbuka pasang modul tersebut dengan memasukkan pengait atas Catatan Hati hati agar kabel atau rol jalur kertas tidak tersangkut atau rusak dan juga tidak melukai jari ...

Page 13: ...terface du déviateur Anpassung der Schnittstelle der Umlenkeinheit 誘導インター フェイスの調整 转向器接口调整 다이버터 인터페이스 조정 Penyesuaian antarmuka pengalih Loosen one screw of each side Desserrez une vis de chaque côté Lösen Sie eine Schraube an jeder Seite 各側で1本のネジを緩めます 每侧拧松一颗螺钉 각 면의 나사 한 개를 풉니다 Longgarkan satu sekrup pada setiap sisi Remove the diverter cover Retirez le capot du déviateur Entfernen Sie die Abdeckung...

Page 14: ...takkan 2 alat pengatur di bawah antarmuka plastik Catatan Pintu harus tetap tertutup dan antarmuka pengalih berada di posisi atas Lower the diverter valve Abaissez la valve du déviateur Senken Sie das Umlenkventil ab 誘導バルブを下げます 调低转向器阀 다이버터 밸브를 내립니다 Turunkan katup pengalih Pull down the plastic interface until it touches both adjustment tools Tirez vers le bas l interface en plastique jusqu à ce qu...

Page 15: ...eur Bringen Sie die Abdeckung der Umlenkeinheit wieder an 誘導インターフェイスのカバーを戻します 将转向器盖装回原处 다이버터 덮개를 다시 덮습니다 Pasang kembali penutup pengalih Connect the cables Connexion des câbles Kabel anschließen ケーブルの接続 连接线缆 케이블 연결 Hubungkan semua kabel Pass the cable connector through the left side plate close the saddle part and plug it in Passez le connecteur du câble par la plaque latérale gauche fermez la par...

Page 16: ...み立て 纸盘组装 용지함 조립 Memasang baki Close the output module Fermez le module de sortie Schließen Sie das Ausgabemodul 排紙モジュールを閉じます 关上输出模块 출력 모듈을 닫습니다 Tutup modul output Place the 2 trays by sliding them from left to right Placez les 2 bacs en les faisant glisser de gauche à droite Setzen Sie die beiden Fächer ein indem Sie sie von links nach rechts schieben 2個のトレイを左から右にスライドさせて取り付けま す 从左向右滑动 放置 2 个纸盘 용지함...

Page 17: ...件安装回去 앞서 제거한 플라스틱 부품을 중앙부터 다시 놓습니다 Pasang kembali bagian plastik yang dilepaskan sebelumnya dimulai dengan bagian tengah WARNING Only to be used with NTP Natural Tracing Paper Insert the bottom tip into the hole then rotate it and insert the top tip into the other hole Slide the wire backwards to fix the position by snapping the top tip into the plastic hole AVERTISSEMENT A n utiliser qu avec du N...

Page 18: ... stacker cover paper path module door and slide the assembly into place Ouvrez la porte du module d accès papier du capot de l empileur puis faites glisser l assemblage en place Öffnen Sie die Tür des Papierpfadmoduls der Staplerabdeckung und schieben Sie die Baugruppe an ihren Platz スタッカ カバーの用紙経路モジュールのドアを開き アセンブリをスライドさせて所定の位置に配置します 打开堆纸器盖上的纸路模块端盖 并将组件滑入到位 스태커 덮개 용지 경로 모듈 도어를 열고 조립한 장치를 제자리에 밀어 넣습...

Page 19: ...de XL Pro Modelle Befestigen Sie die Nockenstiftachse auf jeder Seite HP PageWide XL Proモデルのみ 両側でカム ピン軸を固 定します 限 HP PageWide XL Pro 型号 固定每侧的凸轮销轴 HP PageWide XL Pro 모델만 해당 각 측면에 캄 핀 축을 고정합니다 Khusus model HP PageWide XL Pro Kencangkan poros pin cam di setiap sisi HP PageWide XL Pro only Use a 5mm Allen key to turn the axis pin at both sides to lock the system 62 61 63 64 Modèles HP PageWide XL Pro u...

Page 20: ...z tous les capots en commençant par les anciens puis les nouveaux en les fixant en place avec trois vis de chaque côté Remarque Pour les nouveaux capots il est nécessaire d ouvrir le module de sortie afin d accéder à la troisième vis Bringen Sie alle Abdeckungen wieder an zuerst die alten dann die neuen und befestigen Sie sie mit je 3 Schrauben auf jeder Seite Hinweis Für die neuen Abdeckungen müs...

Page 21: ...fnen Sie das Menü Service Wenn Sie den oberen Stapler mit einem Falter oder einem Hochkapazitätsstapler verwenden ist möglicherweise eine zusätzliche Einstellung der Umlenkeinheit erforderlich Weitere Informationen finden Sie im Abschnitt zur Fehlerbehebung im Servicehandbuch プリンタが新しい場合は トップ スタッカが自動的に認識され 設定されます プリンタを使用している場合 サービス メニューを開きます フォルダまたは大容量スタッカと共にトップ スタッカを使用している場合は 誘導インターフェイスの追加調整が必 要にな...

Page 22: ...ran tieansprüche abzuleiten HP haftet ausgenommen für die Verletzung des Lebens des Körpers der Gesundheit oder nach dem Produkthaftungsgesetz nicht für Schäden die fahrlässig von HP einem gesetzlichen Vertreter oder einem Erfüllungsgehilfen verursacht wurden Die Haftung für grobe Fahrlässigkeit und Vorsatz bleibt hiervon unberührt Copyright 2021 HP Development Company L P 本文档中包含的信息如有更改 恕不另行通知 有关 ...

Reviews: