3.
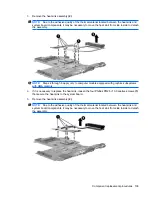
Remove the heat sink assembly
(2)
.
NOTE:
Due to the adhesive quality of the thermal material located between the heat sink and
system board components, it may be necessary to move the heat sink from side to side to detach
the assembly.
NOTE:
Steps 4 through 6 apply only to computer models equipped with graphics subsystems
with UMA memory.
4.
If it is necessary to replace the heat sink, loosen the four Phillips PM2.5×10.0 captive screws
(1)
that secure the heat sink to the system board.
5.
Remove the heat sink assembly
(2)
.
NOTE:
Due to the adhesive quality of the thermal material located between the heat sink and
system board components, it may be necessary to move the heat sink from side to side to detach
the assembly.
Component replacement procedures 103
Summary of Contents for Pavilion dv7-1100 - Entertainment Notebook PC
Page 1: ...HP Pavilion dv7 Entertainment PC Maintenance and Service Guide ...
Page 4: ...iv Safety warning notice ...
Page 26: ...Computer major components 18 Chapter 3 Illustrated parts catalog ...
Page 113: ...Reverse this procedure to install the heat sink Component replacement procedures 105 ...
Page 167: ...Universal Serial Bus Pin Signal 1 5 VDC 2 Data 3 Data 4 Ground Universal Serial Bus 159 ...
Page 181: ......


