background image

CAUTION:

All data saved on your device is deleted when you perform a factory reset. All apps are

uninstalled. It may be possible to restore data in your email account. Back up all important files with an

external storage device or to the cloud using one of several commercially available solutions, before

resetting the tablet.

4.

Touch 

Reset tablet

.

5.

If you set a lock screen password for your tablet, enter your password when prompted.

6.

Touch 

Erase everything

 to begin the reset.

The tablet turns off. When the reset is complete, the tablet starts.

Resetting with the tablet turned off

If the tablet does not start normally, or if you do not remember the lock screen password, you can reset the

tablet without turning it on.

CAUTION:

All data saved on your device is deleted when you perform a factory reset. All apps are

uninstalled, but it may be possible to restore data in your email account. Back up all important files with an

external storage device or to the cloud using one of several commercially available solutions, before

resetting the tablet.

NOTE:

The touch screen is disabled when the device is in recovery mode. Use the volume up (+) and volume

down (-) buttons to navigate up or down in the recovery menu.

1.

Charge the tablet for at least half an hour, and then disconnect the AC adapter from the tablet.

2.

If a micro SD card is installed in the tablet, remove the memory card before resetting the tablet.

3.

With the tablet turned off, press and hold the power button, and then press the volume up (+) button at

the same time.

4.

Press and hold the power button and the volume up (+) button for several seconds.

5.

When the Select Boot Mode appears, press the volume up (+) button to highlight 

Recovery

, and then

press the power button to select 

Recovery

.

6.

Press and hold the power button, and then press the volume up (+) button once to enter Recovery

mode.

7.

Press the volume down (-) button to highlight 

wipe data/factory reset

, and then press the power

button to begin the reset.

8.

Press the volume down (-) button to select 

Yes –delete all user data”

, and then press the power

button.
A recovery system screen shows the reset process.

9.

When the screen displays the message 

Data wipe complete

, press the volume down (-) button to

highlight 

Reboot system now

, and then press the power button to select.

The tablet will restart.

Factory data reset

31

Summary of Contents for Pro Slate 12

Page 1: ...HP Pro Slate 12 Tablet Maintenance and Service Guide IMPORTANT This document is intended for HP authorized service providers only ...

Page 2: ... or editorial errors or omissions contained herein First Edition January 2015 Document Part Number 782895 001 Product notice This guide describes features that are common to most models Some features may not be available on your tablet Software terms By installing copying downloading or otherwise using any software product preinstalled on this tablet you agree to be bound by the terms of the HP En...

Page 3: ... another hard surface such as an adjoining optional printer or a soft surface such as pillows or rugs or clothing to block airflow Also do not allow the AC adapter to contact the skin or a soft surface such as pillows or rugs or clothing during operation The device and the AC adapter comply with the user accessible surface temperature limits defined by the International Standard for Safety of Info...

Page 4: ...iv Safety warning notice ...

Page 5: ...uirements 10 Tools required 10 Service considerations 10 Plastic parts 10 Cables and connectors 10 Grounding guidelines 10 Electrostatic discharge damage 10 Packaging and transporting guidelines 12 Workstation guidelines 12 6 Removal and replacement procedures 14 Tablet component replacement procedures 14 Back cover 14 Battery 15 Rear facing webcamera 16 Front facing webcamera 17 Volume and power ...

Page 6: ...he operating system 30 Back up and reset 30 Factory data reset 30 Resetting with the tablet turned on 30 Resetting with the tablet turned off 31 9 Power adapter requirements 32 Requirements for all countries 32 Requirements for specific countries and regions 32 10 Recycling 34 Index 35 vi ...

Page 7: ...ition rear facing webcamera 2 0 MP full frame high definition front facing webcamera Supports MP3 Ogg FLAC AAC and AMR audio formats Supports 3 5 mm headset only Sensor Accelerometer G sensor Wireless networking Integrated wireless option WLAN 802 11 ac a b g n with one antenna Bluetooth 4 0 LE with Apt X and security support required External expansion Integrated micro SD Card Reader expandable t...

Page 8: ...t headphone 2 Power button 9 Micro SIM slot select models only 3 Volume control button 10 Micro SD Card Reader slot 4 Integrated microphone 11 Speaker 5 Ambient light sensor 12 18 Watt POGO connector 6 Front facing webcamera 13 Speaker 7 Micro USB 2 0 port 2 Chapter 2 External component identification ...

Page 9: ... supported parts for your tablet go to http partsurfer hp com select your country or region and then follow the on screen instructions The model number 1 and serial number 2 of your tablet are located on the back cover of the tablet You may need the information when you travel internationally or when you contact support Locating the serial number and model number 3 ...

Page 10: ...udes cable 795936 001 4 Top speaker Kit includes speaker and cables 795933 001 5 Rear facing webcamera includes cable 795937 001 6 Volume and power button board 795935 001 7 Docking charger 808817 001 8 Connector board 795928 001 9 Display cable 10 Bottom speaker Kit includes speaker and cables 795927 001 11 Main cable 12 Antenna board cable 13 System board 4 Chapter 3 Illustrated parts catalog ...

Page 11: ...18 12 3 LED UXGA UWVA BrightView 1600x1200 Touchscreen display panel assembly 795929 001 Miscellaneous parts Component Spare part number 10W 2 0 type b USB adapter with Micro USB cable 743820 001 10W 2 0 type b USB adapter with Micro USB cable and localized cable plug support For use only in Latin America 798685 001 For use only in Australia 798685 002 For use only in the United Kingdom 798685 003...

Page 12: ...Pen 793490 001 Screw Kit 795932 001 WWAN module ME906E LT4112 LTE HPSA 791396 001 Sequential part number listing Spare part number Description 743820 001 10W 2 0 type b USB adapter with Micro USB cable 791396 001 WWAN module ME906E LT4112 LTE HPSA 793490 001 Q Pen 795552 001 18W POGO adapter for use only in Latin America 795552 002 18W POGO adapter for use only in Australia 795552 003 18W POGO ada...

Page 13: ...5 008 10W 2 0 type b USB adapter with Micro USB cable and localized cable plug support for use in North America 798685 009 10W 2 0 type b USB adapter with Micro USB cable and localized cable plug support for use in Europe 798685 012 10W 2 0 type b USB adapter with Micro USB cable and localized cable plug support for use in Brazil 798685 014 10W 2 0 type b USB adapter with Micro USB cable and local...

Page 14: ...without WWAN capability 808817 001 Docking charger 809056 001 HP Pro Slate 12 equipped with Qualcomm Snapdragon APQ8074 Quad core 2 3GHz Graphics Chipset 2GB RAM memory and 32 GB eMMC hard drive without WWAN capability for use only in North America 8 Chapter 3 Illustrated parts catalog ...

Page 15: ...o its factory state while the device is enrolled with an HP Touchpoint Manager account then an IT administrator is alerted that the device may have been stolen The IT administrator can then use the Lost Device Protection feature to locate lock sound an alarm or erase data from the device see http www hptouchpointmanager com If the device is recovered then the device owner can launch HP Touchpoint ...

Page 16: ...mproper cable placement can damage the tablet Cables must be handled with extreme care to avoid damage Apply only the tension required to unseat or seat the cables during removal and insertion Handle cables by the connector whenever possible In all cases avoid bending twisting or tearing cables Be sure that cables are routed in such a way that they cannot be caught or snagged by parts being remove...

Page 17: ...ndle electronic components as little as possible If you remove a component place it in an electrostatic safe container The following table shows how humidity affects the electrostatic voltage levels generated by different activities CAUTION A product can be degraded by as little as 700 V Typical electrostatic voltage levels Relative humidity Event 10 40 55 Walking across carpet 35 000 V 15 000 V 7...

Page 18: ... proper materials are selected to avoid static charging When grounding is not possible use an ionizer to dissipate electric charges Workstation guidelines Follow these grounding workstation guidelines Cover the workstation with approved static shielding material Use a wrist strap connected to a properly grounded work surface and use properly grounded tools and equipment Use conductive field servic...

Page 19: ...m resistance between the operator and ground To be effective the conductive must be worn in contact with the skin The following grounding equipment is recommended to prevent electrostatic damage Antistatic tape Antistatic smocks aprons and sleeve protectors Conductive bins and other assembly or soldering aids Nonconductive foam Conductive tabletop workstations with ground cords of one megohm resis...

Page 20: ...over Description Spare part number Back cover 795926 001 Before disassembling the tablet follow these steps 1 Turn off the tablet If you are unsure whether the tablet is off turn the tablet on and then shut it down through the operating system 2 Disconnect the power from the tablet by unplugging the power adapter cord from the tablet 3 Disconnect all external devices from the tablet Remove the bac...

Page 21: ...e back cover see Back cover on page 14 WARNING To reduce potential safety issues use only the battery provided with the tablet a replacement battery provided by HP or a compatible battery purchased from HP CAUTION Removing a battery that is the sole power source for the tablet can cause loss of information To prevent loss of information save your work or shut down the tablet through the operating ...

Page 22: ...er the tablet is off turn the tablet on and then shut it down through the operating system 2 Disconnect the power from the tablet by unplugging the power adapter cord from the tablet 3 Disconnect all external devices from the tablet 4 Remove the back cover see Back cover on page 14 5 Remove the battery see Battery on page 15 Remove the rear facing webcamera 1 Disconnect the rear facing webcamera c...

Page 23: ...r the tablet is off turn the tablet on and then shut it down through the operating system 2 Disconnect the power from the tablet by unplugging the power adapter cord from the tablet 3 Disconnect all external devices from the tablet 4 Remove the back cover see Back cover on page 14 5 Remove the battery see Battery on page 15 6 Remove the rear facing webcamera see Rear facing webcamera on page 16 Re...

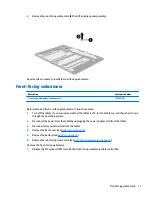
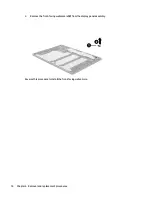
Page 24: ...2 Remove the front facing webcamera 2 from the display panel assembly Reverse this procedure to install the front facing webcamera 18 Chapter 6 Removal and replacement procedures ...

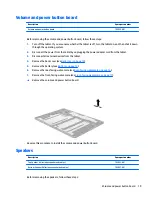
Page 25: ... external devices from the tablet 4 Remove the back cover see Back cover on page 14 5 Remove the battery see Battery on page 15 6 Remove the rear facing webcamera see Rear facing webcamera on page 16 7 Remove the front facing webcamera see Front facing webcamera on page 17 Remove the volume and power button board Reverse this procedure to install the volume and power button board Speakers Descript...

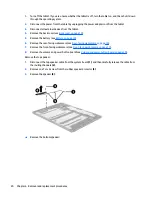
Page 26: ...ttery on page 15 6 Remove the rear facing webcamera see Rear facing webcamera on page 16 7 Remove the front facing webcamera see Front facing webcamera on page 17 8 Remove the volume and power button board see Volume and power button board on page 19 Remove the top speaker 1 Disconnect the top speaker cable from the system board 1 and then carefully release the cable from the routing channels 2 2 ...

Page 27: ...Reverse this procedure to install the speakers Speakers 21 ...

Page 28: ... the power adapter cord from the tablet 3 Disconnect all external devices from the tablet 4 Remove the back cover see Back cover on page 14 5 Remove the battery see Battery on page 15 6 Remove the rear facing webcamera see Rear facing webcamera on page 16 7 Remove the front facing webcamera see Front facing webcamera on page 17 8 Remove the volume and power button board see Volume and power button...

Page 29: ...2 Detach the antenna board 1 from the display panel assembly and then remove it 2 Reverse this procedure to install the antenna board Antenna board 23 ...

Page 30: ...cover on page 14 5 Remove the battery see Battery on page 15 6 Remove the rear facing webcamera see Rear facing webcamera on page 16 7 Remove the front facing webcamera see Front facing webcamera on page 17 8 Remove the volume and power button board see Volume and power button board on page 19 9 Remove the top and bottom speakers see Speakers on page 19 10 Remove the antenna board see Antenna boar...

Page 31: ...let 3 Disconnect all external devices from the tablet 4 Remove the back cover see Back cover on page 14 5 Remove the battery see Battery on page 15 6 Remove the rear facing webcamera see Rear facing webcamera on page 16 7 Remove the front facing webcamera see Front facing webcamera on page 17 8 Remove the volume and power button board see Volume and power button board on page 19 9 Remove the top a...

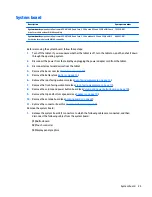
Page 32: ...pter cord from the tablet 3 Disconnect all external devices from the tablet 4 Remove the back cover see Back cover on page 14 5 Remove the battery see Battery on page 15 6 Remove the rear facing webcamera see Rear facing webcamera on page 16 7 Remove the front facing webcamera see Front facing webcamera on page 17 8 Remove the volume and power button board see Volume and power button board on page...

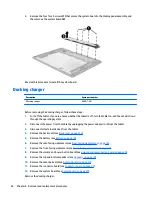
Page 33: ...the tablet 3 Disconnect all external devices from the tablet 4 Remove the back cover see Back cover on page 14 5 Remove the battery see Battery on page 15 6 Remove the rear facing webcamera see Rear facing webcamera on page 16 7 Remove the front facing webcamera see Front facing webcamera on page 17 8 Remove the volume and power button board see Volume and power button board on page 19 9 Remove th...

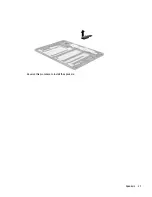
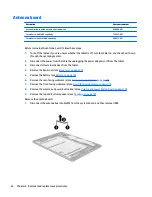
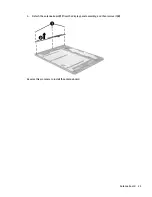
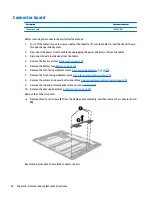
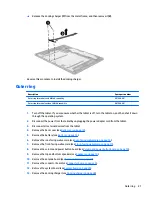
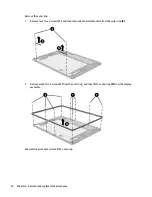
Page 34: ...then remove both metal brackets from the outer ring 2 2 Remove eight Torx 4 screws 1 from the outer ring and then lift the outer ring 2 from the display assembly Reverse this procedure to install the outer ring 28 Chapter 6 Removal and replacement procedures ...

Page 35: ...n DC power using an industry standard micro B USB cable The HP 5V 2A adapter included with your tablet is recommended for charging the tablet Temperature Operating 5 C to 35 C 41 F to 95 F Nonoperating 20 C to 60 C 4 F to 140 F Relative humidity non condensing Operating 10 to 90 Nonoperating 5 to 95 Maximum altitude unpressurized Operating 15 m to 3 048 m 50 ft to 10 000 ft Nonoperating 15 m to 12...

Page 36: ...ther computer a dedicated storage device or to the cloud using one of several commercially available solutions You can select preferences for backing up and restoring your data in case of loss 1 Touch 2 Under PERSONAL touch Back up reset 3 Under BACKUP RESTORE select one or more of the following Back up my data Select the check box to enable backing up app data wireless passwords and other setting...

Page 37: ...The touch screen is disabled when the device is in recovery mode Use the volume up and volume down buttons to navigate up or down in the recovery menu 1 Charge the tablet for at least half an hour and then disconnect the AC adapter from the tablet 2 If a micro SD card is installed in the tablet remove the memory card before resetting the tablet 3 With the tablet turned off press and hold the power...

Page 38: ...ountries The following requirements are applicable to all countries and regions The length of the adapter cord set must be at least 1 0 m 3 3 ft and no more than 2 0 m 6 5 ft All power adapters must be approved by an acceptable accredited agency responsible for evaluation in the country or region where the adapter will be used Requirements for specific countries and regions Country region Accredit...

Page 39: ...e People s Republic of China CCC Saudi Arabia SASO Singapore PSB South Africa SABS South Korea KTL Sweden SEMKO Switzerland SEV Taiwan BSMI Thailand TISI The United Kingdom ASTA The United States UL Requirements for specific countries and regions 33 ...

Page 40: ...in general household waste Follow the local laws and regulations in your area for battery disposal HP encourages customers to recycle used electronic hardware HP original print cartridges and rechargeable batteries For more information about recycling programs see the HP Web site at http www hp com recycle 34 Chapter 10 Recycling ...

Page 41: ...4 7 17 G grounding guidelines 10 guidelines equipment 13 grounding 10 packaging 12 transporting 12 workstation 12 H headphone jack 2 HP Touchpoint Manager 9 J jacks audio out 2 headphone 2 M mass storage device product description 1 memory module product description 1 microphone location 2 microphone product description 1 model name 1 O operating system product description 1 outer ring removal 27 ...

Page 42: ...re part number 4 7 19 storage product description 1 system board removal 25 spare part number 4 5 25 T tablet major components 4 spare part number 6 7 8 specifications 29 tools required 10 transporting guidelines 12 U USB 2 0 port location 2 USB sub board spare part number 8 V video product description 1 volume button board removal 19 spare part number 19 volume control buttons location 2 W webcam...

Reviews: