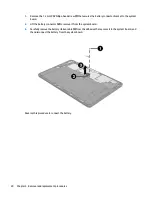
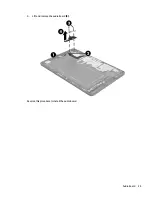
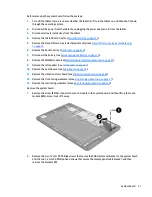
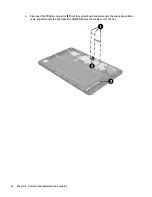
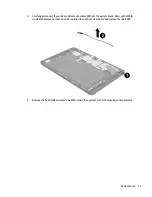
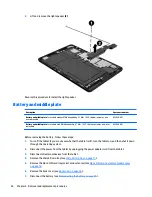
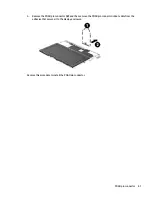
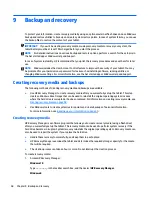
background image

6.

Carefully lift the left edge of the system board and at an angle, remove the USB port from the cutout in 
the display panel assembly. and then remove the system board (2).
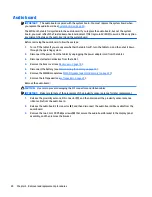
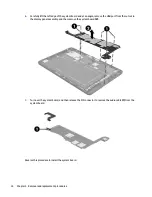
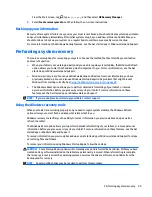
7.

Turn over the system board, and then release the ZIF connector to remove the audio cable (1) from the 
system board.

Reverse this procedure to install the system board.

34

Chapter 5   Removal and replacement procedures

Summary of Contents for Pro Tablet 608 G1

Page 1: ...HP Pro Tablet 608 G1 Maintenance and Service Guide IMPORTANT This document is intended for HP authorized service providers only ...

Page 2: ...anying such products and services Nothing herein should be construed as constituting an additional warranty HP shall not be liable for technical or editorial errors or omissions contained herein Second Edition August 2015 First Edition July 2015 Document Part Number 815234 002 Product notice This guide describes features that are common to most models Some features may not be available on your tab...

Page 3: ...e such as pillows or rugs or clothing to block airflow Also do not allow the AC adapter to come into contact with the skin or a soft surface such as pillows or rugs or clothing during operation The tablet and the AC adapter comply with the user accessible surface temperature limits defined by the International Standard for Safety of Information Technology Equipment IEC 60950 1 iii ...

Page 4: ...iv Safety warning notice ...

Page 5: ...Cables and connectors 13 Grounding guidelines 14 Electrostatic discharge damage 14 Packaging and transporting guidelines 15 Workstation guidelines 15 5 Removal and replacement procedures 17 Tablet component replacement procedures 17 MicroSD card tray 17 Nano SIM card tray select models only 18 Back cover 18 Disconnecting the battery 19 WWAN module select models only 21 Left speaker 23 Audio board ...

Page 6: ...pdate 45 8 Using HP PC Hardware Diagnostics UEFI 47 Downloading HP PC Hardware Diagnostics UEFI 47 9 Backup and recovery 48 Creating recovery media and backups 48 Creating recovery media 48 Backing up your information 49 Performing a system recovery 49 Using the Windows recovery tools 49 Changing the boot device order 50 10 Power adapter requirements 51 Requirements for all countries 51 Requiremen...

Page 7: ... system board 64 GB eMMC integrated onto system board 128 GB eMMC integrated onto system board Your tablet has read write support for SDXC microSD cards up to 2 TB Audio and video Two noise cancellation microphones Two speakers with DTS Studio Sound 8 0 MP full frame high definition rear facing webcamera 2 0 MP full frame high definition front facing webcamera Supports HD audio formats Supports he...

Page 8: ...or Small Tablets retail only available with RS BUs Windows Embedded 8 1 Industry Pro 64 Retail only available with RS BUs Windows 8 1 Core for Higher Education 64 ML only available for Emerging Markets Windows 10 Home 64 Chinese Market CPPP only available for the People s Republic of China Windows 10 Home 64 Shape the Future OS AV for Higher Education only available for Emerging Markets except Asi...

Page 9: ...64 StF MSNA only available for emerging markets Web only support Windows 8 1 Enterprise Windows 10 Enterprise Restore USB for service only USB recovery to align with customer image to include base operating system language packs drivers and QFE s Serviceability End user replaceable parts AC adapter 3 ...

Page 10: ... Audio in microphone combo jack Connects optional powered stereo speakers headphones earbuds a headset or a television audio cable Also connects an optional headset microphone This jack does not support optional microphone only devices 4 Chapter 2 External component identification ...

Page 11: ...p state press the button briefly to exit Sleep CAUTION Unsaved information is lost when the tablet shuts down Be sure to save your work before shutting down the tablet NOTE Although you can turn off the tablet with the power button the recommended procedure is to use the Windows Shut down command 7 Volume button Press to increase or decrease sound 8 Microphones Receive sound 9 Windows button Retur...

Page 12: ...in connector The antennas are not visible from the outside of the tablet For optimal transmission keep the areas immediately around the antennas free from obstructions For wireless regulatory notices see the section of the Regulatory Safety and Environmental Notices that applies to your country or region 6 Chapter 2 External component identification ...

Page 13: ... supported parts for your tablet go to http partsurfer hp com select your country or region and then follow the on screen instructions The model number 1 and serial number 2 of your tablet are located on the back cover of the tablet You may need the information when you travel internationally or when you contact support Locating the serial number and model number 7 ...

Page 14: ... 3G integrated GPS HP hs3110 HSPA Mobile Broadband Module 793516 005 3 Speaker kit includes left and right speakers and cables 823050 001 4 Front facing webcamera includes cable 823055 001 5 Rear facing webcamera includes cable 823056 001 6 Vibration motor board 823042 001 7 Audio USB connector board spared with the system board 8 POGO pin connector and cable 823960 001 9 Antenna kit includes all ...

Page 15: ... x5 Z8500 Quad Core 4 GB RAM memory 64 GB eMMC NFC WWAN support WLAN soldered on 823053 401 Equipped with Windows 8 1 Intel Atom x5 Z8500 Quad Core 4 GB RAM memory 64 GB eMMC NFC WLAN soldered on 826801 401 Equipped with Windows 8 1 Intel Atom x5 Z8500 Quad Core 4 GB RAM memory 128 GB eMMC NFC WWAN support WLAN soldered on 823054 401 11 Battery and middle plate 21 Whr 1S2P Lithium polymer non user...

Page 16: ...rth America supports SKU N3G40AA ABA 833763 001 Sequential part number listing Spare part number Description 762584 001 Power cord with adapter for use in North America 762584 003 Power cord with adapter for use in the United Kingdom 762584 004 Power cord with adapter for use in Europe 762584 005 Power cord with adapter for use in Australia 762584 006 Power cord with adapter for use in India 79019...

Page 17: ... includes thermal pads and audio board 823052 601 System board equipped with Windows 10 Intel Atom x5 Z8500 Quad Core 2 GB RAM memory 64 GB eMMC NFC WLAN soldered on includes thermal pads and audio board 823053 401 System board equipped with Windows 8 1 Intel Atom x5 Z8500 Quad Core 4 GB RAM memory 64 GB eMMC NFC WWAN support WLAN soldered on includes thermal pads and audio board 823053 601 System...

Page 18: ...upports SKU N3G36AA ABA 833760 001 Tablet for use in North America supports SKU N3G41AA ABA 833761 001 Tablet for use in North America supports SKU N3G38AA ABA 833762 001 Tablet for use in North America supports SKU N3G33AA ABA 833763 001 Tablet for use in North America supports SKU N3G40AA ABA 12 Chapter 3 Illustrated parts catalog ...

Page 19: ... disassembly and reassembly can damage plastic parts Use care when handling the plastic parts Apply pressure only at the points designated in the maintenance instructions Cables and connectors CAUTION When servicing the tablet be sure that cables are placed in their proper locations during the reassembly process Improper cable placement can damage the tablet Cables must be handled with extreme car...

Page 20: ... Keep components in their electrostatic safe containers until you are ready to install them Before touching an electronic component discharge static electricity by using the guidelines described in this section Avoid touching pins leads and circuitry Handle electronic components as little as possible If you remove a component place it in an electrostatic safe container The following table shows ho...

Page 21: ... to ground and that proper materials are selected to avoid static charging When grounding is not possible use an ionizer to dissipate electric charges Workstation guidelines Follow these grounding workstation guidelines Cover the workstation with approved static shielding material Use a wrist strap connected to a properly grounded work surface and use properly grounded tools and equipment Use cond...

Page 22: ...n the operator and ground To be effective the conductive must be worn in contact with the skin The following grounding equipment is recommended to prevent electrostatic damage Antistatic tape Antistatic smocks aprons and sleeve protectors Conductive bins and other assembly or soldering aids Nonconductive foam Conductive tabletop workstations with ground cords of one megohm resistance Static dissip...

Page 23: ...ned when servicing the tablet Make special note of each screw size and location during removal and replacement MicroSD card tray CAUTION To reduce the risk of loss of data or an unresponsive system use the following procedure to safely remove the microSD card NOTE The microSD card tray is spared as part of the metal kit spare part number 823036 001 Remove the microSD card tray 1 Save your informat...

Page 24: ... tablet If you are unsure whether the tablet is off turn the tablet on and then shut it down through the operating system 2 Disconnect the power from the tablet by unplugging the power adapter cord from the tablet 3 Disconnect all external devices from the tablet Remove the back cover CAUTION Before turning the display panel assembly upside down make sure the work surface is clear of tools screws ...

Page 25: ...e disconnecting the battery Before disconnecting the battery follow these steps 1 Turn off the computer If you are unsure whether the computer is off turn the computer on and then shut it down through the operating system 2 Disconnect the power from the computer by unplugging the power cord from the computer 3 Disconnect all external devices from the computer 4 Remove the bottom cover see Back cov...

Page 26: ...Lift the battery connector 2 to remove it from the system board 3 Carefully remove the battery ribbon cable 3 from the adhesive that secures it to the system board and then disconnect the battery from the system board Reverse this procedure to connect the battery 20 Chapter 5 Removal and replacement procedures ...

Page 27: ... shut it down through the operating system 2 Disconnect the power from the computer by unplugging the power cord from the computer 3 Disconnect all external devices from the computer 4 Remove the bottom cover see Back cover on page 18 5 Disconnect the battery see Disconnecting the battery on page 19 Remove the WWAN module 1 Disconnect the WWAN antenna cables 1 from the terminals on the WWAN module...

Page 28: ...to prevent incorrect insertion NOTE If the WWAN antennas are not connected to the terminals on the WWAN module the protective sleeves must be installed on the antenna connectors as shown in the following illustration Reverse this procedure to install the WWAN module 22 Chapter 5 Removal and replacement procedures ...

Page 29: ...dapter cord from the tablet 3 Disconnect all external devices from the tablet 4 Remove the back cover see Back cover on page 18 5 Disconnect the battery see Disconnecting the battery on page 19 6 Disconnect the WWAN antenna see WWAN module select models only on page 21 Remove the left speaker 1 Disconnect the left speaker cable 1 from the system board 2 Remove the two 3 mm P0 Phillips screws 2 tha...

Page 30: ...3 Disconnect all external devices from the tablet 4 Remove the back cover see Back cover on page 18 5 Disconnect the battery see Disconnecting the battery on page 19 6 Remove the WWAN module see WWAN module select models only on page 21 7 Remove the left speaker see Left speaker on page 23 Remove the audio board CAUTION Use care to prevent damaging the ZIF connectors and ribbon cables IMPORTANT Ma...

Page 31: ...4 Lift and remove the audio board 4 Reverse this procedure to install the audio board Audio board 25 ...

Page 32: ...ter cord from the tablet 3 Disconnect all external devices from the tablet 4 Remove the back cover see Back cover on page 18 5 Disconnect the battery see Disconnecting the battery on page 19 Remove the vibration motor board 1 Lift up the vibration motor board and then disconnect the cable connector 1 from the system board 2 Remove the vibrator motor cable from the routing tab on the right speaker ...

Page 33: ... see Left speaker on page 23 7 Disconnect the proximity sensor antenna ribbon cable from the audio board see Audio board on page 24 Remove the front facing webcamera CAUTION Use care to prevent damaging the ZIF connectors and ribbon cables 1 Release the copper grounding strap and remove the plastic tape 1 covering the front facing webcamera ZIF connector 2 Release the ZIF connector 2 attaching the...

Page 34: ...re unsure whether the tablet is off turn the tablet on and then shut it down through the operating system 2 Disconnect the power from the tablet by unplugging the power adapter cord from the tablet 3 Disconnect all external devices from the tablet 4 Remove the back cover see Back cover on page 18 5 Disconnect the battery see Disconnecting the battery on page 19 6 Remove the left speaker see Left s...

Page 35: ... connecting the webcamera cable to the battery Start from the elbow of the adhesive and lift the rear facing webcamera cable 3 from the system board 4 Route the camera cable through the antenna proximity sensor area 4 5 Remove the rear facing webcamera 5 from the display panel assembly Reverse this procedure to install the rear facing webcamera IMPORTANT Ensure that the ring gasket is properly pos...

Page 36: ...Atom x5 Z8500 Quad Core 4 GB RAM memory 128 GB eMMC NFC WWAN support WLAN soldered on includes thermal pads and audio board 823054 401 IMPORTANT The processor memory WLAN Bluetooth and eMMC storage card are all embedded on the system board If any of these components fail and require replacement the entire system board must be replaced The tablet provides units with 32G 64GB and 128GB eMMC modules ...

Page 37: ...y on page 19 8 Remove the WWAN module see WWAN module select models only on page 21 9 Remove the left speaker see Left speaker on page 23 10 Remove the audio board see Audio board on page 24 11 Remove the vibration motor board see Vibration motor board on page 26 12 Remove the front facing webcamera see Front facing webcamera on page 27 13 Remove the rear facing webcamera see Rear facing webcamera...

Page 38: ... the POGO pin connector 2 from the system board and disconnect the microphone ribbon cable and disconnect the right speaker cable 3 and move the cables out of the way 32 Chapter 5 Removal and replacement procedures ...

Page 39: ...bles 1 from the system board Remove the MAIN wireless LAN antenna cable from the routing clips on the system board and remove the cable 2 5 Remove the five Phillips silver screws 1 securing the system board to the display panel assembly System board 33 ...

Page 40: ...om the cutout in the display panel assembly and then remove the system board 2 7 Turn over the system board and then release the ZIF connector to remove the audio cable 1 from the system board Reverse this procedure to install the system board 34 Chapter 5 Removal and replacement procedures ...

Page 41: ...ee Nano SIM card tray select models only on page 18 6 Remove the back cover see Back cover on page 18 7 Disconnect the battery see Disconnecting the battery on page 19 8 Remove the WWAN module see WWAN module select models only on page 21 9 Remove the left speaker see Left speaker on page 23 10 Remove the audio board see Audio board on page 24 11 Remove the vibration motor board see Vibration moto...

Page 42: ...e steps 1 Turn off the tablet If you are unsure whether the tablet is off turn the tablet on and then shut it down through the operating system 2 Disconnect the power from the tablet by unplugging the power adapter cord from the tablet 3 Disconnect all external devices from the tablet 4 Remove the MicroSD card tray see MicroSD card tray on page 17 5 Remove the Nano SIM card tray select products on...

Page 43: ...tery provided by HP or a compatible battery purchased from HP WARNING Do not remove the battery from the middle plate To avoid personal injury and damage to the product use extreme care not to puncture twist or crack the battery A puncture or rupture of the battery internally can cause a short with the battery bursting into flames CAUTION Removing a battery that is the sole power source for the ta...

Page 44: ...the operating system 2 Disconnect all external devices from the tablet 3 Remove the MicroSD card tray see MicroSD card tray on page 17 4 Remove the Nano SIM card tray select products only see Nano SIM card tray select models only on page 18 5 Remove the back cover see Back cover on page 18 6 Disconnect the battery see Disconnecting the battery on page 19 7 Remove the WWAN module see WWAN module se...

Page 45: ...ve the right speaker see Right speaker on page 35 15 Remove the battery and middle plate see Battery and middle plate on page 36 Remove the outer ring 1 Remove the power and volume buttons from the ring and then remove the two 2 mm P0 Phillips screws 1 that secure the outer ring to the display panel assembly 2 Disconnect the outer ring from the clips 2 on the frame and then lift the outer ring fro...

Page 46: ...ttery on page 19 8 Remove the WWAN module see WWAN module select models only on page 21 9 Remove the left speaker see Left speaker on page 23 10 Remove the audio board see Audio board on page 24 11 Remove the vibration motor board see Vibration motor board on page 26 12 Remove the front facing webcamera see Front facing webcamera on page 27 13 Remove the rear facing webcamera see Rear facing webca...

Page 47: ...e POGO pin connector 2 and then remove the POGO pin connector ribbon cable from the adhesive that secures it to the display enclosure Reverse this procedure to install the POGO pin connector POGO pin connector 41 ...

Page 48: ...A NOTE The HP adapter included with your tablet is recommended for charging the tablet Temperature Operating 0 C to 35 C 32 F to 95 F Nonoperating 20 C to 60 C 4 F to 140 F Relative humidity non condensing Operating 10 to 90 Nonoperating 5 to 95 Maximum altitude unpressurized Operating 15 m to 3 048 m 50 ft to 10 000 ft Nonoperating 15 m to 12 192 m 50 ft to 40 000 ft NOTE Applicable product safet...

Page 49: ... The Startup menu is displayed 3 Tap F10 BIOS Setup to enter Computer Setup Navigating and selecting in Computer Setup To navigate and select in Computer Setup follow these steps 1 Shut down the tablet 2 Press the power button and when the Press and hold the Volume down button or the ESC key on external Keyboard to enter Startup Menu message displays press the volume down button The Startup menu i...

Page 50: ...te Most BIOS updates on the HP website are packaged in compressed files called SoftPaqs Some download packages contain a file named Readme txt which contains information regarding installing and troubleshooting the file Determining the BIOS version To determine whether available BIOS updates contain later BIOS versions than those currently installed on the tablet you need to know the version of th...

Page 51: ... in the taskbar 2 Make the selections for updates 3 Follow the on screen instructions 4 At the download area follow these steps a Identify the most recent BIOS update and compare it to the BIOS version currently installed on your tablet Make a note of the date name or other identifier You may need this information to locate the update later after it has been downloaded to your hard drive b Follow ...

Page 52: ...lier open the folder on your hard drive that contains the update 4 Double tap the file that has an exe extension for example filename exe The BIOS installation begins 5 Complete the installation by following the on screen instructions NOTE After a message on the screen reports a successful installation you can delete the downloaded file from your hard drive 46 Chapter 7 Using Computer Setup BIOS ...

Page 53: ... UEFI NOTE Instructions for downloading HP PC Hardware Diagnostics UEFI are provided in English only The preferred method is to download UEFI to your tablet You can also download UEFI to a USB device depending on the type of USB device used an adapter for the USB Type C port may needed to transfer the data to the tablet There are two options to download HP PC Hardware Diagnostics Option 1 HP PC Di...

Page 54: ...Use HP Recovery Manager to create recovery media after you successfully set up the tablet This step creates a Windows Reset image that can be used to reinstall the original operating system in cases where the hard drive is corrupted or has been replaced For information on creating recovery media see Creating recovery media on page 48 Use Windows tools to create system restore points and create bac...

Page 55: ...form detailed reformatting of your tablet or remove personal information before you give away or recycle your tablet For more information on these features see the Get started app or Windows Help and Support NOTE If you are unable to boot start up your tablet contact support Using the Windows recovery tools When your tablet is not working properly and you need to regain system stability the Window...

Page 56: ...ct Startup Repair 8 Follow the on screen instructions NOTE For additional information on recovering information using the Windows tools perform a search for these topics in Windows Help and Support Changing the boot device order To change the boot order so that you can boot from an external device NOTE An external flash drive is required to perform this procedure 1 If possible back up all personal...

Page 57: ...ll countries The following requirements are applicable to all countries and regions The length of the adapter cord set must be at least 1 0 m 3 3 ft and no more than 2 0 m 6 5 ft All power adapters must be approved by an acceptable accredited agency responsible for evaluation in the country or region where the adapter will be used Requirements for specific countries and regions Country region Accr...

Page 58: ...KO The People s Republic of China CCC Saudi Arabia SASO Singapore PSB South Africa SABS South Korea KTL Sweden SEMKO Switzerland SEV Taiwan BSMI Thailand TISI The United Kingdom ASTA The United States UL 52 Chapter 10 Power adapter requirements ...

Page 59: ...he battery in general household waste Follow the local laws and regulations in your area for battery disposal HP encourages customers to recycle used electronic hardware HP original print cartridges and rechargeable batteries For more information about recycling programs see the HP Web site at http www hp com recycle 53 ...

Page 60: ...5 transporting 15 workstation 15 H HP PC Hardware Diagnostics UEFI downloading 47 J jacks audio out headphone audio in microphone combo 4 K keyboard product description 2 M mass storage device product description 1 memory module product description 1 metal kit spare part number 11 microphone product description 1 microphones identifying 5 microSD card reader identifying 5 microSD card size 5 micro...

Page 61: ...ader 5 SIM card 5 speaker identifying 5 removal 23 35 spare part number 8 11 23 35 storage product description 1 system board removal 30 spare part number 9 11 30 system restore point creating 48 T tablet major components 8 spare part numbers 11 specifications 42 tablet spare part number 10 tools required 13 transporting guidelines 15 U USB charging port identifying 5 V vibration motor board remov...

Reviews: