background image

3.

Moisten a microfiber cloth with water. The cloth should be moist, but not dripping wet.

IMPORTANT:

To avoid damaging the surface, avoid abrasive cloths, towels, and paper towels.

4.

Wipe the exterior of the product gently with the moistened cloth.

IMPORTANT:

Keep liquids away from the product. Avoid getting moisture in any openings. If liquid 

makes its way inside your HP product, it can cause damage to the product. Do not spray liquids directly 

on the product. Do not use aerosol sprays, solvents, abrasives, or cleaners containing hydrogen peroxide 

or bleach that might damage the finish.

5.

Start with the display (if applicable). Wipe carefully in one direction, and move from the top of the 

display to the bottom. Finish with any flexible cables, like power cord, keyboard cable, and USB cables.

6.

Be sure that surfaces have completely air-dried before turning the device on after cleaning.

7.

Discard the gloves after each cleaning. Clean your hands immediately after you remove the gloves.

See 

Cleaning your computer with a disinfectant on page 24

 for recommended steps to clean the high-touch, 

external surfaces on your computer to help prevent the spread of harmful bacteria and viruses.

Cleaning your computer with a disinfectant

The World Health Organization (WHO) recommends cleaning surfaces, followed by disinfection, as a best 

practice for preventing the spread of viral respiratory illnesses and harmful bacteria.

After cleaning the external surfaces of your computer using the steps in 

Removing dirt and debris from your 

computer on page 23

Caring for wood veneer (select products only) on page 25

, or both, you might also 

choose to clean the surfaces with a disinfectant. A disinfectant that is within HP’s cleaning guidelines is an 

alcohol solution consisting of 70% isopropyl alcohol and 30% water. This solution is also known as rubbing 

alcohol and is sold in most stores.

Follow these steps when disinfecting high-touch, external surfaces on your computer:

1.

Wear disposable gloves made of latex (or nitrile gloves, if you are latex-sensitive) when cleaning the 

surfaces.

2.

Turn off your device and unplug the power cord and other connected external devices. Remove any 

installed batteries from items such as wireless keyboards.

CAUTION:

To prevent electric shock or damage to components, never clean a product while it is turned 

on or plugged in.

3.

Moisten a microfiber cloth with a mixture of 70% isopropyl alcohol and 30% water. The cloth should be 

moist, but not dripping wet.

CAUTION:

Do not use any of the following chemicals or any solutions that contain them, including 

spray-based surface cleaners: bleach, peroxides (including hydrogen peroxide), acetone, ammonia, ethyl 

alcohol, methylene chloride, or any petroleum-based materials, such as gasoline, paint thinner, benzene, 

or toluene.

IMPORTANT:

To avoid damaging the surface, avoid abrasive cloths, towels, and paper towels.

4.

Wipe the exterior of the product gently with the moistened cloth.

IMPORTANT:

Keep liquids away from the product. Avoid getting moisture in any openings. If liquid 

makes its way inside your HP product, it can cause damage to the product. Do not spray liquids directly 

24

Chapter 4  Removal and replacement procedures preliminary requirements

Summary of Contents for ProBook Fortis G10

Page 1: ...Maintenance and Service Guide SUMMARY This guide provides information about spare parts removal and replacement of parts security backing up and more ...

Page 2: ...or versions of Windows Systems may require upgraded and or separately purchased hardware drivers software or BIOS update to take full advantage of Windows functionality Windows is automatically updated which is always enabled High speed internet and Microsoft account required ISP fees may apply and additional requirements may apply over time for updates See http www windows com If your product shi...

Page 3: ...ct the computer air vents Use the computer only on a hard flat surface Do not allow another hard surface such as an adjoining optional printer or a soft surface such as pillows or rugs or clothing to block airflow Also do not allow the AC adapter to come into contact with the skin or a soft surface such as pillows or rugs or clothing during operation The computer and the AC adapter comply with the...

Page 4: ...y requirements 19 Tools required 19 Service considerations 19 Plastic parts 19 Cables and connectors 19 Drive handling 19 Electrostatic discharge information 20 Generating static electricity 20 Preventing electrostatic damage to equipment 21 Personal grounding methods and equipment 21 Grounding the work area 22 Recommended materials and equipment 22 Cleaning your computer 23 Enabling HP Easy Clean...

Page 5: ... HP Sure Start select products only 54 7 Backing up restoring and recovering 55 Backing up information and creating recovery media 55 Using Windows tools for backing up 55 Using the HP Cloud Recovery Download Tool to create recovery media select products only 55 Restoring and recovering your system 55 Creating a system restore 56 Restoring and recovery methods 56 Recovering using HP Recovery media...

Page 6: ...61 Downloading HP PC Hardware Diagnostics UEFI by product name or number select products only 62 Using Remote HP PC Hardware Diagnostics UEFI settings select products only 62 Downloading Remote HP PC Hardware Diagnostics UEFI 62 Downloading the latest Remote HP PC Hardware Diagnostics UEFI version 62 Downloading Remote HP PC Hardware Diagnostics UEFI by product name or number 62 Customizing Remote...

Page 7: ...embedded DisplayPort eDP 250 nits Full high definition FHD 1920 1080 ultra wide viewing angle UWVA FHD UWVA touch on panel TOP High definition HD 1366 768 standard viewing angle SVA Memory Integrated memory supporting 32 GB of RAM nonupgradeable LPDDR4X 4266 Primary storage Solid state drive M 2 2230 PCIe 256 GB 128 GB Audio and video HD camera 720p Dual array microphone Dual speakers Wireless net...

Page 8: ...LA MERCO 45 W nPFC USB Type C Power cord C5 1 0 m 3 3 ft conventional Operating system Windows 10 Enterprise 64 Windows 10 Enterprise 64 LTSC 2109 Windows 11 Enterprise 64 Windows 11 Home 64 Windows 11 Home 64 Single Language Windows 11 Home 64 Single Language Africa Market CCC Windows 11 Home 64 StF MSNA for Higher Education Windows 11 Home 64 StF MSNA for Higher Education Strategic Windows 11 Pr...

Page 9: ...Table 1 1 Product components and their descriptions continued Category Description Windows 11 Pro 4 Value FreeDOS 3 0 Serviceability End user replaceable parts AC adapter Product description 3 ...

Page 10: ...arbuds or a headset For additional safety information see the Regulatory Safety and Environmental Notices To access this guide Select the Search icon select products only in the taskbar type HP Documentation in the search box and then select HP Documentation NOTE When a device is connected to the jack the computer speakers are disabled 2 USB SuperSpeed 5 Gbps port Connects a USB device provides hi...

Page 11: ...k jack status lights Connects a network cable Green left The network is connected Amber right Activity is occurring on the network 4 HDMI port Connects an optional video or audio device such as a high definition television any compatible digital or audio component or a high speed High Definition Multimedia Interface HDMI device 5 USB SuperSpeed 5 Gbps port Connects a USB device provides high speed...

Page 12: ... factory in low blue light mode for improved eye comfort and safety Also blue light mode automatically adjusts blue light emissions when you are using the computer at night or for reading WARNING To reduce the risk of serious injury read the Safety Comfort Guide It describes proper workstation setup and proper posture health and work habits for computer users The Safety Comfort Guide also provides...

Page 13: ...ions For wireless regulatory notices see the section of the Regulatory Safety and Environmental Notices that applies to your country or region To access this guide Select the Search icon select products only in the taskbar type HP Documentation in the search box and then select HP Documentation Keyboard area Keyboards can vary by language NOTE The keyboard including the function keys and power key...

Page 14: ...lect the button Touchpad components Use the illustration and table to identify the touchpad components Table 2 4 Touchpad components and their descriptions Component Description 1 Touchpad zone Reads your finger gestures to move the pointer or activate items on the screen 2 Left touchpad button Functions like the left button on an external mouse 3 Right touchpad button Functions like the right but...

Page 15: ...ly to initiate Sleep When the computer is in the Sleep state press the key briefly to exit Sleep select products only When the computer is in Hibernation press the key briefly to exit Hibernation IMPORTANT Pressing and holding down the power key results in the loss of unsaved information If the computer has stopped responding and shutdown procedures are ineffective press and hold the power key for...

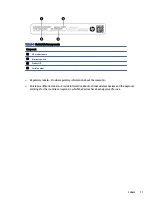
Page 16: ... tablet kickstand Service label Provides important information to identify your computer When contacting support you might be asked for the serial number the product number or the model number Locate this information before you contact support Your service label will resemble one of the examples shown below Refer to the illustration that most closely matches the service label on your computer Tabl...

Page 17: ...oduct ID 4 Serial number Regulatory labels Provide regulatory information about the computer Wireless certification labels Provide information about optional wireless devices and the approval markings for the countries or regions in which the devices have been approved for use Labels 11 ...

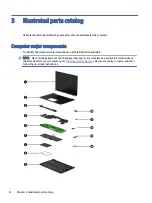
Page 18: ...dentify the computer major components use this illustration and table NOTE HP continually improves and changes product parts For complete and current information about supported parts for your computer go to http partsurfer hp com select your country or region and then follow the on screen instructions 12 Chapter 3 Illustrated parts catalog ...

Page 19: ...x1 Intel Core i3 1210U processor and 8 GB of system memory N15443 xx1 Intel Core i3 1210U processor and 4 GB of system memory N15442 xx1 6 Battery 3 cell 42 Whr M73474 005 7 Touchpad NOTE The touchpad cable is available in the Cable Kit as spare part number N20852 001 N00689 001 8 Touchpad bracket not available as a spare part 9 Bottom cover N14831 001 10 Solid state drive PCIe 2230 NOTE The solid...

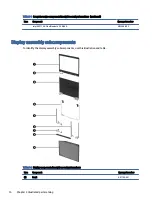
Page 20: ...Intel AX211 Wi Fi 6e Bluetooth 5 2 WLAN M53366 002 Display assembly subcomponents To identify the display assembly subcomponents use this illustration and table Table 3 2 Display component descriptions and part numbers Item Component Spare part number 1 Bezel N07100 001 14 Chapter 3 Illustrated parts catalog ...

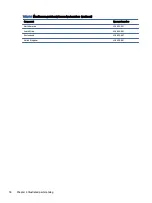
Page 21: ...00685 001 Miscellaneous parts To identify the miscellaneous parts use this table Table 3 3 Miscellaneous part descriptions and part numbers Component Spare part number AC adapter 120 W power factor correction PFC 4 5 mm M95377 001 65 W non power factor correction nPFC 3 pin 4 5 mm 710412 001 65 W nPFC USB C 1 8 m 6 0 ft L32392 001 45 W nPFC 4 5 mm 741727 001 45 W nPFC USB C 860210 850 45 W nPFC wa...

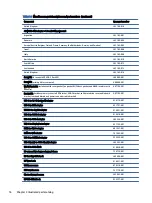
Page 22: ...07109 001 Bracket Kit includes memory cover left I O bracket USB C bracket solid state drive cover audio board bracket touchpad dimple and power connector cable bracket N07102 001 USB C to RJ 45 network adapter 918779 001 USB C to VGA adapter 831751 001 USB 3 0 to Gigabit adapter 914031 001 USB C to USB 3 0 adapter 814618 001 USB C to USB A adapter L65254 001 USB C to DisplayPort adapter 831753 00...

Page 23: ...ermany the Netherlands Norway and Sweden L19361 001 Israel L19362 001 Italy L19364 001 North America L19367 001 South Africa L19369 001 Switzerland L19370 001 United Kingdom L19373 001 Power cord C5 conventional 1 8 m 6 0 ft Argentina L19357 002 Denmark L19360 002 Europe Austria Belgium Finland France Germany the Netherlands Norway and Sweden L19361 002 Israel L19362 002 Italy L19364 002 North Ame...

Page 24: ...laneous part descriptions and part numbers continued Component Spare part number North America L36822 001 South Africa L36824 001 Switzerland L36825 001 United Kingdom L36828 001 18 Chapter 3 Illustrated parts catalog ...

Page 25: ...ic parts Cables and connectors Handle cables with extreme care to avoid damage IMPORTANT When servicing the computer be sure that cables are placed in their proper locations during the reassembly process Improper cable placement can damage the computer Apply only the tension required to unseat or seat the cables during removal and insertion Handle cables by the connector whenever possible In all c...

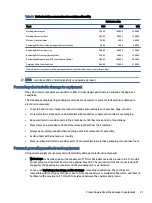
Page 26: ...vices or microcircuitry Often the spark is neither felt nor heard but damage occurs An electronic device exposed to electrostatic discharge ESD might not appear to be affected at all and can work perfectly throughout a normal cycle The device might function normally for a while but it has been degraded in the internal layers reducing its life expectancy Networks built into many integrated circuits...

Page 27: ...tatic safe containers such as tubes bags or boxes Protect all electrostatic parts and assemblies with conductive or approved containers or packaging Keep electrostatic sensitive parts in their containers until they arrive at static free stations Place items on a grounded surface before removing them from their container Always be properly grounded when touching a sensitive component or assembly Av...

Page 28: ...ng connectors or test equipment Use fixtures made of static safe materials when fixtures must directly contact dissipative surfaces Keep the work area free of nonconductive materials such as ordinary plastic assembly aids and polystyrene foam Use conductive field service tools such as cutters screwdrivers and vacuums Avoid contact with pins leads or circuitry Recommended materials and equipment HP...

Page 29: ...select the HP Easy Clean tile 2 Now that your device is disabled for a short period see Removing dirt and debris from your computer on page 23 for the recommended steps to clean the high touch external surfaces on your computer After you remove the dirt and debris you can also clean the surfaces with a disinfectant See Cleaning your computer with a disinfectant on page 24 for guidelines to help pr...

Page 30: ...and debris from your computer on page 23 Caring for wood veneer select products only on page 25 or both you might also choose to clean the surfaces with a disinfectant A disinfectant that is within HP s cleaning guidelines is an alcohol solution consisting of 70 isopropyl alcohol and 30 water This solution is also known as rubbing alcohol and is sold in most stores Follow these steps when disinfec...

Page 31: ...ct with sharp objects or rough surfaces that might scratch the wood See Removing dirt and debris from your computer on page 23 for the recommended steps to clean the high touch external surfaces on your computer After you remove the dirt and debris you can also clean the surfaces with a disinfectant See Cleaning your computer with a disinfectant on page 24 for sanitizing guidelines to help prevent...

Page 32: ...ter and allow the operating system to open 2 Select the search icon in the taskbar 3 Type Event Viewer and then press enter 4 Select the log from the left panel Details display in the right panel Chrome 1 Go to support google com chrome 2 Search collect Chrome device logs Technical bulletins To locate technical bulletins 1 Go to www hp com 2 Place the cursor over Problem solving to display more op...

Page 33: ...4 3 Support information locations continued Service consideration Path to access information 3 Near the bottom of the window select Notebook PCs and then select your location Accessing support information 27 ...

Page 34: ...ollow the on screen instructions Make special note of each screw size and location during removal and replacement Preparation for disassembly To remove and replace computer components use these procedures For initial safety procedures see Removal and replacement procedures preliminary requirements on page 19 1 Turn off the computer If you are unsure whether the computer is off or in Hibernation tu...
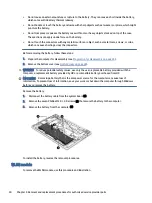
Page 35: ...f the cover from the computer To replace the bottom cover reverse the removal procedures Battery To remove the battery use this procedure and illustration Table 5 2 Battery description and part number Description Spare part number Battery 3 cell 42 Whr M73474 005 WARNING To avoid personal injury and damage to the product Do not puncture twist or crack the battery Battery 29 ...

Page 36: ...n page 28 2 Remove the bottom cover see Bottom cover on page 28 WARNING To reduce potential safety issues use only the user replaceable battery provided with the computer a replacement battery provided by HP or a compatible battery purchased from HP IMPORTANT Removing a battery that is the sole power source for the computer can cause loss of information To prevent loss of information save your wor...

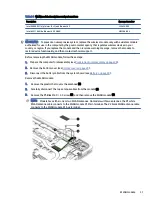
Page 37: ...ntact technical support Before removing the WLAN module follow these steps 1 Prepare the computer for disassembly see Preparation for disassembly on page 28 2 Remove the bottom cover see Bottom cover on page 28 3 Disconnect the battery cable from the system board see Battery on page 29 Remove the WLAN module 1 Remove the plastic that covers the antennas 1 2 Carefully disconnect the two antenna cab...

Page 38: ... Spare part number 256 GB PCIe M11042 002 128 GB PCIe M11040 002 Solid state drive cover in Bracket Kit N07102 001 Before removing the solid state drive follow these steps 1 Prepare the computer for disassembly see Preparation for disassembly on page 28 2 Remove the bottom cover see Bottom cover on page 28 3 Disconnect the battery cable from the system board see Battery on page 29 Remove the solid...

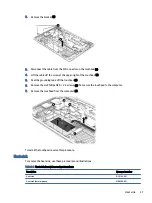
Page 39: ...5 5 RTC battery description and part number Description Spare part number RTC battery L43797 001 Before removing the RTC battery follow these steps 1 Prepare the computer for disassembly see Preparation for disassembly on page 28 2 Remove the bottom cover see Bottom cover on page 28 3 Remove the battery see Battery on page 29 Remove the RTC battery 1 Disconnect the battery cable from the system bo...

Page 40: ...N07102 001 Before removing the USB audio board follow these steps 1 Prepare the computer for disassembly see Preparation for disassembly on page 28 2 Remove the bottom cover see Bottom cover on page 28 3 Disconnect the battery cable from the system board see Battery on page 29 Remove the USB audio board 1 Disconnect the two cables from the ZIF connectors on the USB audio board 1 2 Remove the two P...

Page 41: ...N07104 001 Before removing the speaker follow these steps 1 Prepare the computer for disassembly see Preparation for disassembly on page 28 2 Remove the bottom cover see Bottom cover on page 28 3 Disconnect the battery cable from the system board see Battery on page 29 Remove the speaker 1 Disconnect the speaker cable from the system board 1 2 Remove display cable from the clip on the left side of...

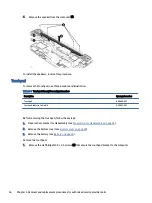
Page 42: ...pad cable in Cable Kit N20852 001 Before removing the touchpad follow these steps 1 Prepare the computer for disassembly see Preparation for disassembly on page 28 2 Remove the bottom cover see Bottom cover on page 28 3 Remove the battery see Battery on page 29 Remove the touchpad 1 Remove the six Phillips M2 0 2 5 screws 1 that secure the touchpad bracket to the computer 36 Chapter 5 Removal and ...

Page 43: ... 3 6 Remove the six Phillips M2 0 2 5 screws 4 that secure the touchpad to the computer 7 Remove the touchpad from the computer 5 To install the touchpad reverse this procedure Heat sink To remove the heat sink use these procedures and illustrations Table 5 9 Heat sink descriptions and part numbers Description Spare part number Heat sink N20164 001 Heat sink thermal grease M86388 001 Heat sink 37 ...

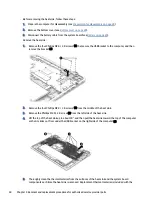
Page 44: ...the four Phillips M2 0 3 0 screws 1 from the middle of the heat sink 3 Remove the Phillips M2 0 3 0 screw 2 from the left side of the heat sink 4 Lift the top of the heat sink up to about 30 and then pull the heat sink toward the top of the computer so that it slides out from under the USB bracket on the right side of the computer 3 5 Thoroughly clean the thermal material from the surfaces of the ...

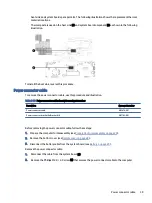
Page 45: ...ription and part number Description Spare part number Power connector cable N02674 001 Power connector bracket in Bracket Kit N07102 001 Before removing the power connector cable follow these steps 1 Prepare the computer for disassembly see Preparation for disassembly on page 28 2 Remove the bottom cover see Bottom cover on page 28 3 Disconnect the battery cable from the system board see Battery o...

Page 46: ...1210U processor and 8 GB of system memory N15443 xx1 Intel Core i3 1210U processor and 4 GB of system memory N15442 xx1 Before removing the system board follow these steps 1 Prepare the computer for disassembly see Preparation for disassembly on page 28 2 Remove the bottom cover see Bottom cover on page 28 3 Disconnect the battery cable from the system board see Battery on page 29 When you replace...

Page 47: ...cable 3 Power connector cable 4 Touchpad cable ZIF 5 Keyboard cable reverse ZIF 6 RTC battery cable 7 2 Remove the five Phillips M2 0 4 0 screws 1 that secure the system board and USB bracket to the computer Four screws secure the USB bracket 3 Remove the USB bracket 2 4 Remove the six Phillips M2 5 3 0 screws 3 that secure the system board to the computer System board 41 ...

Page 48: ... removing the display panel follow these steps 1 Prepare the computer for disassembly see Preparation for disassembly on page 28 2 Remove the bottom cover see Bottom cover on page 28 3 Disconnect the battery cable from the system board see Battery on page 29 Remove the display assembly 1 Disconnect the following cables from the system board 1 WLAN antennas 2 Camera cable 3 Display cable 42 Chapter...

Page 49: ...from the display 3 4 Slide the hinge cover to the right and then remove it from the display NOTE When installing the hinge cover align the cover with the marks press onto the bezel and then slide the cover left until it clicks into place The hinge cover is available in the Hinge Kit as spare part number N00687 001 Display assembly 43 ...

Page 50: ... Insert a thin tool under the bezel and pull it around the entire bezel to release it 2 c Remove the display bezel 3 from the display assembly The bezel is available as spare part number N07100 001 6 If you need to remove the camera module 44 Chapter 5 Removal and replacement procedures for authorized service provider parts ...

Page 51: ...e the four Phillips M2 5 2 5 screws 1 from each hinge b The display panel is secured to the display rear cover with tape that is installed under the panel First remove the tape of the left and right sides of the panel and then lift the bottom of the panel up to access and remove more tape To remove the panel use tweezers to grasp the end of the tape on the left and right sides of the panel 1 While...

Page 52: ...ple times before it is completely removed Display panels are available as the following spare part numbers N08932 001 FHD antiglare UWVA nontouch N08933 001 FHD antiglare UWVA Touch on panel TOP N08935 001 HD antiglare SVA nontouch 46 Chapter 5 Removal and replacement procedures for authorized service provider parts ...

Page 53: ...ment display panels come with the bracket installed To install the panel screw the bracket onto the display back cover install pull tape onto bracket and then align the panel on the top of the display back cover with the bracket After installation if the panel is misaligned or you can see tape from the assembled display near the bezel you must disassemble and reassemble the panel to correct 8 If y...

Page 54: ...then remove the cable from the clips along the bottom of the display rear cover 3 The camera cable is available in the Cable Kit as spare part number N07101 001 10 If you need to remove the WLAN antennas a Remove the cables from their routing along the sides and bottom of the display rear cover 1 48 Chapter 5 Removal and replacement procedures for authorized service provider parts ...

Page 55: ...le 5 12 Top cover with keyboard descriptions and part numbers Description Spare part number Top cover with keyboard N14832 xx1 Table 5 13 Spare part country codes For use in country or region Spare part number For use in country or region Spare part number For use in country or region Spare part number Belgium A41 Hungary 211 Saudi Arabia 171 Brazil 201 Iceland DD1 Slovenia BA1 Bulgaria 261 India ...

Page 56: ...r use in country or region Spare part number For use in country or region Spare part number France 051 Portugal 131 Ukraine BD1 Germany 041 Romania 271 United Kingdom 031 Greece 151 Russia 251 United States 001 50 Chapter 5 Removal and replacement procedures for authorized service provider parts ...

Page 57: ...d arrow keys and then press enter or use a pointing device to select the item To scroll up and down select the up arrow or the down arrow in the upper right corner of the screen or use the up arrow key or the down arrow key on the keyboard To close open dialog boxes and return to the main Computer Setup screen press esc and then follow the on screen instructions To exit Computer Setup choose one o...

Page 58: ...nd System BIOS by pressing fn esc select products only Or you can use Computer Setup 1 Start Computer Setup See Using Computer Setup on page 51 2 Select Main and then select System Information 3 To exit Computer Setup menus without saving your changes select Main select Ignore Changes and Exit and then select Yes NOTE If you are using arrow keys to highlight your choice you must then press enter T...

Page 59: ...r before installing any software updates especially system BIOS updates Installing a BIOS update BIOS installation procedures vary Follow any instructions that are displayed on the screen after the download is complete If no instructions are displayed follow these steps 1 Select the Search icon select products only from the taskbar type file and then select File Explorer 2 Select your hard drive d...

Page 60: ...rating system To access TPM settings in Computer Setup 1 Start Computer Setup See Using Computer Setup on page 51 2 Select Security select TPM Embedded Security and then follow the on screen instructions Using HP Sure Start select products only Select computer models are configured with HP Sure Start a technology that monitors the computer s BIOS for attacks or corruption If the BIOS becomes corru...

Page 61: ...egular backups to avoid information loss NOTE If computer storage is 32 GB or less Microsoft System Restore is disabled by default Using the HP Cloud Recovery Download Tool to create recovery media select products only You can use the HP Cloud Recovery Download Tool to create HP Recovery media on a bootable USB flash drive For details Go to http www hp com search for HP Cloud Recovery and then sel...

Page 62: ... Select the Start button select All apps select products only select the Get Help app and then enter the task you want to perform NOTE You must be connected to the internet to access the Get Help app Recovering using HP Recovery media You can use HP Recovery media to recover the original operating system and software programs that were installed at the factory On select products it can be created ...

Page 63: ... the volume up button and then select f9 or Turn on or restart the tablet quickly press and hold the volume down button and then select f9 3 Select the optical drive or USB flash drive from which you want to boot and then follow the on screen instructions Using HP Sure Recover select products only Select computer models are configured with HP Sure Recover a PC operating system OS recovery solution...

Page 64: ...hat requires hardware replacement a 24 digit failure ID code is generated for select component tests For interactive tests such as keyboard mouse or audio and video palette you must perform troubleshooting steps before you can receive a failure ID You have several options after you receive a failure ID Select Next to open the Event Automation Service EAS page where you can log the case or Scan the...

Page 65: ...nd then select All apps select products only 2 Select HP PC Hardware Diagnostics Windows 3 When the tool opens select the type of diagnostic test that you want to run and then follow the on screen instructions NOTE To stop a diagnostic test select Cancel Downloading HP PC Hardware Diagnostics Windows The HP PC Hardware Diagnostics Windows downloading instructions are provided in English only You m...

Page 66: ... install HP PC Hardware Diagnostics Windows navigate to the folder on your computer or the USB flash drive where the exe file downloaded double click the exe file and then follow the on screen instructions Using HP PC Hardware Diagnostics UEFI HP PC Hardware Diagnostics UEFI Unified Extensible Firmware Interface allows you to run diagnostic tests to determine whether the computer hardware is funct...

Page 67: ... Diagnostics UEFI version on page 61 b Hard drive c BIOS 3 When the diagnostic tool opens select a language select the type of diagnostic test you want to run and then follow the on screen instructions Downloading HP PC Hardware Diagnostics UEFI to a USB flash drive Downloading HP PC Hardware Diagnostics UEFI to a USB flash drive can be useful in some situations HP PC Hardware Diagnostics UEFI is ...

Page 68: ...e HP PC Hardware Diagnostics UEFI HP Remote PC Hardware Diagnostics UEFI is also available as a SoftPaq that you can download to a server Downloading the latest Remote HP PC Hardware Diagnostics UEFI version You can download the latest HP PC Hardware Diagnostics UEFI version to a USB flash drive 1 Go to http www hp com go techcenter pcdiags The HP PC Diagnostics home page is displayed 2 Select Dow...

Page 69: ...to run remote diagnostics Set a location for storing the test results You can also set the user name and password that you use for uploads Display status information about the diagnostics run previously To customize Remote HP PC Hardware Diagnostics UEFI settings follow these steps 1 Turn on or restart the computer and when the HP logo appears press f10 to enter Computer Setup 2 Select Advanced an...

Page 70: ...voltage and current 5 V dc 2 A 12 V dc 3 A 15 V dc 3 A 45 W USB C 5 V dc 3 A 9 V dc 3 A 12 V dc 3 75 A 15 V dc 3 A 45 W USB C 5 V dc 3 A 9 V dc 3 A 10 V dc 3 75 A 12 V dc 3 75 A 15 V dc 3 A 20 V dc 2 25 A 45 W USB C 9 5 V dc 3 33 A 65 W Temperature Operating 5 C to 35 C 41 F to 95 F Nonoperating 20 C to 60 C 4 F to 140 F Relative humidity noncondensing Operating 10 to 90 Nonoperating 5 to 95 Maxim...

Page 71: ...isplay Table 9 2 Display specifications Metric U S Active diagonal size 35 6 cm 14 0 in Resolution 1920 1080 FHD 1366 768 HD Surface treatment Antiglare nontouch Brightness 250 nits Viewing angle UWVA SVA Backlight LED Display panel interface eDP 35 6 cm 14 0in display specifications 65 ...

Page 72: ... and AMD based system boards NOTE If your tablet has a keyboard base connect to the keyboard base before beginning steps in this chapter Current BIOS steps Use these instructions to restore nonvolatile memory 1 Follow these steps to restore the nonvolatile memory that can contain personal data Restoring or reprogramming nonvolatile memory that does not store personal data is neither necessary nor ...

Page 73: ...f the system has a Trusted Platform Module TPM fingerprint reader or both one or two prompts will appear one to clear the TPM and the other to Reset Fingerprint Sensor Press or tap f1 to accept or f2 to reject l Remove all power and system batteries for at least 24 hours 2 Complete one of the following Remove and retain the storage drive or Clear the drive contents by using a third party utility d...

Page 74: ...cts only on page 72 Data cannot be written to this device via the host processor The content is managed solely by the HP Sure Start Embedded Controller This memory is protected by the HP Sure Start Embedded Controller Real Time Clock RTC battery backed up CMOS configuration memory 256 bytes No Yes Stores system date and time and noncritical data RTC battery backed up CMOS is programmed using Compu...

Page 75: ...oning Data and iAMT third party data store Management Engine Code is programmed at the factory Code is updated via Intel secure firmware update utility Unique Provisioning Data can be entered at the factory or by an administrator using the Management Engine MEBx setup utility The third party data store contents can be populated by a remote management console or local applications that have been re...

Page 76: ...cation can make the call to write to the flash Questions and answers Use this section to answer your questions about nonvolatile memory 1 How can the BIOS settings be restored returned to factory settings IMPORTANT The restore defaults feature does not securely erase any information on your hard drive See question and answer 6 for steps to securely erase information The restore defaults feature do...

Page 77: ...he memory module such as size serial number data width speed and timing voltage and thermal information This information is written by the module manufacturer and stored on an EEPROM You cannot write to this EEPROM when the memory module is installed in a computer Third party tools do exist that can write to the EEPROM when the memory module is not installed in a computer Various third party tools...

Page 78: ...tinuously monitors your computer s BIOS for attacks or corruption If the BIOS becomes corrupted or is attacked HP Sure Start restores the BIOS to its previously safe state without user intervention Those select computer models ship with HP Sure Start configured and enabled HP Sure Start is configured and already enabled so that most users can use the HP Sure Start default configuration Advanced us...

Page 79: ...s must be approved by an acceptable accredited agency responsible for evaluation in the country or region where the power cord set will be used The power cord sets must have a minimum current capacity of 10 A and a nominal voltage rating of 125 V ac or 250 V ac as required by the power system of each country or region The appliance coupler must meet the mechanical configuration of an EN 60 320 IEC...

Page 80: ...lexible cord and wall plug must bear a T mark and registration number in accordance with the Japanese Dentori Law The flexible cord must be Type VCTF three conductor 0 75 mm or 1 25 mm conductor size The wall plug must be a two pole grounding type with a Japanese Industrial Standard C8303 7 A 125 V ac configuration 4 The flexible cord must be Type RVV three conductor 0 75 mm conductor size Power c...

Page 81: ...ttery in general household waste Follow the local laws and regulations in your area for battery disposal HP encourages customers to recycle used electronic hardware HP original print cartridges and rechargeable batteries For more information about recycling programs see the HP website at http www hp com recycle Recycling 75 ...

Page 82: ...pecifications 64 connector power 5 D display specifications 64 65 display assembly illustrated 13 spare part numbers 13 subcomponents 14 display back cover illustrated 15 spare part number 15 display bezel illustrated 14 spare part number 14 display cable illustrated 15 spare part number 15 display components 6 display panel illustrated 15 product description 1 spare part number 15 E electrostatic...

Page 83: ... product name 1 serviceability 3 solid state drive 1 video 1 wireless 1 product name 1 product name and number computer 10 R recovery 55 discs 56 media 56 USB flash drive 56 recovery media 55 creating using HP Cloud Recovery Download Tool 55 creating using Windows tools 55 regulatory information regulatory label 10 wireless certification labels 10 Remote HP PC Hardware Diagnostics UEFI settings cu...

Page 84: ...d port identifying 4 5 USB Type C power connector and SuperSpeed port identifying 5 USB audio board illustrated 13 removal 34 spare part number 13 34 V video product description 1 W Windows backup 55 recovery media 55 system restore point 55 Windows key identifying 9 Windows tools using 55 wireless antennas illustrated 15 spare part number 15 wireless antennas identifying 6 wireless certification ...

Reviews: