2
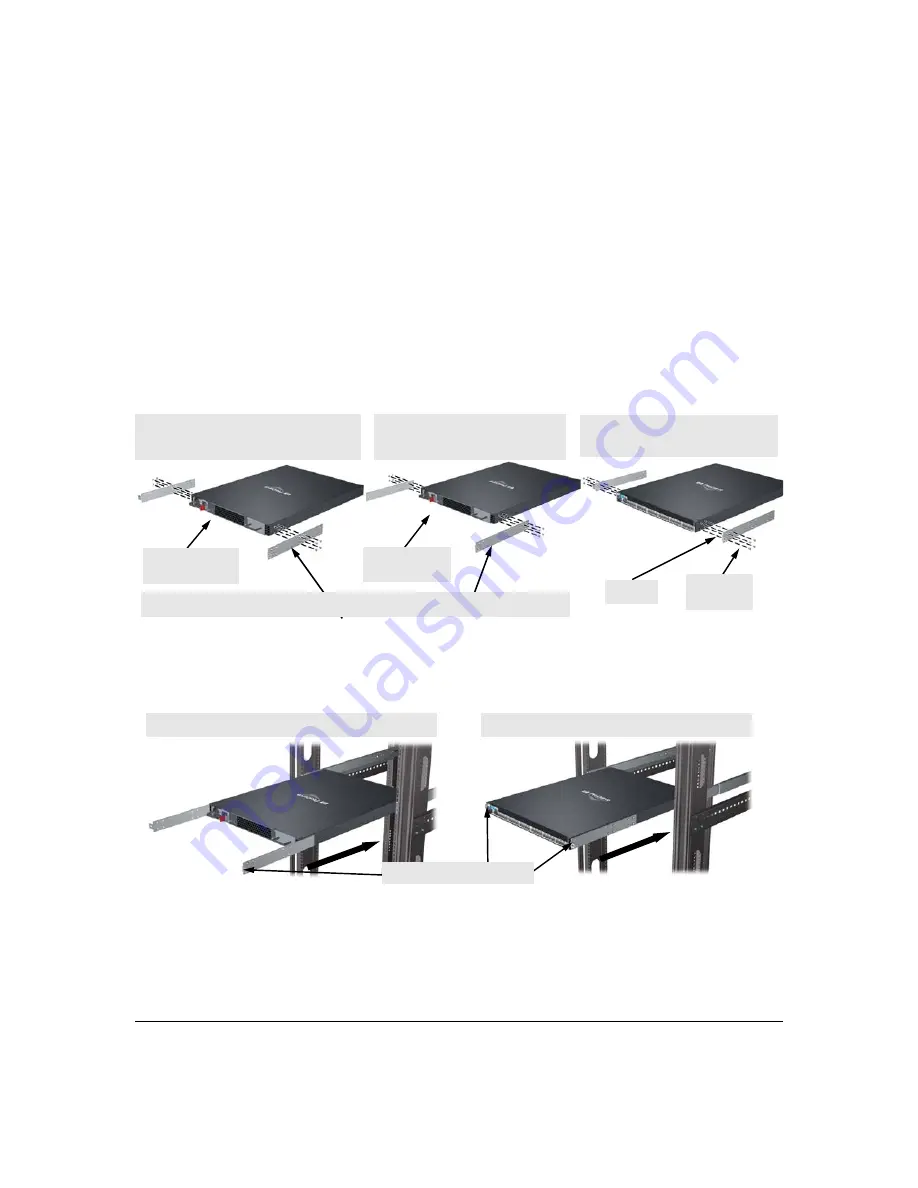
2. Install the switch on the rails.
a.
Install the mounting brackets on the switch.
If you install a 6600 Switch with the power side facing the cold aisle, you must install the switch
as shown in Option 1 or 2 to leave space for an air plenum.
If you install a 6600 Switch with the port side facing the cold aisle, you must install the switch as
shown in Option 3 without an air plenum.
Depending on whether you install the switch in a power-side or port-side mounting, locate the
set of holes where you want to attach the mounting brackets. Use eight M4 8mm screws (four
per bracket) to attach both brackets.
Note that in a power-side mounting, you must attach the brackets in different positions according
to the length of a 6600 Switch. The brackets will extend beyond the back of the switch.
Figure 2.
Attaching the Mounting Brackets on a 6600 Switch
b.
Slide the switch onto the rails until the switch is fully inserted and the mounting hole in
each bracket lines up with the mounting holes in the rack.
Figure 3.
Installing the Switch in the Rack
Important:
In a port-side or power-side mounting, you must ensure that the air flow direction is from
the cold side to the hot side of the aisle. If necessary, reverse the direction of the fans to provide
adequate switch cooling as described in Chapter 2, “Installing the Switch”, in the
6600 Switches:
Installation and Getting Started Guide
at
www.procurve.com/manuals
.
Mounting
screws
Bracket
Option 3 - Port-side-front mounting for
all 6600
Switches
Option 1- Power-side-front mounting for
6600-
24XG
,
6600-48G
, and
6600-48G-4XG
Switches
(24-inch depth products)
Space for shorter
air plenum
Option 2 - Power-side-front mounting
for
6600-24G
and
6600-24G-4XG
Switches (20-inch depth products)
Space for longer
air plenum
Position the bracket in a power-side mounting according to the length of your 6600 Switch.
Power-side-front mounting for a 6600 Switch (Option 1 or 2)
Port-side-front mounting for a 6600 Switch (Option 3)
Mounting Holes on Brackets


