background image

The installation and initial setup of your HP router involves these tasks:

1. Ensuring that you received a complete set of accessories with your

router. (page 1-3).

2. Preparing the network (page 1-4).

3. Preparing the router hardware (page 1-6).

4. Initializing and verifying the router (page 1-26).

Installation

1-2

Summary of Contents for Series 200

Page 1: ...Installation Guide Series 200 Series 400 HP AdvanceStack Routers ...

Page 2: ...Installation Guide Hewlett Packard Series 200 Routers Hewlett Packard Series 400 Routers ...

Page 3: ...r Installation und dem Betrieb mit den Sicherheit smarkierungen und Anleitungen vertraut sind Bitte lesen Sie das Kapitel mit der Überschrift Hinweise zur Sicherheit Considerazioni sulla sicurezza Esaminare il prodotto e la relativa documentazione per familiarizzarsi con gli avvisi e le istruzioni di sicurezza prima dell installazione e dell uso Vedere la sezione di questo documento intitolata Con...

Page 4: ...verifying the router Chapter 2 Router Description Covers the general hardware features of all HP rack and stack routers including port identities status LED indications resetting clearing and initialization sequence Chapter 3 Troubleshooting Provides basic tips status LED interpre tation and indicated actions verifying LED operation and various diag nostic tests Appendixes Provide cable and connec...

Page 5: ...Installation Guide Preface 4 ...

Page 6: ...ot the Router 1 30 C Set the Correct Time and Date Optional 1 33 D Set Manager and User Passwords Optional 1 34 E Verify Router Initialization 1 36 2 Features and General Hardware Operation Features 2 2 Router Ports 2 3 Additional Features 2 4 Interpreting Front Panel LEDs 2 5 Interpreting Back Panel LEDs 2 6 Meanings of Router Status LEDs 2 8 Meanings of Port Status LEDs 2 9 Testing the LEDs 2 13...

Page 7: ...ting a Transceiver on an Ethernet 802 3 Port 3 15 Testing a Link 3 16 A Cables and Connectors HP Cables A 3 Other Standard Cables A 4 Cable and Connector Pin Outs A 5 Router Console Port Connector Pin Outs A 5 RS 232 Modem Cable Minimum Pin Outs A 5 RS 232 Null Modem Cable for Terminal PC with 25 Pin Connector Minimum Pin Out A 6 RS 232 Null Modem Cable for Terminal PC with 9 Pin Connector Minimum...

Page 8: ...ion HP 35031A Support Link II B 2 HP 37212B Support Link B 2 HP 50759A Support Link B 2 Hayes 2400 Smartmodem B 3 Black Box V 32 9600 Async B 3 C Specifications Physical without brackets C 2 Power Consumption C 2 Environmental C 3 Electromagnetic Emissions C 3 Acoustical for Germany C 3 Safety Approvals C 4 Data Communications Specifications C 4 D FDDI Cable Attachment Configurations Dual Attach S...

Page 9: ...1 Installation and Initial Setup ...

Page 10: ...ter involves these tasks 1 Ensuring that you received a complete set of accessories with your router page 1 3 2 Preparing the network page 1 4 3 Preparing the router hardware page 1 6 4 Initializing and verifying the router page 1 26 Installation 1 2 ...

Page 11: ...k of the safety agency in your country that defines the regulations for power cords That is your assurance that the power cord can be used safely with the router Australia 8120 1369 Switzerland 8120 2104 Denmark 8120 2956 United Kingdom 8120 1351 Europe 8120 1689 United States Canada 8120 1378 Japan 8120 4753 Cables The cables you receive with your router depend on the options in your router order...

Page 12: ...bit s Physical medium cable type For each WAN link include the following on the map WAN link type circuit type and WAN link speed Interface type X 21 V 35 etc HDLC address DCE DTE for HP Point to Point links X 121 address and connection ID for X 25 links Quality of service LLC1 LLC2 X 25 Other pertinent data such as ISDN switched 56 or other dial type numbers Frame relay DLCI encoding type and len...

Page 13: ...d in this chapter to verify and configure the router The console must be an ANSI or VT100 terminal or a PC running an ANSI or VT100 terminal emulator You also need either a cable or a modem and a modem cable for connecting the console Refer to appendixes A and B C o n s o l e N o t e Connecting a console to the router s console port is optional if the router will be configured and administered fro...

Page 14: ...ized below and detailed in the following pages 1 Mount the router page 1 7 2 Connect a console optional depending on method for configuring and administering 3 Attach network cables page 1 11 4 Plug in and verify the router page 1 22 Installation Phase 3 Prepare the Router Hardware 1 6 ...

Page 15: ...ypes of screws are included in the accessories kit with the router A cabinet may require 5 8 in 10 32 screws instead available as p n 2680 0302 Make sure you have screws that fit your cabinet or rack before mounting the router For Table Mounting Attach the self adhesive rubber feet to the bottom of the router Set the router on a table near the power source For Wall Mounting Using a Phillips or cro...

Page 16: ...Mounting Wall Mounting Mounting Bracket Figure 1 1 Rack Mount Bracket Position Mounting Bracket Figure 1 2 Rack Mount Back Out Mounting Bracket Figure 1 3 Flat On Wall Mounting Bracket Figure 1 4 Straight Out From Wall Installation Phase 3 Prepare the Router Hardware 1 8 ...

Page 17: ...g Wall Mounting Mounting Bracket Figure 1 5 Rack Mount Bracket Position Mounting Bracket Figure 1 6 Rack Mount Back Out Mounting Bracket Figure 1 7 Flat On Wall Mounting Bracket Figure 1 8 Straight Out From Wall Installation 1 Installation Phase 3 Prepare the Router Hardware 1 9 ...

Page 18: ... asynchronous character mode modem to the console port using an RS 232 cable At the remote site connect an ANSI or VT100 terminal or a PC emulating an ANSI or VT100 terminal to the remote modem Then establish the link between the terminal s modem and the router s modem according to the modem instructions N o t e For recommended console and modem cables and cable pin outs refer to appendix A Cables...

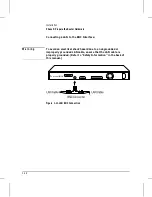
Page 19: ...charge may damage equipment Do not touch the router connector pins or the cable connector pins N o t e On routers providing an AUI interface and a BNC interface for the same LAN 802 3 port you can use either interface at any time but not both at the same time For information on the operation of the green LEDs indicating AUI or BNC interface selection refer to AUI and BNC green LEDs on page 2 10 In...

Page 20: ...le and you attach an HP transceiver directly to the AUI port without an AUI cable then attach the rubber feet you received in the accessory kit page 1 3 to the bottom of the router to prevent the transceiver from supporting the weight of the router Figure 1 9 LAN AUI Connection Installation Phase 3 Prepare the Router Hardware 1 12 ...

Page 21: ... the Ethernet 802 3 port on the router 3 Secure the retainer and the transceiver or cable to the router with the retainer s screws 4 Connect the network cable to the transceiver If your router s LAN port s have both an AUI interface and a BNC interface refer to the note on page 1 11 Transceiver or AUI cable con nector Connector post AUI LAN port on router AUI retainer Figure 1 10 Installing the AU...

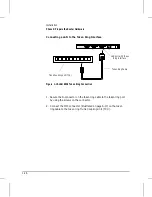
Page 22: ...electrical shock hazard due to an ungrounded or improperly grounded LAN cable ensure that the LAN cable is properly grounded Refer to Safety Information in the back of this manual Figure 1 11 LAN BNC Connection Installation Phase 3 Prepare the Router Hardware 1 14 ...

Page 23: ... with a 50 ohm terminator at each end Figure 1 13 shows the ThinLAN port at the end of a cable segment with the 50 ohm terminator attached to one side of the BNC T connector 4 Attach the T connector to the BNC port on the router 5 Fold the BNC T connector cover around the connection and squeeze the surfaces together around the edges Figure 1 14 The Installed BNC Connector Cover Figure 1 12 BNC Con...

Page 24: ...ing the screws on the connector 2 Connect the MIC connector illustrated on page A 17 on the token ring cable to the token ring Trunk Coupling Unit TCU LAN port with Token Ring interface Token Ring Cable Trunk Coupling Unit TCU Figure 1 15 LAN 802 5 Token Ring Connection Installation Phase 3 Prepare the Router Hardware 1 16 ...

Page 25: ...ation DAS and powers down FDDI operation requires HP router software version 5 76 or later 2 This subsection describes basic connections between the router and the FDDI ring For more information on cable configurations connecting the HP Router BR to dual attach and single attach stations DAS and SAS refer to appendix D FDDI Cable Attachment Configurations 1 For an illustration of wrapping refer to...

Page 26: ...simply insert the modular plugs from your FDDI ring into the MIC A and MIC B FDDI ports on the HP Router BR To port B of adjacent DAS station To port A of adjacent DAS station MIC A MIC B Figure 1 16 Connecting FDDI Without a Bypass Switch Installation Phase 3 Prepare the Router Hardware 1 18 ...

Page 27: ... Packard you may want to verify that your switch has the proper pinouts Refer to FDDI Optical Bypass DIN Connector Pinouts on page A 18 For the part number refer to the release notes you received with your router or most recent software upgrade MIC A MIC B To port B of adjacent DAS station To port A of adjacent DAS station A B Figure 1 17 Connecting a Bypass Switch Installation 1 Installation Phas...

Page 28: ...bles are keyed properly to allow only the connection of the A cable to the router s MIC A port and the B cable to the router s MIC B port Refer to the instructions for your bypass switch 4 Connect the bypass cables to the FDDI ports as shown above 5 Insert the DIN connector on the bypass unit into the Optical Bypass jack on the HP Router BR N o t e The router will not detect the presence of a new ...

Page 29: ...e cable connector 2 Attach the other end of the cable to the WAN link terminating equipment N o t e If any port has no network attached the port s Net Fail LED goes on after the router starts WAN port for RS 232 V 24 V 28 V 35 X 21 RS 422 RS 449 V 36 interfaces WAN link terminating equipment such as a modem or DSU CSU Circuit from WAN service provider Figure 1 18 Connecting a WAN Interface Install...

Page 30: ... Bootp reply message Following download of the full configuration the router then reboots itself and begins routing and bridging in accord with the full configuration For information on set up and operation with a Bootp server refer to the User s Guide shipped with your router N o t e When powered up in the factory default the router by default begins bridging on all ports if Smartboot does not el...

Page 31: ... the router s power socket and into an ac power source 2 Check these LEDs on the back of the router Power LED is continuously lit Self test LED lights during the self test that automatically occurs after you power on or boot the router turns off after a minute or two when the self test completes and the router boots If either LED operates differently refer to chapter 3 Troubleshooting Figure 1 19 ...

Page 32: ...le is connected to the router s console port either directly or through a modem 27290A R outer BR Net Fai l Wrap Sig De t Rx Ring O P Thru Tx See Ma nual Pwr Reset Self test Fault Clear LI NE 5 0 60 H Z 100 120 VAC 1 00 A 200 240 VAC 0 60 A Console Po rt RS 232 BNC AUI Rx Tx Net Fai l Enabled Ethernet 802 3 Po rt 1 BNC AUI Rx Tx Net Fai l Enabled Ethernet 802 3 Po rt 2 BNC AUI Rx Tx Net Fai l Enab...

Page 33: ... Return The Main menu screen then appears 6 The system has booted Go on to Initialize and Verify the Router on page 1 28 N o t e If neither the copyright screen nor the Main menu screen appear press Return again pause and then repeat if necessary Speed sensing may require more than one Return for your type of connection If pressing Return several times does not establish the console connection ref...

Page 34: ...as been configured successfully by any means and is routing through one or more network interfaces you may perform any step in this section using either the console port access or Telnet access provided that the system is configured for Telnet N o t e This section assumes that when Smartboot is not used and the router is set to the factory default you are configuring it by using a console that is ...

Page 35: ...tting Manager and User passwords page 1 34 E Verifying router initialization page 1 36 When you power on the router as described in step 4 of the preceding subsection page 1 22 you will see the Main menu Pointer Quick Configuration Utility Configuration Editor NCL Figure 1 24 The Main Menu Installation 1 Installation Phase 4 Initialize and Verify the Router 1 27 ...

Page 36: ... these additional values as as you need In some cases using Quick Configuration may be all that you need to do for minimal operation Then you can use the Configuration Editor if necessary to enter any other values that may be needed or desirable For more information on configuration tools refer to the following overview N o t e If any port has no network attached the port s Net Fail LED goes on af...

Page 37: ...guration Editor To learn how to use Quick Configuration refer to the User s Guide shipped with your router Configuration Editor This tool accesses a hierarchy of menus and screens that include any parameters you need for customizing the router beyond the getting started level Using this editor you can customize all parameters needed to integrate the router into your system including the subset of ...

Page 38: ...of the process for exiting from the utility In this case it is unnecessary to also use the NCL Boot command described in this subsection When you use the Configuration Editor to create or change a configura tion use the NCL boot command to replace the former configuration with the newly created one To boot the router now 1 In the Main menu page 1 27 press 2 to select the Network Control Language I...

Page 39: ...r the password Enter current manager password Type your Manager password and press Return If you ve forgotten the password and need to clear it refer to To Clear the Manager and User Passwords on page 2 16 4 After you enter the Boot command and enter a password if required the following message prompts you verify that you want to boot the router Do you want to reboot the system y n Press Y to comm...

Page 40: ...ears If the Password prompt appears type the password and press Return to display the Main menu If instead this message appears Press any key to continue Press Return to display the Main menu These actions should return you to the Main menu The router should now be reconfigured to the parameters you specified in the configuration tool Password prompt appears only if pass word set Figure 1 26 The C...

Page 41: ... Client and Server of Time Protocol service Neither client nor server of Time Protocol service No Yes No Yes The router designated as server only provides the Time Protocol service If no router is designated server only then a client server router should pro vide the Time Protocol service If you need to set the time and date use the NCL Time command 1 From the Main menu select the Network Control ...

Page 42: ...sword controls viewing of statistics event log MIB variables and configuration parameters Manager password controls access to the following system manager tasks assigning a user password saving a modified configuration booting the router resetting statistics or MIB variables enabling or disabling services downloading a configuration changing a password changing the date and time using the Fget Fpu...

Page 43: ... as shown below or another name you have already configured for your system 2 At the prompt type password and press Return 3 Follow the prompts to set the manager password 4 To set the user password repeat this procedure substituting user for manager in step 3 NCL prompt Figure 1 27 The NCL Screen with Default Prompt Installation 1 Installation Phase 4 Initialize and Verify the Router 1 35 ...

Page 44: ...r hardware on page 1 22 Then after you configure and boot the router you should verify that the following two conditions exist The network links are operational All networks can be reached by the router While verifying initialization you can save steps by operating from the Network Control Language Interpreter NCL To begin select NCL from the Main menu by pressing 2 Access to NCL Figure 1 28 The N...

Page 45: ...erator s guide you received with your router The most recent event appears in the event log line the second line of the console screen However checking events is easier if you display and interactively scroll around the entire log The following steps provide an overview of how to use the event log 1 Access the event log One way to access the interactive log is to select Event Log from the Main men...

Page 46: ...n the User s Guide for more key options and other information about display control keys a full explanation of the parts of an event line the severity ratings and the number and range of events kept in the log For the meaning of individual event messages refer to the Operator s Reference 2 In the event log verify that the circuits and services that you configured are being enabled The events being...

Page 47: ... exchanged over enabled circuits Match the circuit names with those on the network maps 3 Select and examine the individual statistics screen for each routing and bridging service configured on the router Verify that the configured services are exchanging frames or packets as expected The information listed should match the information on the site survey worksheet and network maps The statistics s...

Page 48: ...faces are identified by their IP addresses The screen shows the number of IP datagrams received forwarded delivered to upper layer protocols and dropped The DoD Internet IP routing service must be configured for this screen to be available IPX Router Statistics This screen provides summary data for each IPX network interface The interfaces are identified by the IPX network numbers of the networks ...

Page 49: ...for all IP subnetworks represented in the network map Check the next hop entries to determine the route that IP packets will take to each destination subnet Verify the number of hops to these subnets a very large hop count may indicate that the route is invalid type field I RGETIR Use the Rgetir command to display the IPX routing table for this node Verify that entries exist for all IPX networks r...

Page 50: ...tion nodes to verify that the hop counts and path costs are as expected RGETDA Displays the DECnet router level 2 inter area routing table for a local or remote router Verify that the router has learned about a path to all areas Trace the paths to the level 2 router in the destination area to verify that hop counts and path costs are as expected Note that DECnet routing services on HP routers are ...

Page 51: ...then repeat the verification steps Testing Node Accessibility The NCL Ping command can be used on a router with IP routing enabled to test whether particular routers and end nodes can be reached Use the specific IP address of the target For example to determine whether a WAN port having the IP address of 10 100 100 1 on a remote router can be reached from your local router you would execute Ping a...

Page 52: ...2 Features and General Hardware Operation ...

Page 53: ...f a packet arrives with an unsupported proto col these routers use their bridging capability to send the packet toward its destination This allows full support for environments where non routable uncommon or unsupported protocols may exist On most models there is also one or more synchronous WAN ports supporting RS 232 V 24 V 28 V 35 X 21 or RS 422 RS 449 V 36 interfaces These provide HP Point to ...

Page 54: ...ynchronous WAN Port For HP Point to Point PPP SMDS frame relay V 25 bis and LAPB X 25 connections to other routers WAN ports support RS 232 V 24 V 28 V 35 X 21 and RS 422 RS 449 V 36 interfaces FDDI LAN Port For connecting to an FDDI network either directly or through an optical bypass switch Console Port Present on every HP router allows access to the router by a terminal or a terminal emulator o...

Page 55: ...for mounting in a 19 inch rack or on a wall Automatic sensing of the power voltage range with no switches needed The option to automatically recover from power failure while maintaining the current configuration Router Operation Features 2 4 ...

Page 56: ... In the HP Router TFR the Activity LED is continually lit while the router is inserted in a ring Fault amber Lights if a failure occurrs on the network or router See the next section about the back of the router for more specific information Fault lights while the Reset button is pressed Refer to the next section for more information Fault Activity Line On Figure 2 2 Example of Router Front Featur...

Page 57: ...o rt RS 232 BNC AUI Rx Tx Net Fai l Enabled Ethernet 802 3 Po rt 1 BNC AUI Rx Tx Net Fai l Enabled Ethernet 802 3 Po rt 2 BNC AUI Rx Tx Net Fai l Enabled Ethernet 802 3 Po rt 3 BNC AUI Rx Tx Net Fai l Enabled Ethernet 802 3 Po rt 4 A SO PO PI Enabled Assembly No 27 290 60001 SI MIC Por ts MIC A Optical By pass MIC B B FDDI Por t LAN port with AUI and BNC connectors FDDI port connectors and status ...

Page 58: ... LEDs for an FDDI Port Figure 2 5 Example of Router and Port Status LEDs in a Double Height Router Figure 2 5 Example of Router and Port Status LEDs in a Single Height Router Features 2 Router Operation Interpreting Back Panel LEDs 2 7 ...

Page 59: ...curred either during a self test or during operation This LED is duplicated on the front panel During self test If the Fault LED is lit the router is faulty and must be replaced Refer to chapter 3 Troubleshooting for details During operation of the router If the Fault LED is lit but none of the Net Fail LEDs are lit there has been a software failure Press the Reset button to reset the router or bo...

Page 60: ...ected if tran sceiver signal polling is enabled in the configuration or if a protocol is running on this port The circuit will be enabled again when the connection is restored There are excessive collisions or excessive deferrals detected at the port The Ethernet 802 3 LAN has a problem Token Ring 802 5 Net Fail If this LED is lit during a self test and the Fault LED is also lit a ring error has o...

Page 61: ... periods of heavy traffic it may look like it is lit all of the time On WAN ports Rx may seem to indicate heavy traffic when using bit oriented protocols however Rx is lit for each packet delimiter flag whether packets are received or not Token Ring Port The Rx LED is lit continuously if the token ring port is inserted in a ring and is receiving any packets or tokens AUI and BNC green LEDs On Ethe...

Page 62: ...e output line for that port This occurs in either of the following cases The unlit port is not communicating A Dual Attach Station DAS attached to the unlit port is not functional These cases occur for example when the cable connection to the unlit port is interrupted or when a DAS connected to the unlit port is down Sig Det green Signal Detection is lit when the router detects an incoming signal ...

Page 63: ...he router will be bypassed when it is booting and when the FDDI circuit is disabled That is the Optical Bypass LED is not lit when the FDDI circuit is enabled If you are not using a bypass switch the Optical Bypass Enabled LED is always lit regardless of the state of communication between the router and the FDDI ring Router Operation Interpreting Back Panel LEDs 2 12 ...

Page 64: ... should be lit while you are pressing the Reset button On the HP Router ER TR and SR pressing the Reset button should light the following LEDs Power Self test Fault front and rear Line On Net Fail Features 2 Router Operation Testing the LEDs 2 13 ...

Page 65: ...net TFTP or network manger access if you have forgotten the password s Clearing the router Removes the current password s erases the current configuration and boots the router in its default factory configuration Use this feature only if you are prepared to lose the router s current configuration The Reset and Clear buttons are located to the left of the console port Figure 2 7 Location of the Res...

Page 66: ...its for you to press a key to restart the router Uses the most recently saved configuration to initialize the router N o t e Resetting does not affect any current password s Pressing the Reset button discards any parameter values you may have specified in either the Quick Configuration utility or the Configuration Editor but have not yet saved That is after a reset the router initializes itself wi...

Page 67: ... will no longer be limited by a password The Clear button removes all constraints on access by anyone using the console Telnet TFTP or a network manager To set a new password use the Network Control Language NCL Password command on the console For information on setting passwords refer to Set Manager and User Passwords page 1 34 Router Operation Resetting the Router Clearing the Passwords and Clea...

Page 68: ...vents the clearing procedure from working In newer models the router goes into a diagnostic utility in older models it goes into a test loop If this happens recover by restarting the clearing procedure 1 Press and hold the Reset button then immediately press and hold the Clear button The Reset button protrudes slightly you can press it with your finger The Clear button is recessed Press it with a ...

Page 69: ...iguration and replaces it with the default factory configuration In this case bridging without spanning tree is enabled on all ports However routing is not enabled unless a Smartboot configuration for this router has previously been enabled on the network If Smartboot has been enabled bridging may or may not be enabled depending upon the resulting configuration Router Operation Resetting the Route...

Page 70: ...ith the devices that are con nected to the router and with the routing applications that are config ured Bridging and routing tables are reset If the router s factory default configuration is still in effect the router will attempt to bridge on all ports You may see activity reported by the port status LEDs on the router Procedures for connecting devices are in chapter 1 Installation and Initial S...

Page 71: ...3 Troubleshooting ...

Page 72: ...s that in some cases require either a recovery procedure done by the operator or replacement of the router Certain later router models also can display error messages indicating FLASH memory problems that require cycling the power downloading new operating code or replacing the router Troubleshooting Introducing Router Troubleshooting Features 3 2 ...

Page 73: ...ault Make sure that the router is plugged in and that cable connections are secure If the console port does not work refer to Connect a console page 1 10 and then check Troubleshooting a Terminal or Modem Connection page 3 12 Check LEDs For descriptions see Interpreting Back Panel LEDs page 2 6 LED patterns that indicate a router or network error are shown in tables 3 1 and 3 2 pages 3 2 through 3...

Page 74: ...set is not pressed router hardware failure detected during self test Replace router Lit Lit Lit Some but not all Lit Ports whose Net Fail LEDs are Lit are faulty Replace router Ports whose Net Fail LEDs are unlit may be usable Lit Flashing Flashing Flashing You have pressed the Reset and Clear buttons for too long to clear the configuration Release them Press them again briefly if clearing configu...

Page 75: ...sconnected network hardware or improper configuration If nothing is to be connected to this port set Auto Enable to No for this circuit in the Configuration Editor or delete the configuration for this port Lit Unlit Unlit Ethernet 802 3 LAN Lit The driver is unable to send data Data is sent by a protocol or when XCVR Signal Polling is enabled on this LAN port The failure may be due to faulty or di...

Page 76: ... Error Patterns During Initialization on page 3 4 Otherwise the console displays the appropriate error message along with instructions for further action 7 MK5025 Test ERROR MK5025 failed interrupt test errcode 00000001 SELFTEST FAILURE A hardware problem was detected while running selftest To enter the selftest monitor press s To attempt to load operating code press any other key If no key is pre...

Page 77: ... record the failure information and call for service from your HP dealer or service provider It may be necessary to replace your router Recoverable Self Test Failures The following two error messages indicate a problem in the router s FLASH memory that may be corrected by cycling the power If after the power is cycled the problem persists then it may be corrected by down loading new operating code...

Page 78: ...tate and or displays any error message other than the five listed above then there may be a hardware problem that requires replacement of the router Contact your HP dealer or service provider Troubleshooting Interpreting ERROR Messages on the HP AdvanceStack Router 200 Series 3 8 ...

Page 79: ...se the button which begins router initialization and verify that the Self test LED is lit After the Self test LED turns off in about one minute if you have running networks connected to the WAN and Ethernet 802 3 ports then you should see Tx and Rx and Activity LEDs blink for passing traffic on these ports If all of this happens the LEDs are verified Verifying LED Operation on Other Router Models ...

Page 80: ...d release the Reset button on the back of the router If you see any of the following results for either test take the indicated action If the Power LED does not light the router is faulty replace the router If the Self test LED does not light and then turn off after one to three minutes the router is faulty If you have tried to change the product operating code or have access to the code on anothe...

Page 81: ...et or 802 5 token ring 1 Set the XCVR Signal Polling parameter to Active for the circuit on the LAN port to be tested To access this parameter use the Configuration Editor from the console select item 4 Circuits select the desired LAN port and specify the Circuit Type parameter The console then displays the XCVR Signal Polling parameter For information on the XCVR Signal Polling parameter refer to...

Page 82: ...ct your console and give you the router s copyright and Main menu screens as described under Connect a console page 1 10 then try the following procedures in se quence Reset Speed Sensing 1 Detach the console cable from the router 2 Reattach the console cable to the router 3 Look for the line of text on your console that indicates waiting for speed sensing then press Return to display the copyrigh...

Page 83: ...menu screen then ensure that you are using the correct console cable Refer to HP Cables on page A 3 If the cable is correct then repeat this procedure for each other baud rate available for your terminal until you find a rate that gives you a successful connection If you cannot establish a successful connection go on to Reset the Terminal below Reset the Terminal 1 Switch the terminal or PC s powe...

Page 84: ...reconnect the console cable to the console port Look for the line of text on your console that indicates waiting for speed sensing then press Return to display the copyright screen or the Main menu screen If neither of these screens appears press Return again If pressing Return four or five times does not display either the copyright or Main menu screen then go on to Check the Configuration below ...

Page 85: ... on the XCVR Signal Polling parameter refer to the Operator s Reference 2 Detach the router s power cord 3 Attach the transceiver to the LAN port and attach the required type of loopback connector to the transceiver If the transceiver has a loopback test switch enable it for the test 4 Reattach the router s power cord 5 If the Net Fail LED for the tested LAN port remains unlit when self test compl...

Page 86: ... the link Refer to the help screens for the software Tests from Other Devices This is the procedure to find the station address also called MAC physical or Ethernet address of a port on this router for use in an IEEE 802 3 test from another network device 1 From the Main menu select the Network Control Language Interpreter NCL The NCL prompt then appears at the bottom of the screen For example Fig...

Page 87: ... BR only get cct fddi name ieee addr Return where cct name or fddi name is the configured circuit name for the port Examples of circuit names are ETHER1 WAN1 TOKEN1 and FDDI1 3 Note the resulting station address 4 Use the Exit command to leave NCL and return to the Main menu exit Return Troubleshooting 3 Troubleshooting Diagnostic Tests 3 17 ...

Page 88: ...ptional is the number of times to repeat the echo request packet If count is not included the packet is sent once wait optional is how many seconds to wait for a response If a second integer is not included the response must be received in five seconds to be successful 3 You will see a message either that the target node is alive meaning that communications are passing successfully from the router...

Page 89: ...s your keystrokes to the remote system If the remote system is another HP router a You will see the system name of the remote node as the NCL prompt at the bottom of your display Check the event log or rout ing tables of the remote node as you do for your own router Use the Exit command to leave NCL and return to the remote node s Main menu exit Return b To disconnect the Telnet session use the Lo...

Page 90: ...A Cables and Connectors ...

Page 91: ...sh to use an unlisted cable you can verify that your cables are correctly wired Note that each pin out does not necessarily match the pin out for the corresponding HP cable but cables manufactured to follow the minimum pin out will function correctly Loopback connec tors for all router ports are also shown in this appendix Cables and Connectors A 2 ...

Page 92: ... female port 28606 63005 5 meters V 35 cable balanced X 27 connecting to WAN port For 34 pin female port 28606 63008 5 meters X 21 cable connecting to WAN port For 15 pin female port 28606 63001 5 meters RS 232 V 24 V 28 cable connecting to WAN port For 25 pin female port 28606 63006 5 meters Back to Back test cable for WAN port connecting to HP routers having a 62 pin synchronous WAN port or the ...

Page 93: ...2 For 25 pin male port Attach a null modem adapter1 Tandy Null Modem Adapter No 26 1496 has been tested to the console port Then attach a straight through modem cable to the null modem adapter For 9 pin male port Use a Black Box PC AT Serial Printer Cable EVNBPC has been tested OR Attach a null modem adapter Tandy Null Modem Adapter No 26 1496 has been tested to the console port Then attach a mode...

Page 94: ...DSR 107 M1 7 GND 102 8 DCD 109 M5 20 DTR 108 S1 22 RI 125 M3 23 SR 111 RS 232 Modem Cable Minimum Pin Outs Modem end 25 pin male Router end 25 pin male 2 2 Tx 3 3 Rx 4 4 RTS 5 5 CTS 6 6 DSR 7 7 GND 8 8 CD or DCD 20 20 DTR 22 22 R1 23 23 DRS typically on V 24 European modems Cables and Connectors A Cables and Connectors Cable and Connector Pin Outs A 5 ...

Page 95: ... pin male Tx 2 2 Tx Rx 3 3 Rx GND 7 7 GND 5 CTS 6 DSR 8 DCD 22 RI 23 DRS RS 232 Null Modem Cable for Terminal PC with 9 Pin Connector Minimum Pin Outs Terminal PC end 9 pin female Router end 25 pin male Tx 2 2 Tx Rx 3 3 Rx GND 5 7 GND 5 CTS 6 DSR 8 DCD 22 RI 23 DRS Cables and Connectors Cable and Connector Pin Outs A 6 ...

Page 96: ...er for Use with Modem Cable Minimum Pin Outs Modem Cable End 25 Pin Female Router End 25 Pin Male Tx Rx RTS CTS DSR DCD DTR GND 2 3 4 5 6 8 20 7 2 3 4 5 6 8 20 7 Tx Rx RTS CTS DSR DCD DTR GND OR 4 5 4 5 N o t e Signals DTR pin 20 and RTS pin 4 must be on or high on your terminal or in your terminal emulation program Cables and Connectors A Cables and Connectors Cable and Connector Pin Outs A 7 ...

Page 97: ...common drain Data In A Voltage Common Control In B Data Out B Chassis Ground Data In B Voltage Plus Chassis Ground For this connection you can use HP 92264D 1 meter ThinLAN AUI extension pin 4 not connected HP 92254A through H 6 meter through 48 meter ThickLAN cables HP 92254J 5 meter ThinLAN AUI cable pin 4 not connected Some longer cables may have all 15 pins wired See the IEEE 802 3 stand ards ...

Page 98: ...er Ready A 14 53 Reserved 15 48 Reserved 16 55 Reserved 17 14 TT Terminal Timing A 18 8 Reserved 19 9 SG Signal Ground 30 32 20 47 Reserved 22 38 SD Send Data B 23 23 ST Send Timing B 24 22 RD Receive Data B 25 36 RS Request to Send B 26 24 RT Receive Timing B 27 25 CS Clear to Send B 28 33 Reserved 29 26 DM Data Mode B 30 37 TR Terminal Ready B 31 27 RR Receiver Ready B 33 29 Reserved 34 34 Reser...

Page 99: ...4 106 Clear to Send E 46 107 Data Mode F 6 109 Receiver Ready H 58 108 2 Terminal Ready J 48 Reserved P 21 103 Send Data A R 20 104 Receive Data A S 42 103 Send Data B T 41 104 Receive Data B U 61 Transmit Timing A V 18 115 Receive Timing A W 60 Transmit Timing B X 39 115 Receive Timing B Y 19 114 Send Timing A AA 40 114 Send Timing B Cables and Connectors Cable and Connector Pin Outs A 10 ...

Page 100: ...ircuit 2 17 T Send Data A 3 16 C Control A 4 1 R Receive Data A 5 4 I Indicator A 6 3 S Send Timing A 8 9 G Ground 32 47 9 38 T Send Data B 10 37 C Control B 11 22 R Receive Data B 12 25 I Indicator B 13 24 S Send Timing B Cables and Connectors A Cables and Connectors Cable and Connector Pin Outs A 11 ...

Page 101: ...46 CC Data Mode 7 9 AB Signal Ground 22 27 47 30 31 52 8 6 CF Receiver Ready 12 28 Reserved 13 7 Reserved 14 13 Reserved 15 2 DB Send Timing 16 49 Reserved 17 3 DD Receive Timing 19 12 Reserved 20 58 CD Terminal Ready 21 29 Reserved 22 48 Reserved 23 55 Reserved 24 56 DA Terminal Timing The maximum cable length is 15 meters 50 feet Cables and Connectors Cable and Connector Pin Outs A 12 ...

Page 102: ...he RS 422 signal level Use the test cables for demonstrations instruction or testing the router The two test cables available are Description Connector at End For Other Device Part Number Back to back test cable 5 meters 62 pin male Most HP routers and the HP Remote Bridge RB 5061 2556 Back to back test cable high speed balanced 5 meters 15 pin male HP 27270 Router CR 5061 2557 The minimum pin out...

Page 103: ...ale 62 pin male SDA 17 1 RDA SDB 38 22 RDB RDA 1 17 SDA RDB 22 38 SDB RSA 15 4 CSA RSB 36 25 CSB CSA 4 15 RSA CSB 25 36 RSB TRA 16 5 DMA 6 RRA TRB 37 26 DMB 27 RRB DMA 5 16 TRA RRA 6 DMB 26 37 TRB RRB 27 TTA 14 2 STA 3 RTA TTB 35 23 STB 24 RTB STA 2 14 TTA RTA 3 STB 23 35 TTB RTB 35 GND 9 9 GND 10 10 30 30 32 32 shield shield Note On the HP Router PR FR and TFR Clock Source is automatically config...

Page 104: ...s test cable see page A 13 above The WAN port on one router must have the Point to Point Address config ured to DCE and the WAN port on the other router must have it config ured to DTE In addition this router must have Clock Source configured to Internal and the HP Router CR must have it configured to External For the pinouts of this cable turn the page Cables and Connectors A Cables and Connector...

Page 105: ...25 1 RSB TRA 16 10 RRA DMA 5 6 TRA RRA 6 DMB 26 1 TRB RRB 27 TTA 14 4 STA 12 RTA STA 2 RTA 3 TTB 35 5 STB 11 RTB STB 23 RTB 24 GND 9 7 GND 10 9 30 32 Shield Shield N o t e In the cable each of the differential signal pairs SDA and SDB RDA and RDB and so on must be twisted pairs of wire Cables and Connectors Cable and Connector Pin Outs A 16 ...

Page 106: ...e Pin Connector Token Ring Signal 1 Data In A 2 Ground 3 5V Out 4 Ground 5 Data Out B 6 Data In A 7 Ground 8 Ground 9 Data Out A The opposite end of the token ring cable should be fitted with a medium interface connector MIC conforming to the IEEE 802 5 specification Figure A 1 Router Token Ring 802 5 MIC Connector Cables and Connectors A Cables and Connectors Cable and Connector Pin Outs A 17 ...

Page 107: ...tive 5V 400 mA max pin 2 pin 3 switch ground pin 4 pin 5 bypass detect pin 6 ground When pin 5 is attached to pin 6 the bypass is detected Pin 5 and pin 6 should be looped together Figure A 2 FDDI Bypass Mini DIN Connector Pinouts Cables and Connectors Cable and Connector Pin Outs A 18 ...

Page 108: ...FDDI Cable Medium Interface Connectors MIC Figure A 3 Example of FDDI Cable Cables and Connectors A Cables and Connectors Cable and Connector Pin Outs A 19 ...

Page 109: ...n AUI LAN Port HP part number 28663 63001 pin connections pin 3 to pin 5 pin 10 to pin 12 For a Token Ring 802 5 Port HP part number 5061 2550 pin connections Modular RJ 45 to subminiature D connector pin 3 to pin1 pin 4 to pin 6 pin 5 to pin 9 pin 6 to pin 5 Subminiature D Connector pin 1 to pin 9 pin 5 to pin 6 Cables and Connectors Cable and Connector Pin Outs A 20 ...

Page 110: ...not used to pin 29 not used pin 35 to pins 40 and 39 pin 36 to pin 25 pin 37 to pin 26 pin 38 to pin 22 pin 42 to pin 41 pin 47 not used to pin 24 pin 51 to pin 2 pin 53 not used to pin 8 not used pin 54 not used to pin 29 not used pin 55 not used to pin 8 not used pin 56 to pin 3 pin 57 to pin 28 not used pin 58 to pin 6 pin 59 to pin 48 not used For an FDDI Port HP part number 5063 2490 FDDI sta...

Page 111: ...B Modem Configuration ...

Page 112: ...switches 8 9 11 and 12 up set to 1 all others down set to 0 AUTO ANS on the front should be pushed in At the user end Set switches 8 9 11 and 12 up set to 1 all others down set to 0 HP 50759A Support Link At the router end For an 8 position switch set switch 4 down all others up For a 4 position switch set switch 2 up all others down At the user end For an 8 position switch set switches 3 and 8 do...

Page 113: ...9600 Async At the router end Load the factory option set 1 Then change the following submenus Data Rate Menu change to 9600 uncoded Modem Parameters Menu change to Forced Answer DTE Parameters Menu Set DTR State to Responds to DTR Change Set DSR State to DSR is Normal Set CTS State to CTS is Normal Set DCD State to DCD is Normal At the user end Configure as at the router end except Modem Parameter...

Page 114: ...C Specifications ...

Page 115: ...er Model Maximum current at 100 120 Vac Maximum current at 200 240 Vac Frequency Range HP Router ER 0 6 amp 0 45 amp 50 60 Hz HP Router TR 0 9 amp 0 6 amp HP Router LR 0 9 amp 0 5 amp HP Router SR 0 9 amp 0 6 amp HP Router BR 1 0 amp 0 6 amp HP Router PR 0 5 amp 0 3 amp HP Router FR 0 5 amp 0 3 amp HP Router TFR 0 5 amp 0 3 amp The routers automatically adjust to voltage in the range of 90 240 V a...

Page 116: ...ons Countries ER TR SR Models PR FR TFR LR BR Models U S A Canada and Latin America FCC part 15 class A FCC part 15 class A Europe and other countries CISPR 22 class B CISPR 22 class A Europe EN 55022 class B EN 55022 1988 class A Japan VCCI class 2 VCCI class 1 Acoustical for Germany Geraeuschemission LwA 53 dB am fiktiven Arbeitsplatz nach DIN 45635 T 19 Safety Approvals CSA 950 UL 1950 IEC 950 ...

Page 117: ...opriate cable EIA RS 232 and CCITT V 24 V 28 synchronous EIA RS 422 449 and CCITT V 36 CCITT X 21 CCITT V 35 ISO 2593 and MIL C 28747 FDDI port X3 166 1990 ISO 9314 3 1990 PMD standard for 62 5 125 micron multimode fiber optic cable with media interface connectors MIC Data Communications All models covered by this manual are approved under Approval Number NS G 1234 J 100003 for indirect connection...

Page 118: ...tions were still in progress at the time of printing Please contact your local HP representative for latest certification status North America Telenet Tymnet Infonet DDN Europe Austria DATEX P Belgium DCS Finland DATAPAK Germany Italy ITAPAK Luxembourg LUXPAC Netherlands DATANET Norway DATAPAK Specifications C Specifications C 5 ...

Page 119: ...D FDDI Cable Attachment Configurations ...

Page 120: ...can attach it to the FDDI network in several different ways The three examples described below are standard FDDI methods for FDDI dual attach station DAS devices and are not specific to any HP router FDDI Cable Attachment Configurations D 2 ...

Page 121: ... tional 1 Attach port A of the router to port B of an adjacent DAS 2 Attach port B of the router to port A of another DAS Adjacent DAS router with FDDI HP router with FDDI port Adajacent DAS router with FDDI A B A B A B Figure D 1 Example of Dual Attach Station Connections FDDI Cable Attachments D FDDI Cable Attachment Configurations Dual Attach Station DAS D 3 ...

Page 122: ...ng wrap if the router s FDDI circuit be comes non operational 1 Attach the concentrator to the FDDI ring 2 Attach either port A or port B to any M port on the FDDI concentrator FDDI Concentrator Connect either A or B to any M port on the concentrator HP router with an FDDI port Figure D 2 Example of Single Attach Station Connections FDDI Cable Attachment Configurations Single Attach Station SAS D ...

Page 123: ...is sent and re ceived over port B of the router Port A is used only if the cable or concentrator attached to port B fails 1 Attach port A of the to an M port of a concentrator 2 Attach port B of the router to an M port of another router Backup FDDI Concentrator A B A B A B M M M M M M M M Primary FDDI Concentrator HP router with FDDI port Figure D 3 Example of Dual Homed Connection FDDI Cable Atta...

Page 124: ...ct s input wiring terminals power cord or supplied power cord set Whenever it is likely that the protec tion has been impaired disconnect the power cord until the ground has been restored For LAN cable grounding If your LAN covers an area served by more than one power distribution system be sure their safety grounds are securely interconnected LAN cables may occasionally be subject to hazardous tr...

Page 125: ...don d alimentation ou le cordon de raccordement fourni avec le produit Lorsque cette protection semble avoir été endommagée débrancher le cor don d alimentation jusqu à ce que la mise à la terre ait été réparée Mise à la terre du câble de réseau local si votre réseau local s étend sur une zone desservie par plus d un système de distribu tion de puissance assurez vous que les prises de terre de séc...

Page 126: ... Netzkabeln oder dem mit Strom be lieferten Netzkabelsatz voraus Sobald Grund zur Annahme besteht daß der Schutz beein trächtigt worden ist das Netzkabel aus der Wandsteckdose herausziehen bis die Erdung wiederhergestellt ist Für LAN Kabelerdung Wenn Ihr LAN ein Gebiet umfaßt das von mehr als einem Stromverteilungssystem be liefert wird müssen Sie sich vergewissern daß die Sicherheitserdungen fest...

Page 127: ...azione oppure al set cavo d alimentazione fornito con il prodotto Ogniqualvolta vi sia probabilità di danneggiamento della protezione disinserite il cavo d alimentazione fino a quando il collegamento a terra non sia stato ripristinato Per la messa a terra dei cavi LAN se la vostra LAN copre un area servita da più di un sistema di distribuzione elettrica accertatevi che i collegamenti a terra di si...

Page 128: ...el ca ble de alimentación o el juego de cable de alimentación suministrado Si existe la prob abilidad de que la protección a tierra haya sufrido desperfectos desenchufar el cable de alimentación hasta haberse subsanado el problema Puesta a tierra del cable de la red local LAN Si la LAN abarca un área cuyo suministro eléctrico proviene de más de una red de dis tribución de electricidad cerciorarse ...

Page 129: ...Safety Information Safety Information 6 ...

Page 130: ...operated in a commercial envi ronment Operation of this equipment in a residential area is likely to cause interference in which case the user at his own expense will be required to take whatever measures may be required to correct the interference If this equipment causes interference to radio reception which can be determined by un plugging the power cord from the equipment try these measures Re...

Page 131: ...and BR This equipment complies with ISO IEC Guide 22 and EN55022 Class A N o t e The HP router models PR FR TFR LR and BR are class A products In a domestic environment this product may cause radio interference in which case the user may be required to take adequate measures Regulatory Statements and Warranty 2 ...

Page 132: ...eclarations of Conformity complies with ISO IEC Guide 22 and EN 45014 It identifies the product the manufacturer s name and address and the applicable specifications that are recognized in the European community Regulatory Statements and Warranty Regulatory Statements and Warranty 3 ...

Page 133: ...HP Router PR HP Router FR HP Router TFR HP Router LR HP Router BR Regulatory Statements and Warranty 4 ...

Page 134: ...other warranty either expressed or implied with respect to this product HP specifically disclaims the implied warranties of merchantability and fitness for a particular purpose Some states or provinces do not allow limitations on the duration of an implied warranty so the above limitation or exclusion might not apply to you However any implied warranty of merchantability or fitness is limited to t...

Page 135: ...Etwaige fehlerhafte Geräte werden nach eigenem Ermessen repariert oder ersetzt Garantía Esta pieza de hardware está garantizada por HP contra defectos de materiales o manufactura por un período de tres años a partir del momento en que el usuario la recibe Durante dicho período de garantía HP o un distribuidor autorizado reparará o reemplazará según su criterio aquellos productos que resulten defec...

Page 136: ...ng instructions for a period of ninety 90 days from the date of purchase from HP or its Authorized Reseller If HP receives notice of defects within the warranty period HP will at its option either repair or replace the defective soft ware or firmware or refund the purchase price Regulatory Statements and Warranty Regulatory Statements and Warranty 7 ...

Page 137: ...28 1 30 1 36 2 8 2 14 2 15 2 19 3 5 failure 1 25 password 1 25 See also command speed sense 1 24 boot effect on configuration 1 28 Bootp request 1 22 2 17 Bootp server See configuration Breath of Life packet 3 5 bridging 2 2 bridging enabled 2 18 Bypass switch See FDDI C cabinet mounting 1 7 cable 1 3 1 11 1 22 A 1 A 22 AUI stub A 3 A 8 coaxial 2 3 console A 3 A 7 fiber optic 2 3 modem A 3 A 5 A 7...

Page 138: ...ole 1 10 3 3 A 3 A 7 A 20 baud rate 2 3 boot failure 1 25 loopback connector A 20 optional 1 5 1 6 1 10 port 2 3 RS 232 interface 2 3 console cable 3 12 3 13 console port test 3 12 Copyright 1 2 copyright screen 1 25 1 32 cord power 1 3 Crash command 3 5 crossover cable See null modem cable current C 2 D DAS See FDDI data communications certification for UK C 4 data communications specifications C...

Page 139: ... bypass not needed D 4 D 5 port testing 3 12 ring OP 2 11 ring wrap D 4 SAS D 4 Slg Det 2 11 Thru 2 11 Wrap 2 11 wrapping 1 17 Fget 1 34 filtering 1 29 FLASH ROM 3 2 3 7 Fput 1 34 frame relay 2 2 G H Geraeuschemission C 3 get command 3 17 ground LAN cable 1 14 1 15 grounding LAN cable 1 14 hardware failure 3 8 HP 27285A See HP Router ER HP cables A 3 HP Router ER 1 23 3 9 HP Router FR 3 6 HP Route...

Page 140: ...ort See FDDI MAC address See station address Main menu 1 25 1 29 1 36 management of routers See network management manager password 2 17 See password manuals 1 3 MAU See transceiver MIB 3 16 MIB variables 1 34 MIC See FDDI modem 1 10 1 21 A 3 A 5 A 7 B 1 B 3 monitor selftest 3 7 mounting 1 7 N NCL 1 27 1 30 1 33 1 36 1 41 password 1 35 NCL prompt 1 30 Net fail LED 1 28 3 9 3 11 3 15 network map 1 ...

Page 141: ...19 3 4 3 5 3 9 3 10 3 14 reset password 2 15 resetting 2 14 2 15 resetting caution 3 14 restart See boot and resetting retainer AUI 1 12 1 13 Rget commands 1 41 1 42 Rgetatr 1 42 Rgetda 1 42 ring error 2 9 3 5 ring interface rate 3 5 routing tables 3 16 RS 232 cable A 3 A 7 A 12 RS 232 console port A 3 A 4 A 6 A 7 RS 232 WAN interface C 4 RS 422 WAN interface A 3 A 9 A 13 A 15 C 4 RS 449 WAN inter...

Page 142: ...ation 1 10 PC emulation 1 10 VT100 1 5 1 10 used for console A 3 A 4 A 6 terminator BNC 1 15 Test 1 34 test LED 2 13 TFTP 2 16 TFTP server 1 22 thin coaxial LAN connection A 3 Thru FDDI 2 11 time 1 33 protocol service 1 33 time command 1 33 Time command 1 33 Time protocol 2 19 time protocol service 1 33 Time server 2 19 token ring error 3 5 token ring interface 1 11 1 16 token ring interface rate ...

Page 143: ...or A 21 port A 3 A 9 A 15 A 21 C 4 test cable A 3 WAN interface 1 11 1 21 WAN port test 3 11 Warranty 1 2 weight C 2 Wrap FDDI 2 11 D 4 wrapping FDDI ring 1 17 X X 21 WAN interface A 3 A 11 C 4 X 25 1 29 2 2 XCVR signal polling 3 5 3 15 XCVR Signal Polling parameter 3 11 XNS IPX 2 2 Index 7 ...

Page 144: ... Copyright 1994 Hewlett Packard Company Printed in Singapore 7 94 Manual Part Number 5962 8307 ...

Reviews: