For most operating systems you can run HP Library & Tape Tools from the HP StorageWorks Tape
CD-ROM to check your server’s current SCSI con
fi
guration (see
Diagnostic tools
). This will provide
information about the SCSI bus and the SCSI IDs in use. To do this, select the ‘troubleshoot with
L&TT’ option from the CD-ROM menu.
The
UNIX Con
fi
guration Guide
on the HP StorageWorks Tape CD-ROM also contains instructions on
how to determine the SCSI IDs of existing devices on UNIX servers.
2.
Change the tape drive’s SCSI ID, if necessary.
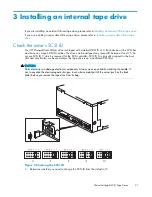
The SCSI ID is set using jumpers on a set of pins at the rear of the drive, as shown in
Figure 3
. Use
tweezers or small pliers to move the jumpers to the pattern corresponding to the ID you want. Spare
jumpers are provided with the drive.
Prepare mounting bay
For many servers, no mounting tray or rails are required. Devices simply slide into the server’s chassis
and are
fi
xed with screws. Other servers have built-in trays or rails.
Rail kits for a number of industry-standard servers may be available. For more details refer to:
http://www.hp.com/go/connect
.
Some servers use non-standard mounting rails and do not include spares. If this is the case with your
system, you will have to order these accessories from the server manufacturer before you can install the
tape drive.
WARNING!
To avoid personal injury or damage to the server or tape drive, ensure that the server is disconnected
from the mains power supply while you install the drive.
CAUTION:
Static electricity can damage electronic components. Always wear an antistatic wriststrap if one is
available. If not, after you have disconnected power from the server and removed the cover, touch a bare
metal part of the chassis. Similarly, touch a bare metal part of the drive before installing it.
1.
Assemble the necessary tools and materials:
• Phillips screwdriver
• Flat-bladed screwdriver (if your server uses slotted screws)
• Torx screwdriver (if your server uses torx screws)
• Your server manuals (for reference during installation)
2.
Perform a normal system shutdown and turn off the server and any connected peripherals.
3.
Remove the cover and front panel from the server, as detailed in your server’s documentation.
As you work inside the server, you may have to disconnect other signal cables or power cables from
other devices to maneuver the new drive into place. If you have to do this, make a note of their
position and connections so you can put them back correctly later.
NOTE:
The server must provide forced cooling and be capable of drawing 6 cfm (0.17 m
3
/minute or 10.08
m
3
/hour) of air through the tape drive at up to 35 C ambient operation. This rises to 8 cfm for up to 40
C ambient operation. Ensure that empty bays have the appropriate blanking plates installed so that
air
fl
ow is maintained.
22
Installing an internal tape drive
Summary of Contents for StorageWorks Ultrium 460
Page 8: ...8 ...
Page 12: ...12 About this guide ...
Page 18: ...18 Before you start ...
Page 30: ...30 Installing an internal tape drive ...
Page 40: ...40 Installing a removable Ultrium tape drive ...
Page 42: ...42 Verify installation ...
Page 56: ...56 Using HP OBDR ...
Page 60: ...60 Diagnostic Tools and Performance ...
Page 64: ...64 Troubleshooting ...
Page 66: ...66 Replacing a tape drive ...


