background image

http://www.hp.com/go/bladesystem/interconnects

Installing the HP 3830 Gateway Storage
Blade

IMPORTANT:

If your product is

factory-integrated, the blades are pre-installed
in the enclosure.

CAUTION:

To prevent improper cooling and

thermal damage, do not operate the blade or
the enclosure unless all hard drive and device
bays are populated with either a component or
a blank.

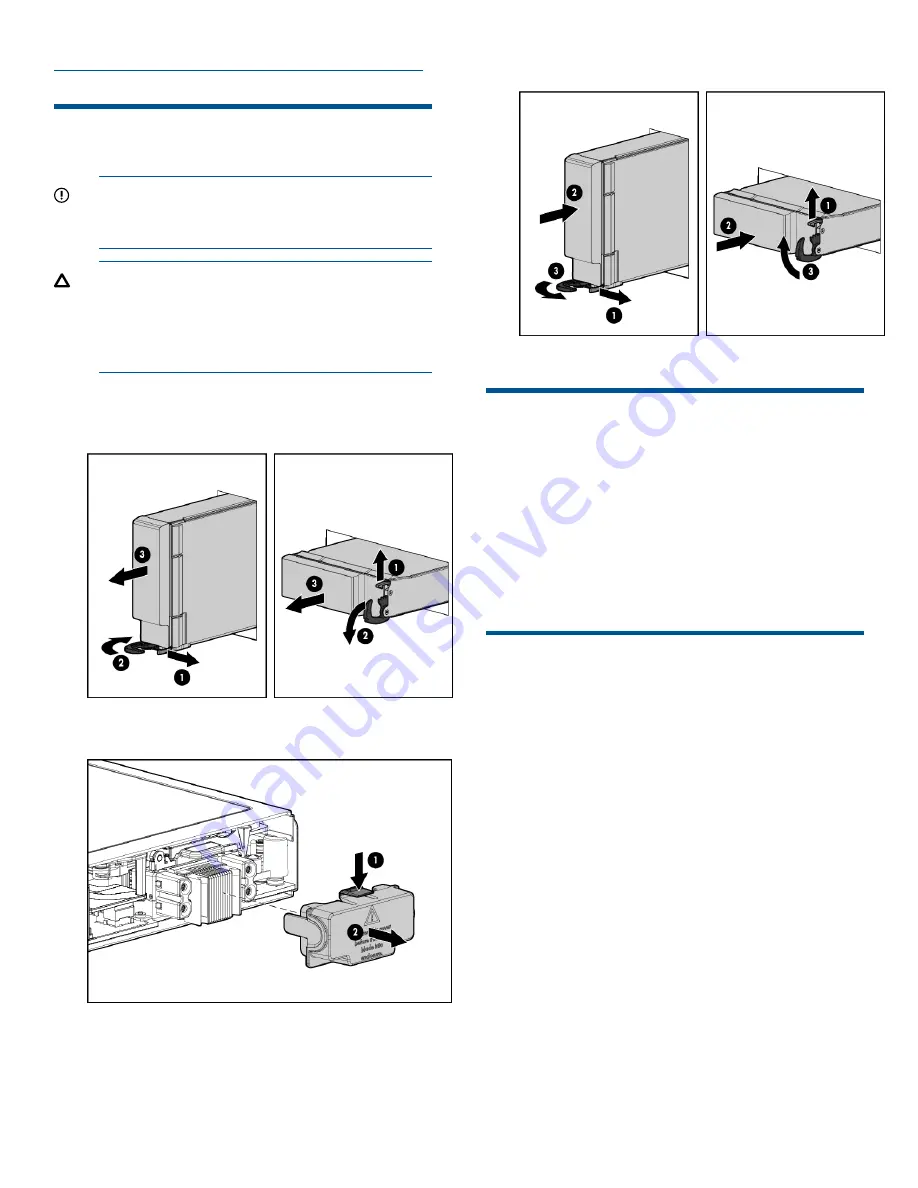
Installation procedure

1.

Remove the blank.

2.

Remove the enclosure connector cover.

3.

Install the HP 3830 Gateway Storage Blade.

Powering on the server blade

If the enclosure is powered on, the server blade begins
its power on sequence as soon as it is installed. If the
default Onboard Administrator setting has been
changed and the server blade does not power on,
press and release the power button on the server blade
or use a virtual power button via iLO.

You must access the server console to complete the
setup.

Accessing the server console

For initial setup, there are two ways to access the
server console:

Using iLO

Attaching the provided SUV cable to the front of
the server blade and then attaching a monitor,
keyboard, and mouse.

Once the server blade has been configured and IP
addresses assigned, you may also connect to the
server blade using a remote desktop connection.

For iLO access, use the enclosure Onboard
Administrator to identify the iLO IP address of the
server blade, then connect a remote web browser to
that address. The factory assigned iLO DNS name and
iLO Administrator password are provided on a pull-out
tab at the front of the server blade. In the browser, log
on to iLO as Administrator, then open a remote console
to the server blade.

Page 4

Summary of Contents for StoreEasy 3830

Page 1: ... with the system installation and configuration It may be necessary to pre stage DNS information Contact your system administrator to clarify network configuration requirements IMPORTANT Before joining the StoreEasy system nodes to the Active Directory domain ensure that there is network connectivity between each node and the domain controller The StoreEasy 3830 requires a minimum of 2 IP addresse...

Page 2: ...NS servers is correct pingpath DNS server address Repeat for each DNS server Table 2 Validation tests continued Successful Y N Command s to execute Test pingpath DNS server name Repeat for each DNS server Additionally verify that the DNS information is valid for the cluster and file server HP recommends that you also verify the iLO and Enclosure Manager IP address name resolution however this is n...

Page 3: ...y 3 Ports 2 and 4 connect to bay 4 For detailed port mapping information see the HP BladeSystem enclosure installation poster or the HP BladeSystem enclosure setup and installation guide on the following HP website http www hp com go bladesystem documentation Connecting to the network To connect the HP BladeSystem to a network each enclosure must be configured with network interconnect devices to ...

Page 4: ...es not power on press and release the power button on the server blade or use a virtual power button via iLO You must access the server console to complete the setup Accessing the server console For initial setup there are two ways to access the server console Using iLO Attaching the provided SUV cable to the front of the server blade and then attaching a monitor keyboard and mouse Once the server...

Page 5: ...mmends that you validate your configuration when using clusters Whether you create a cluster through the ICT or the Failover Cluster Manager one of the first steps is validating your configuration using the Microsoft cluster validation tool If you choose to skip the validation step you can still validate the cluster after it is created Supporting documentation For administration service and mainte...

Reviews: