


HP Vectra PC User's Guide
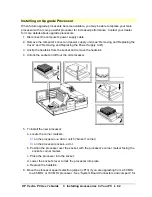
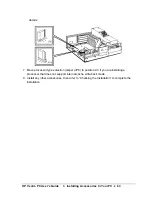
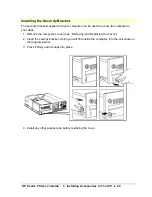
3 Installing Accessories In Your PC
••
67
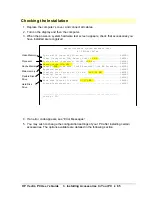
Using the Setup Program to Configure the PC
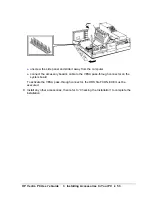
Start the Setup program by pressing
[F2]
after the power-on system hardware test program
has completed, then refer to the relevant section below that describes the accessory or
accessories that you have installed.
Main Memory
Main memory is automatically configured.
1. If main memory now exceeds 16 MB and you are running applications designed for 286
and earlier processors that cannot work with more than 16 MB total memory, set the
16
MB Memory Limit
to
Yes
.
2. If you are running applications that specifically require a memory base of 512 KB, set
the
Memory Base, on System
to
512 KB
.
3. If you have no other changes to make, press
[F3]
to save the settings and exit the
Setup
program.
Cache Memory
1. Check that the
All Memory Cache
field is set to
On
.
2. If you have no other changes to make, press
[F3]
to save the setting and exit the Setup
program.
Video Memory
If you are using Windows, it is recommended that you use the Video Mode utility in HP User
Tools to select settings (see “Using the HP User Tools”).
For a list of additional settings available after installing extra video memory, see “Available
Video Resolutions.” To enter the new settings:
1. Select the resolution that you wish to change, for example 800x600 and set the refresh
rate required from the list provided. Repeat for each resolution you wish to change.
2. If you have no other changes to make, press
[F3]
to save the setting and exit the Setup
program.
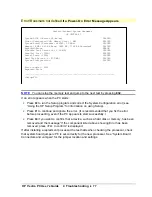
Accessory Boards
•
If you have installed an ISA board with memory mapped below 1 MB, highlight the
Memory Hole Below 1 MB
, then specify the board’s memory, and its location in main
memory between 0C8000h and 0DFFFFh. (Refer to the board’s manual for details.)
•
If you have installed an ISA board that uses IRQ 9, 10, 11, or 15, you must tell the
Setup
program which IRQ it uses. This allows PCI devices to be automatically
configured. You should always leave at least one IRQ free for use by the integrated PCI
devices.
IRQ 12 is normally used by the mouse. If you do not use a mouse, IRQ 12 can be made
available.
1. Highlight the IRQ field you want to change, for example IRQ 11.
Summary of Contents for Vectra VE4
Page 6: ...HP Vectra PC User s Guide 1 Setting Up Your PC 6 1 Setting Up Your PC ...
Page 14: ...HP Vectra PC User s Guide 2 Using Your PC 14 2 Using Your PC ...
Page 71: ...HP Vectra PC User s Guide 4 Troubleshooting 71 4 Troubleshooting ...
Page 72: ...HP Vectra PC User s Guide 4 Troubleshooting 72 The PC Does Not Work ...
Page 75: ...HP Vectra PC User s Guide 4 Troubleshooting 75 Error Messages ...
Page 94: ...HP Vectra PC User s Guide 4 Troubleshooting 94 Software Problems ...
Page 98: ...HP Vectra PC User s Guide 4 Troubleshooting 98 Power Management Does Not Work ...
Page 102: ...HP Vectra PC User s Guide 5 Technical Information 102 5 Technical Information ...
Page 103: ...HP Vectra PC User s Guide 5 Technical Information 103 Specifications ...
Page 116: ...HP Vectra PC User s Guide 6 Getting Support 116 6 Getting Support ...
Page 124: ...HP Vectra PC User s Guide Glossary 124 Glossary ...
Page 135: ...HP Vectra PC User s Guide 7 Regulatory Information and Warranty 135 Notice for Japan ...
Page 136: ...HP Vectra PC User s Guide 7 Regulatory Information and Warranty 136 Notice for Korea ...


