


HP Vectra PC User's Guide
3 Installing Accessories In Your PC
••
68
2. Use
[F7]
or
[F8]
to set the value to ISA, freeing the IRQ from the PCI controller,
thereby making it available for the ISA card.
•
If you have installed an ISA card and enabled a serial or parallel port on the card, a
conflict may occur with the internal serial or parallel port. The BIOS will automatically
resolve the conflict, making the port on the card the active port. The POST screen will
display “external” for the port address concerned.
•
If you have installed a PCI card that requires the “bus master” bit to be enabled, set the
PCI Bus Master
field to
Enabled
.
•
If you have no other changes to make, press
[F3]
to save the setting and exit the Setup
program.
Mass Storage Devices
•
If the installed device uses a controller board, depending on which connector you have
used for the drive, set the
Primary IDE Interface
or
Secondary IDE
Interface
field to Disabled.
•
If you have installed a hard disk drive that requires a specific translation method, set the
Translation Method
field to
Standard CHS
, or
Extended CHS
as appropriate.
•
If you have installed an additional flexible disk drive and wish to use 1.2 MB capacity
diskettes, set the
Flexible Drive 2
field to
1.2 MB
.
If you wish to use 1.2 MB capacity diskettes in the supplied drive, set the
Flexible
Drive 1
field to
1.2 MB
.
•
If you have no other changes to make, press
[F3]
to save the setting and exit the Setup
program.
Printer or Plotter
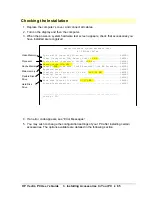
Select the mode used by your PC to communicate with your printer.
1. Highlight the
Parallel Port Mode
field. Choices are Centronics, ECP, or EPP. The
I/O addresses and IRQs used by the printer ports are shown in the
Parallel Port
and
Serial Port
fields. These values can be changed, but the same address and
IRQ cannot be used both serial ports.
2. If you have no other changes to make, press
[F3]
to save the setting and exit the Setup
program.
Display
If your display supports Display Data Channel (DDC1), the computer can detect the display
and set it to the optimum resolution, when the
Plug and Play Display
field in the
Setup
program is set to
Enabled
(default).
1. If you do not wish the resolution to be automatically set, change the option to Disabled.
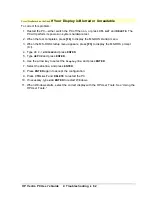
If you wish to change the resolution after your system has started, see Using HP User
Tools to Configure Video Settings below.
Summary of Contents for Vectra VE4
Page 6: ...HP Vectra PC User s Guide 1 Setting Up Your PC 6 1 Setting Up Your PC ...
Page 14: ...HP Vectra PC User s Guide 2 Using Your PC 14 2 Using Your PC ...
Page 71: ...HP Vectra PC User s Guide 4 Troubleshooting 71 4 Troubleshooting ...
Page 72: ...HP Vectra PC User s Guide 4 Troubleshooting 72 The PC Does Not Work ...
Page 75: ...HP Vectra PC User s Guide 4 Troubleshooting 75 Error Messages ...
Page 94: ...HP Vectra PC User s Guide 4 Troubleshooting 94 Software Problems ...
Page 98: ...HP Vectra PC User s Guide 4 Troubleshooting 98 Power Management Does Not Work ...
Page 102: ...HP Vectra PC User s Guide 5 Technical Information 102 5 Technical Information ...
Page 103: ...HP Vectra PC User s Guide 5 Technical Information 103 Specifications ...
Page 116: ...HP Vectra PC User s Guide 6 Getting Support 116 6 Getting Support ...
Page 124: ...HP Vectra PC User s Guide Glossary 124 Glossary ...
Page 135: ...HP Vectra PC User s Guide 7 Regulatory Information and Warranty 135 Notice for Japan ...
Page 136: ...HP Vectra PC User s Guide 7 Regulatory Information and Warranty 136 Notice for Korea ...


