background image

Main Menu

Description

Input Control

Selects the video input signal.

Image Control

Adjusts the screen image.

PIP Control

Selects and adjusts the PIP image.

Power Control

Adjusts the power settings.

Menu Control

Adjusts the OSD controls.

Management

Adjusts the DDC/CI settings and returns all OSD menu settings to the factory default settings.

Language

Selects the language in which the OSD menu is displayed. The factory default is English.

Information

Selects and displays important information about the monitor.

Exit

Exits the OSD menu screen.

Assigning the function buttons

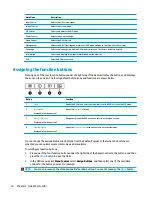
Pressing one of the four function buttons under the right side of the bezel activates the buttons and displays 

the icons on the screen. The factory default button icons and functions are shown below.

Button

Function

1

Menu

Opens the OSD menu, selects a menu item from the OSD, or closes the OSD menu.

2

Information

Assignable function button 1

Opens the 

Information

 menu.

3

Next Active Input

Assignable function button 2

Navigates through the OSD menu and selects a video input source.

4

Viewing Modes

Assignable function button 3

Opens the 

Viewing Modes

 menu and selects a preset view mode.

You can change the assignable function buttons from their default values so that when the buttons are 

activated you can quickly access commonly used menu items.
To reconfigure function buttons:

1.

Press one of the four function buttons under the right side of the bezel to activate the buttons, and then 

press the 

Menu

 button to open the OSD.

2.

In the OSD menu, select Menu Control, select Assign Buttons, and then select one of the available 

options for the button you want to reassign.

NOTE:

You can only reassign the three assignable function buttons. You can not reassign the 

Menu

 button.

16

Chapter 2   Using the monitor

Summary of Contents for Z43

Page 1: ...User Guide ...

Page 2: ...d States and or other countries The information contained herein is subject to change without notice The only warranties for HP products and services are set forth in the express warranty statements accompanying such products and services Nothing herein should be construed as constituting an additional warranty HP shall not be liable for technical or editorial errors or omissions contained herein ...

Page 3: ...nformation IMPORTANT Indicates information considered important but not hazard related for example messages related to property damage A notice alerts the user that failure to follow a procedure exactly as described could result in loss of data or in damage to hardware or software Also contains essential information to explain a concept or to complete a task NOTE Contains additional information to...

Page 4: ...iv About This Guide ...
Page 5: ... stand 13 Attaching the monitor to a mounting device 14 2 Using the monitor 15 Software and utilities 15 The Information file 15 The Image Color Matching file 15 Using the on screen display OSD menu 15 Assigning the function buttons 16 Using Picture in Picture PIP and Picture beside Picture PBP 17 Adjusting to Low Blue Light Mode 17 Using Auto Sleep Mode 18 3 Support and troubleshooting 19 Solving...

Page 6: ...hipping the monitor 21 Appendix A Technical specifications 22 Preset display resolutions 23 Entering user modes 24 Energy saver feature 24 Appendix B Accessibility 25 Supported assistive technologies 25 Contacting support 25 vi ...

Page 7: ...ts for computer users The Safety Comfort Guide also provides important electrical and mechanical safety information The Safety Comfort Guide is available on the web at http www hp com ergo IMPORTANT For the protection of the monitor as well as the computer connect all power cords for the computer and its peripheral devices such as a monitor printer scanner to some form of surge protection device s...

Page 8: ...vided to connect the monitor s USB hub to the USB connector on the computer Four function buttons under the right side of the bezel three that can be reconfigured to quickly allow selection of the most commonly used operations Plug and Play capability if supported by your operating system Security cable slot on the rear of the monitor for an optional cable lock Cable management feature for placeme...

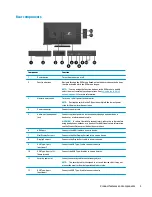
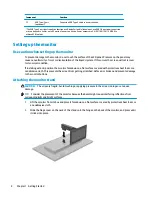
Page 9: ... headset or a television audio cable WARNING To reduce the risk of personal injury reduce the volume before using headphones earbuds or a headset For additional safety information see the Product Notices provided with your product 6 HDMI port Connects the HDMI cable to a source device 7 Mini DisplayPort port Connects the Mini DisplayPort cable to a source device 8 DisplayPort port Connects the Dis...

Page 10: ...to its normal condition If installing a stand position the monitor facedown on a flat surface covered with protective sheet foam or a nonabrasive cloth This prevents the screen from getting scratched defaced or broken and prevents damage to the control buttons Attaching the monitor stand CAUTION The screen is fragile Avoid touching or applying pressure to the screen doing so can cause damage TIP C...

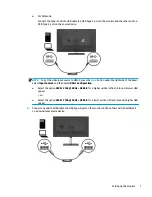
Page 11: ...e which inputs have valid video signals The inputs can be selected through the OSD by pressing the Menu button and selecting Input Control Connect one end of a DisplayPort cable to the DisplayPort port on the rear of the monitor and the other end to the DisplayPort port on the source device Connect one end of a Mini DisplayPort cable to the Mini DisplayPort port on the rear of the monitor and the ...

Page 12: ...rce device 3 You must connect the USB upstream cable from the source computer to the monitor to enable the USB ports on the monitor For a USB Hub Connect the Type C end of a USB cable to a USB Type C port on the monitor and the other end to a USB Type A port on the source device 6 Chapter 1 Getting Started ...

Page 13: ...ide of the bezel select Input Control and then select USB C Configuration Select the option 3840 2160 60 Hz USB 2 0 for a higher vertical refresh rate and a lower USB speed or Select the option 3840 2160 30 Hz USB 3 0 for a lower vertical refresh rate and a higher USB speed 4 Connect one end of a USB cable to a USB Type A port on the monitor and the other end to the USB port on a downstream source...

Page 14: ...afety feature Plug the power cord into a grounded earthed AC outlet that is easily accessible at all times Disconnect power from the equipment by unplugging the power cord from the AC outlet For your safety do not place anything on power cords or cables Arrange them so that no one may accidentally step on or trip over them Do not pull on a cord or cable When unplugging the power cord from the AC o...

Page 15: ... downstream USB ports on the monitor two USB Type A ports on the rear and on the side one USB Type C port and one USB Type A port NOTE You must connect the USB upstream cable from the computer to the monitor to enable the USB downstream ports on the monitor See step 4 in Connecting the cables on page 5 Setting up the monitor 9 ...

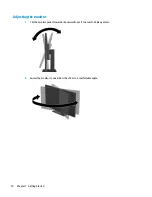
Page 16: ...Adjusting the monitor 1 Tilt the monitor panel forward or backward to set it to a comfortable eye level 2 Swivel the monitor to one side or the other to a comfortable angle 10 Chapter 1 Getting Started ...

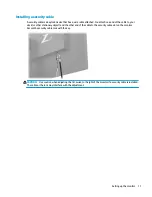
Page 17: ...desk or other stationary object and the other end of the cable to the security cable slot on the monitor Secure the security cable lock with the key CAUTION Use caution when adjusting the tilt swivel or height of the monitor if a security cable is installed The cable or the lock may interfere with the adjustment Setting up the monitor 11 ...

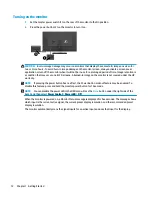
Page 18: ... the monitor is not covered under the HP warranty NOTE If pressing the power button has no effect the Power Button Lockout feature may be enabled To disable this feature press and hold the monitor power button for 10 seconds NOTE You can disable the power LED in the OSD menu Press the Menu button under the right side of the bezel and then select Power Control Power LED Off When the monitor is powe...

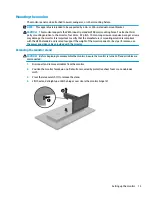
Page 19: ...facturer s mounting solution is compliant with the VESA standard and is rated to support the weight of the monitor panel For best performance use the power and video cables provided with the monitor Removing the monitor stand CAUTION Before beginning to disassemble the monitor be sure the monitor is turned off and all cables are disconnected 1 Disconnect and remove all cables from the monitor 2 Po...

Page 20: ...ews through the holes on the swing arm plate and into the mounting holes on the monitor To attach the monitor to other mounting fixtures follow the instructions included with the mounting fixture to ensure that the monitor is safely attached IMPORTANT Follow the mounting device manufacturer s instructions when mounting the monitor to a wall or swing arm IMPORTANT For optimal monitor performance an...

Page 21: ... monitor screen to printer or from scanner to monitor screen This file is activated from within graphics programs that support this feature NOTE The ICM color profile is written in accordance with the International Color Consortium ICC Profile Format specification Using the on screen display OSD menu Use the OSD menu to adjust the monitor screen image based on your preferences You can access and m...

Page 22: ... 1 Menu Opens the OSD menu selects a menu item from the OSD or closes the OSD menu 2 Information Assignable function button 1 Opens the Information menu 3 Next Active Input Assignable function button 2 Navigates through the OSD menu and selects a video input source 4 Viewing Modes Assignable function button 3 Opens the Viewing Modes menu and selects a preset view mode You can change the assignable...

Page 23: ...ode Decreasing the blue light emitted by the display reduces the blue light exposure to your eyes This monitor allows you to select a setting to reduce blue light output and create a more relaxing and less stimulating image while reading content on the screen To adjust the blue light output from the display 1 Press one of the four function buttons under the right side of the bezel to activate the ...

Page 24: ...ced power state sleep mode the monitor screen is blanked the backlight is turned off and the power LED indicator turns amber The monitor draws less than 0 5 watts of power when in this reduced power state The monitor will wake from sleep mode when the computer sends an active signal to the monitor for example if you activate the mouse or keyboard You can disable Auto Sleep Mode in the OSD Press th...

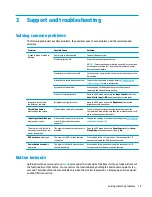
Page 25: ...n Monitor video cable is disconnected Connect the appropriate video signal cable between the computer and monitor Be sure that the computer power is off while connecting the video cable Input Signal Out of Range is displayed on screen Video resolution and or refresh rate are set higher than the monitor supports Change the settings to a supported setting see Preset display resolutions on page 23 Th...

Page 26: ...roubleshooting tips in this section you may need to call technical support Have the following information available when you call Monitor model number Monitor serial number Purchase date on invoice Conditions under which the problem occurred Error messages received Hardware configuration Name and version of the hardware and software you are using Locating the serial number and product number The s...

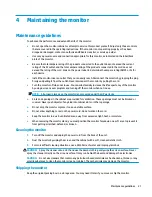
Page 27: ...e on the monitor is not covered under the HP warranty Slots and openings in the cabinet are provided for ventilation These openings must not be blocked or covered Never push objects of any kind into cabinet slots or other openings Do not drop the monitor or place it on an unstable surface Do not allow anything to rest on the power cord Do not walk on the cord Keep the monitor in a well ventilated ...

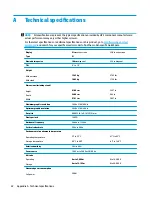
Page 28: ...5 kg 16 95 kg 27 45 lbs 37 38 lbs Dimensions including stand Height Depth Width 61 90 cm 24 00 cm 97 21 cm 24 37 in 9 44 in 38 27 in Maximum graphic resolution 3840 x 2160 60 Hz Optimum graphic resolution 3840 x 2160 60 Hz Dot pitch 0 06053 H x 0 18159 V mm Pixels per inch 140 PPI Horizontal frequency 28 kHz to 135 kHz Vertical refresh rate 29 Hz to 60 Hz Environmental requirements temperature Ope...

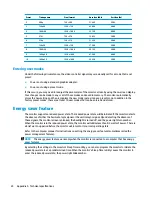
Page 29: ...on the screen Preset Pixel format Horn free kHz Vert free Hz 1 640 480 31 469 59 940 2 720 x 400 31 469 70 087 3 800 600 37 879 60 317 4 720 480 31 469 59 940 5 1280 720 45 000 60 000 6 1280 768 47 396 59 995 7 1280 800 49 702 59 810 8 1280 1024 63 981 60 020 9 1440 900 55 935 59 887 10 1440 900 55 469 59 901 11 1600 900 60 000 60 000 12 1600 1200 75 000 60 000 13 1680 1050 65 290 59 954 14 1920 1...

Page 30: ...that can be entered and stored Energy saver feature The monitor supports a reduced power state The reduced power state will be initiated if the monitor detects the absence of either the horizontal sync signal or the vertical sync signal Upon detecting the absence of these signals the monitor screen is blanked the backlight is turned off and the power light turns amber When the monitor is in the re...

Page 31: ...ve features NOTE For additional information about a particular assistive technology product contact customer support for that product Contacting support We are constantly refining the accessibility of our products and services and welcome feedback from users If you have an issue with a product or would like to tell us about accessibility features that have helped you please contact us at 888 259 5...

Reviews: