background image

1

2

1

1

1

1

1

1

1

1

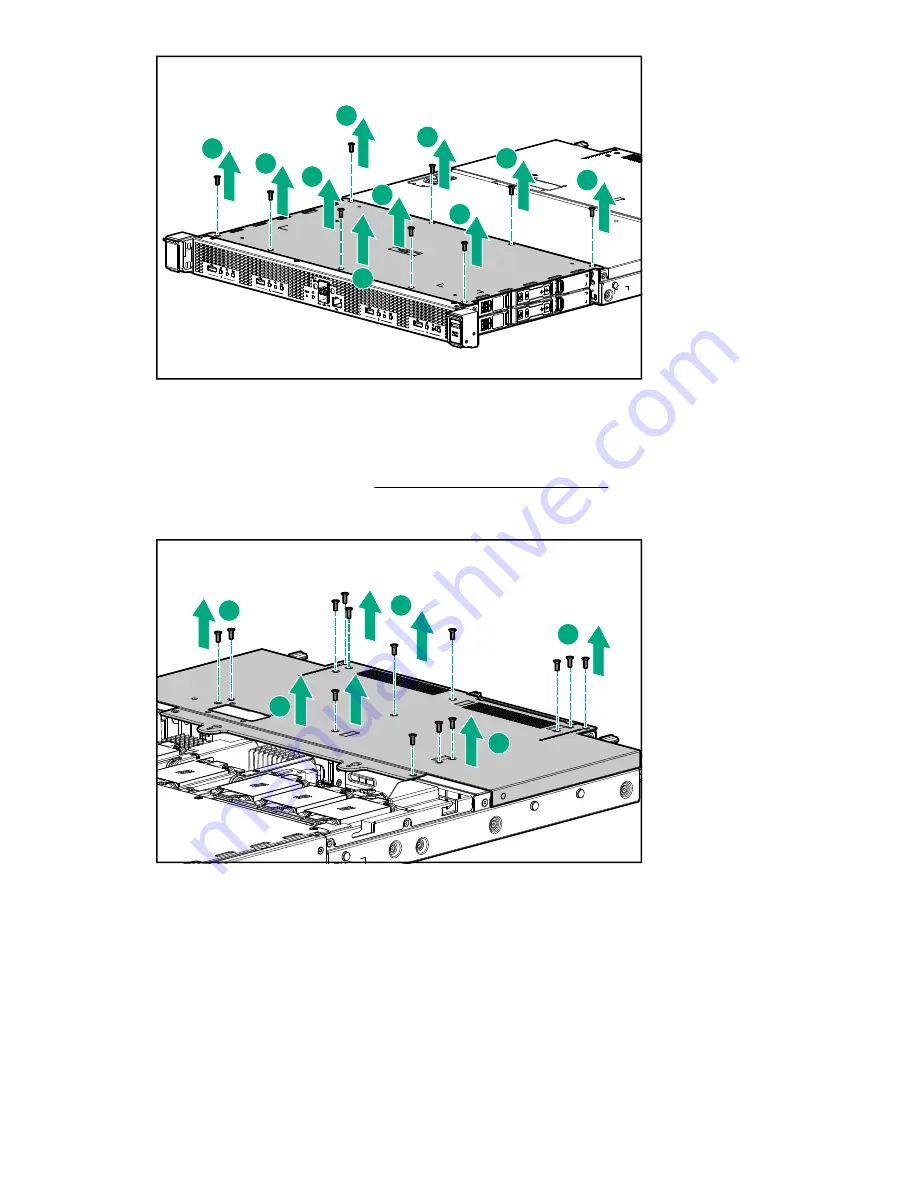
Removing the fixed rear top cover of the PXIe system

Procedure

1.

Remove the PXIe access panel (

Removing the PXIe access panel

 on page 20).

2.

Using a Torx screwdriver, remove the 14 T-10 Torx screws securing the fixed rear top cover to the
system.

1

1

1

2

1

Install the fans

Procedure

1.

Align the fan with the fan slots of the system.

2.

Squeeze the tabs on either side of the fan, and then slide it into the bay until it clicks in place.

22

 Removing the fixed rear top cover of the PXIe system

Summary of Contents for Edgeline EL4000

Page 1: ...ion 2 Abstract This document is for the person who installs administers and troubleshoots servers and storage systems Hewlett Packard Enterprise assumes you are qualified in the servicing of computer equipment and trained in recognizing hazards in products with hazardous energy levels ...

Page 2: ... Technical Data for Commercial Items are licensed to the U S Government under vendor s standard commercial license Links to third party websites take you outside the Hewlett Packard Enterprise website Hewlett Packard Enterprise has no control over and is not responsible for information outside the Hewlett Packard Enterprise website Acknowledgments Intel Itanium Pentium Intel Inside and the Intel I...

Page 3: ...the system 19 Power up the system 19 Mount the system 19 Remove the access panel 20 Removing the PCIe access panel 20 Removing the PXIe access panel 20 Remove the fixed top cover 21 Removing the fixed top cover of the PCIe system 21 Removing the fixed front top cover of the PXIe system 21 Removing the fixed rear top cover of the PXIe system 22 Install the fans 22 Install the cartridge 23 Setup 25 ...

Page 4: ...nager 35 UEFI System Utilities 35 Using UEFI System Utilities 35 Flexible boot control 36 Restoring and customizing configuration settings 36 Secure Boot configuration 37 Embedded UEFI shell 37 Embedded Diagnostics option 37 iLO RESTful API support for UEFI 38 Re entering the server serial number and product ID 38 Troubleshooting 39 HPE Edgeline Troubleshooting Guide 39 Battery 40 Battery specific...

Page 5: ...I PXIe specifications 49 Electrical load regulation specifications 49 Chassis cooling specifications 49 Pollution specifications 49 Shock and vibration specifications 49 Acoustic emission specifications 49 System synchronization clock specifications 50 Websites 52 Support and other resources 53 Accessing Hewlett Packard Enterprise Support 53 Information to collect 53 Accessing updates 53 Customer ...

Page 6: ...t half length PCIe cards The core network is Layer 2 switched A separate 1G RJ 45 network port is provided for access to the iLO management network HPE Edgeline EL4000 10GbE 2xSFP Switch PXIe System Supports 1 to 4 PXIe modules The core network is Layer 2 switched A separate 1G RJ 45 network port is provided for access to the iLO management network For identification of system components see the f...

Page 7: ...dition Off No power or no cartridge installed 4 Cartridge UID LED Blue Cartridge ID is selected Flashing Blue Cartridge firmware update is in progress or iLO IRC is in use Off Cartridge ID is not selected 5 Management reset pin hole button1 Pressing the reset button resets the chassis controller iLO remains operational 6 Chassis system health LED Green Normal operation Flashing Amber Degraded cond...

Page 8: ... iLO port 5 Chassis UID LED 6 PCIe slot 1 top 7 PCIe slot 2 bottom 8 Power supply 9 QSFP Uplink B or SFP Uplink B1 10 QSFP Uplink A or SFP Uplink A1 1 Rear components include either QSFP or SFP ports depending on configuration System board components PCIe 2 1 1 2 3 4 5 6 8 Rear panel components ...

Page 9: ... bottom Cartridge 2 3 Right side top Cartridge 3 4 Right side bottom Cartridge 4 PXIe configuration Front panel components 1 2 8 9 3 4 5 6 7 Item Description 1 Cartridge 1 2 Cartridge 2 3 10 MHz REF OUT clock 4 SFP Uplink A connector 5 SFP Uplink B connector 6 10 MHz REF IN clock 7 iLO connector Table Continued Cartridge slot identification 9 ...

Page 10: ...on Flashing Red Critical condition Off No power or no cartridge installed 4 Cartridge UID LED Blue Cartridge ID is selected Flashing Blue Cartridge firmware update is in progress or iLO IRC is in use Off Cartridge ID is not selected 5 Management reset pin hole button1 Pressing the reset button resets the chassis controller iLO remains operational 6 Chassis system health LED Green Normal operation ...

Page 11: ...m Description 1 Power supply 1 2 PXIe slot 4 3 PXIe slot 5 4 PXIe slot 3 5 PXIe slot 2 6 Power supply 2 Rear panel LEDs and buttons 2 1 3 2 Item Description 1 Power supply 1 LED 2 Chassis UID LED 3 Power supply 2 LED Rear panel components 11 ...

Page 12: ...oard 2 DIP Switch 3 System battery DIP switch Position Default Function S1 Off Off Fan normal mode On Fan high mode Cartridge slot identification 3 4 1 2 Item Description 1 Left side top Cartridge 1 2 Left side bottom Cartridge 2 Table Continued 12 System board components PXIe ...

Page 13: ...Item Description 3 Right side top Cartridge 3 4 Right side bottom Cartridge 4 Component identification 13 ...

Page 14: ...til it locks in place 3 Connect the power cord and tie wrap the cable You must press the Power On Off button twice to power on the system Install the DC power supply Procedure 1 Remove the ring tongue from the top of the power supply 2 Crimp the ring tongue to the ground cable from the 48V power source 14 Operations ...

Page 15: ...3 Remove the black connector from the rear of the power supply 4 Loosen the screws on the connector Operations 15 ...

Page 16: ...round cable must be connected before connecting the 48V wire and return wire 6 Insert the 48V wire into the left side of the connector and tighten the screw to 10 lb in of torque 7 Insert the return wire into the right side of the connector and tighten the screw to 10 lb in of torque 16 Operations ...

Page 17: ...8 Insert the power supply into the power supply bay until it clicks into place 9 Insert the connector into the power supply Operations 17 ...

Page 18: ...reseller 12 Make sure the 48V DC power source is off or the PDU breaker is in the off position and then connect the power cord to the 48V DC power source or PDU 13 Turn on the 48V power source or switch the PDU breaker to the on position to supply 48V to the power supply 14 Be sure that the green power supply LED is on Install a power supply blank Procedure 1 Align the power supply blank to the un...

Page 19: ...orce the system to power down This method forces the system to power down without properly exiting applications and the OS If an application stops responding you can use this method to force a shutdown Verify the system is in standby mode and the system power LED is off Power up the system About this task If the system is connected to a power source it powers up automatically by default Generally ...

Page 20: ...ne of the following procedures Removing the PCIe access panel on page 20 Removing the PXIe access panel on page 20 Removing the PCIe access panel Procedure 1 Using a Torx screwdriver turn the T 15 locking Torx screw a quarter turn to unlock the latch 2 Press the latch button and open the latch 3 Remove the access panel Removing the PXIe access panel Procedure 1 Press the latch button and open the ...

Page 21: ...m on page 21 Removing the fixed rear top cover of the PXIe system on page 22 Removing the fixed top cover of the PCIe system Procedure 1 Using a Torx screwdriver remove the nine T 10 Torx screws securing the fixed top cover to the system Removing the fixed front top cover of the PXIe system Procedure 1 Using a Torx screwdriver remove the 10 T 10 Torx screws securing the fixed front top cover to th...

Page 22: ...e 20 2 Using a Torx screwdriver remove the 14 T 10 Torx screws securing the fixed rear top cover to the system 1 1 1 2 1 Install the fans Procedure 1 Align the fan with the fan slots of the system 2 Squeeze the tabs on either side of the fan and then slide it into the bay until it clicks in place 22 Removing the fixed rear top cover of the PXIe system ...

Page 23: ...able to the board Install the cartridge Procedure 1 Align and install the cartridge into the system a For cartridges 1 and 2 left side the cartridges must be inserted with the processor facing up Install the cartridge 23 ...

Page 24: ...b For cartridges 3 and 4 right side the cartridges must be inserted with the processor facing down Cartridges 3 and 4 will appear upside down from image 24 Operations ...

Page 25: ...xchange Service see the Hewlett Packard Enterprise website Optimum environment When installing the system select a location that meets the environmental standards Space and airflow requirements on page 25 Temperature requirements on page 25 Power requirements on page 25 Space and airflow requirements To allow for servicing and adequate airflow leave a minimum clearance of 20 cm 7 9 in around the s...

Page 26: ...ation information see the option documentation For system specific information see Hardware options installation Registering the product To experience quicker service and more efficient support register the product at the Hewlett Packard Enterprise Product Registration website 26 Installing hardware options ...

Page 27: ... rails to the rear of the rack Align the system with the rails and slide into the rack Installing the full extension rail kit with cable management arm About this task For detailed instructions see the instructions that ship with the rack rail hardware kit Procedure 1 Attach the rails to the system 2 Attach the rails to the front of the rack 3 Attach the rails to the rear of the rack Align the sys...

Page 28: ...rt labelled A Unicast packets to a cartridge are sent only to that cartridge while multicast or broadcast packets are sent to all cartridges For VLAN segmentation you can use one of the following methods If all the NIC As are in the same VLAN that VLAN can be configured at the port of the external switch to which the system port A is connected Similarly all of the NIC Bs may be configured in anoth...

Page 29: ...al port Specifications Value Baud rate 115200 Data bits 8 Parity None Stop bit 1 8 N1 Procedure 1 Power down the cartridge 2 Connect the USB to serial cable to the system The USB end is connected to a system USB port 3 Attach the serial end of the cable to a serial port using a null modem cable The other serial port may be another USB to serial adapter on a different machine 4 Power on the cartrid...

Page 30: ... or update the DHCP settings 4 To save any changes press the F10 key 5 After saving all settings iLO prompts for a reset in order for any new settings to be used Reset the system Finding the IP address through DHCP Procedure 1 Access the System Utilities menu 2 Navigate through the menu options System Configuration iLO 4 Configuration Utility Network Options 3 The Network Options screen displays t...

Page 31: ...ons System Configuration iLO 4 Configuration Utility Network Options The Network Options screen displays 3 Change DHCP Enable to OFF 4 Configure the IP Address Subnet Mask and Gateway Address as required The following image is an example of a completed Network Options screen Setting the static IP address using the serial console cable 31 ...

Page 32: ...ce completed press ESC to back out of the menus Save the settings when prompted 6 After saving all settings iLO prompts for a reset in order for the new settings to be used Reset the system 32 Configuration ...

Page 33: ...e licensed For more information see the iLO documentation on the Hewlett Packard Enterprise website Active Health System The Active Health System monitors and records changes in the server hardware and system configuration The Active Health System provides Continuous health monitoring of over 1600 system parameters Logging of all configuration changes Consolidated health and service alerts with pr...

Page 34: ... operations GET PUT POST DELETE and PATCH to submit or return JSON formatted data with iLO web server HPE iLO 4 2 30 and later is Redfish 1 0 conformant while remaining backward compatible with the existing iLO RESTful API HPE iLO 4 supports the iLO RESTful API with ProLiant Gen8 and later servers For more information about the iLO RESTful API see the Hewlett Packard Enterprise website Integrated ...

Page 35: ...of firmware in use on nodes you identify The application installs updates in the correct order and ensures that all dependencies are met before deploying an update and prevents an installation if there are version based dependencies that it cannot resolve The version of HP SUM included with each HPE Edgeline Component Pack release is designed to be the best solution for installing Edgeline System ...

Page 36: ...cation as a new UEFI boot option The new boot option is appended to the boot order list When you select a file you are prompted to enter the boot option description This description and any optional data to be passed to an EFI application is then displayed in the boot menu Boot to System Utilities After pre POST the boot options screen appears During this time you can access the UEFI System Utilit...

Page 37: ...e the certificates embedded in the UEFI BIOS by adding or removing their own certificates When Secure Boot is enabled the System Maintenance Switch does not restore all manufacturing defaults when set to the ON position For security reasons the following are not restored to defaults when the System Maintenance Switch is in the ON position Secure Boot is not disabled and remains enabled The Boot Mo...

Page 38: ...re enter the system serial number and the product ID Procedure 1 During the system startup sequence press the F9 key to access UEFI System Utilities 2 Select System Configuration BIOS Platform Configuration RBSU Advanced Options Advanced System ROM Options Serial Number and then press the Enter key 3 Enter the serial number and press the Enter key The following message appears The serial number sh...

Page 39: ...uide provides procedures for resolving common problems and comprehensive courses of action for fault isolation and identification issue resolution and software maintenance on the Edgeline System The document is available in the Hewlett Packard Enterprise Information Library Troubleshooting 39 ...

Page 40: ...e the system battery Procedure 1 Locate the battery on the system board System board components PCIe on page 8 System board components PXIe on page 12 2 Slightly push the metal tab and then use the small flat nose pliers to remove the system battery from its socket 3 Slightly push the metal tab then install the system battery in the socket 40 Battery ...

Page 41: ...For more information about battery replacement or proper disposal contact an authorized reseller or an authorized service provider Battery 41 ...

Page 42: ...ion for Server Storage Power Networking and Rack Products available at the Hewlett Packard Enterprise website http www hpe com support Safety Compliance EnterpriseProducts Belarus Kazakhstan Russia marking Manufacturer and Local Representative Information Manufacturer information Hewlett Packard Enterprise Company 3000 Hanover Street Palo Alto CA 94304 U S Local representative information Russian ...

Page 43: ...cade with 2000 as the starting point for example 238 2 for 2002 and 38 for the week of September 9 In addition 2010 is indicated by 0 2011 by 1 2012 by 2 2013 by 3 and so forth YYWW where YY indicates the year using a base year of 2000 for example 0238 02 for 2002 and 38 for the week of September 9 Turkey RoHS material content declaration Ukraine RoHS material content declaration Turkey RoHS mater...

Page 44: ...mbly Grounding methods to prevent electrostatic discharge Several methods are used for grounding Use one or more of the following methods when handling or installing electrostatic sensitive parts Use a wrist strap connected by a ground cord to a grounded workstation or computer chassis Wrist straps are flexible straps with a minimum of 1 megohm 10 percent resistance in the ground cords To provide ...

Page 45: ...ximum rate of change is 20 C per hour 36 F per hour Table 3 ASHRAE Class A3 specifications Specification Value Temperature range1 Operating 5 C to 40 C 41 F to 104 F Nonoperating 30 C to 60 C 22 F to 140 F Relative humidity noncondensing Operating 8 to 90 at 28 C 82 4 F maximum wet bulb temperature Non Operating 5 to 95 at 38 7 C 101 7 F maximum wet bulb temperature 1 All temperature ratings shown...

Page 46: ...ions Specification Value Temperature range1 Operating 0 C to 55 C 32 F to 131 F Nonoperating 30 C to 60 C 22 F to 140 F Relative humidity noncondensing Operating 8 to 90 at 28 C 82 4 F maximum wet bulb temperature Non Operating 5 to 95 at 38 7 C 101 7 F maximum wet bulb temperature 1 All temperature ratings shown are for sea level An altitude derating of 1 0 C per 304 8 m 1 8 F per 1 000 ft to 3 0...

Page 47: ... rated at 65 C or higher and an air speed of 375 ft min Mechanical specifications Specification Value Length 615 mm 24 21 in Width 435 mm 17 13 in Depth 43 mm 1 69 in Weight 14 kg 30 86 lb Power supply specifications Depending on installed options the system is configured with one of the following power supplies HPE 800W Flex Slot Platinum Hot Plug Power Supply on page 47 HPE 800W Flex 48VDC Hot P...

Page 48: ... Thermal Unit rating BTU Hr 3090 3040 2997 2972 2968 2963 2960 2963 HPE 800W Flex 48VDC Hot Plug Power Supply Specification Value Input voltage range V DC 40 to 72 Frequency range Nominal Hz DC Nominal input voltage V DC 40 48 72 Maximum rated output wattage rating Watts 800 800 800 Nominal input current A DC 22 0 18 1 11 9 Maximum rated input wattage rating Watts 882 871 858 Maximum rated VA Volt...

Page 49: ...ecifications Value Pollution degree 2 For indoor use only in a climate controlled environment Shock and vibration specifications Specification Value Operational shock 30 g peak half sine 11 ms pulse Random vibration 5 Hz to 500 Hz 0 3 g rms Acoustic emission specifications Acoustic noise Acoustic noise specifications for the following base configurations are available Table 6 Base configuration 1 ...

Page 50: ...s idle system configuration LWAd B LpAm dBA Base 1 8 64 6 Base 2 8 64 6 Table 9 Acoustic noise when system is operating system configuration LWAd B LpAm dBA Base 1 8 64 6 Bae 2 8 64 6 NOTE If used in a manner not described in this document the protection provided by the system can be impaired System synchronization clock specifications 10 MHz system reference clock PXI_CLK10 Specification Value Ma...

Page 51: ...pair has 50 W termination to 1 30 V or Thévenin equivalent 400 mV to 1 000 mV NOTE For other specifications see PXI 5 PXI Express Hardware Specification at the PXI Systems Alliance website http www pxisa org userfiles files Specifications PXIEXPRESS_HW_SPEC_R1 PDF External 10 MHz reference out SMA on front panel of chassis Specification Value Accuracy 25 ppm max guaranteed over the operating tempe...

Page 52: ...ibrary www hpe com info EIL Single Point of Connectivity Knowledge SPOCK Storage compatibility matrix www hpe com storage spock Storage white papers and analyst reports www hpe com storage whitepapers For additional websites see Support and other resources 52 Websites ...

Page 53: ...ackard Enterprise Support Center Software downloads www hpe com support downloads Software Depot www hpe com support softwaredepot To subscribe to eNewsletters and alerts www hpe com support e updates To view and update your entitlements and to link your contracts and warranties with your profile go to the Hewlett Packard Enterprise Support Center More Information on Access to Support Materials pa...

Page 54: ...h will initiate a fast and accurate resolution based on your product s service level Hewlett Packard Enterprise strongly recommends that you register your device for remote support If your product includes additional remote support details use search to locate that information Remote support and Proactive Care information HPE Get Connected HPE Proactive Care services HPE Proactive Care service Sup...

Page 55: ... PCI peripheral component interconnect PCIe Peripheral Component Interconnect Express PXE preboot execution environment PXI PCI eXtensions for instrumentation PXIe PCI eXtensions for instrumentation express QSFP enhanced quad small form factor pluggable SFP enhanced small form factor pluggable UEFI Unified Extensible Firmware Interface UID unit identification WiFi wireless fidelity WLAN wireless l...

Page 56: ...wireless wide area network 56 Acronyms and abbreviations ...

Page 57: ...ggestions or comments to Documentation Feedback docsfeedback hpe com When submitting your feedback include the document title part number edition and publication date located on the front cover of the document For online help content include the product name product version help edition and publication date located on the legal notices page Documentation feedback 57 ...

Reviews: