background image

Page 

13 of 21 


System Start Up & Operation 

I. Plumber Commissioning 

When you are confident that the system is correctly installed, do the following steps to start up the system and 
commence the flushing procedure. 
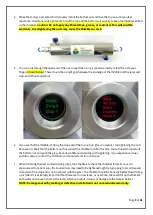
1.


Open a tap downstream from the system to allow air to bleed from the plumbing – if this is not easily 
achievable disregard, just note that sputtering may occur more prevalently in the house until the air has 
vented from the lines. 

2.


Close off the bypass and open the system valves to allow water to flow through the system, depress the red 
button on top of the 1

st

 housing until water comes out (to bleed the air), repeat for each housing inline. 

3.


The water coming out of the system will likely run cloudy or discoloured temporarily which is normal as this is 
the fines coming off the carbon filter. 

4.


Shut off the downstream tap and allow the system to hold under static pressure and check for any leaks in 
the filter plumbing connections. 

5.


While the filter is new, there may be some slight taste issues with the water (such as a metallic or ‘chemical 
like’ taste. This is normal and is the reaction that activated carbon has with water when the filters are new. 
Flushing the filters will help reduce the time until the water is back to normal taste. The metallic taste is 
usually due to the high pH that is created due to this reaction, it is only temporary and is usually gone within 
1 week from installation if not sooner. 
 

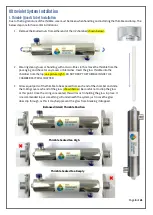
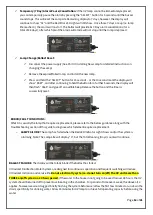
II. Turning the System On/Off 

This will depend on the style of bypass that is installed on the system. Refer to the above diagrams of a bypass in 
service and bypass position. 

If the water to the house in not going to be used for over 48 hours, it is recommended to turn the system into bypass 
mode to avoid static pressure build up in the system. The UV system should also be turned off to prevent overheating 
in the chamber. For periods of time over 1 week, the above also applies, however we would suggest briefly flushing 
the system before use (allow the first few minutes to run down the drain) specifically for drinking water. 

Maintenance 

I. Stainless Steel Enc Filter Housing Replacement Parts 

There are generally no parts (excluding consumables) on the system that will require periodic replacement at regular 
intervals. Below is a list of parts that may be applicable: 
GT8-13G 


20” x 4.5” Housing (Includes Cap) 

GT8-11G-CAP   

BB Cap 1” Ports Suit GT8-11G + GT8-13G 

GT19-35SC 


1” Poly Nipple Joiner with O-Rings 

GT16-3S 


60mm Bottom Mount Pressure Gauge 

GT19-127 


¼” Gauge Port Stopper 

GT23-1LS 


BB O-Ring 

GT17-2LS 


BB Opening Spanner 

II. Replacement Cartridges 

Cartridges have a varying life span but generally can be replaced under the following guidelines under normal 
working conditions. For clean water supplies (commonly found in Metro locations on the E & SE coast of Australia), 
filters should generally last up to 12 months. For harsher water conditions (high hardness, scale and TDS) commonly 
found in rural areas or the North, West and South parts of Australia, filters may need to be changed every 6 months. 
Filters that are exposed to raw water sources (rain, tank and bore water) may be more susceptible to clogging due to 
sediment, and may be prone to bio-fouling (given that bacteria breeds on carbon ash). 

Summary of Contents for HPFUV

Page 1: ... Systems 5 Installation Introduction 5 I Site Preparation 5 II Stainless Steel Enclosure 6 III System Installation Mounting 6 IV Installing Connections 6 V Filter Protection 6 VI Pressure Gauge Installation 7 VII Cartridge Installation 7 Ultraviolet System Installation 8 I Thimble Quartz Tube Installation 8 II UV Lamp Installation 10 III Ballast Operation 11 System Start Up Operation 13 I Plumber ...

Page 2: ...s turn the power off immediately before conducting maintenance or repair to the system Installation must be carried out by a qualified plumber or authorised technician The power supply should always be plugged directly into a surge protector Standard power supplies are NOT water proof and must be installed out of the elements to avoid water damage This appliance is not intended for use by persons ...

Page 3: ...er off unplug the electrical connection and then retrieve the unit if safe to do so Do not operate this unit if it has a damaged cord or plug if it is malfunctioning or if it has been dropped or been damaged in any manner Always disconnect the water supply and completely drain the water purifier if it will be subjected to temperatures below freezing for extended periods of time Overheating For lon...

Page 4: ...ctions 6 It is important to remember that in the event that a UV is briefly shut down for routine cleaning or during power interruptions where water could have passed through the system the aforementioned pipe disinfection procedure must be conducted again The UV system should be installed after a filter on the return line This helps ensure that the water is clear of debris and impurities that cou...

Page 5: ...rbing taste and odour molecules and can provide a slight improvement in water clarity Calcite Filter Calcite filters are usually installed on Rainwater Systems to counteract the pH of acidic rainwater which usually causes green blue staining in the water or on fixtures The calcite filter is usually installed as stage 1 as it is a back washable media vessel followed by the Big Blue components of th...

Page 6: ...teel and has two keyhole mounts at the rear of the top plate for mounting the unit Allow enough space on either side for the plumbing connections and ensure there is enough space in front of the unit to allow easy removal of the front top covers and for maintenance Also allow at least 500mm height clearance for the UV lamp installation maintenance The mounting location will require a 10A GPO withi...

Page 7: ...g removed before being installed Maintain minimal contact with the surface of the carbon filter handle by the end caps only to avoid contamination as carbon will absorb smells and oils from the skin NOTE Cartridges may be supplied already inside the housings for transport however they will still be wrapped in their original wrapping as per regulatory guidelines MAKE SURE TO REMOVE THE WRAPPERS BEF...

Page 8: ...rt the glass thimble into the chamber from the top see picture right DO NOT DROP THE THIMBLE INSIDE THE CHAMBER AS IT WILL SHATTER 3 Allow equal parts of the thimble to be exposed from each end of the chamber and slide the O Rings over each end of the glass shown below Be careful not to drop the glass at this point Once the O rings are seated this will assist in holding the glass in place It is re...

Page 9: ...tening the nuts because it is likely that the bottom nut has caused the thimble to shift off centre You will need to loosen off the bottom nut and push the glass back down before continuing with tightening If you experience issues with this please contact the distributor or manufacturer for assistance 7 When following the next commissioning steps take the time to check the chamber for leaks once i...

Page 10: ... of the pins so they will only go into the power supply one way Ensure the connection is firm and plugged in all the way 4 Lower the lamp carefully down into the thimble until the lamp makes contact with the spring as shown to the right Then gently slide wiggle the white cap over the knurled nut 5 Connect the Green Yellow earth wire to the small nut per the below and finger tighten the nut over it...

Page 11: ...tomof ballast power source as shown picture to the right The earth wire must be affixed securely WORKING CONDITIONS The Lamp and Ballast are working correctly when the Green LED Indicator Light shows Display Screen Press the SELECT button for 2 seconds to toggle between the Lamp Life Remaining Days Default Display Screen and the Total Running Days Ballast Operation Time Lamp Life Remaining Days De...

Page 12: ...the button and the timer is successfully reset ERROR FAULT CONDITIONS Whilst it is usually the lamp that requires replacement please refer to the below guidance along with the Troubleshooting section of this guide to diagnose which element requires replacement LAMP FAILURE The Lamp has failed when the Red LED Indicator Light shows and or the system is alarming Note The Lamp Life will display 0 but...

Page 13: ...stalled on the system Refer to the above diagrams of a bypass in service and bypass position If the water to the house innot going to be used for over 48 hours it is recommended to turn the system into bypass mode to avoid static pressure build up in the system The UV system should also be turned off to prevent overheating in the chamber For periods of time over 1 week the above also applies howev...

Page 14: ...h alcohol or a mild detergent Lamp replacement Every 12 Months Replace Quarts Sleeve and O Rings Every 2 years H7 90 Lamp 48W HO UV Lamp to suit H7 90 AT H7 90 Thimble 470mm x 23mm OD Quartz Domed End Thimble H7 90 OR 23mm OD O Rings Replacement Ballast H7 90 PS HPF Electronic Ballast 33W 120W with Countdown Timer V Lamp Replacement CAUTION DO not touch the Lamp with your fingers Handle by the end...

Page 15: ... drop out from threaded fitting of the chamber Flush water through chamber being careful to remove all fragments from the interior of the chamber d Carefully discard all pieces of the broken quartz sleeve 9 Follow the installation steps Thimble Quartz Tube Installation steps 1 to 7 to re install the thimble into the chamber 10 Slowing restore water supply to UV system and check for leaks 11 Follow...

Page 16: ... these gauges to seal if required remove the seals and use thread tape as directed previously 2 Install the O ring into the port and try again 3 If there are any signs of damage to the port it may need replacing with a new cap No Water Flow 1 Valve Position 2 Insufficient pressure 3 Damaged or Blocked Filter 4 Filter Wrapping 1 Check that the bypass and service valves are in the correct position E...

Page 17: ...rom the system plumbing Slimy Feeling Water 1 Activated Carbon Reaction 1 This is a common symptom with activated coconut carbon It gives the feeling of ultra softened water and can feel slimy and also cause soaps to have an increased lather making it harder to rinse off This is only temporary and does not happen with every installation Ultraviolet Sanitation System Leaking from Chamber 1 O Rings ...

Page 18: ...he electricals Due to the elevator temperature of the lamp high humidity may cause condensate to form If there are no signs of leaking check for signs of shorts or charring on the lamp connection with the ballast lastly inspect the tube to see if there are any dark patches or if the filaments are burnt out 2 Sometimes the ballasts may trigger failure alarm if the connection to the lamp is interrup...

Page 19: ...uire replacement Turn the system off check connections and turn back on to see if it fixes the alarm 2 The ballast could have a problem with the lamp failure protection and may require replacement Turn the system off check connections and turn back on to see if it fixes the alarm ...

Page 20: ...warranties and manufacturer shall in no circumstance be held liable for damages consequential or otherwise or delays caused or faulty manufacturing except as excluded by law Warranties need to be approved by HPF to ensure the product was not incorrectly used installed or claimed False and incorrect claims will be pursued at HPF s discretion including chargeable inspection and transit costs incurre...

Page 21: ...warranty claimafter 6 months from date of original invoice the discount will be 50 from the next purchase of a replacement UV lamp Pro Rata Warranty only applies for a single use within the pro rata period 12 months Pro Rata Warranty only applies to components purchased new at full list price or as part of an applicable UV system Due to a large range of factors cartridges for the filter system are...

Reviews: