Page
10 of 21
II. UV Lamp Installation
Once the chamber has been pressure tested and there are no water leaks, the lamp can be installed. It is usually
recommended to complete step 1 to 4 of
I. Plumber Commissioning (below)
before installing the lamp.
1.
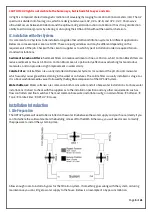
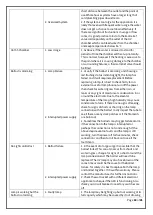
Drop the spring into the thimble chamber. The spring should sit at the bottom of the thimble.
This prevents the UV lamp from falling/hitting the bottom of the glass, and keeps the lamp in
the correct position for the power connection.
2.
Remove the lamp from its protective wrapping & inspect for damages. Before the lamp is installed, the
chamber, thimble and surrounding plumbing must be dry and free from water or leaks. Plug the ballast
(power supply) into a certified single socket surge protector, then into a 240V 10A GPO. Ensure the ballast
(power supply) is turned OFF at the wall.
Note: No warranty will be covered for a blown lamp if the
ballast is not plugged directly into a surge protector.
3.
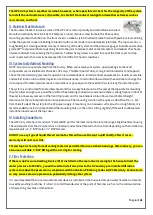
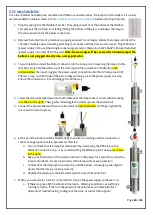
You will need to connect the ballast connection to the lamp prior to lowering the lamp into the
thimble. Firmly hold the white cap of the UV lamp and the connection of the Ballast (see
picture below), then push (wiggle) the power supply connection onto the UV lamp pins. NOTE:
There is a long and short side of the pins so they will only go into the power supply one way.
Ensure the connection is firm and plugged in all the way.
4.
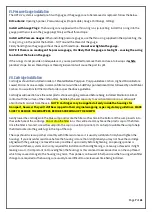
Lower the lamp carefully down into the thimble until the lamp makes contact with the spring
(as shown to the right). Then, gently slide/wiggle the white cap over the knurled nut.
5.
Connect the Green/Yellow earth wire to the small nut (per the below) and finger tighten the
nut over it to hold it in place.
6.
At this point the lamp should be tested briefly to ensure it is working and the connection is
sound. Use appropriate Safety Eyewear for this step.
a.
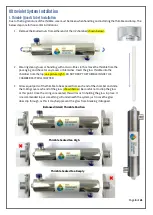
You can check that the lamp has illuminated by unscrewing the RED plug on the
White UV Connection Cap, or by carefully lifting the White Cap/UV Tube up (as shown
to the right).
b.
Keep your hands clear of the system and turn on the power for 5 seconds to allow the
lamp to illuminate. Do not look directly at the lamp without eye protection.
c.
Confirm that the lamp lights up correctly, and the ballast is showing a green light to
signify that the lamp is running correctly.
d.
Replace the red plug or slide the white cap back over the knurled nut.
7.
When you are ready to start 24/7 UV Sanitation, turn on the power supply and leave it on.
a.
If there is a green light (per Ballast Operation - Working Conditions), everything is
running correctly. If not, turn the power off, check for leaks and refer to Ballast
Operation/Troubleshooting to diagnose the issue, or contact the supplier.

