background image


HQLE10017 

V. 01 – 20/01/2017 

©Velleman nv 

7.


Cleaning and Maintenance 

Before starting any cleaning or maintenance activities: 


1.


Unplug the device's power cord from the outlet. 

2.


Let the device cool down. 

Cleaning 


Use normal glass cleaner and a soft cloth to wipe off the outside casing. 


Clean the external optics with glass cleaner and a soft cloth every 20 days. 


Always be sure to dry all parts completely before plugging the unit back in. 


Cleaning frequency depends on the environment in which the unit operates (i.e. smoke, fog residue, 
dust, dew). 


Do not immerse the device in any liquid. 

Maintenance 


All screws should be tightened and free of corrosion. 


The housing, the lenses, the mounting supports and the installation location (e.g. ceiling, suspension, 

trussing) should not be deformed, modified or tampered with; e.g. do not drill extra holes in 
mounting supports, do not change the location of the connections… 


Mechanically moving parts must not show any signs of wear and tear. 


The electric power supply cables must not show any damage. Have a qualified technician maintain 
the device. 


There are no user-serviceable parts, apart from the fuse and the lamp. 


Refer to an authorized dealer for service and/or spare parts. 

8.


Technical Specifications 


power supply ......................................................................... 100-240 V~, 50/60 Hz 


power consumption .......................................................................................... 6 W 


LED source .......................................................................................... 1 x 9 W RGB 


dimensions .............................................................................. 175 x 146 x 160 mm 


weight ......................................................................................................... 0.7 kg 


Use this device with original accessories only. Velleman nv cannot be held responsible in the 
event of damage or injury resulting from (incorrect) use of this device. For more info 

concerning this product and the latest version of this manual, please visit our website 
www.hqpower.eu. The information in this manual is subject to change without prior notice. 


© COPYRIGHT NOTICE 
The copyright to this manual is owned by Velleman nv. All worldwide rights reserved. 

No part 

of this manual may be copied, reproduced, translated or reduced to any electronic medium or otherwise 
without the prior written consent of the copyright holder.  
 

Summary of Contents for HQLE10017

Page 1: ...HQLE10017 FLOWER BURST RGB USER MANUAL 3 HANDLEIDING 7 MODE D EMPLOI 11 MANUAL DEL USUARIO 15 BEDIENUNGSANLEITUNG 19...

Page 2: ...HQLE10017 V 01 20 01 2017 2 Velleman nv...

Page 3: ...top of or close to the device Keep this device away from children and unauthorized users Caution device heats up during use Do not stare directly at the light source as this may cause epileptic seizu...

Page 4: ...240 V 50 60 Hz Lighting effects are not designed for permanent operation regular operation breaks will prolong their lives Use the original packaging if the device is to be transported Keep this manu...

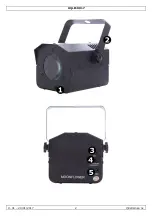
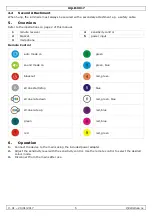
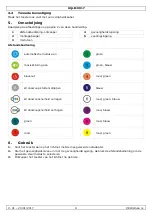
Page 5: ...2 bracket 5 power input 3 microphone Remote Control auto mode on green sound mode on green blue blackout red green strobe start stop blue strobe rate down red green blue strobe rate up red blue green...

Page 6: ...connections Mechanically moving parts must not show any signs of wear and tear The electric power supply cables must not show any damage Have a qualified technician maintain the device There are no us...

Page 7: ...Plaats nooit objecten gevuld met vloeistof op of naast het toestel Houd dit toestel buiten het bereik van kinderen en onbevoegden Opgelet de behuizing wordt zeer warm tijdens gebruik Kijk niet rechts...

Page 8: ...60 Hz Het toestel is niet ontworpen voor een continue werking een regelmatige pauze verlengt de levensduur Gebruik de oorspronkelijke verpakking tijdens het transport Bewaar deze handleiding voor ver...

Page 9: ...ing automatische modus aan groen muzieksturing aan groen blauw blackout rood groen stroboscoop starten stoppen blauw stroboscoopsnelheid verlagen rood groen blauw stroboscoopsnelheid verhogen rood bla...

Page 10: ...sporen van slijtage vertonen De voedingskabels mogen niet beschadigd zijn Laat het toestel onderhouden door een geschoolde technicus Er zijn geen door de gebruiker vervangbare onderdelen in dit toest...

Page 11: ...Ne jamais placer d objets contenant du liquide sur ou pr s de l appareil Garder l appareil hors de la port e des enfants et des personnes non autoris es Attention l appareil chauffe pendant l usage N...

Page 12: ...continue des pauses r guli res prolongeront la dur e de vie Transporter l appareil dans son emballage originel Garder ce mode d emploi pour toute r f rence ult rieure 4 Installation Choisir un emplac...

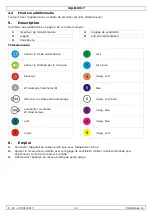
Page 13: ...activer le mode automatique vert activer le pilotage par la musique vert bleu blackout rouge vert stroboscope marche arr t bleu diminuer la vitesse stroboscopique rouge vert bleu augmenter la vitesse...

Page 14: ...es c bles d alimentation ne peuvent pas tre endommag s L entretien doit tre effectu par un technicien qualifi Il n y a aucune pi ce r parable par l utilisateur sauf le fusible et la lampe Commander de...

Page 15: ...o en interiores No exponga este equipo a lluvia humedad ni a ning n tipo de salpicadura o goteo Nunca ponga un objeto con l quido en el aparato Mantenga el aparato lejos del alcance de personas no cap...

Page 16: ...ausa para prolongar la vida del aparato Transporte el aparato en su embalaje original Guarde este manual del usuario para cuando necesite consultarlo 4 Instalaci n Seleccione un lugar de montaje adecu...

Page 17: ...ar el modo autom tico verde activar el modo controlado por la m sica verde azul blackout rojo verde activar desactivar el estroboscopio azul disminuir la frecuencia estrobosc pica rojo verde azul aume...

Page 18: ...r bien equilibradas No da e los cables de alimentaci n Contacte con un t cnico especializado para instalar el aparato El mantenimiento debe ser realizado por un t cnico cualificado El usuario no habr...

Page 19: ...Sie das Ger t nur im Innenbereich Sch tzen Sie das Ger t vor Regen und Feuchte Setzen Sie das Ger t keiner Fl ssigkeit wie z B Tropf oder Spritzwasser aus Stellen Sie keine mit Fl ssigkeit bef llten G...

Page 20: ...icht f r permanenten Betrieb eine regelm ige Pause verl ngert die Lebensdauer Verwenden Sie die Originalverpackung wenn das Ger t transportiert werden soll Bewahren Sie diese Bedienungsanleitung f r k...

Page 21: ...ung automatischer Modus einschalten gr n musikgesteuerter Modus einschalten gr n blau Blackout rot gr n Stroboskop starten stoppen blau Stroboskop Frequenz verringern rot gr n blau Stroboskop Frequenz...

Page 22: ...ie die Anschl sse nicht usw Mechanisch bewegende Teile d rfen keine Spuren von Abnutzung aufweisen Sorgen Sie daf r dass die Netzkabel nicht besch digt sind Lassen Sie das Ger t von einer Fachkraft wa...

Page 23: ...volledig terug te betalen In dat geval krijgt u een vervangend product of terugbetaling ter waarde van 100 van de aankoopsom bij ontdekking van een gebrek tot n jaar na aankoop en levering of een ver...

Page 24: ...de transporte de y a Velleman si el aparato ya no est cubierto por la garant a Cualquier art culo que tenga que ser reparado tendr que ser devuelto a su distribuidor Velleman Devuelva el aparato con l...

Reviews: