PROMIX303
2
VELLEMAN
•
Always use the included power supply. The power supply falls under protection class II and the mixing table under
protection class III.
•
Do not shake the device. Avoid brute force when installing or operating the device.
•
Select a location where the device is protected against extreme temperatures, dust and moisture. Do not leave
any cables lying around.
•
Keep the device away from heaters.
•
Familiarise yourself with the functions of the device before actually using it. Do not allow operation by unqualified
people. Any damage that may occur will most probably be due to unprofessional use of the device.
•
Use the original packaging if the device is to be transported.
•
Do not use spray cleaners to clean the faders and do not clean the device with abrasives or solvents. Use a clean
and damp cloth instead.
•
All modifications of the device are forbidden for safety reasons.
•
Removing the barcode will void the warranty.
•
Use only high-quality cables in order to obtain the highest sound quality.
•
Only use the device for its intended purpose. All other uses may lead to short circuits, burns, electroshocks,
crash, etc. Using the device in an unauthorised way will void the warranty.
•
Connecting devices: put the power switch in the OFF position. Make sure the devices in question are also OFF.
Place the master control in the minimum position.
•
The installation has to be approved by an expert before the device is taken into service.
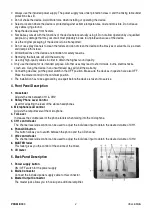
4. Front Panel Description
1. Crossfader
Adjusts the mix between CH1 & CH2.
2. Rotary Phone Level Control
Used for adjusting the level of the stereo headphones
3. Microphone level control
Adjusts the output levels of the microphone.
4. Talk over
Increases the volume level of the phone faders when talking into the microphone.
5. CH1 control fader
The channel level slide control can be used to adjust the individual input to obtain the desired volume of CH1.
6. Phono/CD button
This button allows you to switch between the phono and the CD channel.
7. CH2 control fader
The channel level slide control can be used to adjust the individual input to obtain the desired volume of CH2.
8. MASTER fader
This fader gives you the control of the volume of the mixer.
9. VU meter
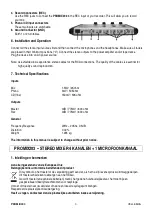
5. Back Panel Description
1. Power supply button
ON / OFF switch for the power supply
2. Mains Connector
Connect the included power supply cable to this connector.
3. Master Output Connector
The master jack allows you to hook up an additional amplifier.


